Authentication is one of the basic requirements of securing any environment and having the ability to be able to assign permissions to various resources across the infrastructure landscape. Authentication plays a key role in basic security measures and is central to the overall security posture of any environment.
When thinking about authentication mechanisms, this applies as well to the VMware vSphere environment. Generally speaking, for most environments, different personnel may need different types of permissions and capabilities when connecting to VMware vSphere. This requires being able to effectively identify a user and allow that user to be differentiated from other users. After identifying a user, roles and permissions can be effectively assigned to the specific user to apply the permissions needed.
Microsoft Active Directory is the most popular identity source found today in the enterprise datacenter. Most organizations use Active Directory as their centralized authentication mechanism to be able to authenticate users and devices. Active Directory can also be used to authenticate users in the VMware vSphere environment.
In this post, we will take a look at how to configure VMware vSphere 6.7 Update 1 Active Directory authentication.
Why Use Active Directory Authentication?
From an authentication standpoint, using Active Directory is powerful and it serves as a centralized authentication database for most organizations. Active Directory is known the world over as the standard for centralized authentication as most use it for securing file/folder permissions, 802.1X authentication, authenticating users for VPN, email authentication, etc. Centralizing authentication is great from a security perspective since it allows to have one set of credentials and enforcing the same password policy across various solutions which is extremely valuable from a security perspective.
An added benefit of using Active Directory from an authentication perspective is the ability to perform auditing from one centralized location. User logons and logoffs can be monitored from the domain controllers themselves for accessing of resources within the environment. If a password is changed in one location, it will change the password across the environment.
Configuring VMware vSphere 6.7 Update 1 Active Directory Authentication
Having the power of centralized authentication and utilizing this to scope down access to the VMware vSphere environment is a great way to secure the vSphere environment, utilize password policies that are centralized to your organization’s policies, and assign roles and permissions for those AD authenticated users within VMware vSphere. Additionally, the visibility that is gained from an authentication side with the built-in Active Directory auditing tools is another powerful benefit to configuring VMware vSphere 6.7 Update 1 Active Directory Authentication.
Generally speaking, the primary point of communication with the VMware vSphere environment is going to take place through the vCenter Server. The reason for this is vCenter Server is the centralized location to apply vSphere permissions in the environment. However, it is worth mentioning you can also connect the ESXi server to Active Directory as well.
Let’s take a look at the process to connect vCenter Server to an Active Directory domain for the purposes of centralized authentication as this is primarily where you will want to implement Active Directory authentication.
The primary supported platform for vCenter Server moving forward in vSphere 6.7 Update 1 is the VSA appliance. This is a photon OS-based appliance that is purpose-built for running vSphere vCenter Server.
vCenter Server connection to Active Directory depends on the VCSA configuration. The preferred installation is VCSA appliance with an embedded Platform Services Controller or PSC. However, legacy deployments could have been configured with an external PSC. The PSC component is responsible for holding the SSO domain configuration among other things.
- Embedded PSC – the VCSA appliance itself will be joined to Active Directory
- External PSC – the PSC is an external appliance that will be the component joined to the Active Directory domain
For the simplest example of joining VCSA to Active Directory, we will look at joining an embedded PSC controller enabled VCSA appliance to Active Directory.
Navigate to Administration > Single Sign On > Configuration > Active Directory Domain > Join AD. Click the Join AD link.
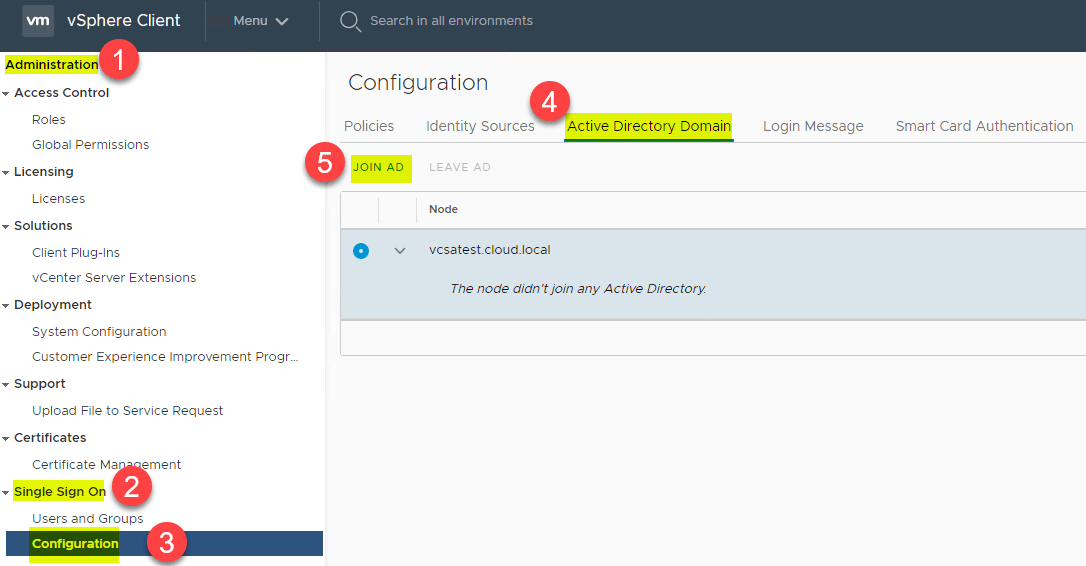
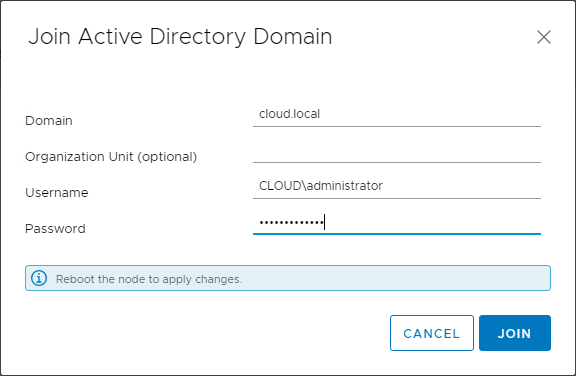
This will launch the Join Active Directory Domain dialog box.
A common error that many receive when attempting to add the VCSA appliance to an Active Directory domain is the following error:
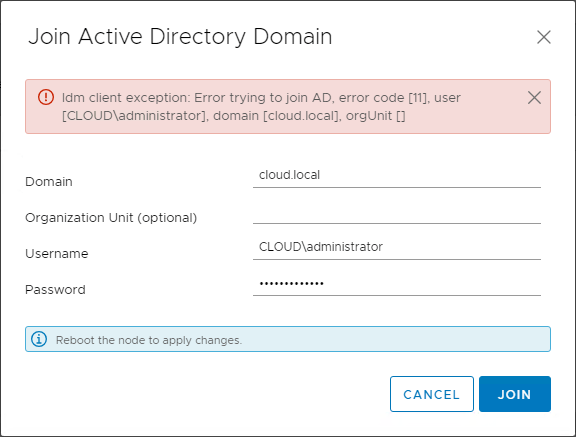
When this error is encountered, the typical workaround as noted here is to join the VCSA appliance to Active Directory using the VCSA shell command line.
The command line command is as follows:
- /opt/likewise/bin/domainjoin-cli join
This will prompt for a password to perform the domain join operation. Enter your password when prompted. You should see the SUCCESS message after a few moments when the domain join is successful. After you receive the SUCCESS message, reboot the VCSA appliance.

A quick check on one of your domain controllers should reveal if the computer account for the VCSA appliance was successfully created.

After the VCSA appliance is successfully joined to Active Directory, you will be able to add the Identity Source using the Active Directory domain to properly add Active Directory users to the vCenter Server and assign permissions to them within vSphere.
Navigate to Administration > Single Sign On > Configuration > Identity Sources > Add Identity Source. Click on the Add Identity Source.
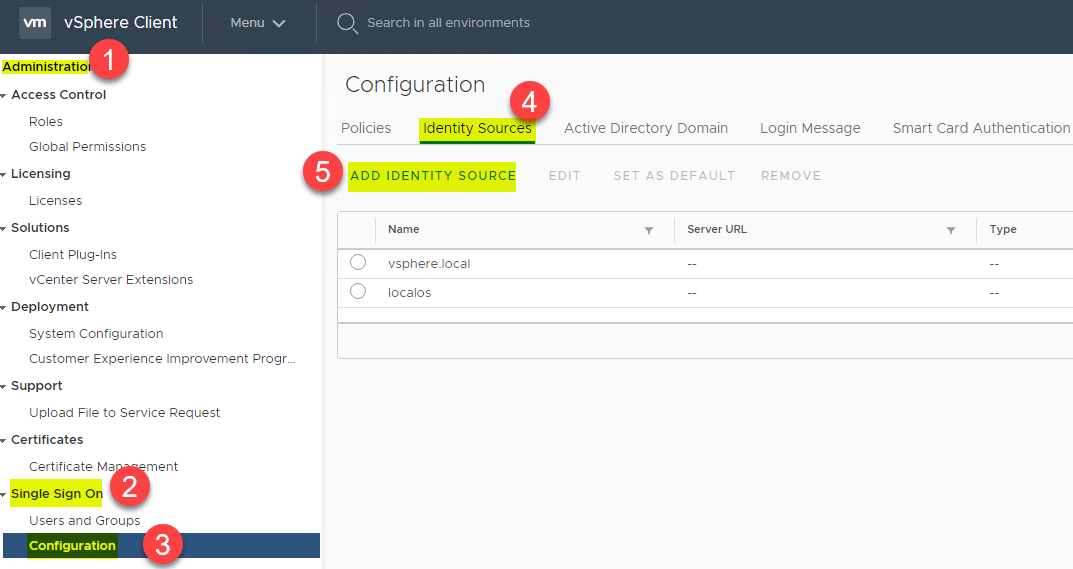
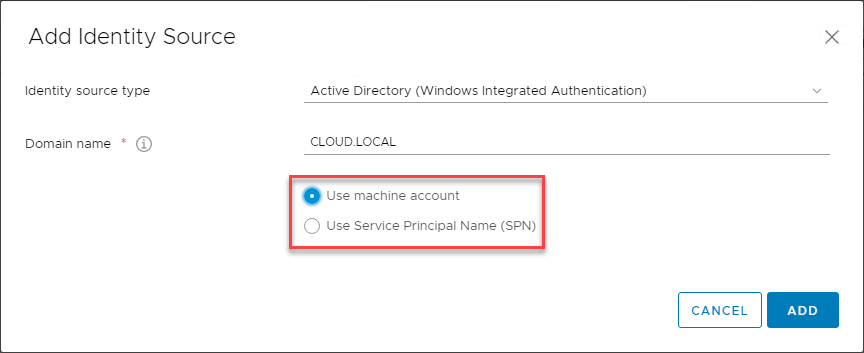
This will launch the Add Identity Source dialog box. Here you will see the Active Directory (Windows Integration Authentication) listed by default.
There are a couple of options to use either the machine account or Service Principal Name (SPN).
Here we are sticking with the default machine account option.
After selecting your domain, click the Add button.
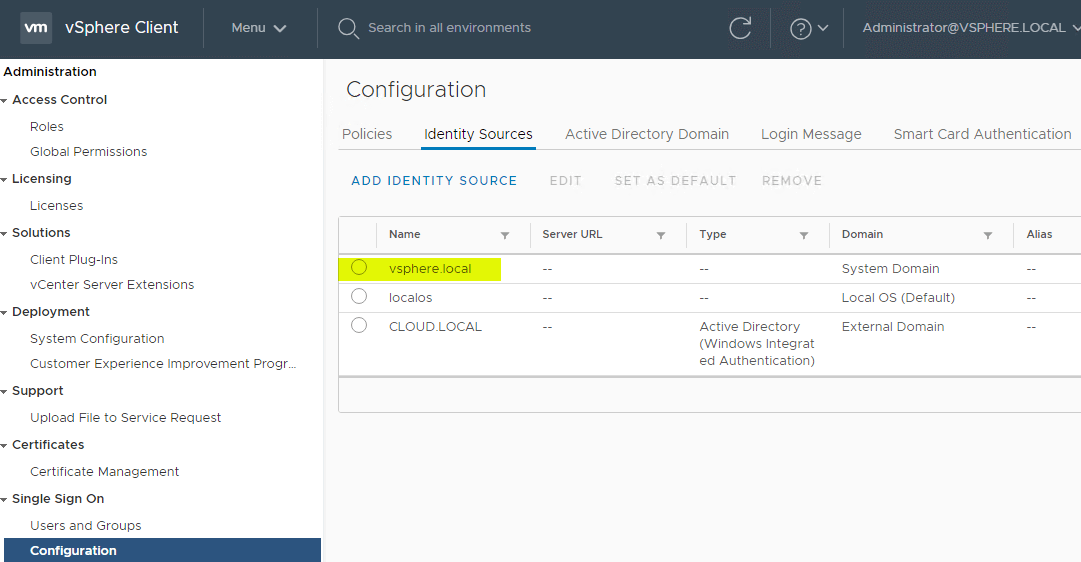
After clicking the Add button, you should see the new Active Directory domain listed as an Identity Source.
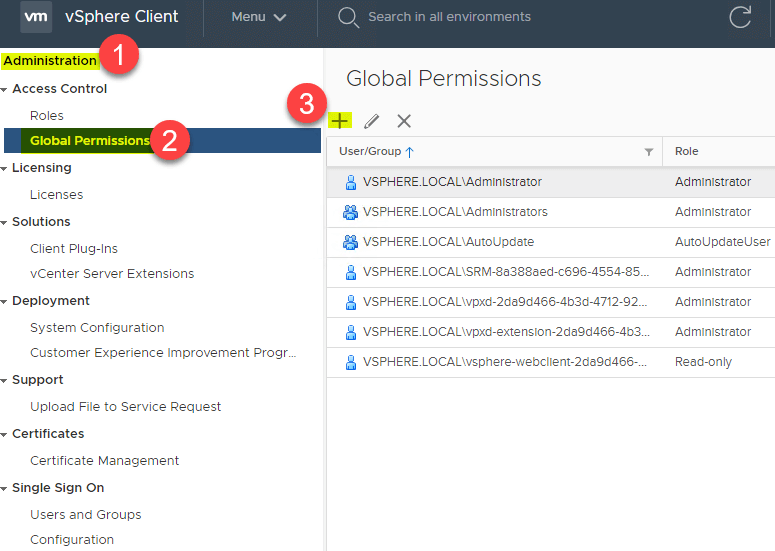
Now that we have the Active Directory identity source added, we can now use it to assign permissions. Navigate to Administration > Global Permissions > + sign.
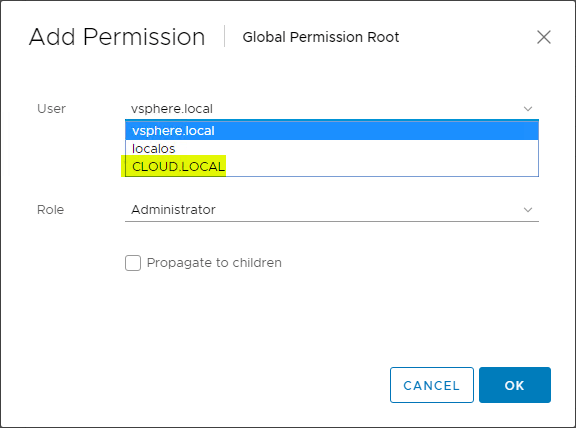
Once you click the “+” sign, you will see the Add Permission dialog box open. In the User field, the drop-down box should list the Active Directory domain.
Wrapping Up
Using centralized permissions is a great way to bolster security, have consistent password policies, and use centralized auditing for authentication requests. Integrated VMware vSphere with Active Directory is easily accomplished and provides a way to utilize Active Directory domain accounts inside vSphere. Doing this will allow aligning roles and permissions throughout the environment, including vSphere access.
The process with the new VCSA appliance is very straightforward. There is an error that is documented above that can be encountered, but easily worked around by using the shell command line. The VCSA appliance is added to Active Directory and a computer account is added inside AD as a result. Be sure to schedule the downtime with vCenter as this will result in the need to reboot the appliance. Afterwards, permissions are easily assigned in the global permissions area of administration in the vSphere client.
Follow our Twitter and Facebook feeds for new releases, updates, insightful posts and more.


Leave A Comment