Read on: Overview of vSphere : Part 1
In this second part of the VMware for Beginners Series, we will check the hardware requirements for installing vSphere and the licenses.
Important note: Before we start, please bear in mind that this blog post is to build a training environment, not a production environment. That said, we can install vSphere on a supported server or computer as long as it runs without issues(like the purple screen of death – PSOD).
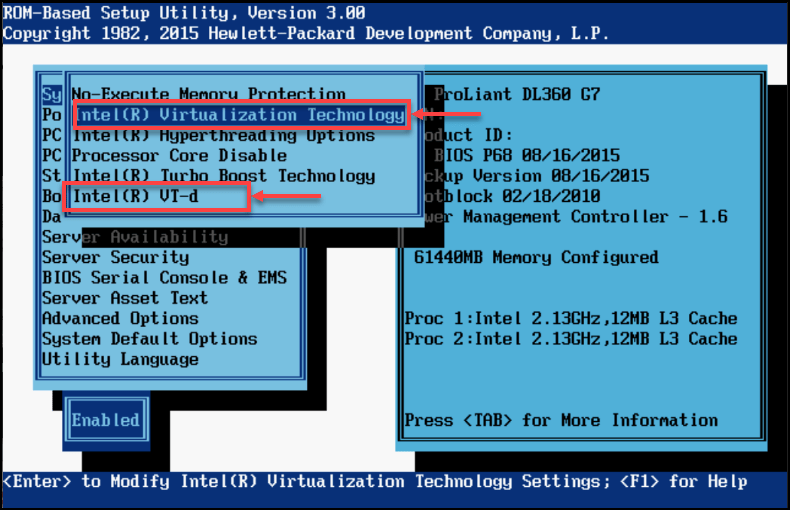
As I said in my previous article on this VMware series, you can install vSphere on a server(like an HP, Dell, Leono, IBM, etc.) or install it on your computer/laptop. You are good to go as long as you have a CPU with NX/XD bit enabled in the BIOS and have the rest of the requirements.
Just two BIOS examples of a server and a computer:
Server:
Computer/Laptop:
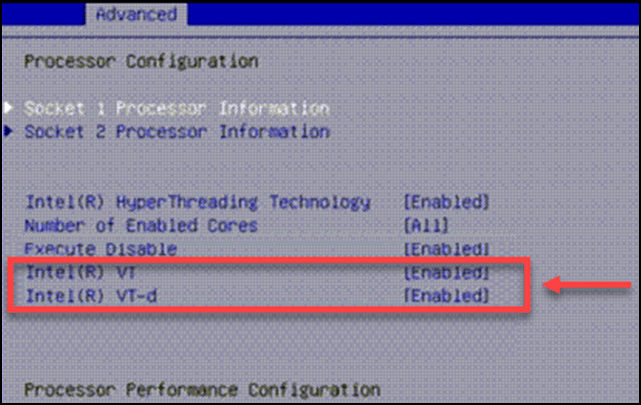
Depending on the server/computer and BIOS version or brand, options can differ.
Note: We will discuss and explain vSphere nested in this blog, at the end.
vSphere Requirements:
Check in the HCL list if VMware supports your CPU to install vSphere. Some CPUs are on the list; we can install them but need extra configurations to work.
- ESXi 7.0 requires a host with at least two CPU cores
- ESXi 7.0 requires a minimum of 4 GB of physical RAM
- One or more Gigabit or faster Ethernet controllers
Note: Ethernet controllers could be one of the problems when using non-supported hardware from VMware. Some Network cards will not be recognized when you install your vSphere.
It is best to visit HCL and check if your network card is on the supported list.
Starting with ESXi 7.0 Update 3, if the boot device is a USB or SD card with no local persistent storage, such as HDD, SSD, or an NVMe device, the VMware Tools partition is automatically created on the RAM disk.
- ESXi 7.0 requires a boot disk of at least 32 GB of persistent storage such as HDD, SSD, or NVMe. Use USB, SD, and non-USB flash media devices only for ESXi boot bank partitions. A boot device must not be shared between ESXi hosts
Note: The above settings/devices are the best option for better performance, but you can still install vSphere in an SD card/USB key with 8/16Gb as long as you have local disks for the ESX-OSData. Since this is for testing/training, you can choose this option.
- Local Disk or a NAS/SAN to install and store your Virtual Machines
The above requirements are the minimum for installing your vSphere 7.x. Check HERE for the full requirements to install vSphere.
Let us download a standard vSphere 7.0 ISO to start our installation.
You need a VMware account to download VMware products. If you don’t have it, register and create an account.
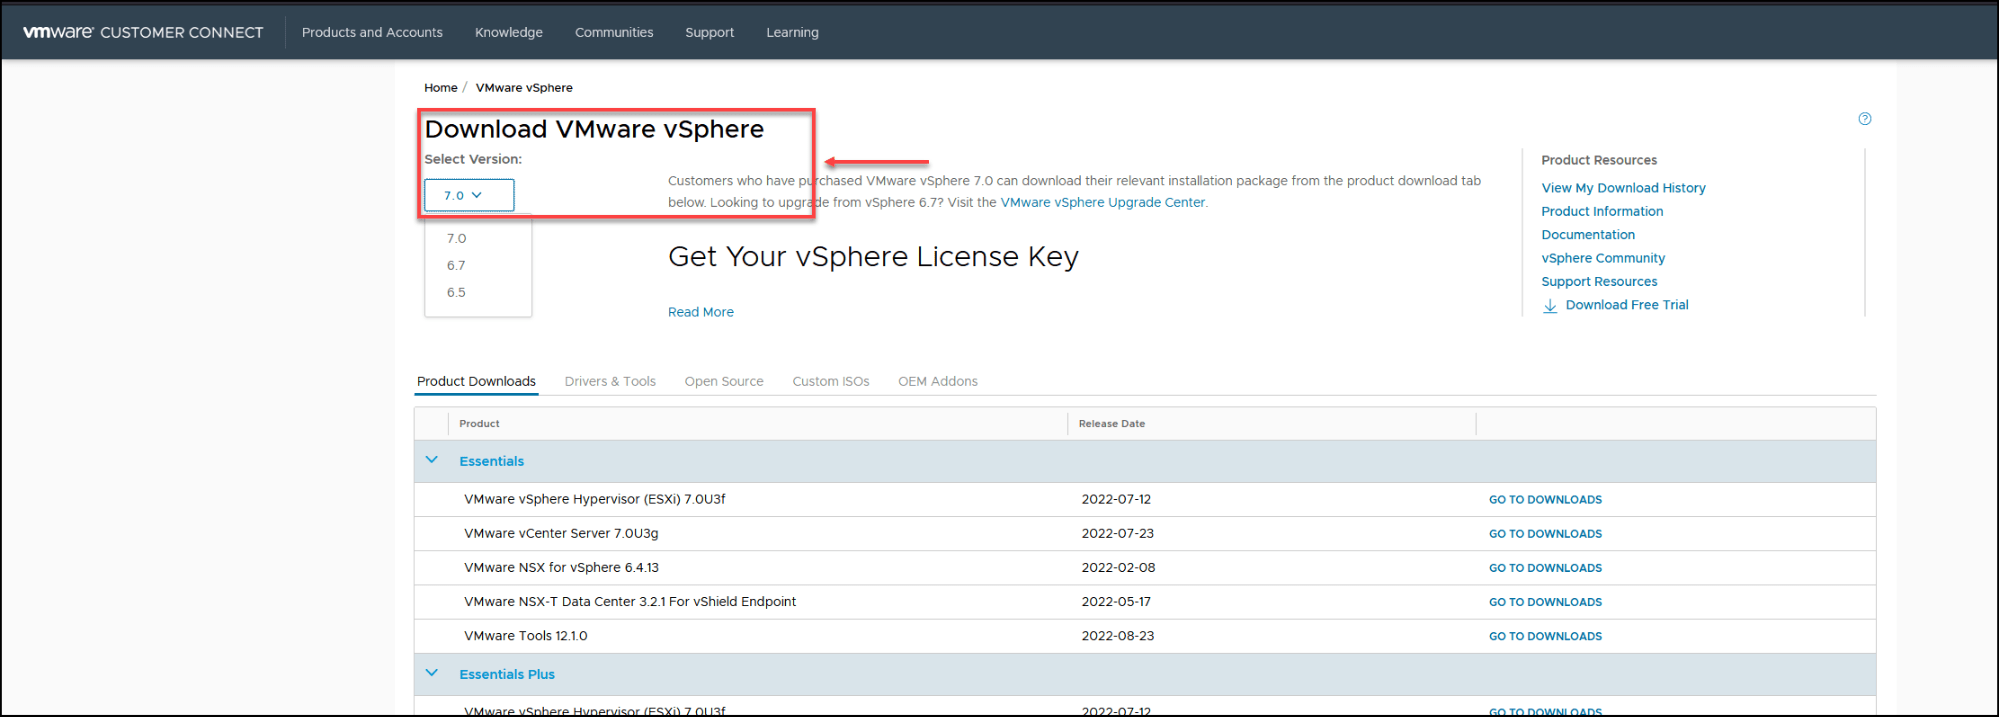
First, find vSphere in the VMware products, select the version you want to download, for this case it’s 7.0 and then select the type of product (or license if you have one).
I drilled down and selected Enterprise Plus.Check HERE to check the features included in each License.

After you click the option Go To Downloads, you can download the vSphere 7 (the latest or previous versions).
But you get the following information(shown in the next image) if you don’t have a registered or paid license. You need to register for a trial license.
Click on Download Trial and then register. Fill out the remaining data and register(VMware will use your VMware account data to fill in most fields).
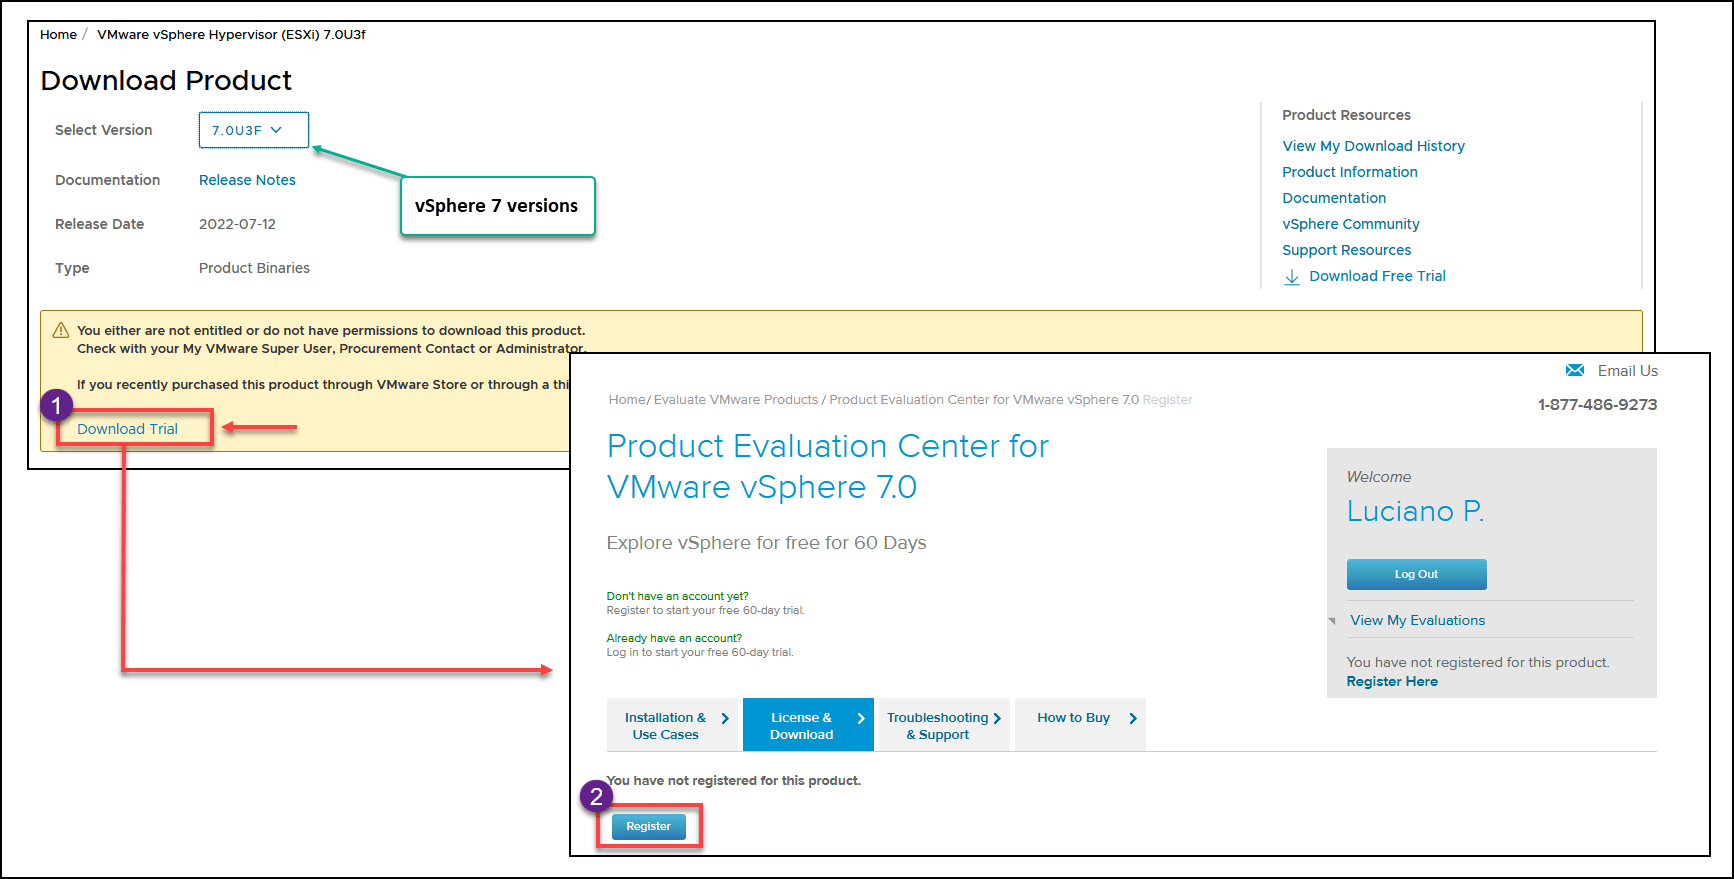
After registration, you can download your vSphere 7 and have a full evaluation license for 60 days.
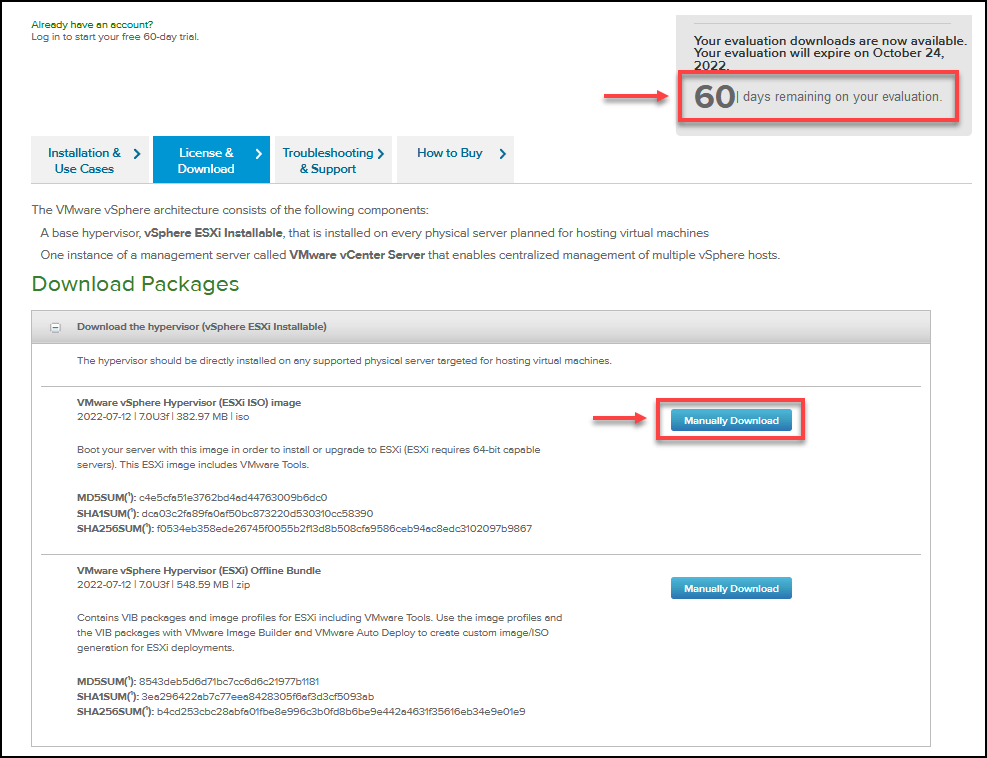
Note: Besides the two options we see above(full vSphere 7 and vSphere 7 Offline Bundle update), you can also download vCenter with this registration.
The above option is for those who have never registered or have a vSphere license. If you have a vSphere license or a company VMware account, then after you select the vSphere 7 Enterprise Plus(selected in the above example), you have access to all vSphere suite of products to download.
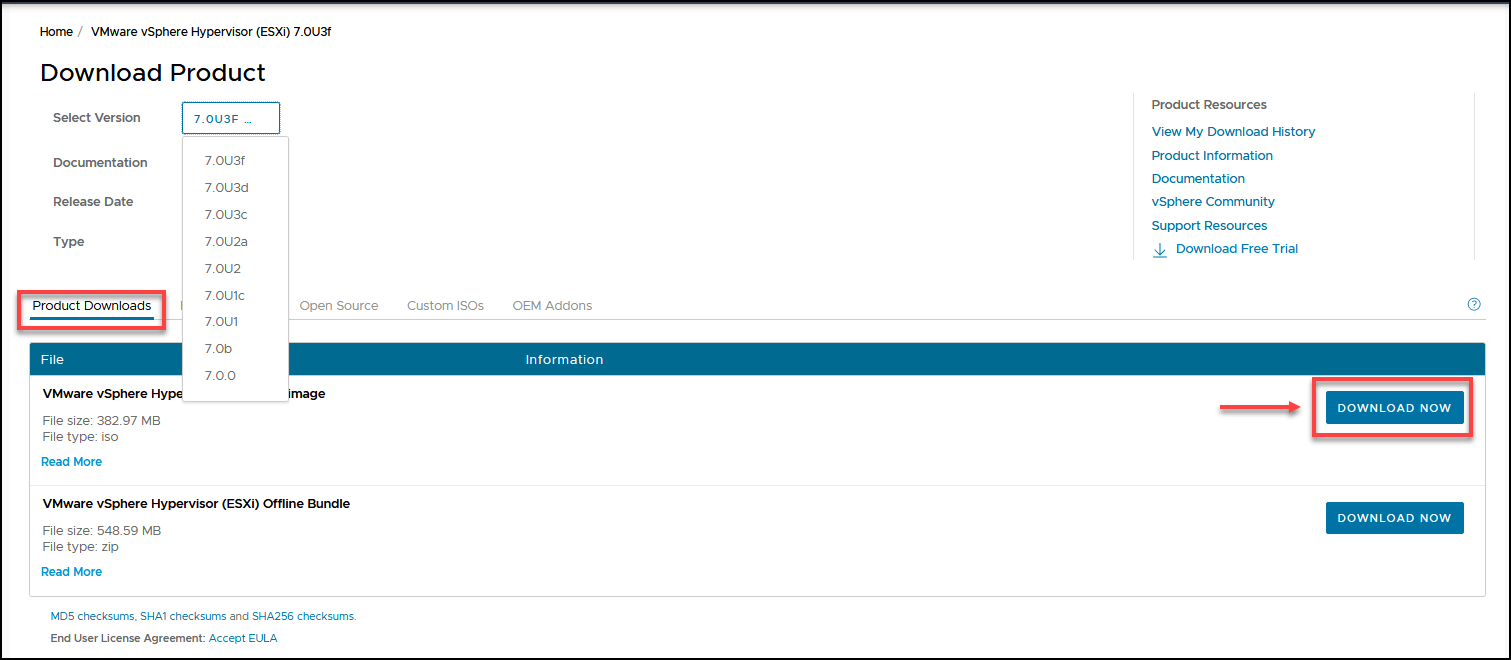
Note: In one of the chapters, I want to explain how to upgrade to the latest version. In that chapter, we will try an update to the latest version, 7.0U3f. For this vSphere 7 installation, we use version 7.0U3c.
It can happen that a vendor doesn’t have a customized ISO for a particular version. In that case, you need to use a lower or higher version. In this case, HPE only has vSphere 7.0U3d and doesn’t have 7.0U3c.
If you have an HPE, Dell, or Lenovo server, you should use the vendor customized vSphere 7 version. Select the Custom ISOs tab and your vSphere 7 hardware vendor ISO.

Information about the vSphere 7 license.
VMware changed the licenses after vSphere 7.0. One CPU vSphere 7 license covers up to 32 cores. A server with more than 32 cores in one CPU needs a second vSphere 7 license.
HERE is a full explanation of the new license mode for vSphere 7.
Evaluation License: This type of License is vSphere Enterprise Plus 60 days(meaning it has all vSphere features included), but if you add a Standard License after 20/30 days, vSphere will only show the features available on the Standard License.
If you decide to go back and re-use the evaluation license, you can use it for the remaining 60 days that were not used.
Upgrade Licenses: With the same license, it is possible to upgrade from 6.x to 6.5, 6.7, etc., but it is not possible to upgrade to a different version that starts with a different number, like vSphere 7. In this case, you need a new license.
Check HERE for more information about vSphere licensing.
Now that we have our license registered and we have downloaded the vSphere 7 ISO, we can start installing our vSphere 7, which we will discuss in our next blog post on this series.
Conclusion:
This article explains how to enable CPU Virtualisation on the BIOS server/computer, the requirements to install vSphere 7, evaluation licenses, and how to register and download vSphere 7 ISO(Standard and Customized).
Follow our Twitter and Facebook feeds for new releases, updates, insightful posts and more.


Leave A Comment