Read on:
Microsoft Azure for Beginners: Understanding Azure Terminologies – Part 1
Microsoft Azure for Beginners: How to Create an Azure Virtual Machine – Part 2
Microsoft Azure for Beginners: What is Azure Governance – Part 3
Microsoft Azure for Beginners: What is Azure PaaS – Part 4
Microsoft Azure for Beginners: Cloud Adoption Framework – Part 5
In this article, we will create and deploy our first BICEP template. Let’s get started!
What do we need?
I am using my Windows 11 laptop with Visual Studio Code in this example. In addition, I have access to an Azure account, and I have created a resource group MyResourceGroup there. We are going to use this resource group to deploy resources.
Uhhhh … Azure Bicep, what was that again?
Azure Bicep is a syntax-based language that allows you to easily deploy Azure resources repeatedly and in a consistent manner. Bicep is ideal for use as Infrastructure as Code. It provides full support for all resource types and API versions, the syntax is easy, quick to understand and production worthy. It is also fully supported by Microsoft. In addition, it can be built modularly and there is no cost involved. In addition, Azure Bicep is completely open source!
But let’s get started quickly!
Configuration of VSCode
Assuming Visual Studio Code is already installed, open Visual Studio Code and go to extensions. Install the Bicep module.
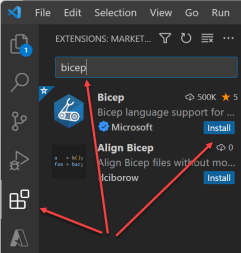
Now that this module is installed in Visual Studio, shortcuts will be offered automatically when opening or creating .bicep files. Let me explain this. Let’s create a .bicep file, example storage.bicep
If you then use a Bicep command, for example resource (this is used to create Azure resources) you will see that Visual Studio Code automatically adds the possible commands :
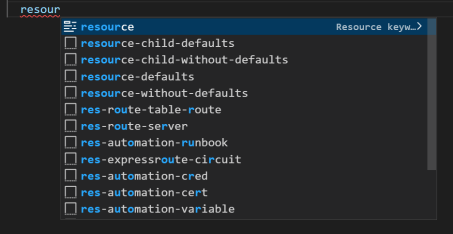
Visual Studio Code makes it very easy for us to use code in the right way and with the right formatting. But Visual Studio Code offers (an awful lot) more! We can also use snippets. Snippets are complete pieces of Bicep code that you can use and possibly modify and use. In this example, we’re going to roll-out a storage account. See what happens when you type res-stor (you don’t have to fill in the whole command, Visual Studio Code completes it automatically)
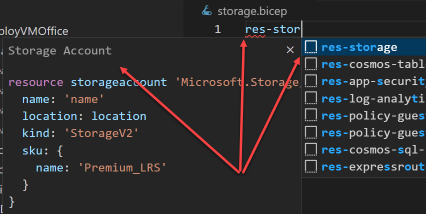
You can see that VSC automatically suggests a piece of code. Let’s use this one.

We now have a piece of sample code where we can customize our specific parameters. We still want to modify the name and location. Let’s do this.
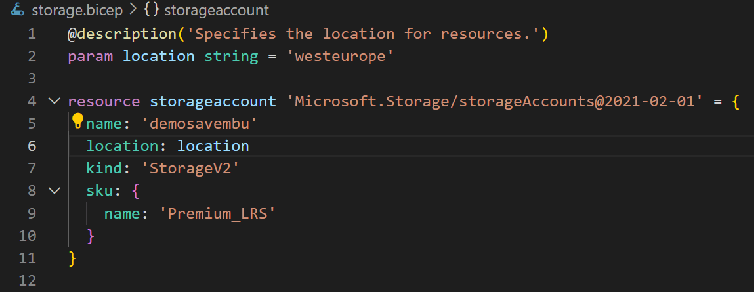
For demo purposes, we will not use parameter files for the time being. This is because we want to capture all unique values in the template and in a parameter file. But we will cover this at a later moment.
Ok, let’s deploy the template!
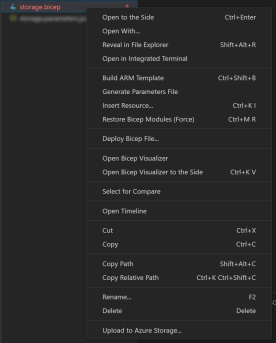
Open the storage file we just created, and the right mouse button opens the options menu. Choose Deploy Bicep File.

Provide a name for deployment

The Resource Group in which we want to deploy

And a possible parameter file (in this example we are not using it yet)
After a few seconds you will see something similar :

Note Deployment succeeded
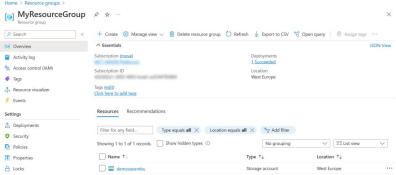
As you can see next in Azure, the deployment succeeded :

Now let’s use a parameter for the location.

Visual Studio Code automatically “sees” when parameters can be used and helps with this as well. At westeurope you see an orange line, if you click on this you get the tip to create a parameter and the option to set it automatically as well.

Once we have done this you will see that part of the code is automatically modified and you use a parameter :

You can then deploy this code in exactly the same way. In another article, we’ll look at parameter files and how to easily deploy them, among other things.
Voila! You’ve created and successfully deployed your 1st Bicep template. In subsequent articles, we will look at what other features Azure Bicep offers.
Follow our Twitter and Facebook feeds for new releases, updates, insightful posts and more.


Leave A Comment