Read on:
Microsoft Azure for Beginners: Understanding Azure Terminologies – Part 1
Microsoft Azure for Beginners: How to Create an Azure Virtual Machine – Part 2
Microsoft Azure for Beginners: What is Azure Governance – Part 3
Microsoft Azure for Beginners: What is Azure PaaS – Part 4
Microsoft Azure for Beginners: Cloud Adoption Framework – Part 5
Microsoft Azure for Beginners: How to Create your First Azure Bicep Template – Part 6
Microsoft Azure for Beginners: How to Create Modules with Azure Bicep – Part 7
Welcome to 10 tips for using Azure Bicep. In previous articles, we have covered Azure Bicep. There, we covered the benefits of Azure Bicep and some practical examples, among other things. Next, we pick up where we left off with 10 tips for using Azure Bicep. My personal real-world experiences!
#1 Use Visual Studio Code as your editor
This tip is obvious and needs no explanation! But I strongly recommend using Visual Studio Code as an editor for several reasons :
- Visual Studio Code provides automatic completion, code formatting, syntax highlighting, and error detection for Bicep code.
- liVisual Studio Code provides a debugger that you can use to test and debug your BICEP code.
- Visual Studio Code offers easy access to your resources within Azure through an explorer.
- Visual Studio Code provides a Git integration that can be used to version control your Bicep code and collaborate with other (Bicep) developers.
- Many extensions are available for Visual Studio Code specifically aimed at working with Azure Bicep, such as Bicep intellisense, Bicep validation, etc. But, of course, don’t forget the Bicep extension. This is a must-have for Bicep developers.
#2 Use resource snippets
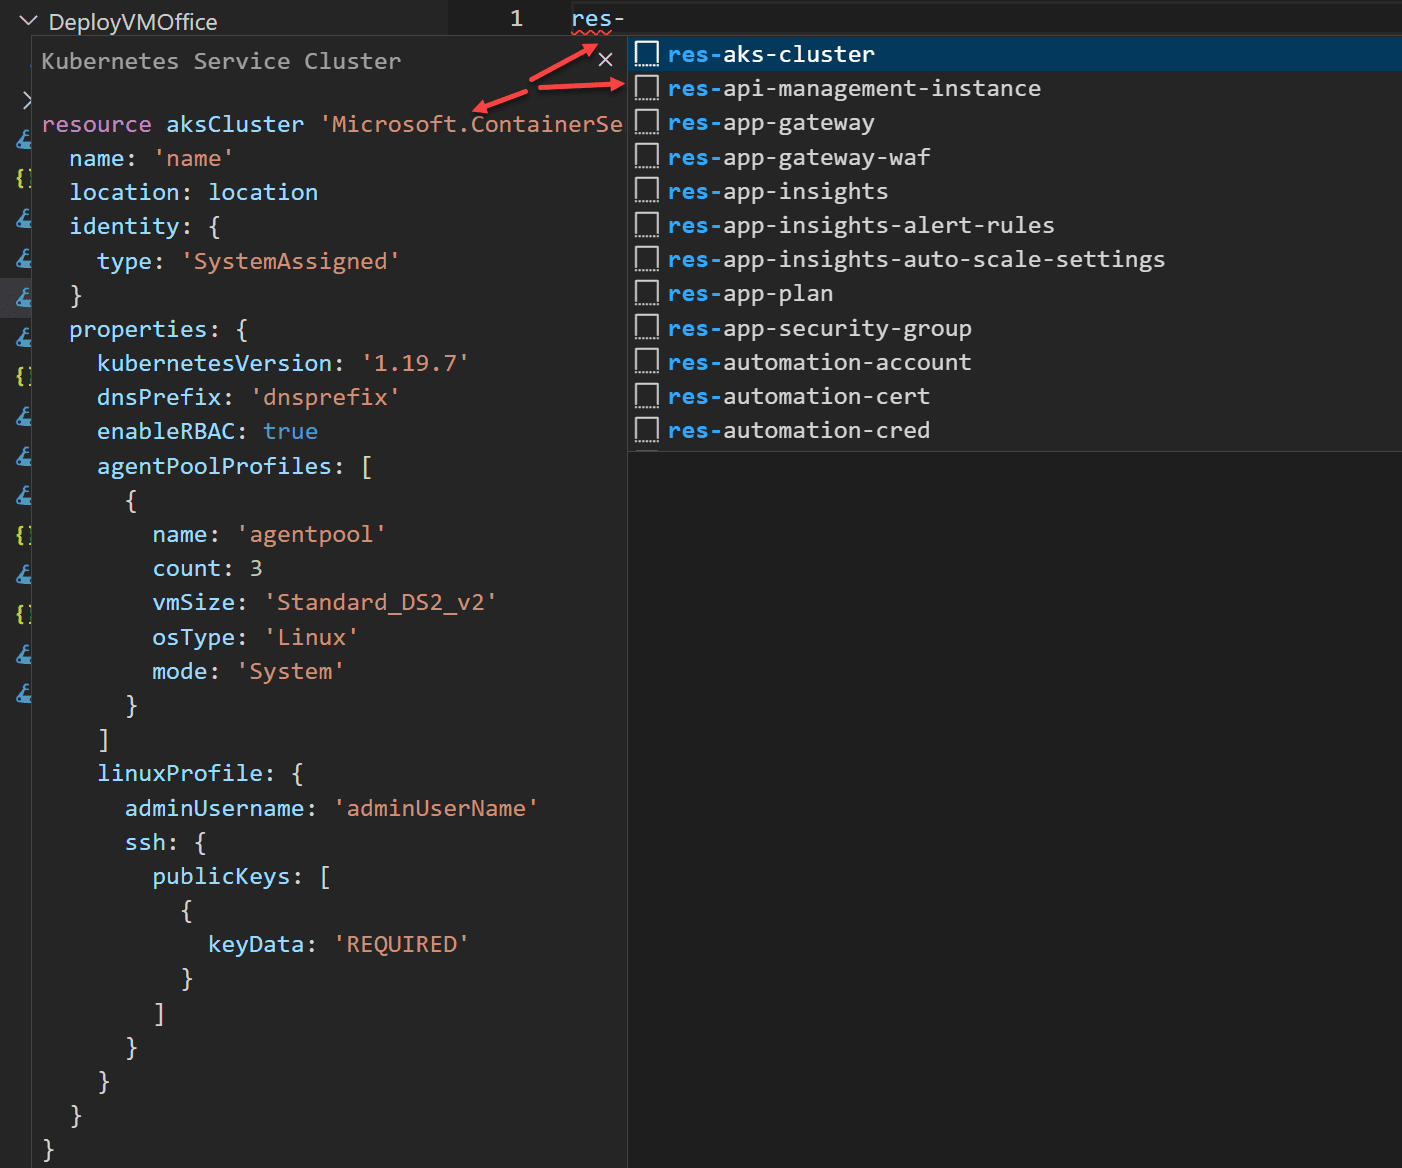
Azure Bicep resource snippets are short pieces of complete Bicep code for frequently used resources. You can quickly insert these snippets in your Bicep code to save time writing code. For example, Bicep resource snippets can include the code for a specific Azure resource, such as a virtual machine, storage account, or network.
You can use these snippets to quickly add a particular resource to your Bicep code or learn how to implement a specific resource in Bicep. Then, modifications and additions can be made to the code. The resource snippets are available as part of Visual Studio Code in conjunction with the Bicep extension.

#3 Use autocomplete in Visual Studio Code
Autocomplete in Visual Studio Code (VSCode) suggests possible complements based on the text you type. This can help you code faster and more efficiently.
To use auto-completion with Azure Bicep in VSCode, you must first install the Bicep extension in your VSCode environment. This extension provides syntax highlighting, code snippets and IntelliSense for Bicep.
Once installed, you can use the auto-completion by simply starting to type in a Bicep file. VSCode will automatically suggest Bicep-specific functions, parameters, and variables.
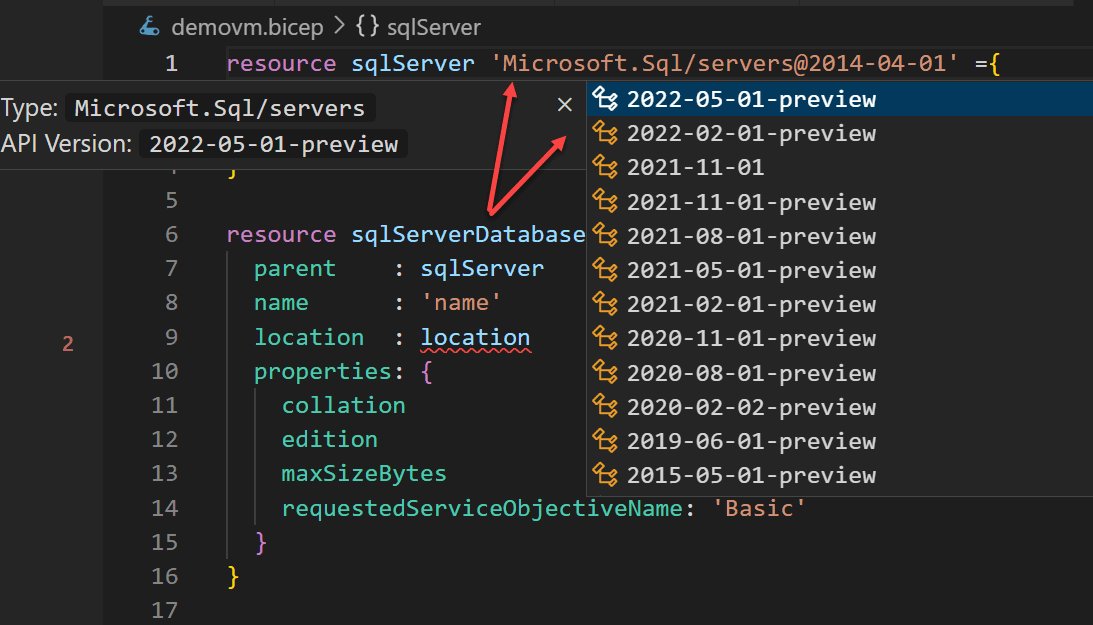
You can also use the tab key to switch between suggestions quickly. You can also use the Ctrl + Space hotkey to open the list of suggestions. Here’s an example. If you stand on the API version field in the code snippet and use Ctrl + Space, you can select from the available APIs and if necessary, select another one directly.

#4 Use what-if
As discussed earlier, the what-if function is a powerful tool for simulating changes to your Bicep code before implementing it. It is best practice to use this function before you actually implement it.
The what-if function lets you see what changes will be made to your Azure resources before you deploy.
You can use the what-if function by running the following command in the Azure CLI:
az deployment group what-if –template-file main.bicep
This command will simulate the changes to your Azure resources when the Bicep code in the main.bicep file is implemented. This allows you to view the desired changes on your resources and resolve any errors before actually deploying.
The what-if feature is a powerful tool for managing IAC environments in Azure, it helps you ensure that your deployments are correct and that your resources are modified as expected. It is recommended that you use this feature before you deploy.
#5 Use modules
We covered this in a previous article of mine, but I wanted to touch on it anyway. I recommend using modules within Azure Bicep. These modules can organize and reuse repeatable or complicated parts of your code. This helps you make your code more readable and manageable.
#6 Use parameters
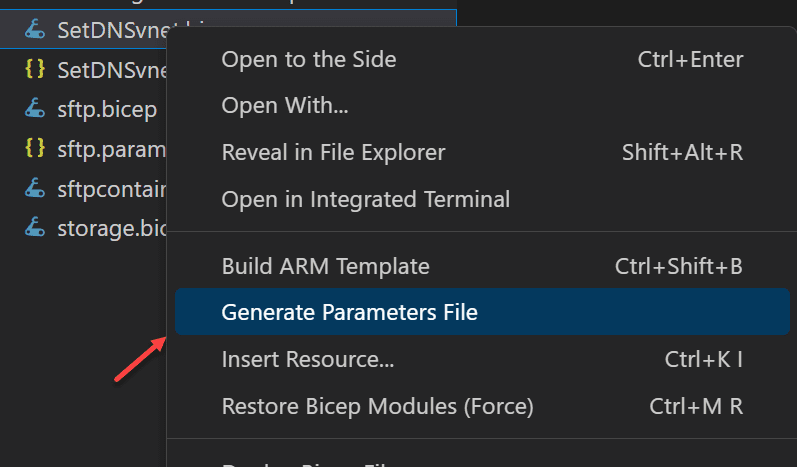
Bicep supports parameterization, which you can use to replace values in your code with parameters. This makes deploying the same infrastructure with different values for specific scenarios easier. So this means you don’t have to create a new template for each deployment (customer?). Instead, you use the new parameters in the parameter file, and you can immediately deploy the resources. Visual Studio Code can help you automatically generate a parameter file :

#7 Use output variables
Bicep supports output variables, which you can export values from your code for use in other parts of your code or scripts. This helps manage dependencies between your resources.
Output variables are defined in the outputs section of a Bicep script and have a name and a value. The value of an output variable can be defined by an expression or by a reference to another resource or variable.
Example :

In this example, storageAccountName is the name of the output variable and the value of this variable is defined by the resourceId expression that references the name of a storageAccount resource.
Output variables can be used in a Bicep script through the output function, which returns the value of an output variable.
Example:

In this example, the storageAccount resource name is stored in the output variable storageAccountName, which can then be used in other parts of the code.
#8 Use Azure Policy
Bicep supports Azure Policy, which you can use to validate your Bicep code before it is deployed. This helps you ensure that your code meets your organization’s security and compliance requirements. In addition, it even provides logs and reports on rule implementation and compliance, giving you insight into the status of your policies and their impact on your infrastructure.
#9 Use Azure Resource Visualizer
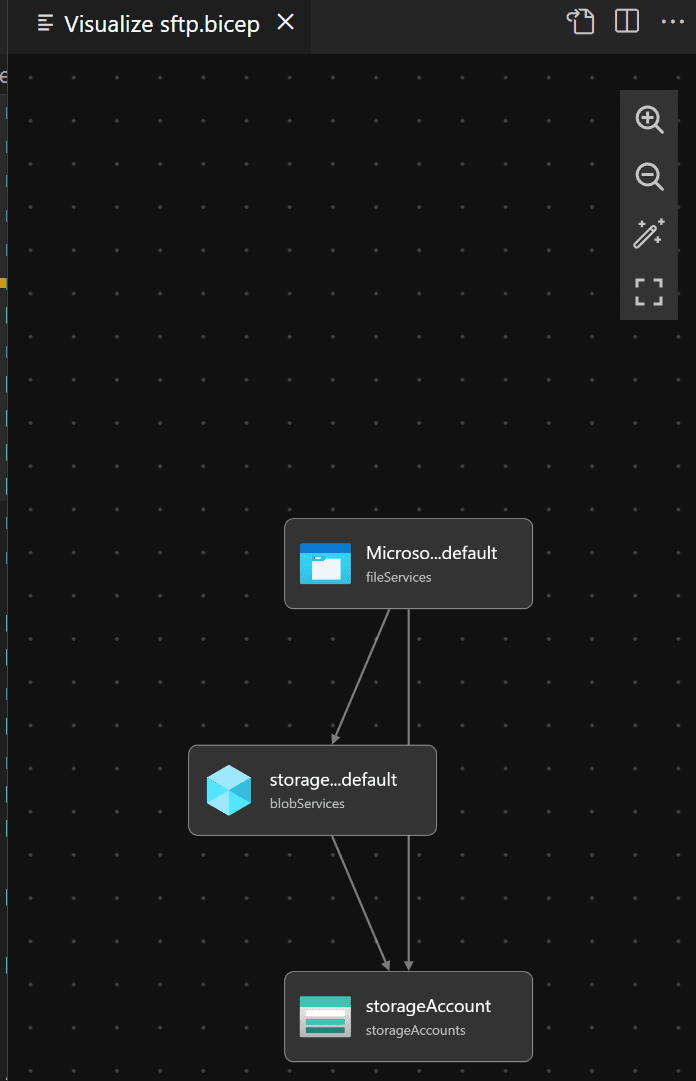
Azure Resource Visualizer is a tool for visualizing the resources defined in Bicep code. This makes it easier to understand the logic and dependencies of the resources. You can access the resource visualizer within Azure and Visual Studio Code.

Right above your template code you see the button for the Resource Visualizer. If you use this you will immediately see a graphical representation of your resources :

#10 Take advantage of reverse engineering
You may find yourself looking for the right syntax or commands to deploy certain resources. In this case, you may know how to write it in a JSON (ARM) template. You can convert this template to BICEP code and then incorporate it into your template. An example might be that you don’t know exactly how to apply an Azure Firewall rule in BICEP. A possible workaround could be manually adding the firewall rule in Azure, exporting it to JSON(ARM) and then converting it to BICEP. It’s a little extra step but a) you know the code works and b) you can easily add it to your BICEP template file.
Follow our Twitter and Facebook feeds for new releases, updates, insightful posts and more.


Leave A Comment