What is Sole tenant node in GCP ?
Google Cloud Platform (GCP) offers a service called “sole-tenant nodes” that allows users to run their virtual machine (VM) instances on dedicated physical hardware. Sole Tenant nodes allow you to group your VMs together on the same hardware or separate your VMs. Mainly, Sole-tenant nodes can help you meet dedicated hardware requirements with respect to Bring Your Own License (BYOL) scenarios that require per-core or per-processor licenses.
Here’s a breakdown of what sole-tenant nodes are in GCP:
- Dedicated Physical Servers: Sole-tenant nodes provide users with dedicated physical servers for their VM instances. This means that the underlying hardware is reserved exclusively for a specific project, rather than being shared with other projects
- Isolation: This isolation can be valuable for certain workloads that have specific compliance or regulatory requirements. It ensures that the resources are not shared with other GCP customers, providing a higher level of control and predictability
- Placement Policies: Users can define placement policies to control which VM instances run on which sole-tenant nodes. This allows for customization and optimization of resource usage based on specific requirements
- License Mobility: Sole-tenant nodes also provide the flexibility to bring your own licenses for certain software products. This can be beneficial for customers who already have licenses for specific applications and want to use them in the GCP environment
- Billing: Sole-tenant nodes typically have a separate billing model compared to regular (shared) VM instances. Users are billed for the sole-tenant nodes on a per-second basis, with a one-minute minimum usage cost
Workload considerations for the customers running a Sole tenant server node in GCP
According to Google Cloud documentation, here are the following types of workloads that might benefit from using sole-tenant nodes:
- Gaming workloads with performance requirements
- Finance or healthcare workloads with security and compliance requirements
- Windows workloads with licensing requirements
- Machine learning, data processing, or image rendering workloads. For these workloads, consider reserving GPUs
- Workloads requiring increased input/output operations per second (IOPS) and decreased latency, or workloads that use temporary storage in the form of caches, processing space, or low-value data. For these workloads, consider reserving Local SSDs
There are various types of Sole tenant server nodes available in GCP. They vary depending on the processor type, max vCPU supported and max Memory supported. Before deploying a sole tenant server, user must find all the details of a particular server node type and choose one among them.
Creating a Node Group
Before creating a Sole tenant server node, the user has to create a Node group. Before provisioning VMs on sole-tenant nodes, you must create a sole-tenant node group. A node group is a homogeneous set of sole-tenant nodes in a specific zone.
Here are the steps to be followed for creating a Node Group.
- Login to GCP console with a valid username and password
- Choose the Project you are currently working on or create a new project to use for deploying the sole tenant server node
- On left navigation menu, choose Compute engine → Sole tenant nodes
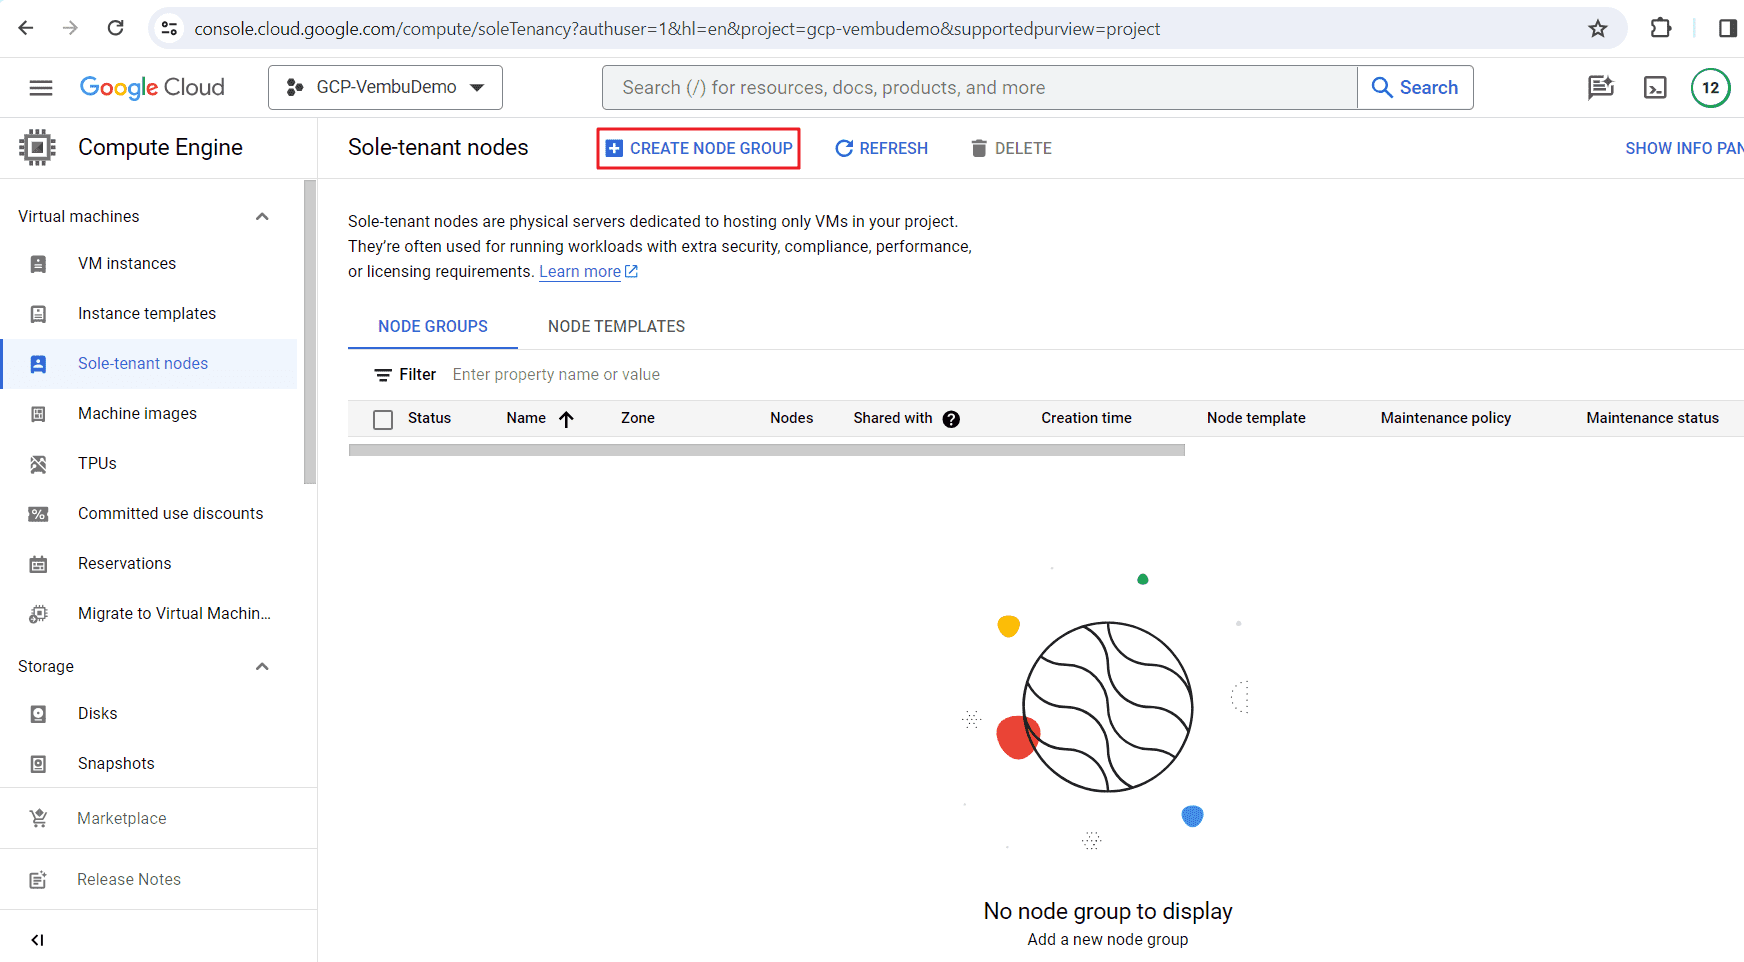
- Click the “CREATE NODE GROUP” icon to create a new node group
Below screenshot shows the creation of node group in GCP console
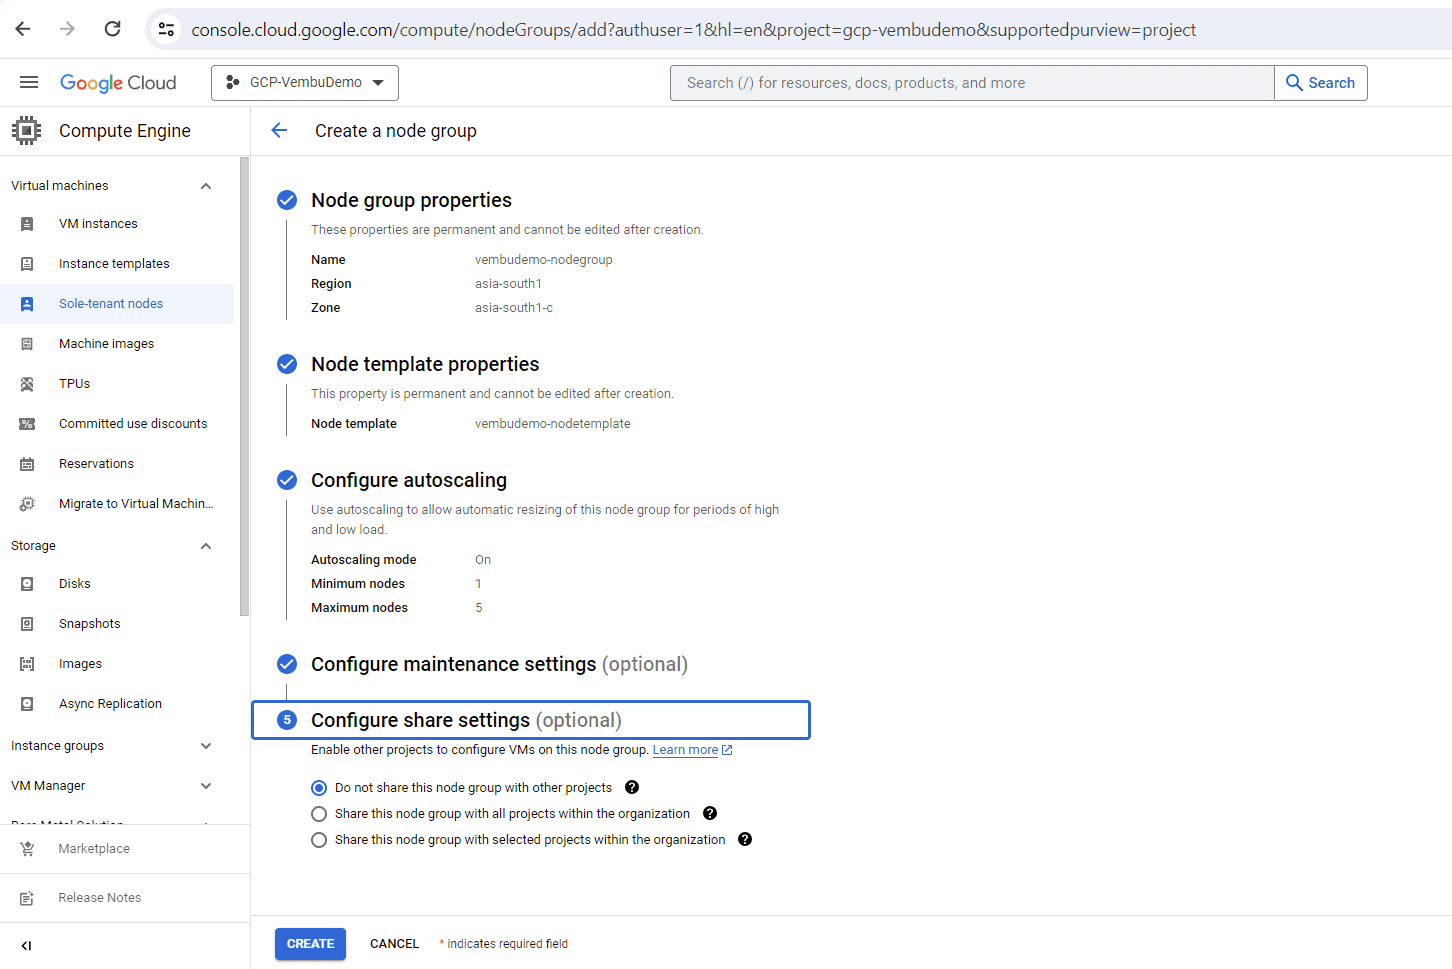
Creating a node group involves five steps. they are :
- Node group properties – Here user should provide a name for the node group & choose the region and zone in which this node group is created. Click continue to the next step
- Node template properties – A node template is a regional resource that defines the properties of each node in a node group. When you create a node group from a node template, the properties of the node template are immutably copied to each node in the node group. For the first time, user should create a new template in which user should provide a name for the template, choose the node type from a list of supported nodes in the region. Optionally, in Local SSD, user can to choose the number of SSD disks 16 of 6000GB or 24 disks of 9000GB capacities. In GPU Accelerator, you choose None or any of the modes supported. (Compute Engine provides graphics processing units (GPUs) that you can add to your virtual machine (VM) instances. You can use these GPUs to accelerate specific workloads on your VMs such as machine learning and data processing).Click “CREATE” to create a new template.Click “Continue” to the next step after creating the template
- Configure autoscaling – Autoscaling is to allow automatic resizing of this node group for periods of high and low load. User can turn ON or OFF this mode. Also user has to provide the minimum and maximum number of nodes when turned ON. If the autoscaling mode is OFF, user has to provide the no of nodes to be added in the node group
- Configure maintenance settings – Configure the behavior of the node group during host maintenance events. Unless physical server affinity is required, the default maintenance policy is recommended. Click “CONTINUE” to the final step.(Note: This is an optional setting)
- Configure share settings – These settings allow you to share your node group with other projects in the organization. You can share this node group to all the projects or some of the projects or turn off the sharing. Choose any one of the share settings and Click “CREATE” to complete the node group creation process
The below screenshot shows these above details before creating the node group.
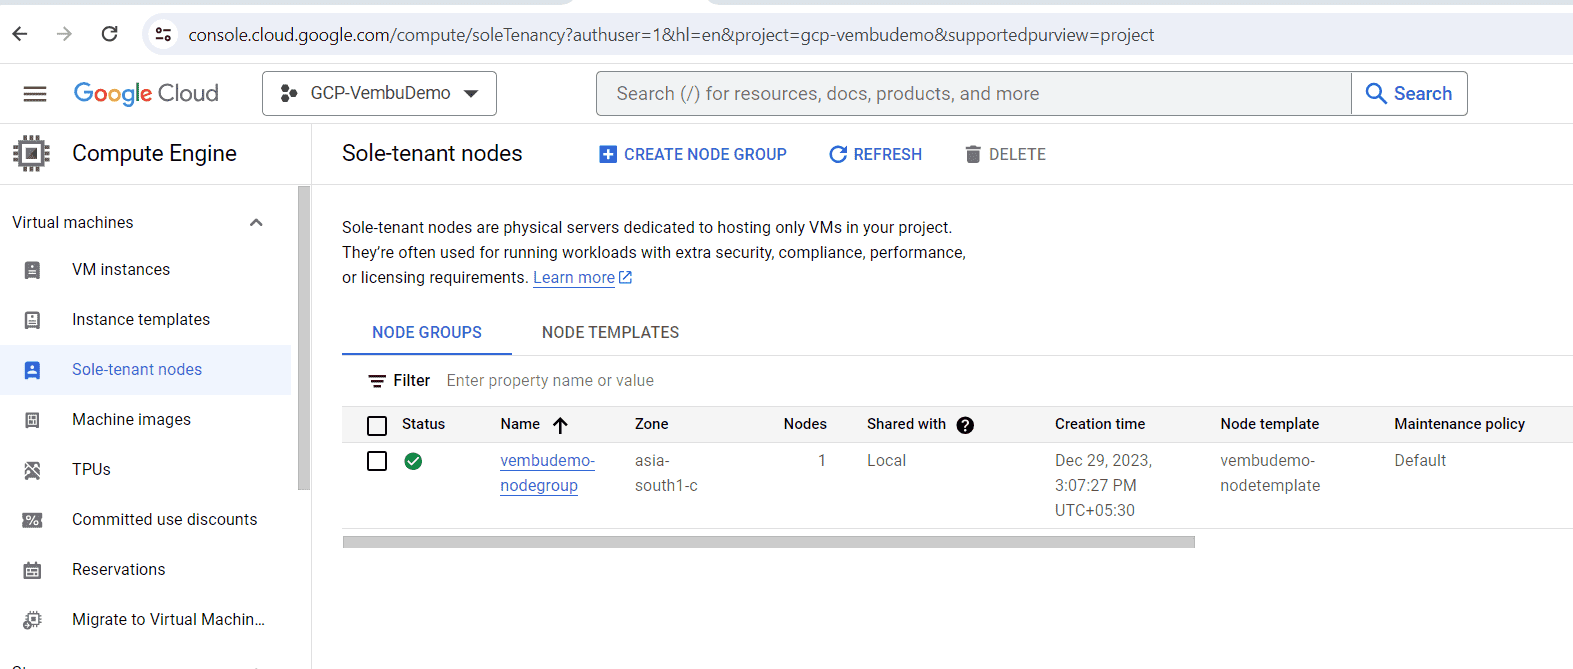
After a while, a new node group will be created and you can view it under the “sole-tenant nodes” page. The below screenshot shows this.
Creating a VM instance in the Sole-tenant server node
Now entirely a new dedicated server is up and running. Now the user can create as many VMs on it as we create a normal VM in the GCP VM console under “Virtual machines → VM instances” navigation menu.
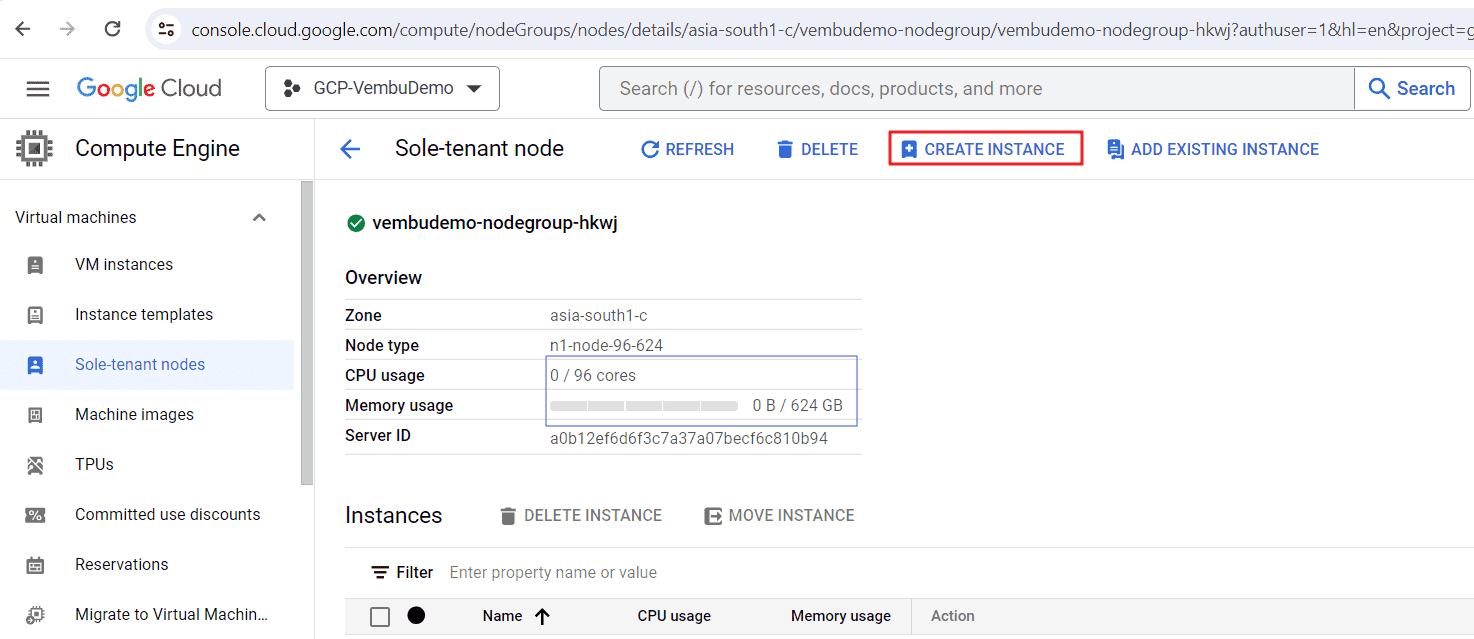
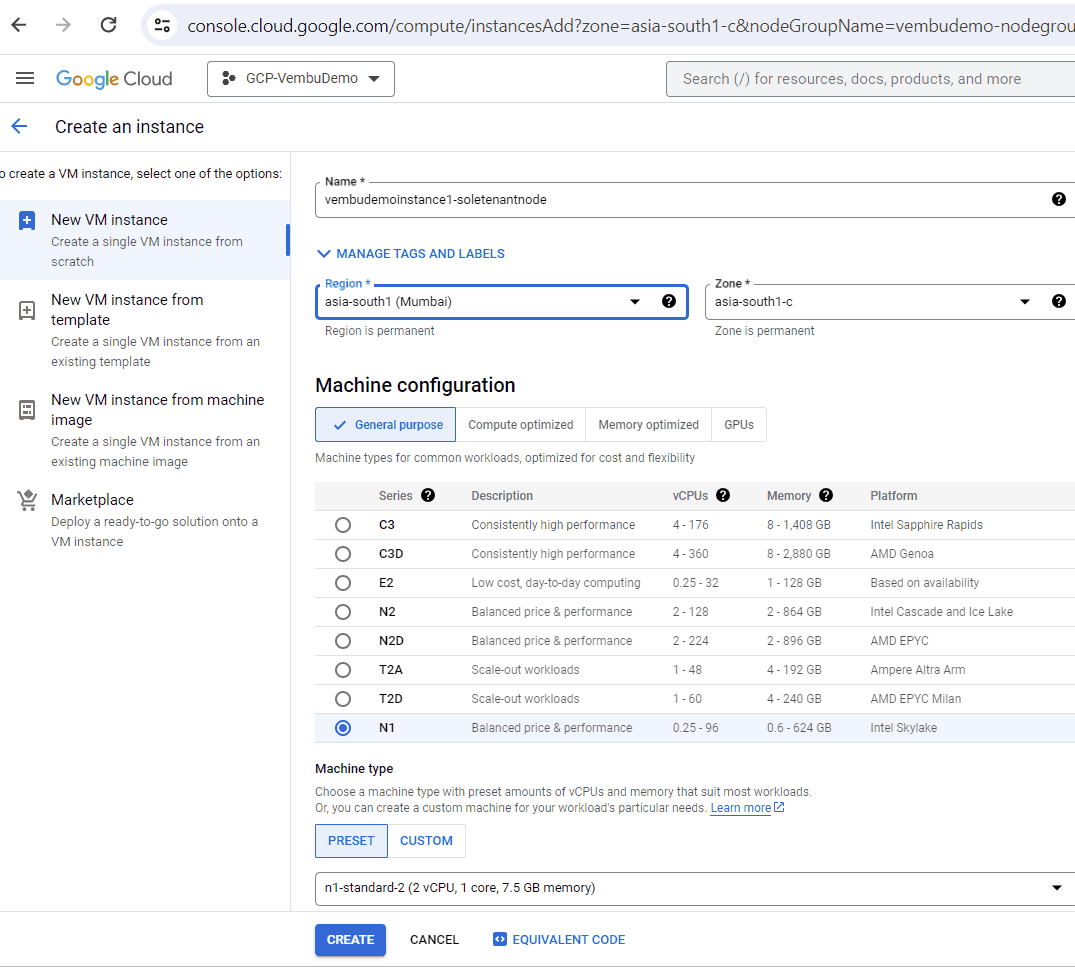
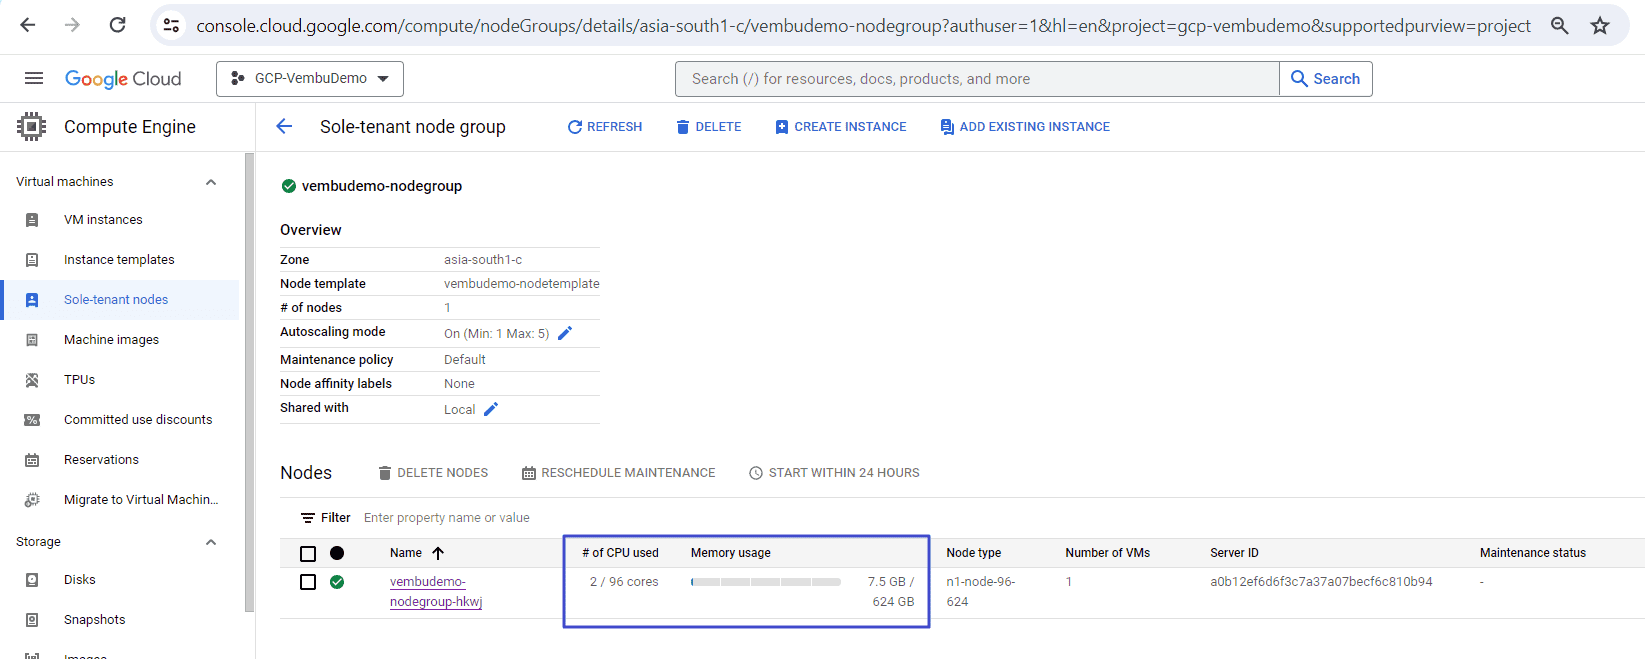
Click the “CREATE INSTANCE” button to proceed further. The below screenshot shows this step. Here you can see 96 cores in CPU usage and 624 GB in memory usage, and this is provisioned when we create the node group.
As usual, you can create a VM instance in few steps:
- Provide a name for the instance
- Choose the region and zone (Since you are using node group, the region and zone will be automatically selected )
- Choose machine configuration and machine type and click “CREATE” to proceed further. ( Here we are not providing all the details for creating a VM, considering the viewer will know rest of the details )
- After creating the instance, user can view the VM details in the newly created node group pane as shown in the below image. Here one can view that the core and memory usage for the node group. As the VM deployment increases, the collection of core and total memory usage will increase
Conclusion
Though GCP Sole tenant nodes offers attractive features such as dedicated physical servers with isolation facility, can control the VM using specific placement policy, and license mobility wherein it provides the flexibility to bring your own licenses for certain software products, it’s important to note that while sole-tenant nodes offer these advantages, they may come with additional costs compared to using shared resources. Organizations should carefully evaluate their specific requirements and the associated cost implications before opting for sole-tenant nodes.
Follow our Twitter and Facebook feeds for new releases, updates, insightful posts and more.


Leave A Comment