Azure resource groups are fundamental entities in the Azure landscape, serving as containers that hold related resources for an Azure solution. Understanding how to manage these resource groups is critical for efficient Azure administration. This AZ-104 manage resource groups study guide will examine how you can use Azure resource groups.
What are Azure Resource Groups?
Azure Resource Groups are a type of logical container that can hold Azure resources and manage access to those resources. It provides a way for admins to manage all the resources in the Azure resource group as a group of resources. You can allocate resources to different resource groups as needed for various configurations.
Azure resource groups effectively allow admins to deploy and configure resources and perform lifecycle operations as a group, leading to better consistency and governance.
Export as a template
You can even export resource groups and resources as Azure Resource Manager templates. These templates can be created from existing resources in the Azure resource groups. You can then deploy from existing ARM templates to deploy those same resource group objects to automate future deployments.
Resource groups considerations
There are a few things to keep in mind about Azure resource groups. Note the following:
- A resource is limited to a single resource group at any one time, but it can be transferred in or out of this group as necessary
- The descriptive data of a resource group and its resources is stored in the region where the resource group is created
- In the event of a regional outage of the resource group’s location, resources in the group cannot be updated due to the unavailability of metadata, but those deployed in other regions will still function, albeit without the ability to be managed or updated
- Resources within a resource group are not confined to the geographic location of the resource group and can be deployed in various regions
- When establishing resource groups, it’s crucial to consider an organizational strategy that considers ownership, billing, location, type of resources, departmental needs, applications involved, and access permissions
- Access to resource groups can be controlled through role-based access control (RBAC) roles, Azure Policy, or resource locks
Brief overview of Azure Resource Manager
The Azure Resource Manager (ARM) is the management and deployment service used by Microsoft Azure. Using ARM, you can create, update, and delete resources, manage environment features like tags and locks, and configure access control.
Azure Resource Manager is used to create Azure resource groups and is also used in the template process mentioned above.
Management groups vs Resource groups
Management groups and resource groups in Azure serve different purposes. Note the following comparison between the two.
Management Groups
- Higher Hierarchy Level: Manage multiple subscriptions
- Broad Application: Ideal for enterprise-level policy and compliance across subscriptions
- Large Scale Governance: Best for large organizations requiring centralized control over various Azure subscriptions
Resource Groups
- Lower Hierarchy Level: Organize resources within a single subscription
- Specific Application: Suited for grouping related resources and integrating Azure services (like virtual machines, web apps) that share a common lifecycle
- Detailed Resource Management: Offers granular control over settings, policies, and access within its scope
Key Differences:
- Scope: Management groups handle governance at the subscription level, while resource groups focus on organizing resources within those subscriptions
- Control Level: Management groups offer a top-down approach for broad policies, whereas resource groups provide more detailed management of resources
- Use Case: Management groups are used by larger organizations for widespread control, while resource groups are suitable for managing specific sets of resources in a more contained environment
Create a resource group
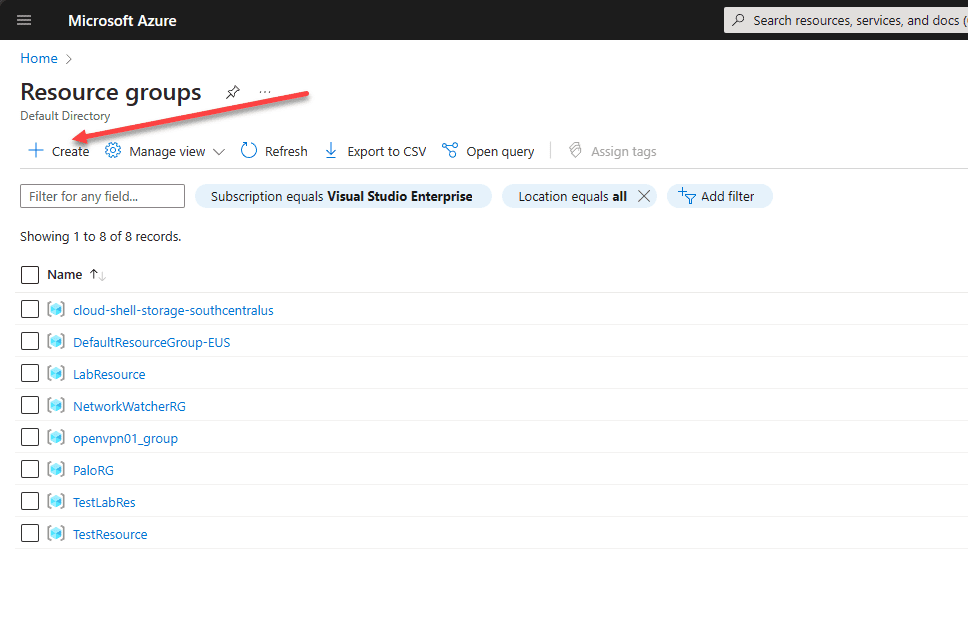
First, log into the Azure Portal. Search for “resource group”. Launch the Resource groups blade. To create a new resource group, click the + Create link. As you can see below as well, on this screen you will see a list of the existing resource groups in your Azure environment.
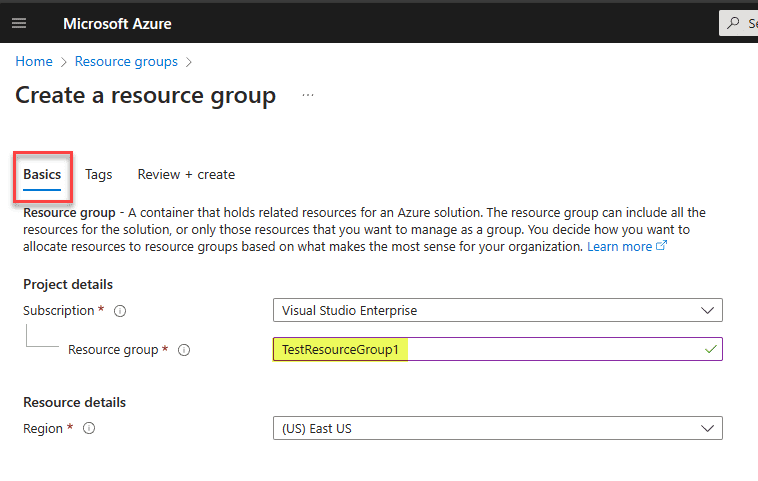
On the Basics screen, select the Azure subscription, name the resource group, and set the region.
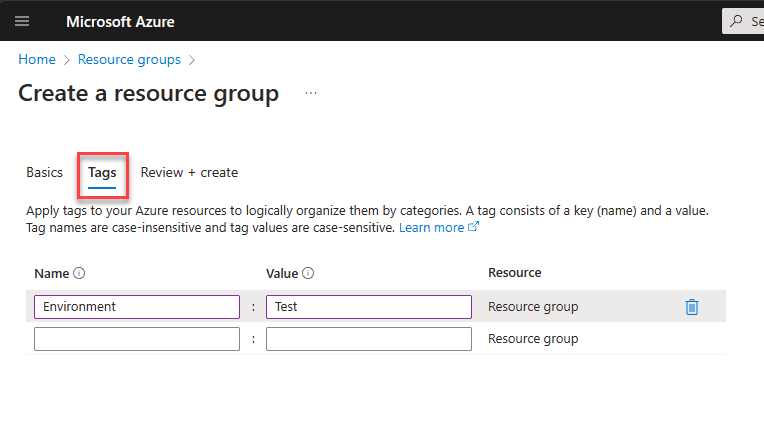
Add tags you want to attach to the new resource group.
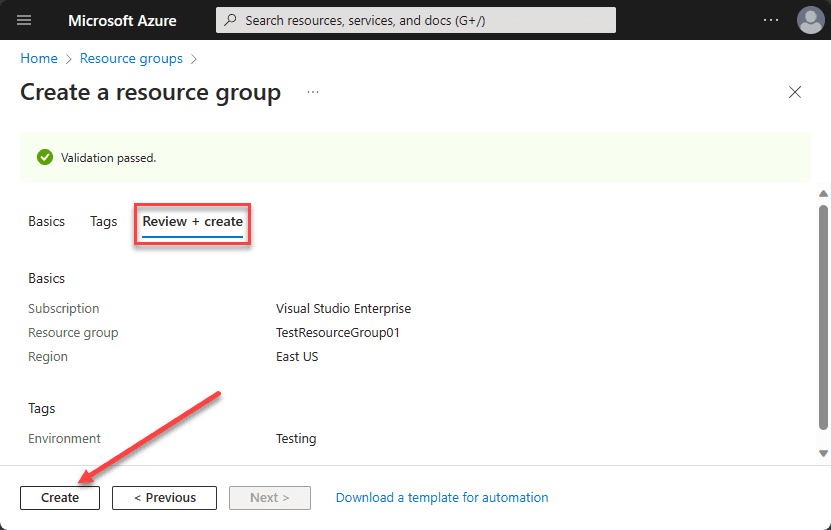
Finally, on the Review + create screen, click the Create button.
Delete a resource group
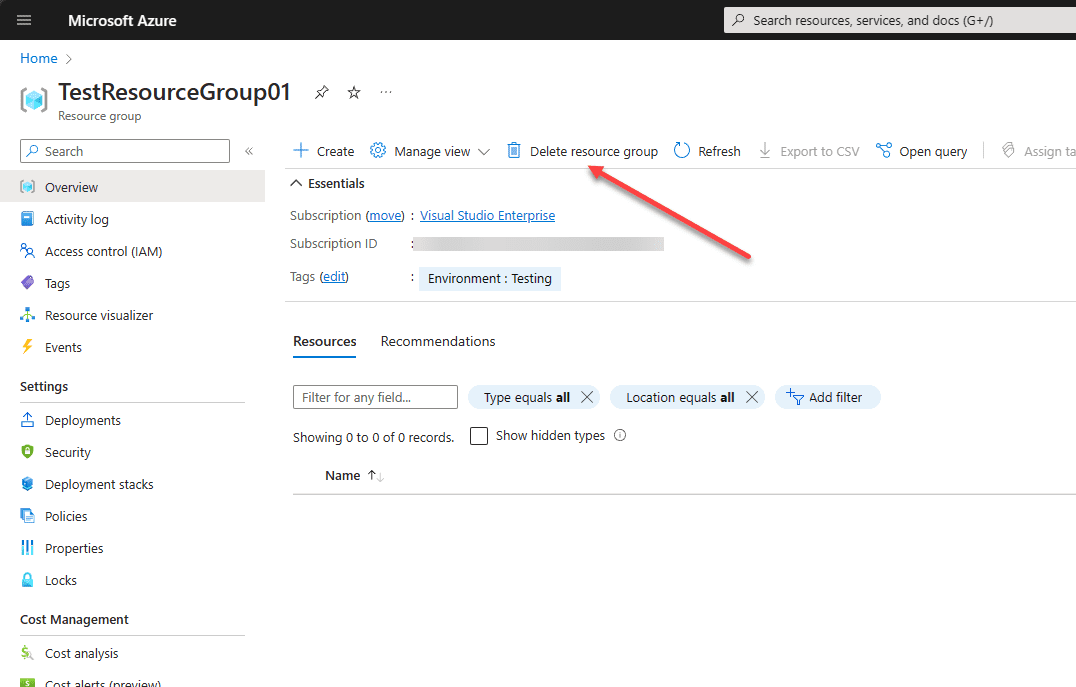
The process to delete a resource group is straightforward. Click on the name of a resource group in the Azure portal.
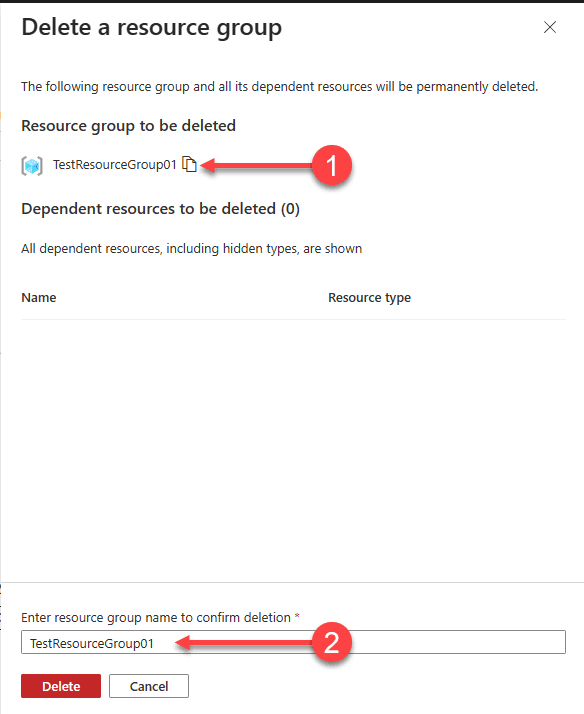
It will ask you to confirm the name of the resource group to delete. You can copy the value and paste it to delete as well.
Best Practices in Resource Group Management
Adopting best practices in managing resources in Azure is essential for maintaining an efficient Azure environment. This section covers tips on organizing resources, setting up role-based access control, and using tags for easy identification and management.
- Use resource tagging to organize and track Azure resource costs
- Use a deployment model and standardize your resource groups based on Dev, Test, Stage, and Production
- Stick to a naming convention. Name resource groups based on their role, application, region, or other parameters
Wrapping up
Azure resource groups are a fundamental construct in the Azure environment. They allow admins to logically group resources together in a way they can be managed and governed consistently and seamlessly. Having a thorough understanding of the Azure resource group is a requirement for the AZ-104 exam and will also help with day-to-day management of production Azure environments.
Related Posts:
Microsoft Azure Administrator: AZ-104 : Configure Azure Resource Tags – Part 15
Follow our Twitter and Facebook feeds for new releases, updates, insightful posts and more.


Leave A Comment