What is Amazon Elastic File System?
Amazon Elastic File system is an elastic NFS file system that provides a scalable, easy, and fully managed file system to AWS resources especially for EC2 and on-premises resources. The main reason for using the term Elastic is that you can expand or shrink your storage space without disturbing the application running on this file system. A simple web interface allows you to create and configure file systems with ease. AWS manages EFS infrastructure for you so that you can avoid the complexity of deploying, patching, and maintaining complex file system configurations always.
Amazon EFS supports the Network File System version 4 (NFSv4.1 and NFSv4.0) protocol, so the applications and tools that you use older versions of NFS can be supported on Amazon EFS. Another important feature Amazon EFS supports is accessing the file system from different EC2 instances or servers simultaneously, and hence can be used for cluster storage for supported applications and providing a common data source for workloads and applications running on more than one instance or server.
Table of Contents
- How Amazon EFS works with other Amazon resources?
- Creating an EFS file system for EC2
- Mounting the created EFS file system to an EC2 instance
- Deleting the EFS File system
- Conclusion
- Start free trial of BDRSuite Backup for AWS
Types of Amazon EFS storage classes
Amazon EFS offers two types of storage classes:
- The Standard storage class is used to store frequently accessed files such as database applications.
- The Infrequent Access (IA) storage class is a lower-cost storage class that’s designed for storing infrequently accessed files cost-effectively. You can use this type of storage for archival purposes.
How Amazon EFS works with other Amazon resources?
With Amazon EFS, you can create a file system and mount it on an Amazon EC2 instance, and also perform read and write operations. You can mount an Amazon EFS file system in your VPC, through the Network File System versions 4.0 and 4.1 (NFSv4) protocol. By using an Amazon EFS file system mounted on an on-premises server, you can migrate on-premises data into the AWS Cloud hosted in an Amazon EFS file system by using Amazon Direct Connect and AWS Managed VPN. You can also use Amazon EFS for the AWS Backup service. With the help of Amazon EFS APIs and AWS SDKs, you can do all kinds of file operations programmatically.
Prerequisites for setting up Amazon EFS in AWS infrastructure.
- A valid signup account in AWS
- Create an IAM user to perform setup operations
- An EC2 instance, if you want to mount your created EFS file system into it.
- Working knowledge of other AWS resources like AWS Backup, AWS Managed VPN and Amazon Direct connect for connecting OnPremise resources to use Amazon EFS
Creating an EFS file system for EC2
Login to AWS console, Select Services → EFS under Storage
If you are creating the EFS file system for the first time, Select Create File System
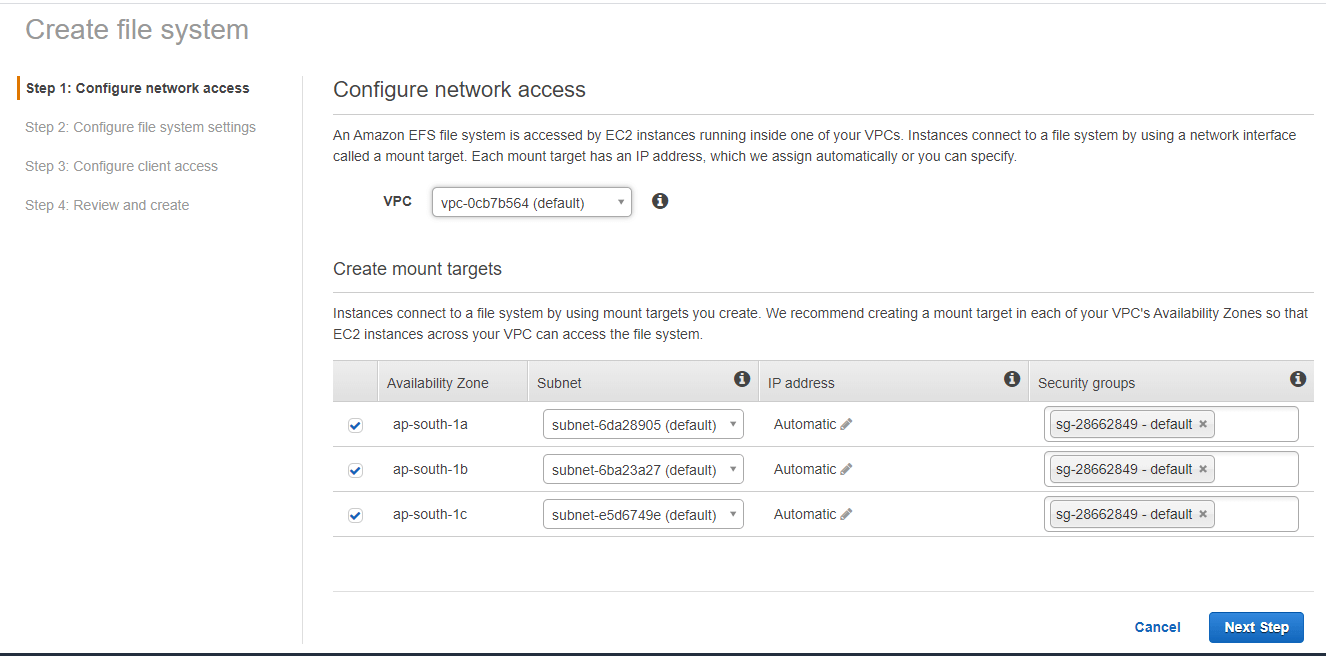
Step1: Configure network access
Since you are creating an EFS file system to mount to an EC2 instance, your first step will be creating a new VPC or allowing to configure your existing VPC under which your EC2 instance is running. Instances connect to a file system by using a network interface called a mount target. Each mount target has an IP address, which we assign automatically or you can specify.
Instances connect to a file system by using mount targets you create. AWS recommends creating a mount target in each of your VPC’s Availability Zones so that EC2 instances across your VPC can access the file system.
Select the VPC you created under VPC. Only instances available in the selected VPC can access the EFS
Create Mount target – Instances connect to a file system by using mount targets you create. We recommend creating a mount target in each of your VPC’s Availability Zones so that EC2 instances across your VPC can access the file system. You can select all available availability zones.
Click Next Step
Step 2 Configure file system settings
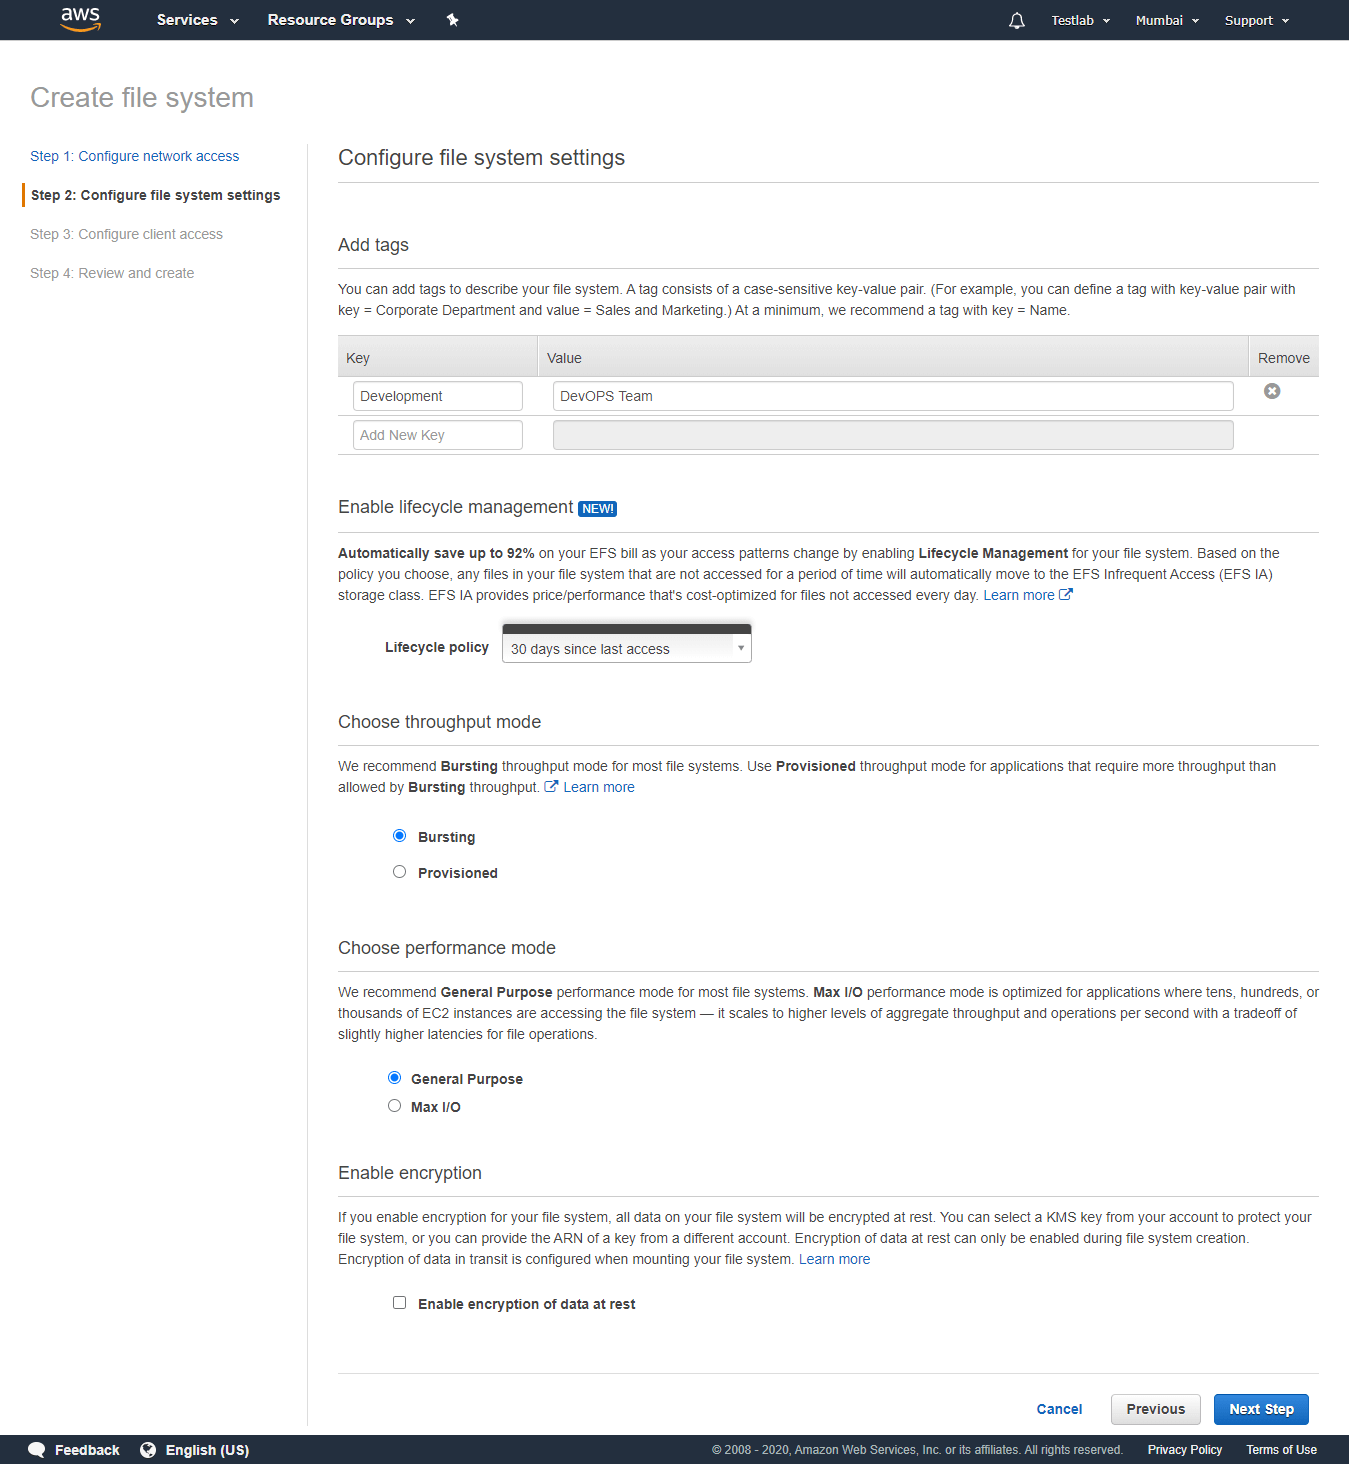
In this step, you can
- Add tags – Describe your file system with a tag that consists of a case sensitive key-value pair. You can define a key-value pair with Department and value with the section under it.
- Enable lifecycle management – This defines the life cycle policy of the data residing in the EFS system. By configuring this lifecycle policy you can save up to 92% of the EFS storage data bill as your access patterns change depending on the configuration. Based on the policy you choose, any files in your file system that are not accessed for a period of time will automatically move to the EFS Infrequent Access (EFS IA) storage class. You can choose the policy from 7 days to 90 days interval since the data’s last access to move to Infrequent Access storage class. Here, we have selected the “30 days since last access” policy.
- Choose throughput mode – Bursting or Provisioned
AWS recommends Bursting throughput mode for most file systems. Provisioned throughput mode for applications that require more throughput than allowed by Bursting throughput. So we are selecting the Bursting mode.
- Choose performance mode – General Purpose or Max I/O
AWS recommends General Purpose performance mode for most file systems. Max I/O performance mode is optimized for applications where thousands of EC2 instances are accessing the file system. It scales to higher levels of aggregate throughput and operations per second. But for this setting, you are compromising higher latencies for file operations.
- Enable encryption – If you enable encryption for your file system, all data on your file system will be encrypted at rest. You can select a KMS key from your account to protect your file system, or you can provide the ARN of a key from a different account. Encryption of data at rest can only be enabled during file system creation. Encryption of data in transit is configured when mounting your file system. Here we are not enabling encryption of data
Click Next Step to continue
Step 3: Configure client access
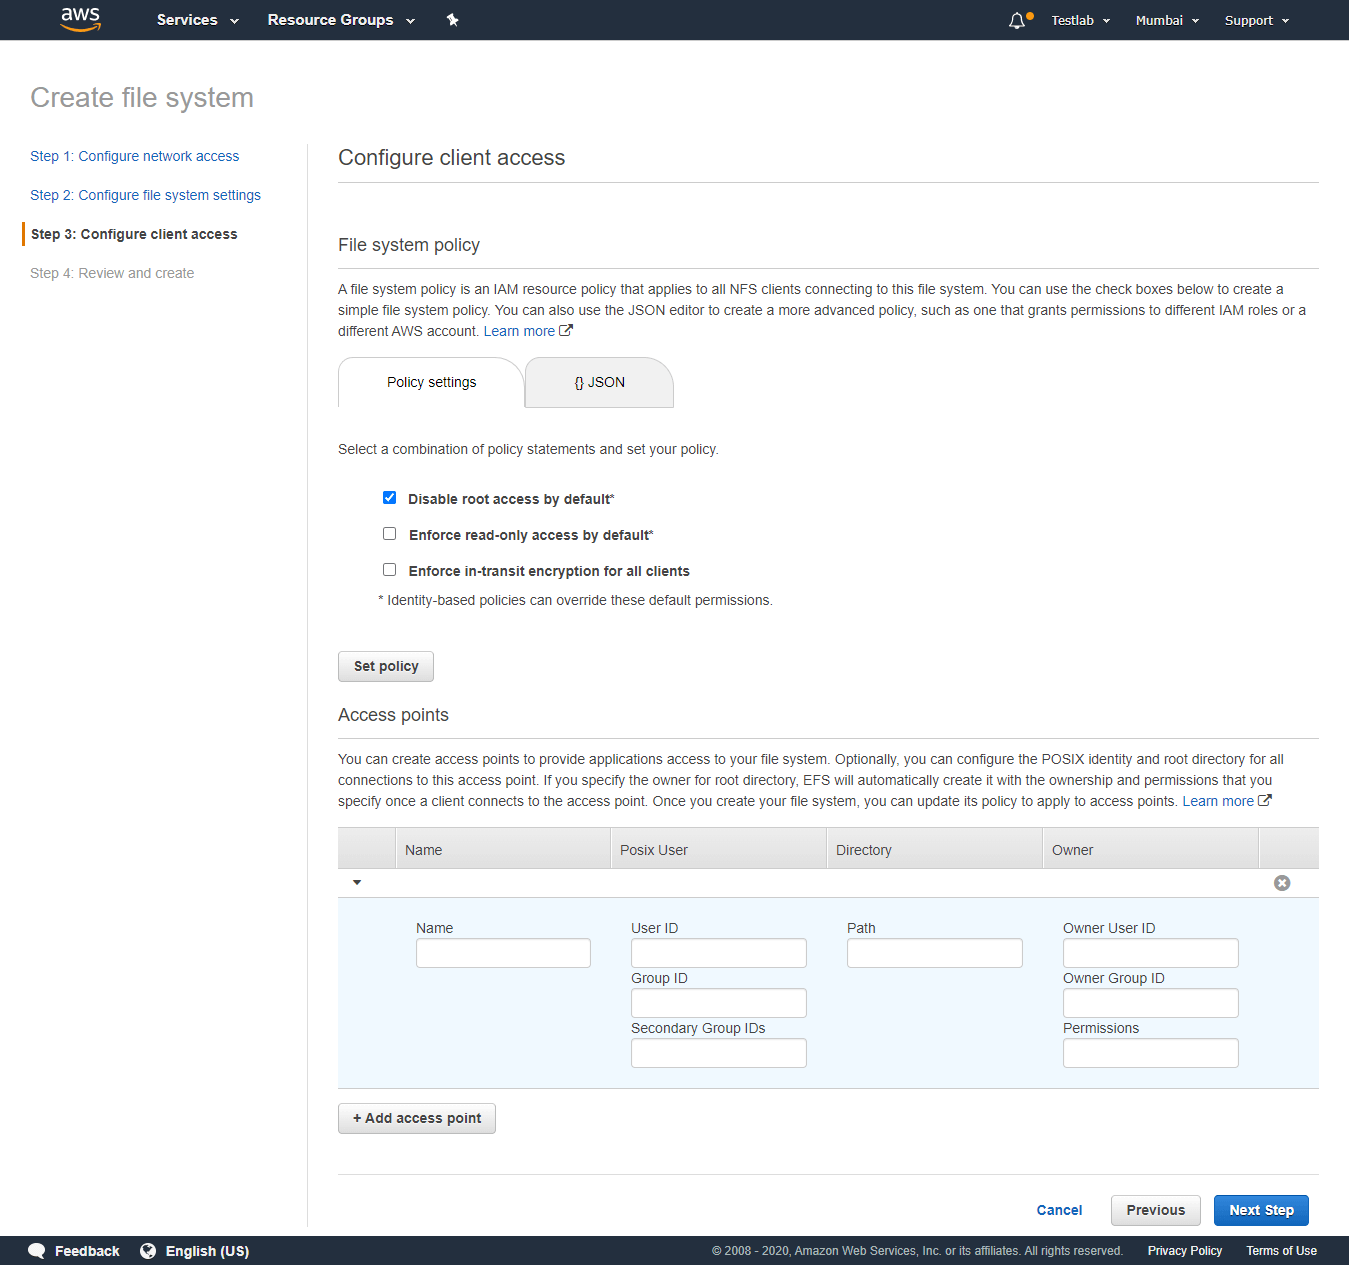
In this step, you can configure
- File system policy – A file system policy is an IAM resource policy that applies to all NFS clients connecting to the creating file system. It has three checkboxes and we are proceeding with the following configuration:
- Disable root access by default – Enabled
- Enforce read-only access by default – Disabled
- Enforce in-transit encryption for all clients – Disabled
Click Set policy to update the policy statements.
- Access points – You can create access points to provide applications access to your file system. In most of the cases, the EC2 instance accessing the EFS also runs applications on it to use the EFS file system. EFS will automatically create it with the ownership and permissions that you specify once a client connects to the access point. Once you create your file system, you can update its policy to apply to access points.
Click Next Step to continue.
Step 4: Review and Create
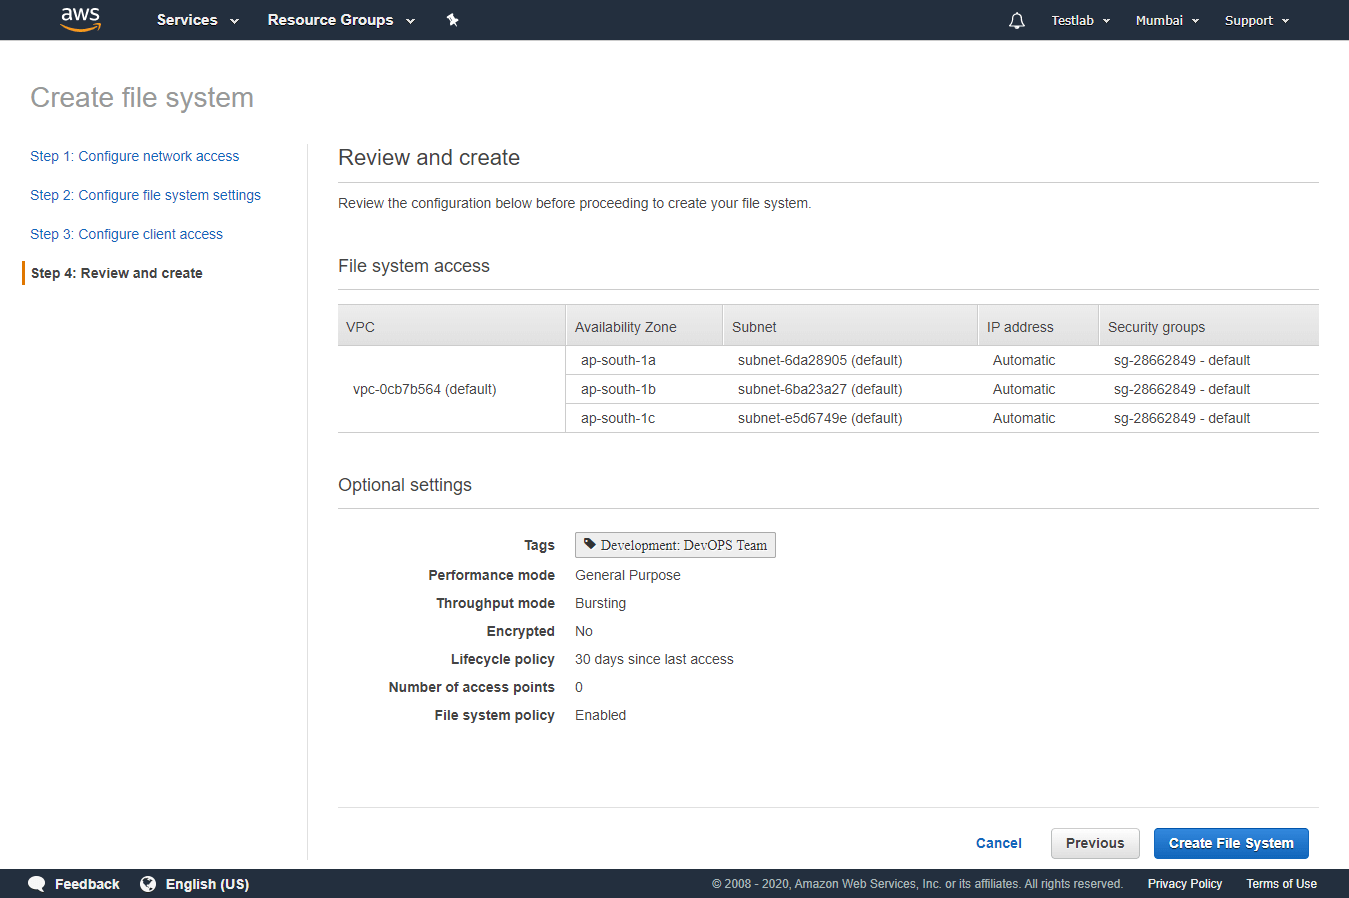
In this final step, review all your selection and configuration for the file system. Click Create File System to proceed.
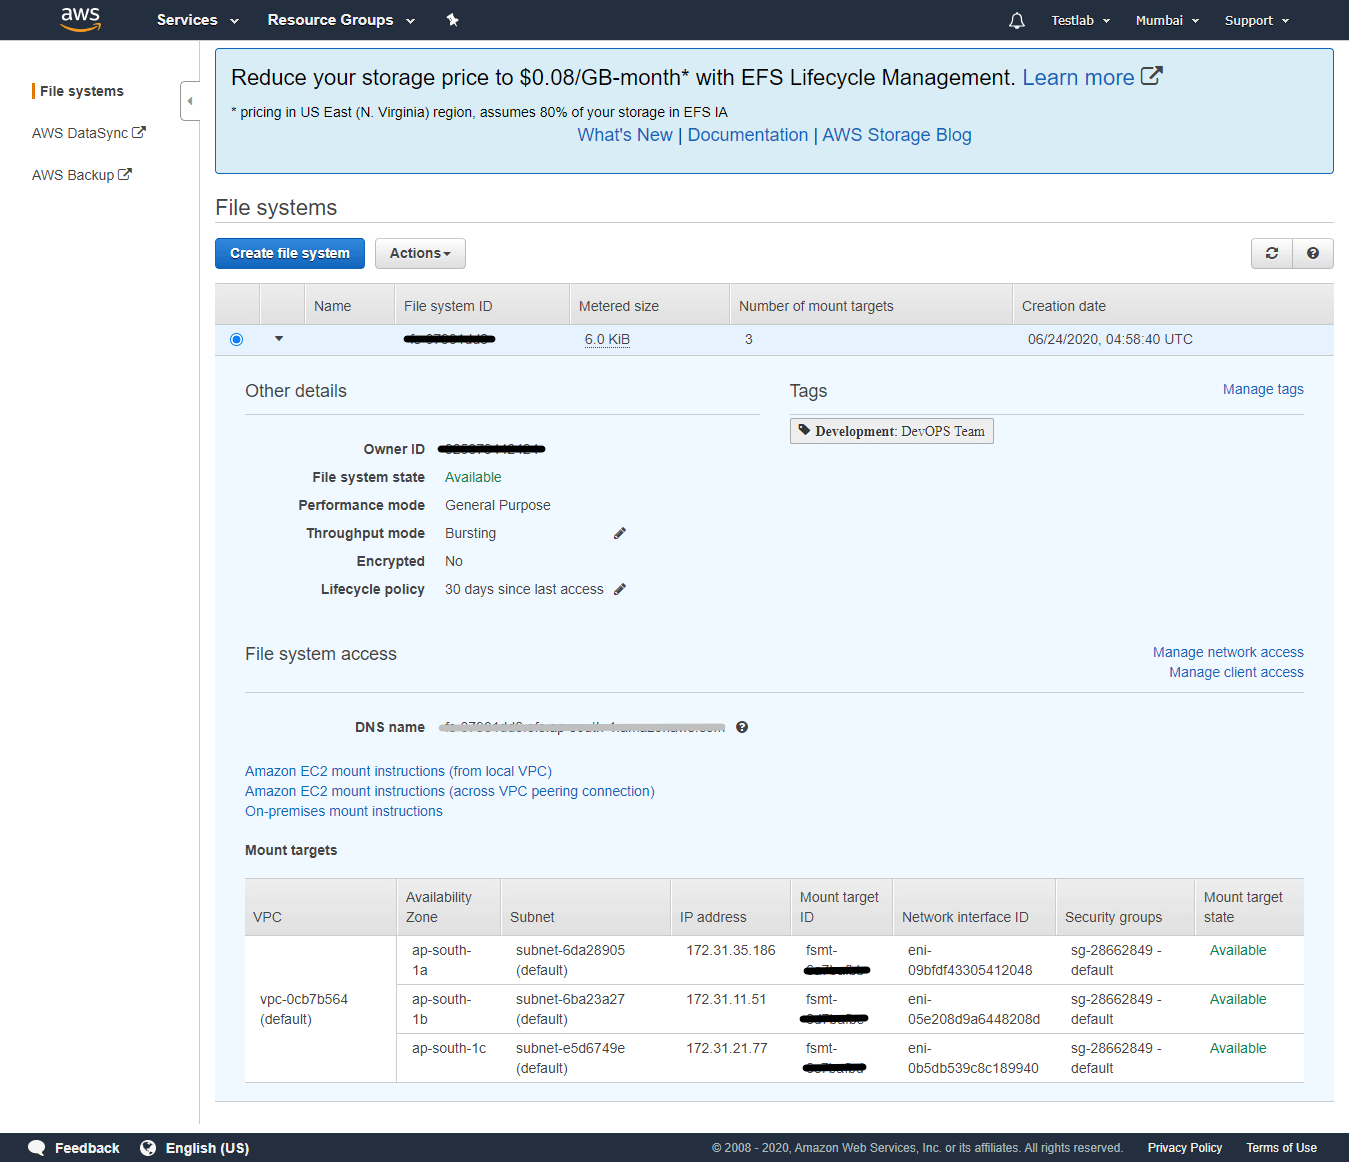
It takes some time to create an EFS file system and mount targets. You can verify the mount target state as “Available” when it is created. Also, note down the IP address assigned to the mount target. This will be needed when you mount the EFS file system in the EC2 instance.
Mounting the created EFS file system to an EC2 instance
1. Amazon EC2 mount instructions (from local VPC)
To set up your EC2 instance:
- Using the Amazon EC2 console, associate your EC2 instance with a VPC security group that enables access to your mount target. For example, if you assigned the “default” security group to your mount target, you should assign the “default” security group to your EC2 instance.
- Open an SSH client and connect to your EC2 instance.
- If you’re using an Amazon Linux EC2 instance, install the EFS mount helper with the following command:
sudo yum install -y amazon-efs-utils
You can still use the EFS mount helper if you’re not using an Amazon Linux instance.
If you’re not using the EFS mount helper, install the NFS client on your EC2 instance:- On a Red Hat Enterprise Linux or SUSE Linux instance, use this command:
sudo yum install -y nfs-utils - On an Ubuntu instance, use this command:
sudo apt-get install nfs-common
- On a Red Hat Enterprise Linux or SUSE Linux instance, use this command:
Mounting your file system
- Open an SSH client and connect to your EC2 instance.
- Create a new directory on your EC2 instance, such as “efs”.
- sudo mkdir efs
- Mount your file system with a method listed following. If you need encryption of data in transit, use the EFS mount helper and the TLS mount option.
- Using the EFS mount helper:
sudo mount -t efs fs-07931dd6:/ efs - Using the EFS mount helper and the TLS mount option:
sudo mount -t efs -o tls fs-07931dd6:/ efs - Using the NFS client:
sudo mount -t nfs4 -o nfsvers=4.1,rsize=1048576,wsize=1048576,hard,timeo=600,retrans=2,noresvport fs-07931dd6.efs.ap-south-1.amazonaws.com:/ efs
Note : Based on your file system ID and region, the linux mounting command will differ.
- Using the EFS mount helper:
2. Amazon EC2 mount instructions (across a VPC peering connection)
You can mount an EFS file system on an Amazon EC2 instance over a VPC peering connection.
To set up your EC2 instance:
- Establish a VPC peering connection
- On the Amazon EC2 console, add a rule to the mount target security group to allow inbound traffic over NFS (port 2049) from your other VPC. Learn more
- Open an SSH client and connect to your EC2 instance.
- Install the Network File System (NFS) client on your EC2 instance:
- On a Red Hat Enterprise Linux or SUSE Linux server, use this command:
sudo yum install -y nfs-utils - On an Ubuntu server, use this command:
sudo apt-get install nfs-common
To mount your file system:
- Open an SSH client and connect to your EC2 instance.
- Create a new directory on your EC2 instance, such as “efs”, for example:
- sudo mkdir efs
- Mount your file system using one of the mount target IP addresses that your EC2 instance can access over the VPC peering connection. If your EC2 instance and your EFS file system are in the same AWS Region, you should use the mount target IP address in your Availability Zone. This command is an example:
- sudo mount -t nfs4 -o nfsvers=4.1,rsize=1048576,wsize=1048576,hard,timeo=600,retrans=2,noresvport MOUNT_TARGET_IP:/ efs
3. On-premises mount instructions
You can mount an EFS file system on an on-premises server by using an AWS Direct Connect connection or an AWS-based VPN connection.
To set up your on-premises server:
- Establish an AWS Direct Connect or AWS VPN connection.
- Using the Amazon EC2 console, add a rule to the mount target security group to allow inbound traffic over NFS (port 2049) from your on-premises network
- Open an SSH client and connect to your on-premises server.
- Install the Network File System (NFS) client on your on-premises server:
- On a Red Hat Enterprise Linux or SUSE Linux server, use this command:
sudo yum install -y nfs-utils - On an Ubuntu server, use this command:
sudo apt-get install nfs-common
- On a Red Hat Enterprise Linux or SUSE Linux server, use this command:
To mount your file system:
- Open an SSH client and connect to your on-premises server.
- Create a new directory on your on-premises server, such as “efs”, for example:
- sudo mkdir efs
- Mount your file system using one of the mount target IP addresses that AWS Direct Connect or an AWS VPN connection can access.
- sudo mount -t nfs4 -o nfsvers=4.1,rsize=1048576,wsize=1048576,hard,timeo=600,retrans=2,noresvport MOUNT_TARGET_IP:/ efs
Deleting the EFS File system
Deleting an EFS file system when it is mounted on EC2 systems is a destructive act and cannot be undone. You lose the file system along with the data in it. Before deciding to delete the file system, backup the data available in the file system, and unmount the target from the connected EC2 instances. Also make sure any applications using the file system, deleting the file system without making the application to not use the data in it is irrecoverable.
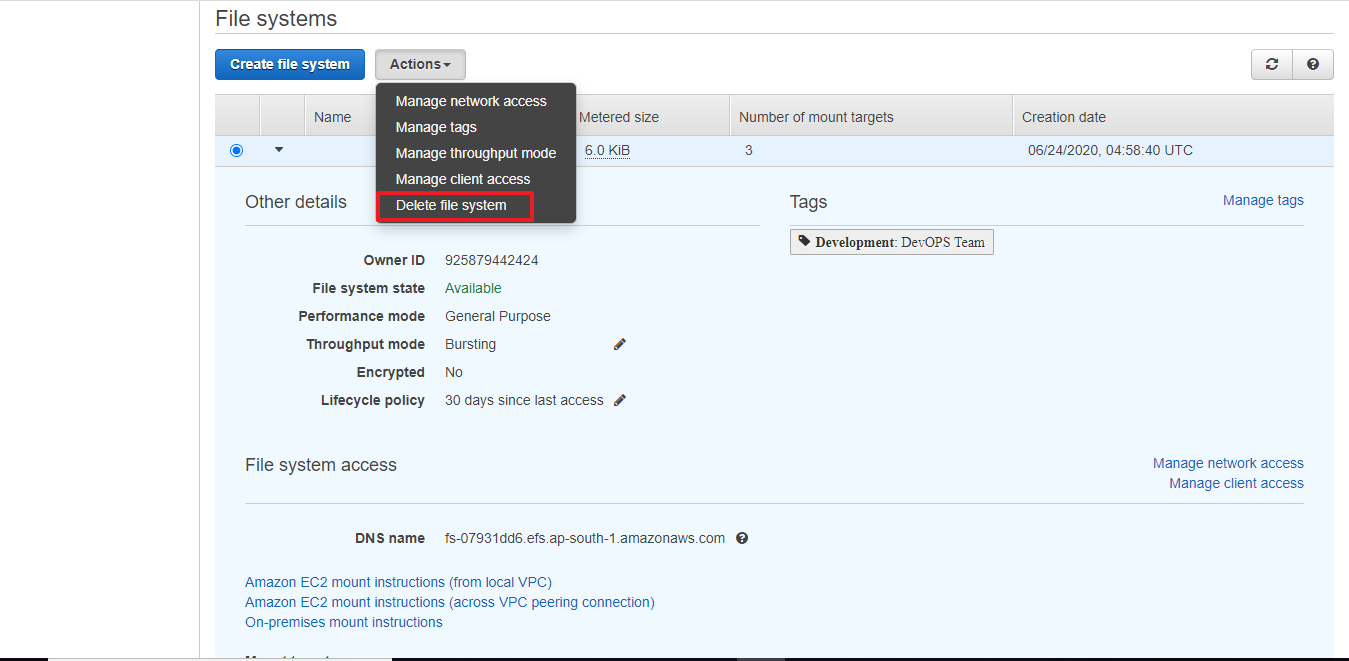
If you are having more than one file system created, select the file system with File System ID, and select “Delete file system” under Actions.
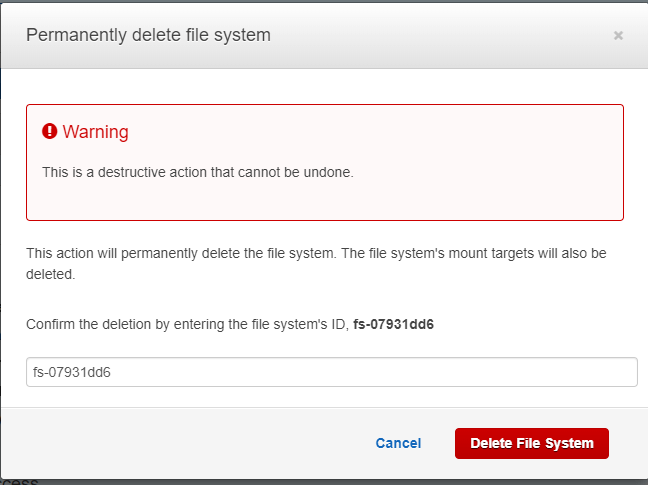
On confirming the deletion, you need to provide the file system ID provided in the box and click Delete File system.
Conclusion
Setting up AWS EFS is easy and straightforward. Since the EFS file system supports accessing files mounted on EC2 instances simultaneously, one can easily recommend clustering level applications to run on it. Also, it supports encryption of data at rest, it is highly recommended for a higher secured data environment. It is an added advantage that the AWS EFS ecosystem runs under a particular VPC with an advanced security group, to eliminate unnecessary and unwanted data breach from the outside world.
Start free trial of BDRSuite Backup for AWS
BDRSuite offers an agentless and cloud-native backup solution to protect your instances across any AWS account and region while ensuring instant recovery options.
- Backup from any AWS account and region.
- Flexible Backup scheduling and retention
- Application-aware processing
- Instance-level and Volume-level Recovery
To learn more about BDRSuite Backup for AWS.
Related Posts:
What are the Difference between EBS vs EFS vs FSx vs S3
Windows Hyper-V NTFS vs ReFS: A Comparison
Follow our Twitter and Facebook feeds for new releases, updates, insightful posts and more.


Leave A Comment