Quick Bites
- Amazon FSx for Windows File Server is a fully managed, highly reliable file storage service that provides a native file system for Windows file server instances
- You can use Amazon FSx as a simple Windows storage service or for hosting applications, storing important backup data, and as a file share for Windows and Linux instances
- Amazon FSx provides multiple levels of security and compliance to ensure that your data is protected
- Amazon FSx is easily deployable in minutes and can be attached to Windows and Linux EC2 instances
- Amazon FSx is a cost-effective solution for running enterprise applications
What is Amazon FSx?
Amazon FSx is a native file system that can be used for Windows file server instances and your enterprise applications running on this file system. It has native support for Windows file system features and SMB protocol to access storage over the network.
Table of Contents
- How can I use Amazon FSx?
- Steps for creating AWS managed Microsoft AD
- Steps for creating Amazon FSx file system
- Attaching the file system
- From Windows Instances (Amazon EC2, Amazon Workspaces, VMware Cloud on AWS)
- From Linux Instances (Amazon EC2, Amazon Workspaces, VMware Cloud on AWS)
- Conclusion
It is useful for AWS administrators as it helps in avoiding all the effort that goes into setting up file servers and storage volumes. Also, it automatically updates the Windows software, identified and addresses hardware failures, and even performs periodic backups.
How can I use Amazon FSx?
You can use Amazon FSx as a simple Windows storage service or for hosting applications, storage repository for storing important backup data, and as a file share for Windows and Linux instances.
Amazon FSx provides multiple levels of security and compliance to ensure that your data is protected. It automatically encrypts data at rest (for both file systems and backups) using keys that you manage in AWS Key Management Service (AWS KMS). So, you can use Amazon FSx storage file share as your On-Premise file share on local compute instances using AWS Direct Connect or AWS VPN.
Amazon FSx also protects your data by taking backups of your file system automatically on a custom schedule. You can replicate your file system data across all AWS regions that support Amazon FSx service.
Prerequisites to implement Amazon FSx
- An AWS account with necessary permissions to create Amazon FSx file system and an AWS EC2 instance
- A running Windows EC2 Instance in VPC with RDP enabled & administrator role enabled
- AWS Directory services running with the latest configuration on your console
- Join your Windows EC2 Instance to the running AWS Directory service.
Steps for creating AWS managed Microsoft AD
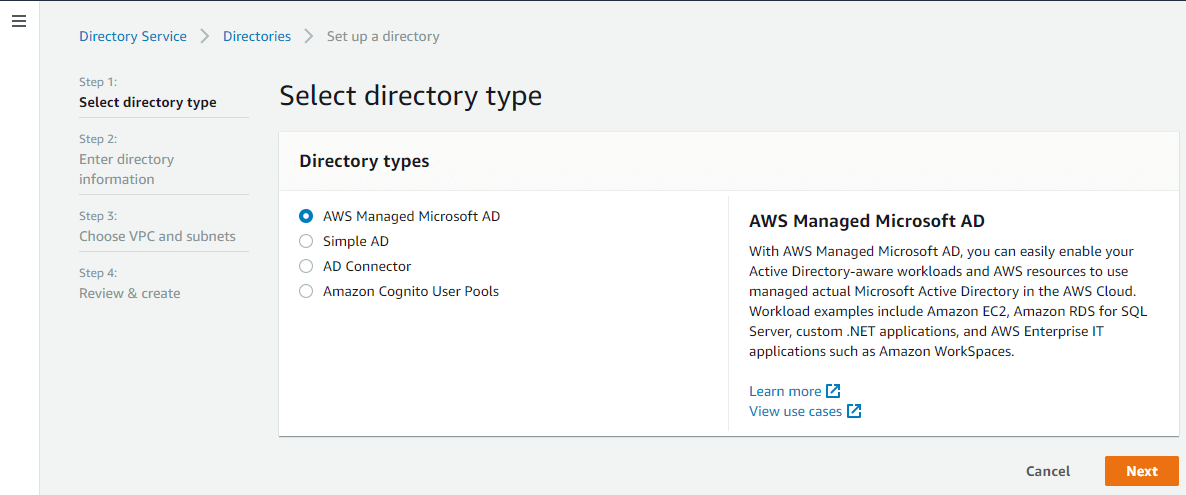
Step 1: Select Directory Type
Login to the AWS console. Under the Security, Identity & Compliance section, select Directories → Set up directory and choose AWS Managed Microsoft AD.
Step 2: Enter Directory Information
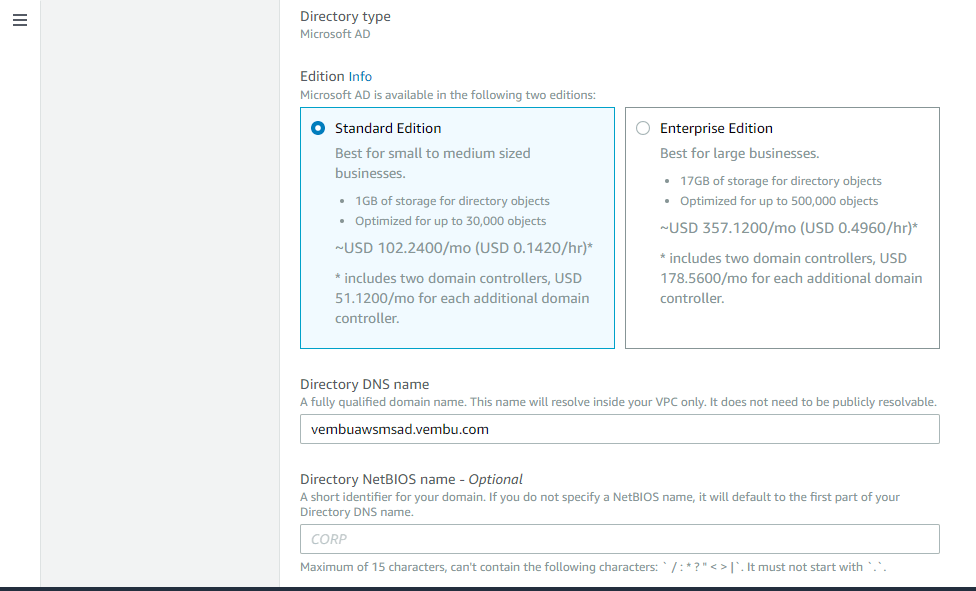
AWS provides two editions of Microsoft AD that you can choose based on your requirement – Standard Edition (sufficient for small to medium businesses) and Enterprise Edition (suitable for large enterprises).
Here we are choosing Standard Edition.
On the next step, provide a Directory DNS Name, a fully qualified domain name that can be resolvable only inside the VPC and not publicly accessible. In our case, fqdn name is vembuawsmsad.vembu.com
You can optionally provide a NETBIOS name and directory description.
Then, provide a password for the default administrative user named Admin. Click Next.
Step 3: Choose VPC and Subnets
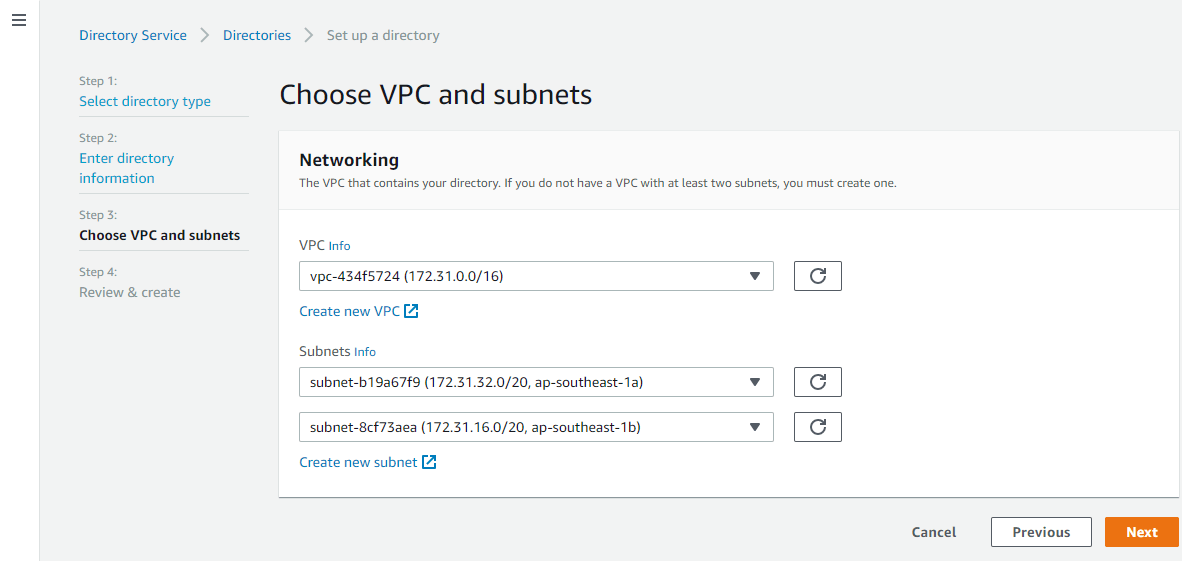
You can choose your existing VPC or create a new one for Amazon FSx file system creation. Also, provide two subnets for the created VPC. You can use the existing subnets or create two new subnets. We are using already existing VPC and subnets here. Click Next to continue.
Step 4 : Review and Create
On this final step, verify all the given inputs and click Create Directory.
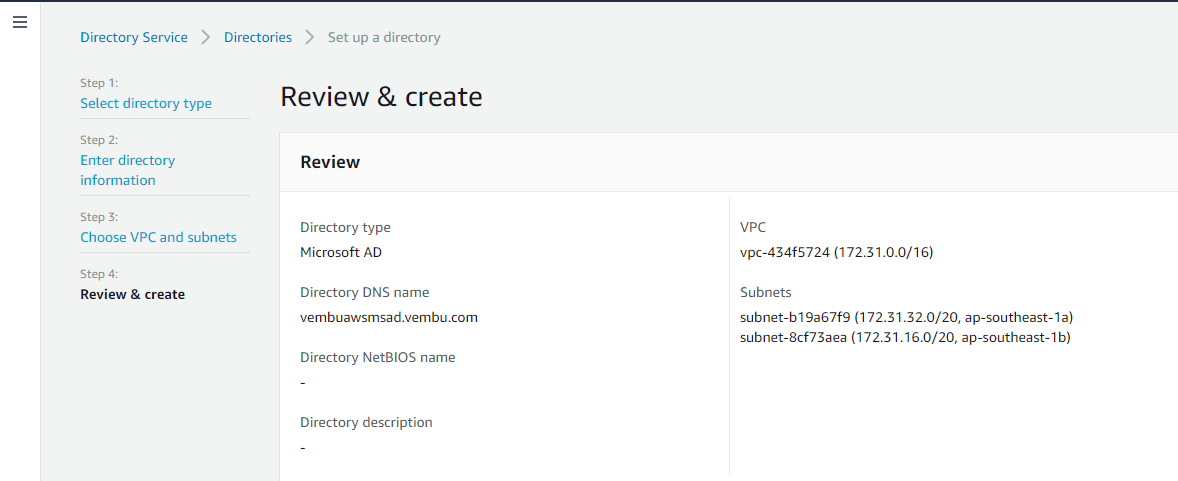
It takes 20 to 45 minutes to create AWS Microsoft AD during which you can see the status as creating. After creation, you will see the status as Active under Directory Service → Active Directory → Directories.

Steps for creating Amazon FSx file system
Login to the AWS console. Select Services → Storage → FSx
Click Create file system.
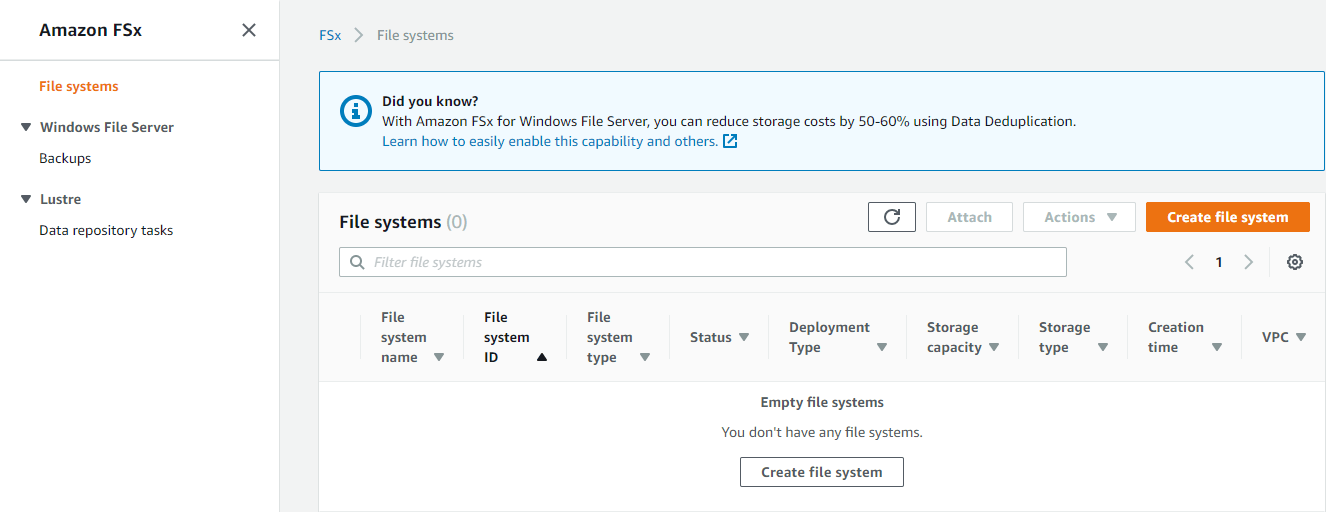
Step 1: Select File System
On the next screen, select Amazon FSx for Windows File server
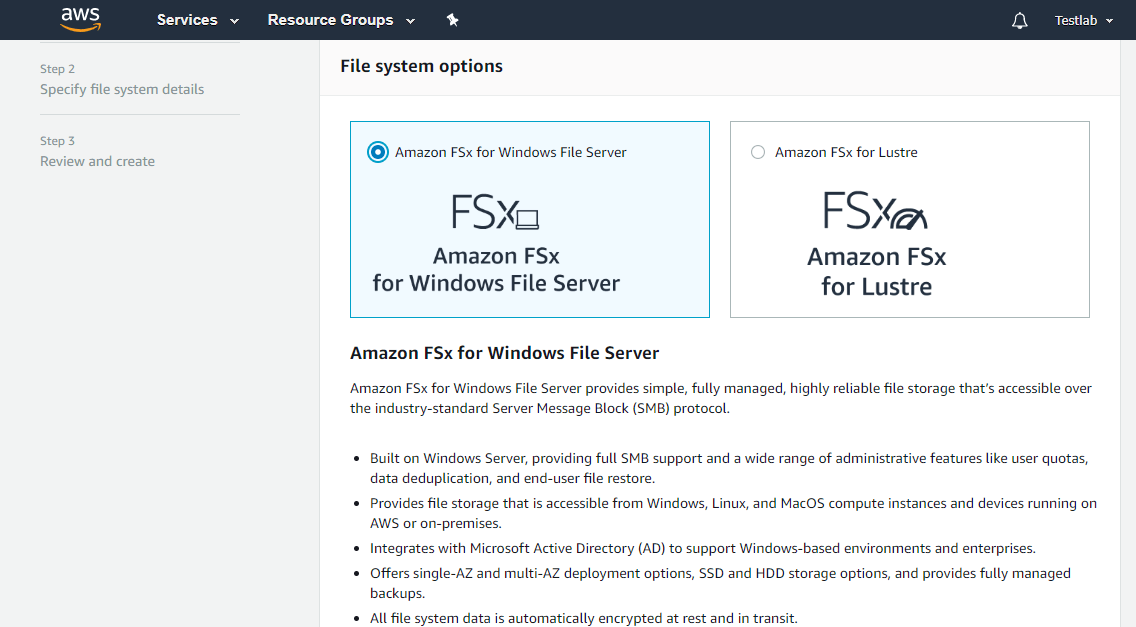
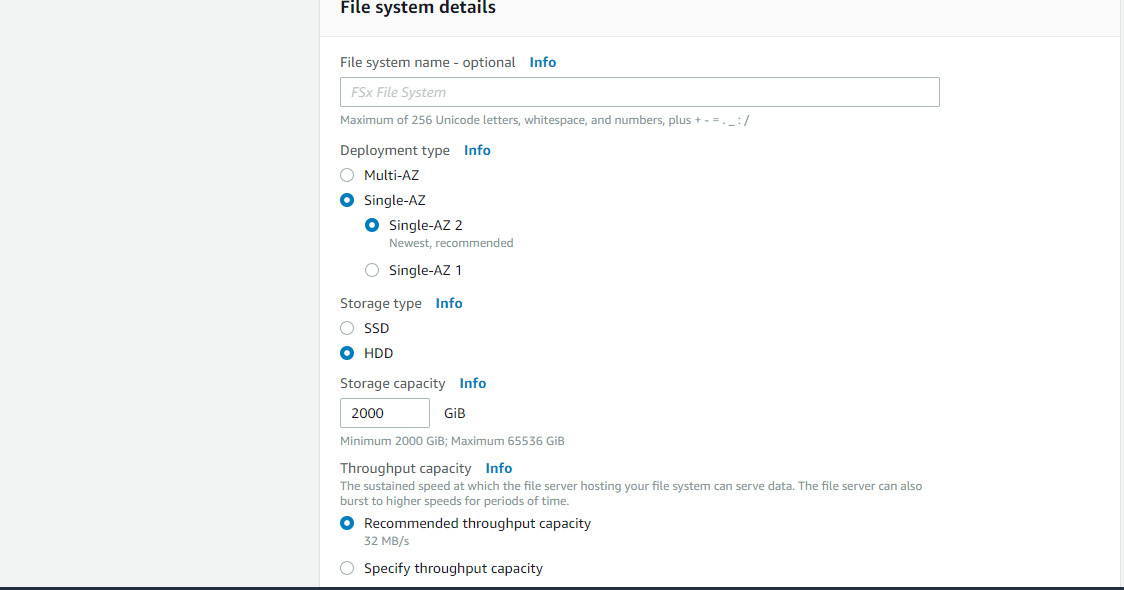
Step 2: Specify file system details
- A. File system name (optional)
- B. Deployment type – Multi AZ or Single AZ
Multi AZ – File systems that are designed to maintain the availability of your data in the event an Availability Zone (AZ) becomes inaccessible.
Single AZ – The latest Single-AZ FSx deployment type that can take advantage of cost-optimized HDD storage. Single-AZ 1 supports the use of Microsoft Distributed File System Replication (DFS-R). AWS recommends Single-AZ 2 type.
- C. Storage Type – SSD or HDD
Hard Disk Drives (HDD)– Storage that is designed for a broad spectrum of workloads, including home directories, user and departmental shares, and content management systems.
Solid State Drives (SSD)– Storage that is designed for the highest-performance and most latency-sensitive workloads, including databases, media processing workloads, and data analytics applications.
- D. Storage Capacity – A file system’s storage capacity determines how much data you can store on the file system. You must specify in GiB (Minimum 32GiB and Maximum 65536GiB).
- E. Throughput capacity – A file system’s throughput capacity determines the sustained speed at which the file server hosting your file system can serve data.
All file systems can burst to higher speeds for periods of time. The recommended throughput capacity is selected based on the storage capacity that you provided for your file system. You can choose between Recommended throughput capacity or Specify throughput capacity. Recommended throughput capacity is 8 MB/s, or you can specify throughput capacity in MB/s format.
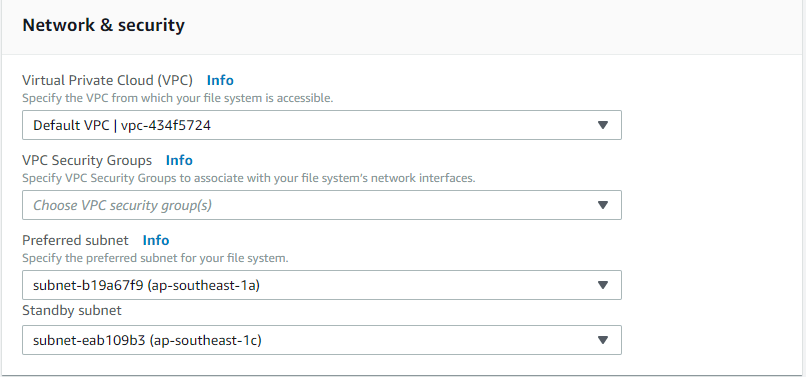
Step 3: Network & Security details
- A. Virtual Private Cloud – Specify the VPC from which your file system is accessible. You can create a separate VPC for this file system or can use the Default one.
- B. VPC Security Groups – Specify VPC Security Groups to associate with your file system’s network interfaces. You can create a separate VPC security group for this file system creation or can use the existing/default one.
- C. Preferred and Standby Subnet – Use the default subnet.
- D. Windows Authentication – Choose an Active Directory to provide user authentication and access control for your file system. You can either use AWS managed Microsoft Active Directory or Self-managed Microsoft Active Directory. Amazon FSx works with Microsoft Active Directory (AD) to integrate with your existing Windows environments.
When you create a file system with Amazon FSx, you join it to your Active Directory to provide user authentication and file- and folder-level access control. So, we are choosing AWS managed Microsoft Active Directory.
- E. Encryption – With Amazon FSx for Windows File Server, your data is always encrypted at rest. Your customer master key (CMK), an AWS Key Management Service (KMS) key, is the key that is used to encrypt the data in your file system at rest. By default, this CMK is an AWS-managed CMK. However, you can use a customer-managed CMK if you already have one. We are using the default encryption key here.
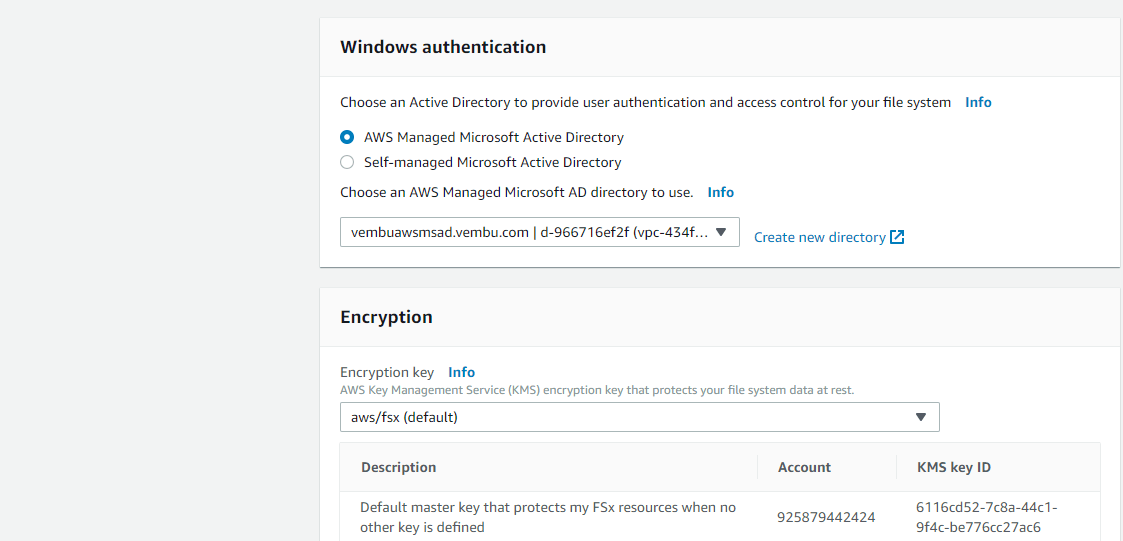
Maintenance Preferences and Tags are optional, so we are skipping it. Click Next.
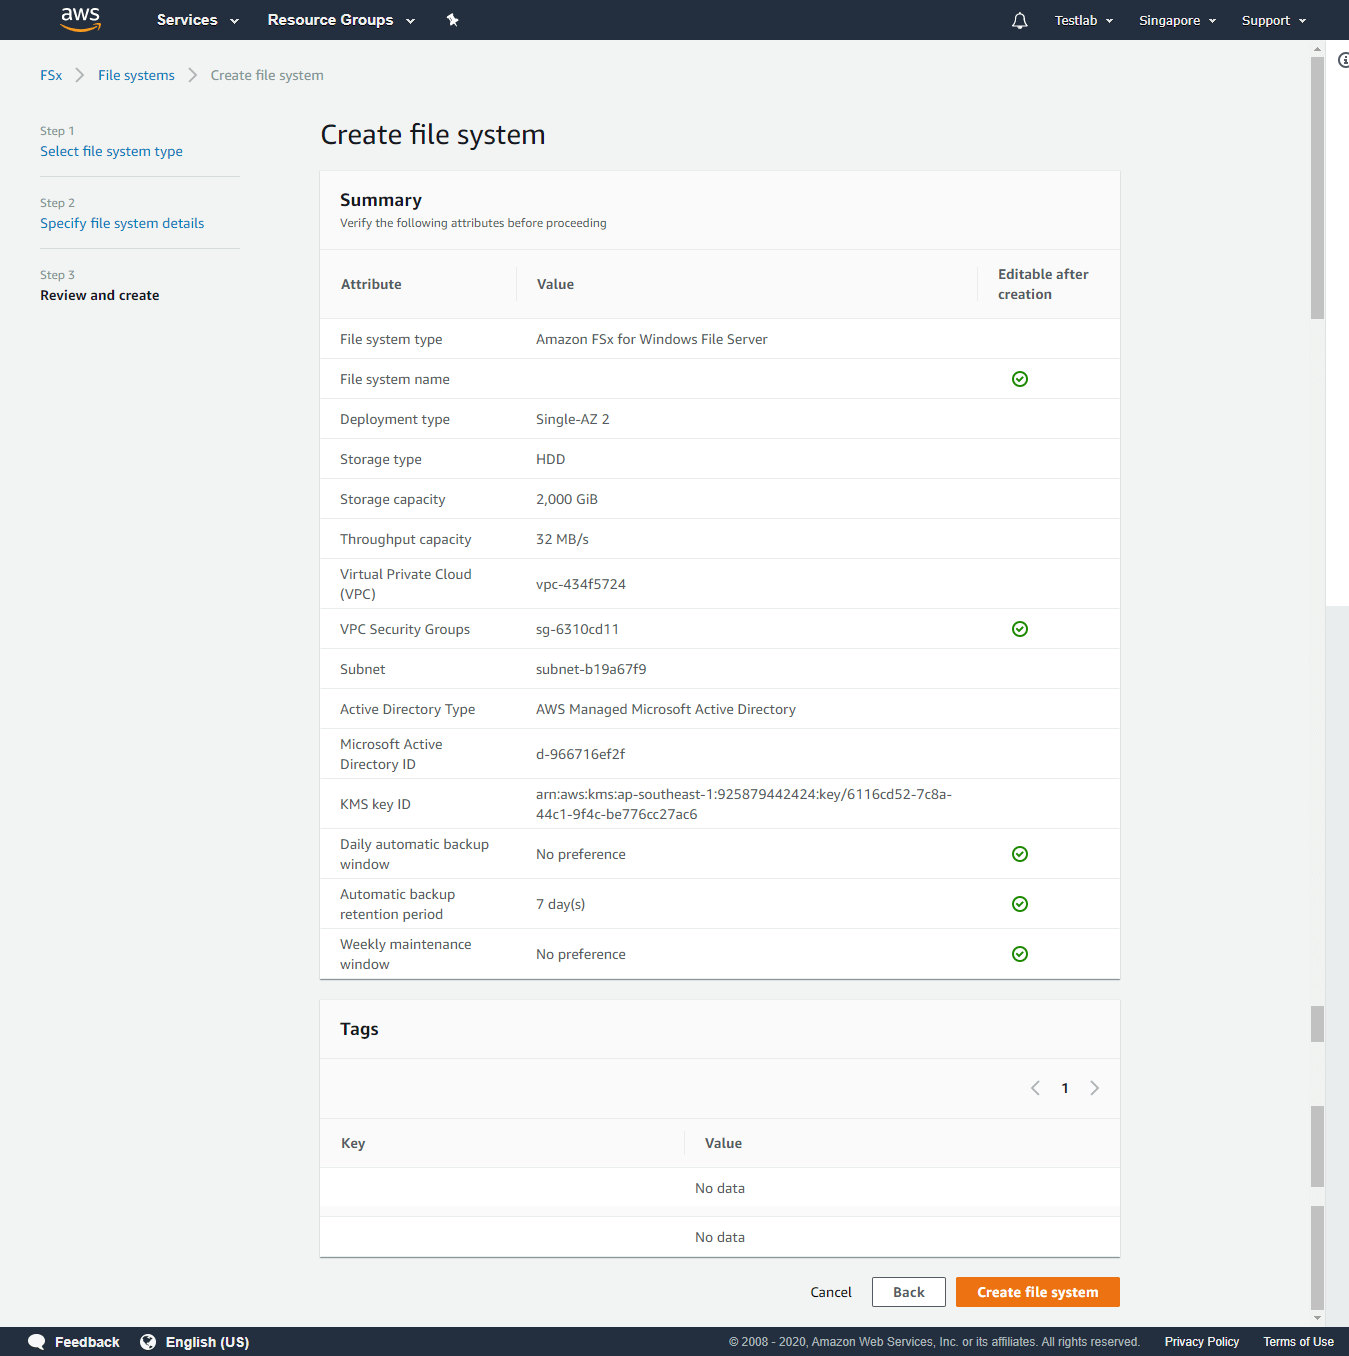
Step 4: Review and Create – This is the final step to verify all the attributes before creating the file system, review once, and click Create file system.
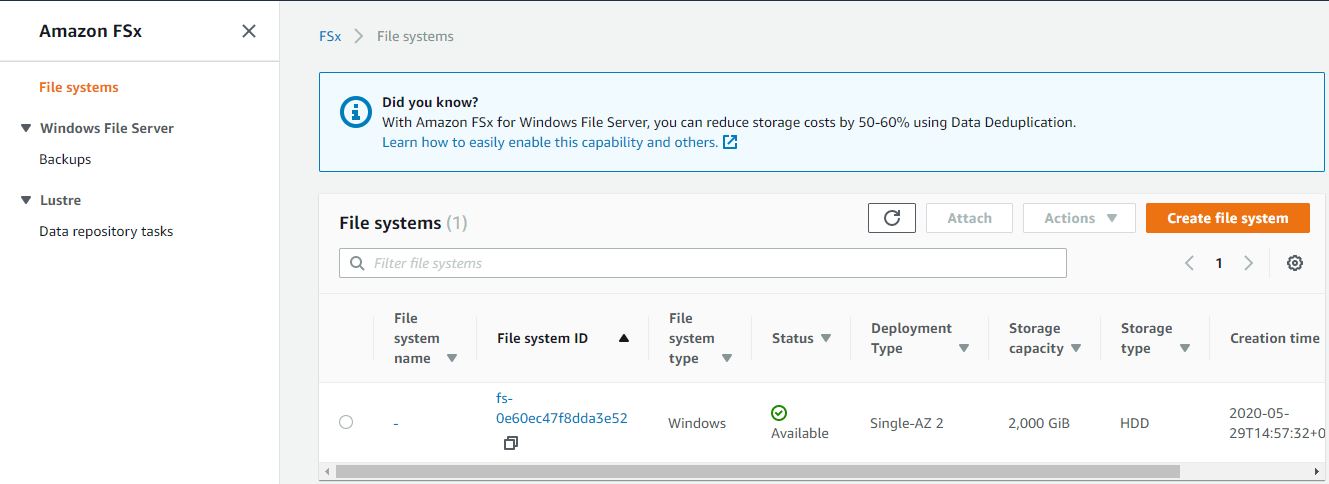
Amazon FSx file system creation will take some time during which the status on the File system page will be Creating. After creation, the status will be shown as Available.
Attaching the file system
For attaching the file system to Windows or Linux EC2 instances, click on the file system ID, a new window will open as shown below. Click Attach.
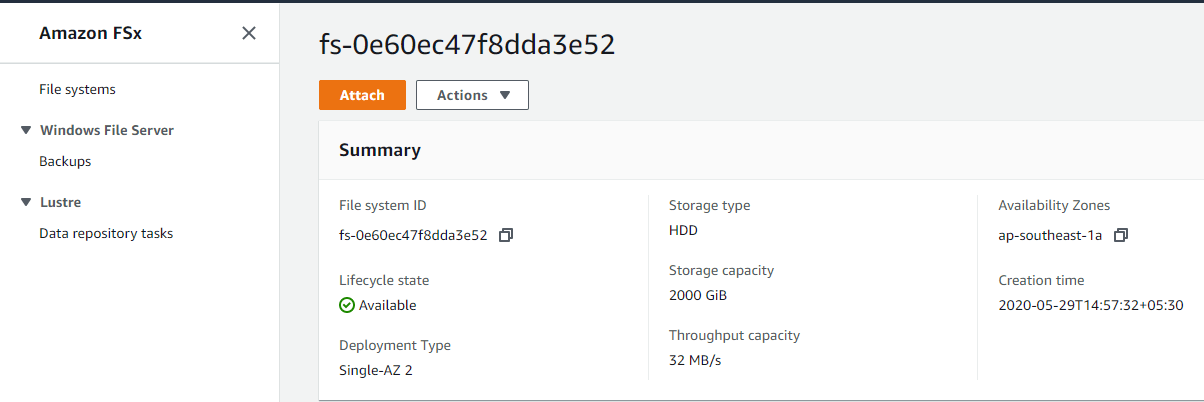
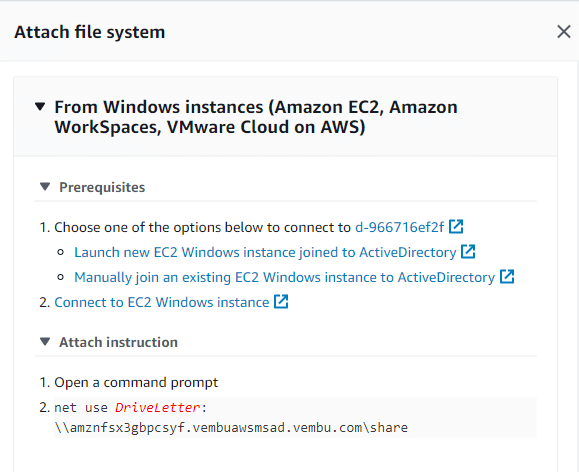
On a new window, you will find the instructions for attaching the FSx file system from Windows and Linux EC2 instances.
From Windows Instances (Amazon EC2, Amazon Workspaces, VMware Cloud on AWS)
Before mounting the FSx file system from Windows EC2 instance, fulfill the prerequisites mentioned in the link. Either you can launch a new Windows EC2 instance joined to the created AWS Microsoft AD or manually join an existing running EC2 instance to the created AWS Microsoft AD.
- After joining the Windows EC2 instance to AD, open Command Prompt
- Use the command netuse driveletter:\\fqdn name \share
- Enter the file system FQDN DNS name and the share name. The default Amazon FSx share is called \share.
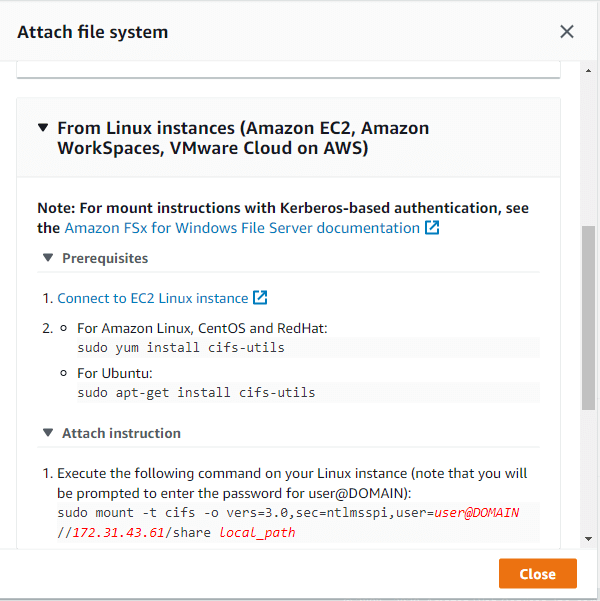
From Linux Instances (Amazon EC2, Amazon Workspaces, VMware Cloud on AWS)
You can mount the Amazon FSx file system from a Linux EC2 machine after installing the cifs-utils package. Using mount command you can mount the file system into a created directory. For permanent mount edit the /etc/fstab file and make the entries as below.
“sudo mount -t cifs -o vers=3.0, sec=ntlmsspi, user=user@DOMAIN //172.31.43.61/share Local_path”.
Note: You can take the IP address of the FSx file system from Network & security section
FSx → Filesystem → Filesystem ID → Network & Security
Conclusion:
Amazon FSx for Windows File Server provides fully managed, highly reliable file storage, and is encouraged to run enterprise applications for any Organization. With SSD and HDD storage options, you can optimize costs and provide better performance for an end-user. Since FSx offers a backup solution with encryption, it is recommended to be used as a file share for all end-users and even as backup storage. It is also easily deployable in minutes and with a few clicks, you can launch a fully managed file system.
Related Posts:
Amazon Elastic File System (EFS): An Overview
Configuring Storage Spaces Direct and Resilient File System (ReFS)
Resilient File System (ReFS) on Windows 10 – A brief overview
Follow our Twitter and Facebook feeds for new releases, updates, insightful posts and more.


Leave A Comment