What is Azure Backup Center?
Azure backup introduces a new revamped backup service that has central management capabilities to manage a Company’s total backup estate from a single page of the Azure management console. Backup Center provides you with the capability to monitor, operate, govern, and optimize data protection at scale in a unified manner consistent with core Azure native management capabilities.
Using this new Backup Center service, you can now perform all your backup related actions from this central console. You get an aggregated view of your inventory across subscriptions, locations, resources groups, vaults, and even tenants. You can monitor your jobs from a single place with easy filters, to get instant attention. Also, you can get reports on Backup that provide you with insights that can help you optimize backup operations regularly.
Currently, the backup center is in a preview state and can expect a protection state soon.
In this blog, we are going to provide a brief description of configuring an Azure VM backup to an Azure Vault. Before scheduling a backup it is important to create a Recovery Services vault where you can store your backup data and can restore any time instantly.
Azure Backup Center has mainly three categories
- Managing
- Monitoring and Reporting
- Policy and Compliance
Managing Backup instances, managing backup policies, and creating recovery services vault are the core processes in Azure Backup Center. Additionally, you can create backup compliance and Azure policies for backup.
How to access Azure Backup Center in Azure console?
Login to Azure management console, Select All services → Backup Center ( Preview )
Or use the below URL to access Azure Backup Center directly.
https://portal.azure.com/#blade/Microsoft_Azure_DataProtection/BackupCenterMenuBlade/overview
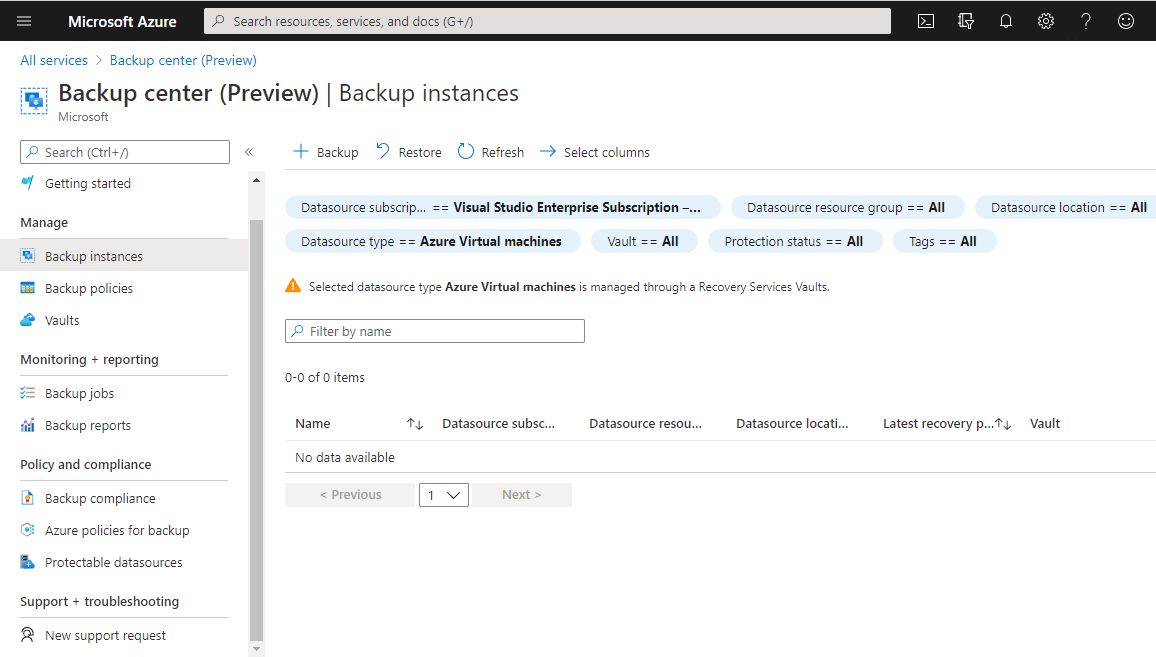
Creating a Recovery Services Vault in Azure Backup Center
A vault is an entity that stores the backups and recovery points created over time. The vault also contains the backup policies that are associated with the protected virtual machines. Creating a recovery services vault is the first step before configuring backup for any data sources in Azure. Select “Vaults” under manage and click the + button, you can initiate creating a new vault.
There are two types of vault available for creation, Recovery Services Vault, and Backup Vault.
Recovery Services Vault supports the below data sources
- Azure Virtual machines
- SQL in Azure VM
- Azure Storage (Azure Files)
- SAP HANA in Azure VM
- Azure Backup Server
- Azure Backup Agent
- DPM
Backup vault supports Azure Database for PostgreSQL servers only. Here we are selecting the Recovery Services Vault to proceed.
Under Project details, Select the subscription and the resource group in which you want to create the vault. Under instance, details provide a Vault name ( in our case the vault name is “VembuDemoVault” ) and choose the region where you host the vault ( in our case, we are hosting the vault in the US-East region ). Choose Next
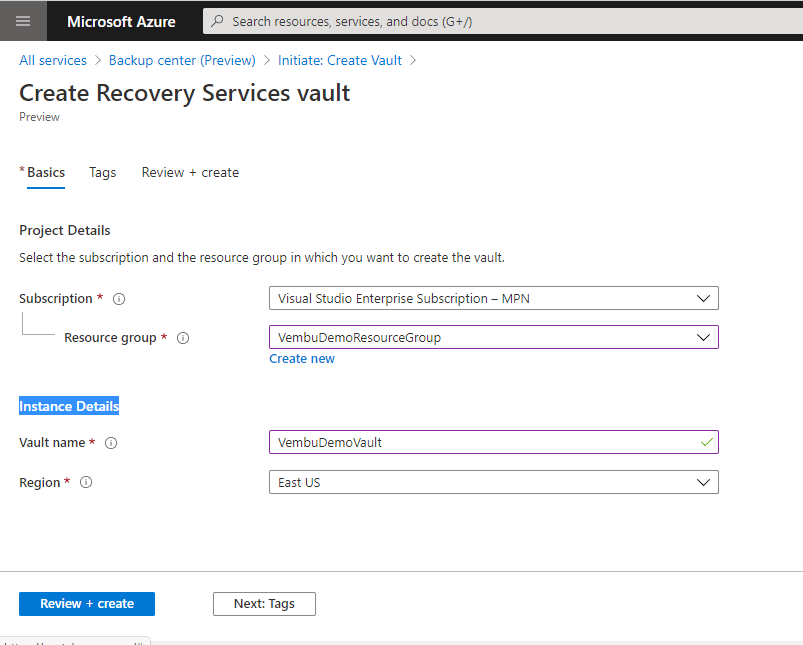
In the Next step, you may provide Tags details ( Name and Value ). Tags are name/value pairs that enable you to categorize resources and view consolidated billing by applying the same tag to multiple resources and resource groups. Note that if you create tags and then change resource settings on other tabs, your tags will be automatically updated. Click the “Review + Create” button to proceed.
It takes a while to create a vault, once created the vault is ready for backup and site recovery purposes.
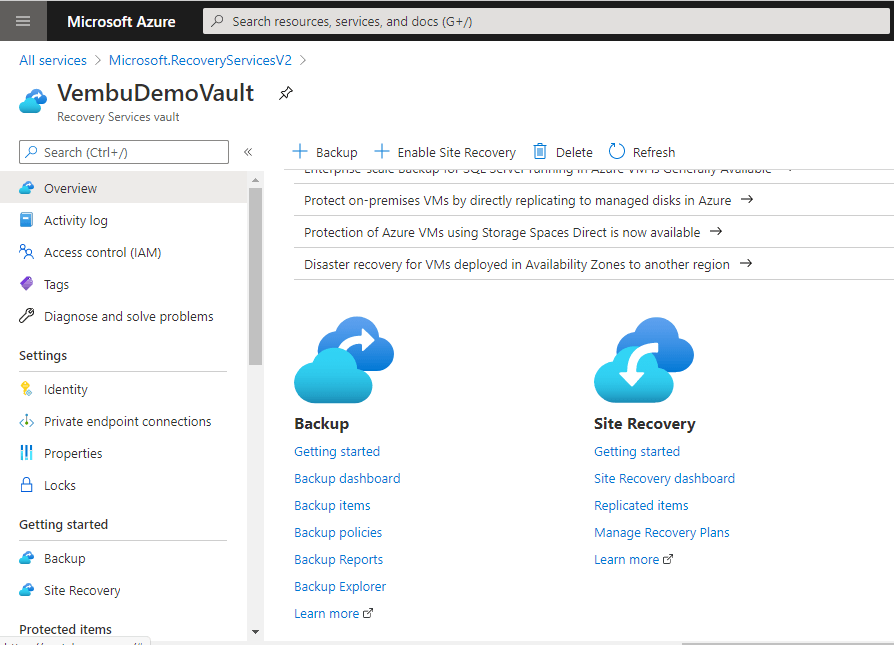
Configuring an Azure VM Backup to VembuDemoVault
On Azure Backup Center, select Backup instances under Manage, click + sign to configure a backup.
- Select “Azure Virtual Machines” in Datasource type
- Select the created vault “VembuDemoVault” in name of the Vault
Click Proceed. On the next step, you can choose the policy for the backup. You can choose the default policy or create a new policy for the backup. Here we are creating a new policy for taking the Azure VM backup.
Creating a new backup policy
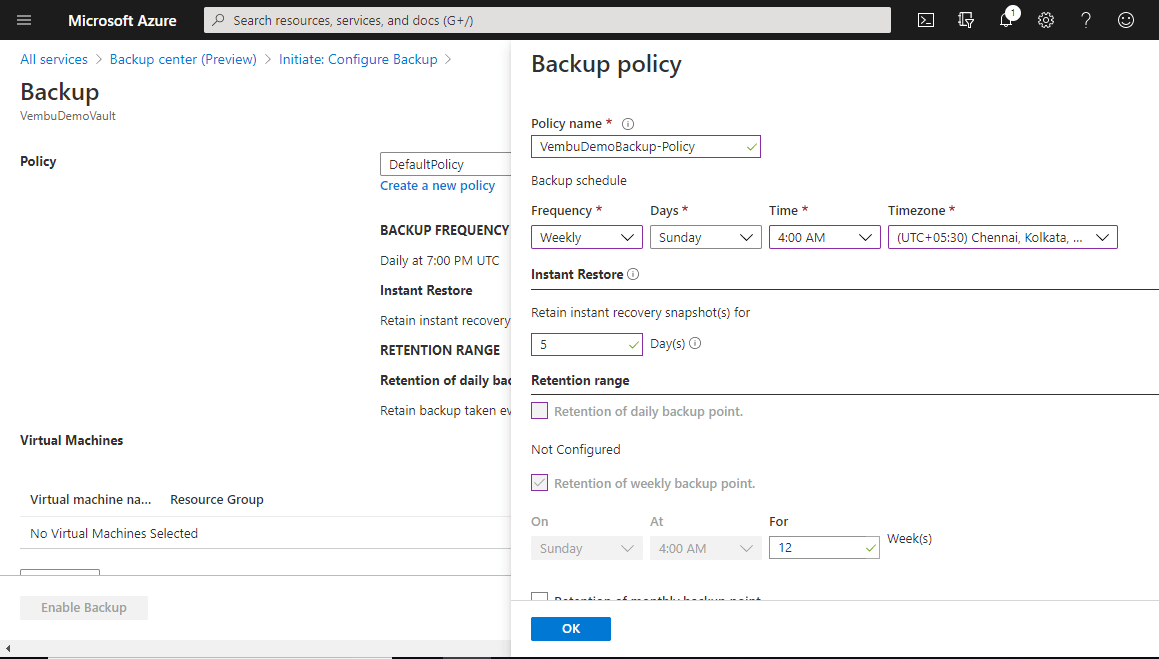
Under Policy, click create a new policy, on the new window provided the details as below
Policy Name – Provide a policy name ( in our case VembuDemobackup-policy )
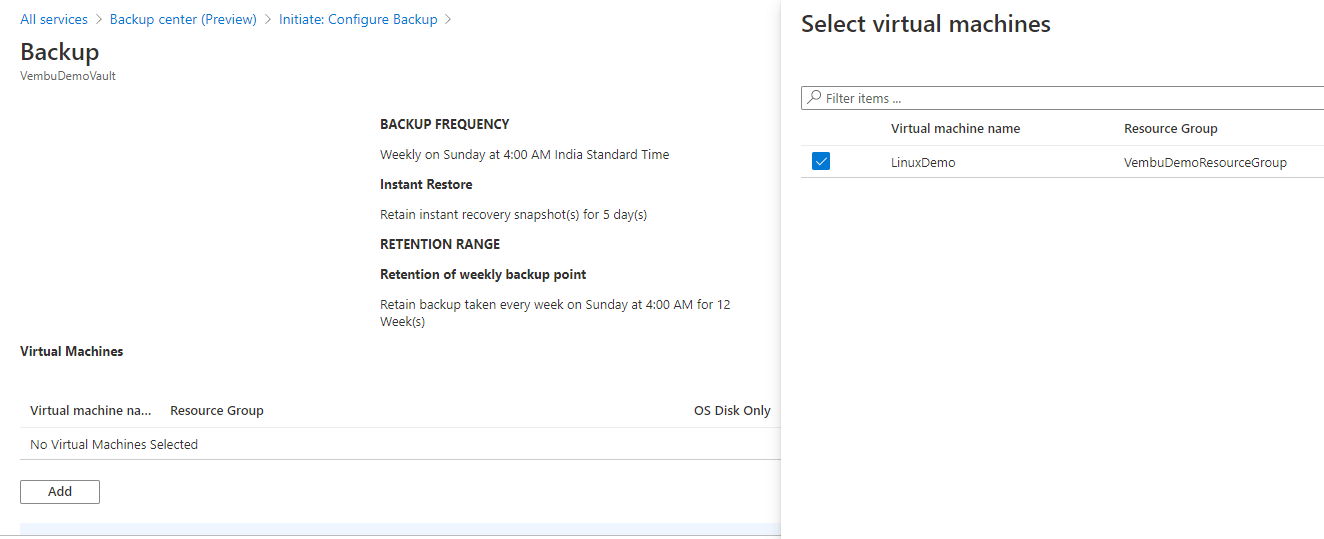
Backup schedule frequency – You can choose daily or weekly. If you choose daily, provide a time to backup the Azure VM daily at that time. Choose the Timezone according to your timezone. If you choose weekly, Choose the weekday and time along with the time zone. Here we have chosen weekly Sunday 4 AM to initiate the backup.
Instant restore – Specify the number of days to retain instant recovery snapshot
Retention range – You can configure retention range weekly, monthly, and yearly separately. Enable the respective checkbox and provide the day and month details. In our case selected Retention of weekly backup point for 12 weeks
Click OK to create the new backup policy.
On the next step, add the virtual machine you want to take backup. Click Add to proceed
Choose the Virtual machine(s) from the available list for backup.
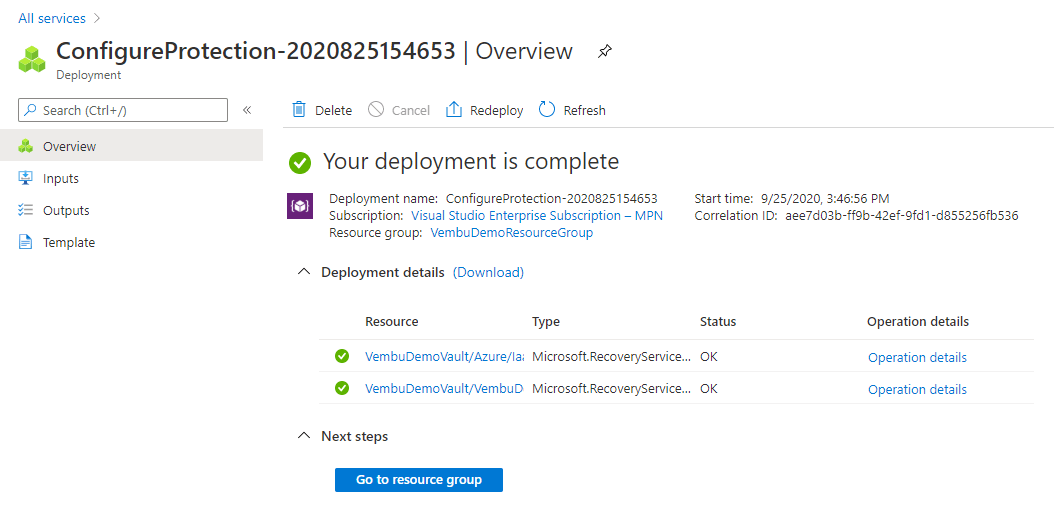
Then click Enable Backup at the bottom of the page. You will get the deployment notification on the notification icon at the right top of the screen, and you will get a similar deployment complete notification as shown in the screenshot below.
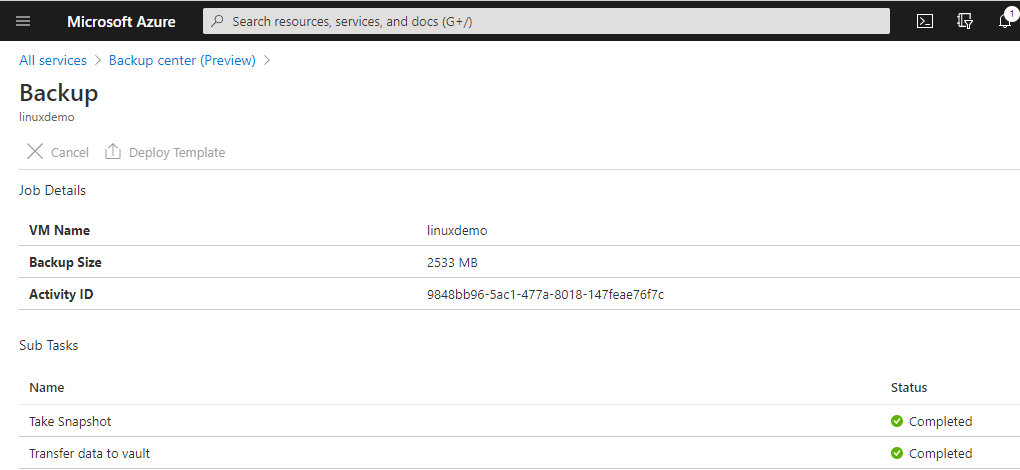
You can check the backup jobs after completion of the backup window time. In our case, backup is scheduled every Sunday at 4 AM IST. You can verify any backup job under the Backup Center → Monitoring + Reporting → Backup jobs. On clicking each backup job, you will get a detailed backup report similar to the below screenshot
Changing a backup schedule by modifying its backup policy
You can always change the backup schedule by modifying the respective backup policy at any time. Choose to Manage → Backup policies → Select the backup policy created for taking backup of your Azure VM ( in our case VembuDemoBackup-Policy ), and then click Modify
Here we are changing the backup policy from weekly Sunday 4 AM to daily 4 AM IST. Also configuring weekly retention backup points for 12 weeks on Sunday 4 AM every week.
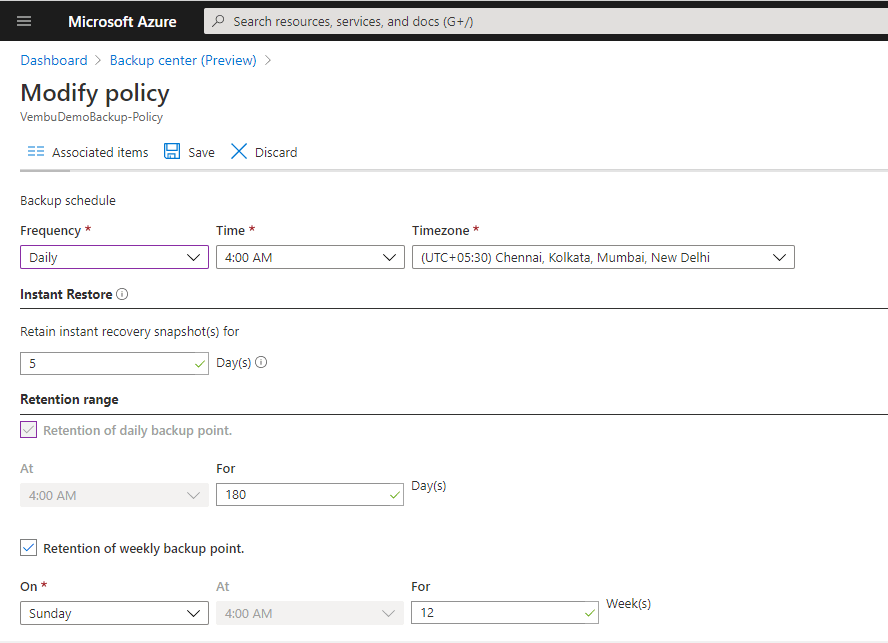
Click Save to change the effect. The changes will apply to all the existing and new recovery points. Existing recovery points will be affected and now retained as per the modified retention range. On the notification bar, you can view the changes, and finally got the “Deployment succeeded” message.
You can also add additional data sources such as another Azure VM or Azure PostgreSQL database to an existing policy ( for keeping the same backup schedule ). In this case, create a new backup job and choose the existing backup policy.
Conclusion :
Now the new revamped Azure Backup Center becomes a single place to take backup and restore your data sources instantly. This Azure Backup Center service becomes an essential backup solution for every Azure Administrator. With Azure Recovery services vault, this Azure Backup Center service is a foundation platform for any Business considering their DR solution on their important data sources including Azure VM. By considering all the key points of using Azure Recovery Services Vault as a backup solution the administrative overhead can be reduced and cost can be managed efficiently while the organization’s data is protected easily by configuring Azure VM Backup to Recovery Services Vault in a few steps.
Follow our Twitter and Facebook feeds for new releases, updates, insightful posts and more.


Leave A Comment