What is Amazon ElastiCache?
Amazon ElastiCache is a fully managed in-memory data store and cache service by Amazon Web Services (AWS). The service improves the performance of web applications by retrieving information from managed in-memory caches, instead of relying entirely on slower disk-based databases. ElastiCache supports two open-source in-memory caching engines: Memcached and Redis (also called “ElastiCache for Redis”)
As a web service running in the computing cloud, Amazon ElastiCache is designed to simplify the setup, operation, and scaling of Memcached and Redis deployments. Complex administration processes like patching software, backing up and restoring data sets, and dynamically adding or removing capabilities are managed automatically. Scaling ElastiCache resources can be performed by API calls.
Amazon ElastiCache in AWS involves three major components viz
- Creating an Amazon ElastiCache cluster
- Connecting the Amazon ElastiCache cluster from an EC2 instance
- Managing the Amazon ElastiCache environment from the AWS console
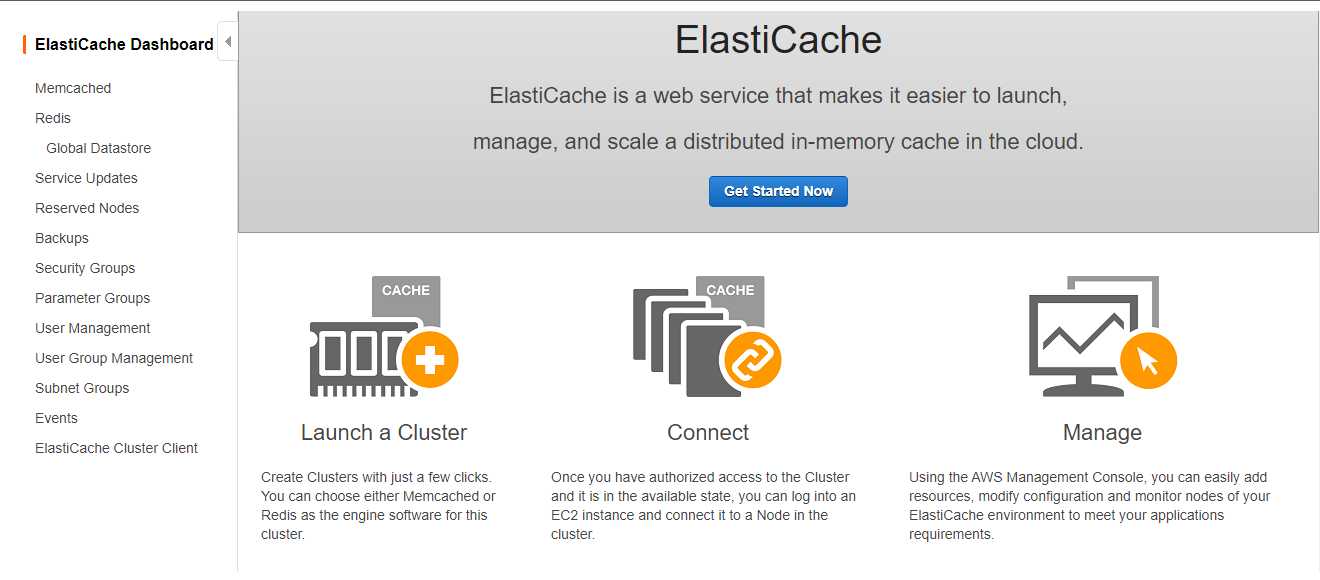
Creating an Amazon ElastiCache cluster
Initially in this blog, we are describing the steps involved in creating an Amazon ElastiCache cluster. Creating an Amazon ElastiCache cluster is nothing but configuring Redis for ElastiCache, security, and backup settings for the cluster.
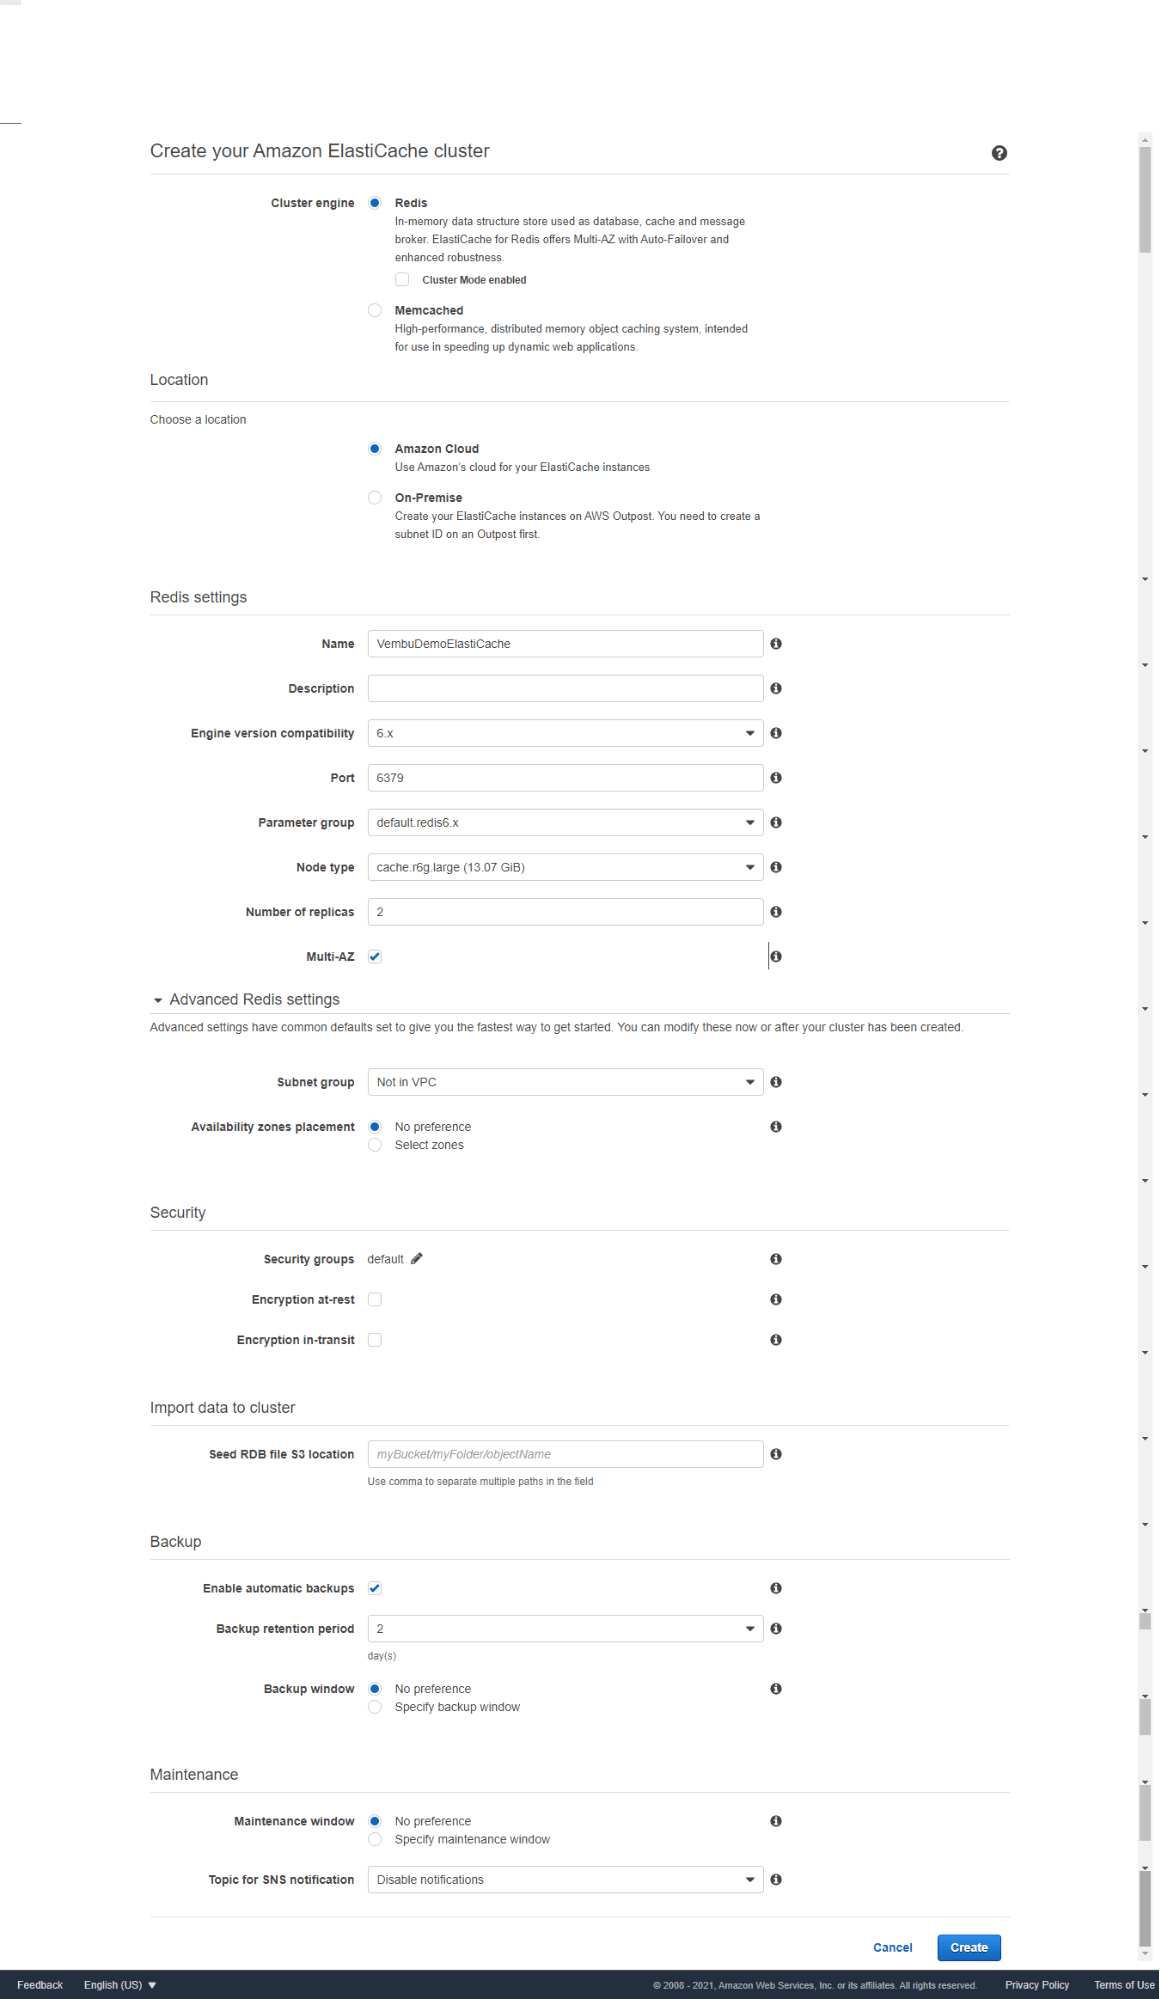
At this point, we need to choose the caching engine, either Redis or Memcached. For each caching engine, configuration parameters may differ, check with ElasticCache documentation for further details. Here we are choosing Redis.
In the next step, we need to choose the location i.e. you want to host the ElastiCache instances on AWS cloud or OnPremise. It has two options,
Amazon Cloud – Use Amazon’s cloud for your ElastiCache instances
On-Premise – Create your ElastiCache instances on AWS Outpost. You need to create a subnet ID on an Outpost first. AWS Outposts is a fully managed service that extends AWS infrastructure, services, APIs, and tools to customer’s On-premise infrastructure.
Redis Settings
In the third step, we will provide the detailed Redis settings, this includes
- Name – Name of the cluster that will contain the primary and the read replica nodes
- Description – (Optional) Description of this cluster
- Engine version compatibility – Version compatibility of the Redis engine that will be run on your node. You can choose the available versions from the list.
- Port – Port number on which the nodes accept connections, default port no is 6379
- Parameter group – A Parameter Group acts as a container for engine configuration values that can be applied to one or more clusters. If you have created a custom Parameter Group you want to use, select it from below, otherwise proceed with the default one we created for you.
- Node type – Type and the associated memory size of the nodes to be deployed. You can choose the node type from the available list.
- A number of replicas – Input number of replicas between 0 and 5. Zero replicas will not enable an enhanced cluster with primary/replica roles. Default replica value is 2
- Multi-AZ – ElastiCache Multi-AZ provides enhanced high availability through automatic failover to a read replica, cross AZs, in case of a primary node failover. For SLA guarantees select to enable Multi-AZ.
Advanced Redis settings – Advanced settings have common defaults set to give you the fastest way to get started. You can modify these now or after your cluster has been created. You don’t need to change anything about these settings while creating the Amazon ElastiCache cluster.
Subnet group – A collection of subnets (typically private) that you can designate for your clusters running in an Amazon VPC
Availability zone placement – It has two options No preference and Selects Zones. It is highly recommended to select at least one of the read replicas in a different availability zone from the primary for improved fault tolerance in the unlikely event of an availability zone disruption. For clustered Redis, if you choose ‘No Preference’, ElastiCache automatically spreads your nodes over Availability Zones. To manually select Availability Zones for each node, use ‘Select Zones’.
Security
Security Groups – A Security Group acts like a firewall that controls network access to your clusters. Please select one or more Security Groups for this Cluster. You can use the default security group associated with this cluster or can use your own created security group.
Encryption at-rest – You can enable or disable this setting. Enables encryption of data stored on disk. Currently, enabling encryption at-rest can only be done when creating a Redis cluster using Redis version 3.2.6 only or at least 4.0. So enabling and disabling Encryption at-rest setting depending on the Redis version you have chosen.
Encryption in transit – Enables encryption of data on-the-wire. Currently, enabling encryption in-transit can only be done when creating a Redis cluster using Redis version 3.2.6 only or at least 4.0. Enabling and disabling Encryption at-rest setting depending on the Redis version you chose.
Import data to cluster
Seed RDB file S3 location – This is an optional setting. Provide the path to S3 bucket which contains an external Redis RDB backup to seed your cluster
Backup
Enable automatic backup – When selected, allows ElastiCache to automatically create a daily backup of a replica node (non clustered Redis) or set of replicas (Clustered Redis). Non-clustered Redis can also be configured to create a backup of the primary node after the cluster is created.
Backup retention period – The number of days for which automated backups are retained before they are automatically deleted. You can choose the no of days 1 to 35 from the drop-down list.
Backup window – The daily time range during which automated backups are initiated if automated backups are enabled. You may provide start time and duration time if enabled.
Maintenance
Maintenance window – Maintenance Window allows you to specify the time range (UTC) during which any scheduled maintenance activities such as software patching or pending Cluster modifications you requested would occur. Scheduled maintenance activities occur infrequently (generally once every few months). If enabled. You can specify the start day, start time, and duration of the maintenance window.
The topic for SNS notification – Select an SNS topic from the list, or type an existing topic Amazon Resource Name (ARN) or disable notifications.
Click Create to create a new Amazon ElastiCache with the above settings.
After a few minutes, your Amazon ElastiCache cluster is ready, and you can view all the details of the cluster under, after expanding the new cluster name ( in our case the new cluster name is “vembudemoelasticache”. Below screenshot shows the details of the cluster
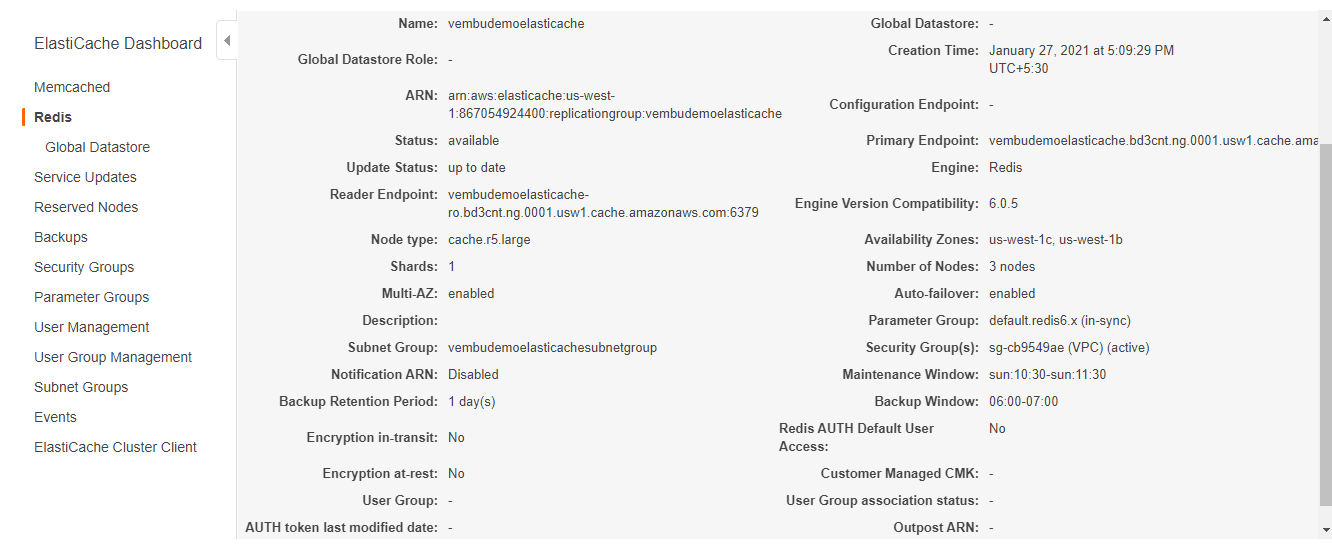
You can also view the primary and two replica nodes associated with the cluster under Nodes section as shown below

Managing the Amazon ElastiCache environment from the AWS console
You can manage your Amazon ElastiCache cluster environment from the ElastiCache dashboard on the AWS console. Some of the management tools described below.
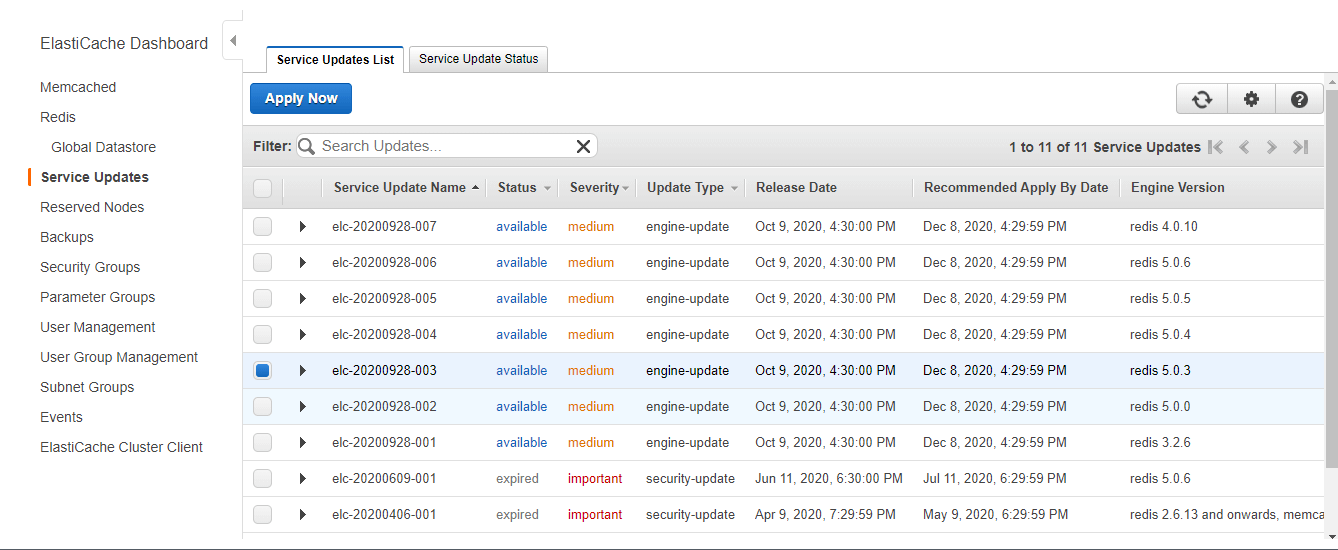
Service Updates – Amazon ElastiCache automatically monitors your fleet of Redis clusters and nodes to apply service updates as they become available. Typically, you set up a predefined maintenance window so that ElastiCache can apply these updates. You can view all the available and expired updates on this management console. The below screenshot shows the available updates, on clicking each Service update name you will get the full description of the updates below. Also shows each update severity status, Release date, Recommended Apply date and the corresponding Redis engine version. You can select each of the Service updates and click the “Apply Now” button to do the update action.
Reserved Nodes – You can view and purchase reserved nodes from this management console section. Reserving one or more nodes may be a way for you to reduce costs. Reserved nodes are charged an upfront fee that depends upon the node type and the length of reservation—one or three years. Here the reserved notes are nothing but member nodes that form the ElastiCache cluster.
Security Groups – You can view the associated security group details here. You can also add a new customized security group here and can replace the default security group added while creating the ElastiCache cluster.
Parameters Group – Amazon ElastiCache uses parameters to control the runtime properties of your nodes and clusters. Generally, newer engine versions include additional parameters to support the newer functionality. You can configure Engine Parameters Using Parameter Groups by creating a new one. Also on this page, you can view all default parameter groups for each engine version with its values as shown in the below screenshot.
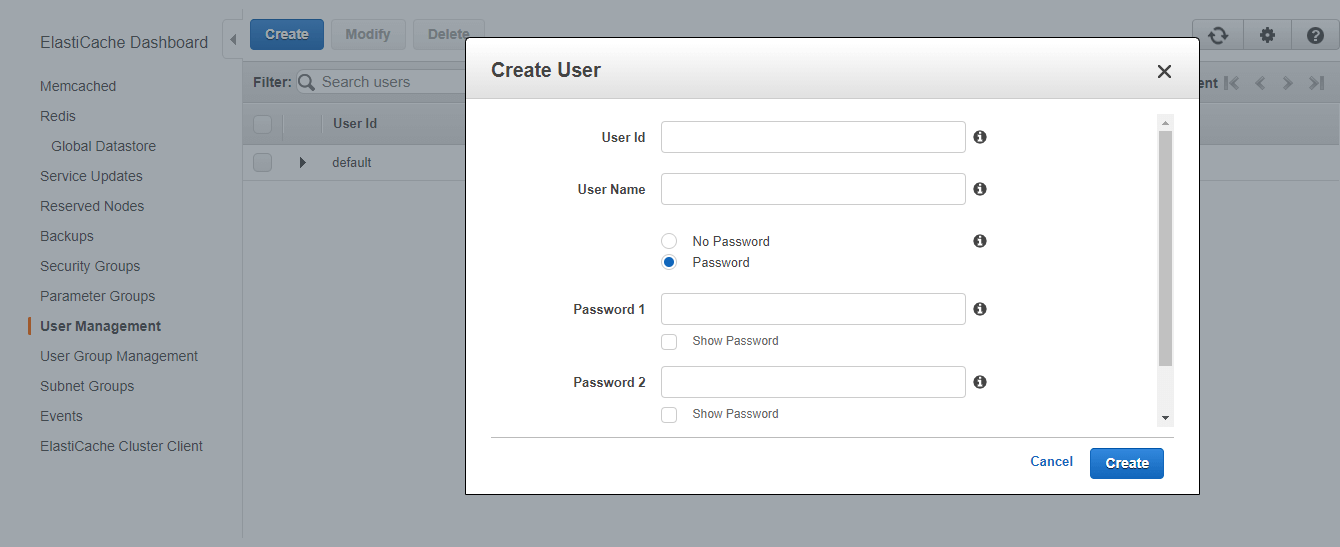
Users Management – Amazon ElastiCache for Redis 6.x you can use a feature called Role-Based Access Control (RBAC), where RBAC enables you to control cluster access through user groups. You can create users in the User Management console and assign them specific permissions by using an access string. The below screenshot shows a default user with an access string and a screenshot-creating users.
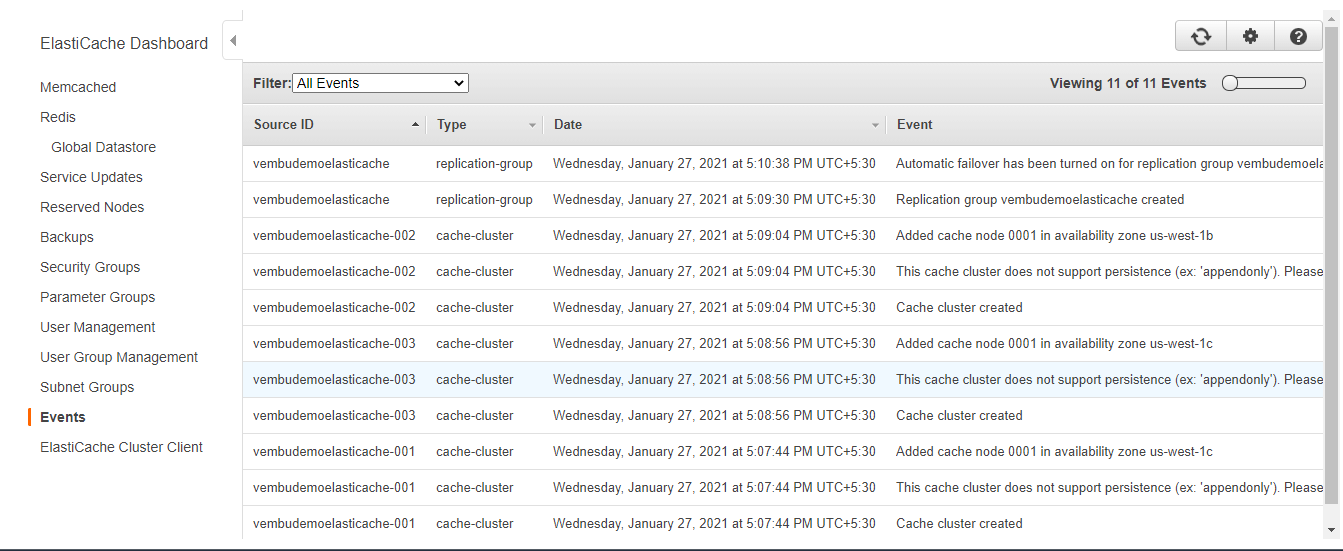
Events – When significant events happen for a cluster, ElastiCache sends a notification to a specific Amazon SNS topic configured during the ElastiCache cluster setup. By monitoring for key events, you can know the current state of your clusters and, depending upon the event, be able to take corrective action. The below screenshot shows all events recorded during and after the creation of the cluster setup. You can also filter the type of the event based on Cache Cluster, Cache Parameter Group, Security Group, and Subnet Group.
ElastiCache Cluster client – ElastiCache Cluster Client is a Memcached client that supports Auto Discovery which allows it to automatically discover Nodes. This means that scaling the number of nodes in a cluster no longer requires updating the static list of endpoints in the client configuration. You can download the client from this web console. Users can select the client download from the list based on the version they are using. Supported versions are Java, .Net and PHP versions installed on Linux machines.
Deleting the ElastiCluster
As long as a cluster is in the available state, you are being charged for it, whether or not you are actively using it. To stop incurring charges, delete the cluster. When you delete an ElastiCache for the Redis cluster, your manual snapshots are retained. You can also create a final snapshot before the cluster is deleted. Automatic cache snapshots are not retained. The manual snapshots created will be deleted manually.
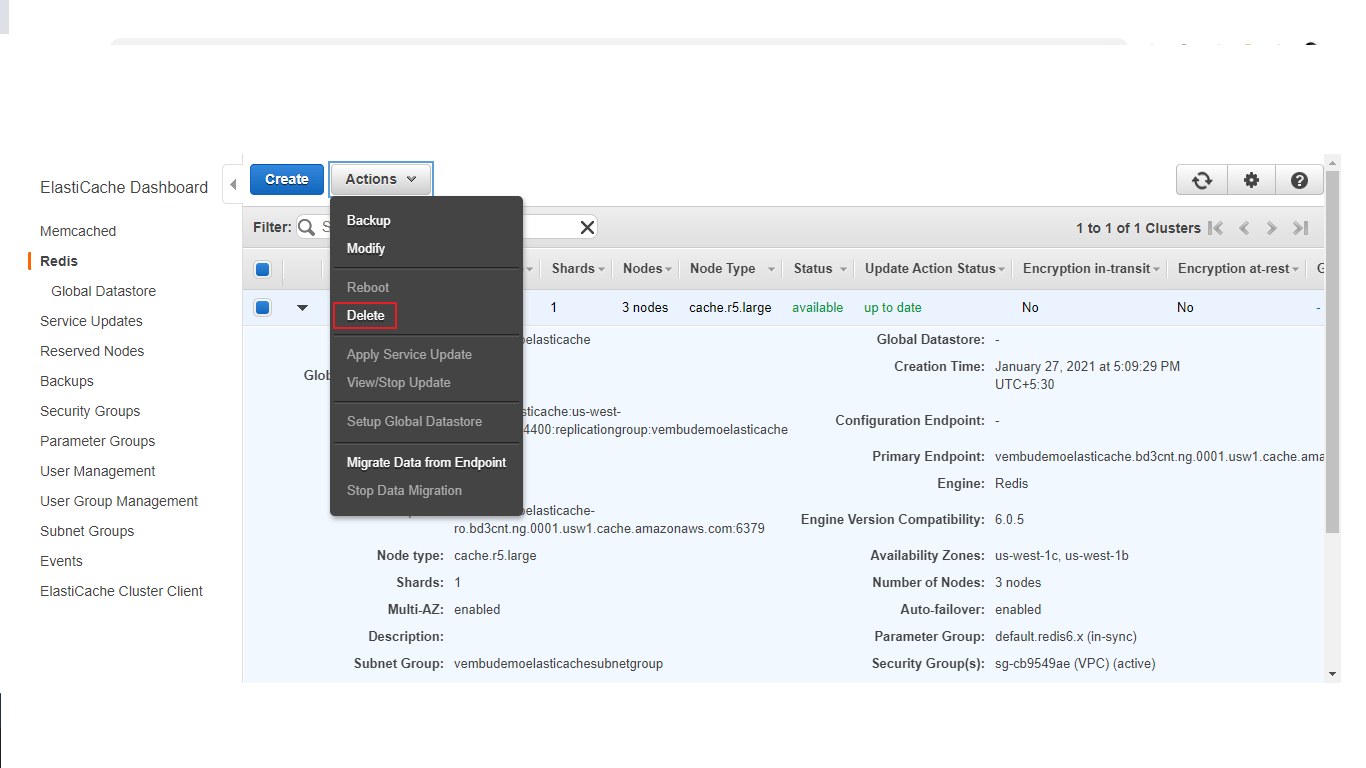
In the ElastiCache dashboard, choose Redis, and select the cluster name you want to delete. From the Actions drop-down menu choose the Delete option as shown in the Red box below.
You will get a warning notice stating that “ If you delete a Cluster, Amazon ElastiCache will also delete the primary node and any read replicas in the group. Once you begin this operation, all of the data in the entire Cluster will be lost. There is no way to undo this operation” If you require a final backup before deleting the cluster, choose yes otherwise choose No.
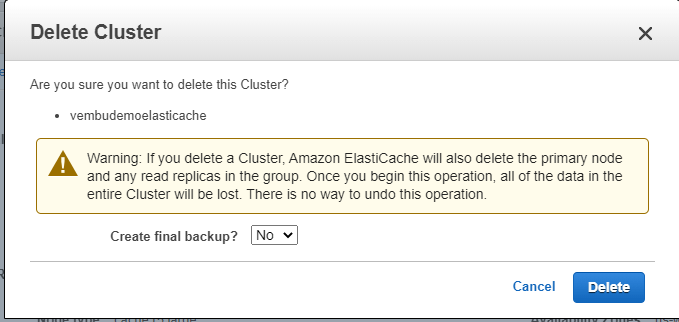
Click Delete to confirm the delete action.
Conclusion :
Amazon ElastiCache is a popular choice for real-time use cases like Caching, Session Stores, Gaming, Geospatial Services, Real-Time Analytics, and Queuing. It is easy to create an Amazon ElastiCache cluster in a few minutes with little knowledge of the configuration settings. AWS provided a complete management solution for the Amazon ElastiCache cluster using the Amazon ElastiCache dashboard in the AWS web console.
Follow our Twitter and Facebook feeds for new releases, updates, insightful posts and more.


Leave A Comment