
Introduction
In this comprehensive guide, we delve into the power and functionality of the Proxmox Cluster File System (PMXCFS). This exploration into the capabilities of CFS will shed light on how you can optimize storage solutions and enhance the efficiency of your systems.
The Proxmox Cluster file system (“pmxcfs”) is a database-driven file system designed to securely store configuration files. Utilizing corosync, the system ensures real-time replication to all cluster nodes. All Proxmox VE related configuration files are safely stored here.
All data is stored in a persistent database on disk, with a duplicate residing in RAM. Currently capped at 128 MiB, this setup imposes limitations on the maximum size. Despite this, the capacity is substantial enough to house the configuration of numerous virtual machines.
Proxmox Cluster Manager (pvecm) & Corosync Cluster Engine
Proxmox VE cluster manager, pvecm, is a powerful tool designed to form a collective of physical servers known as a cluster. Proxmox relies on the Corosync Cluster Engine to ensure robust group communication within the cluster. Notably, there are no defined constraints on the maximum number of nodes that can be included in a cluster.
pvecm can be used to create a new cluster, join nodes to a cluster, leave the cluster, get status information, and do various other cluster-related tasks. The Proxmox Cluster File System (“pmxcfs”) is used to transparently distribute the cluster configuration to all cluster nodes.

Advantages of grouping nodes into a cluster in Proxmox VE
There are several advantages of having Proxmox VE clusters if you want to deploy more than one Proxmox VE server node.
- Centralized, web-based management
- Multi-master clusters: each node can do all management tasks
- Use of pmxcfs, a database-driven file system, for storing configuration files, replicated in real-time on all nodes using corosync
- Easy migration of virtual machines and containers between physical hosts
- Fast deployment
- Cluster-wide services like firewall and HA
Proxmox Cluster Requirement
Below are the requirements suggested by the Proxmox documentaion, when you want to implement a cluster by adding Proxmox VE server nodes.
- All nodes must be able to connect to each other via UDP ports 5405-5412 for corosync to work
- Date and time must be synchronized across all nodes of the cluster
- An SSH tunnel on TCP port 22 between nodes is required
- To implement High Availability among the nodes, you need to have at least three nodes for reliable quorum. All nodes should have the same proxmox VE version
- Proxmox recommend a dedicated NIC for the cluster traffic, especially if you use shared storage
- The root password of a cluster node is required for adding nodes
- Online migration of virtual machines is only supported when nodes have CPUs from the same vendor. It might work otherwise, but this is never guaranteed
Preparing cluster nodes
First, ensure that Proxmox VE is installed on all nodes with the final hostname and IP configuration. Remember that changing the hostname and IP after creating the cluster is not possible.
While it is a common practice to list all node names and their IPs in /etc/hosts to make their names resolvable, it is not necessary for the cluster to function. However, it can be beneficial as it allows for easier SSH connections between nodes using their memorable names. It’s important to note that referencing nodes by their IP addresses in the cluster configuration is always recommended.
In this blog, we are having three proxmox VE nodes as below:
proxmoxhost (IP : 192.168.100.78)
proxmoxhostnode2 (IP : 192.168.100.168)
proxmoxhostnode3 (IP : 192.168.100.169)
Creating a cluster
Users can either create a cluster on the console (login via ssh), or through the API using the Proxmox VE web interface (Datacenter → Cluster).
Note : Use a unique name for your cluster. This name cannot be changed later. The cluster name follows the same rules as node names.
Through the web GUI
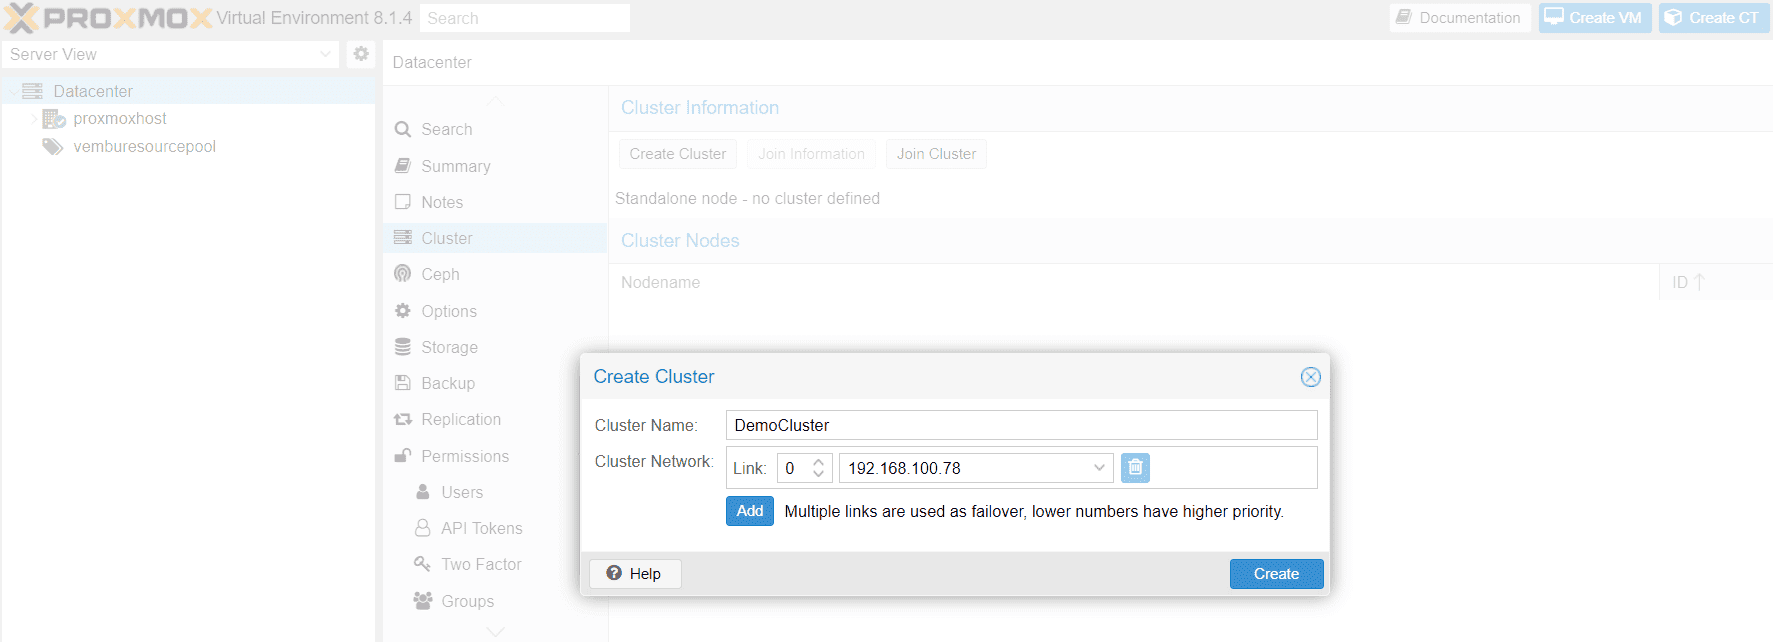
Under Datacenter → Cluster, click on Create Cluster. Enter the cluster name and select a network connection from the drop-down list to serve as the main cluster network (Link 0). It defaults to the IP resolved via the node’s hostname.
Ensure that the network designated for cluster communication is not utilized for any high-traffic purposes such as network storage or live migration. Although the cluster network itself generates small amounts of data, it is highly sensitive to latency.
The below screenshot shows this step.
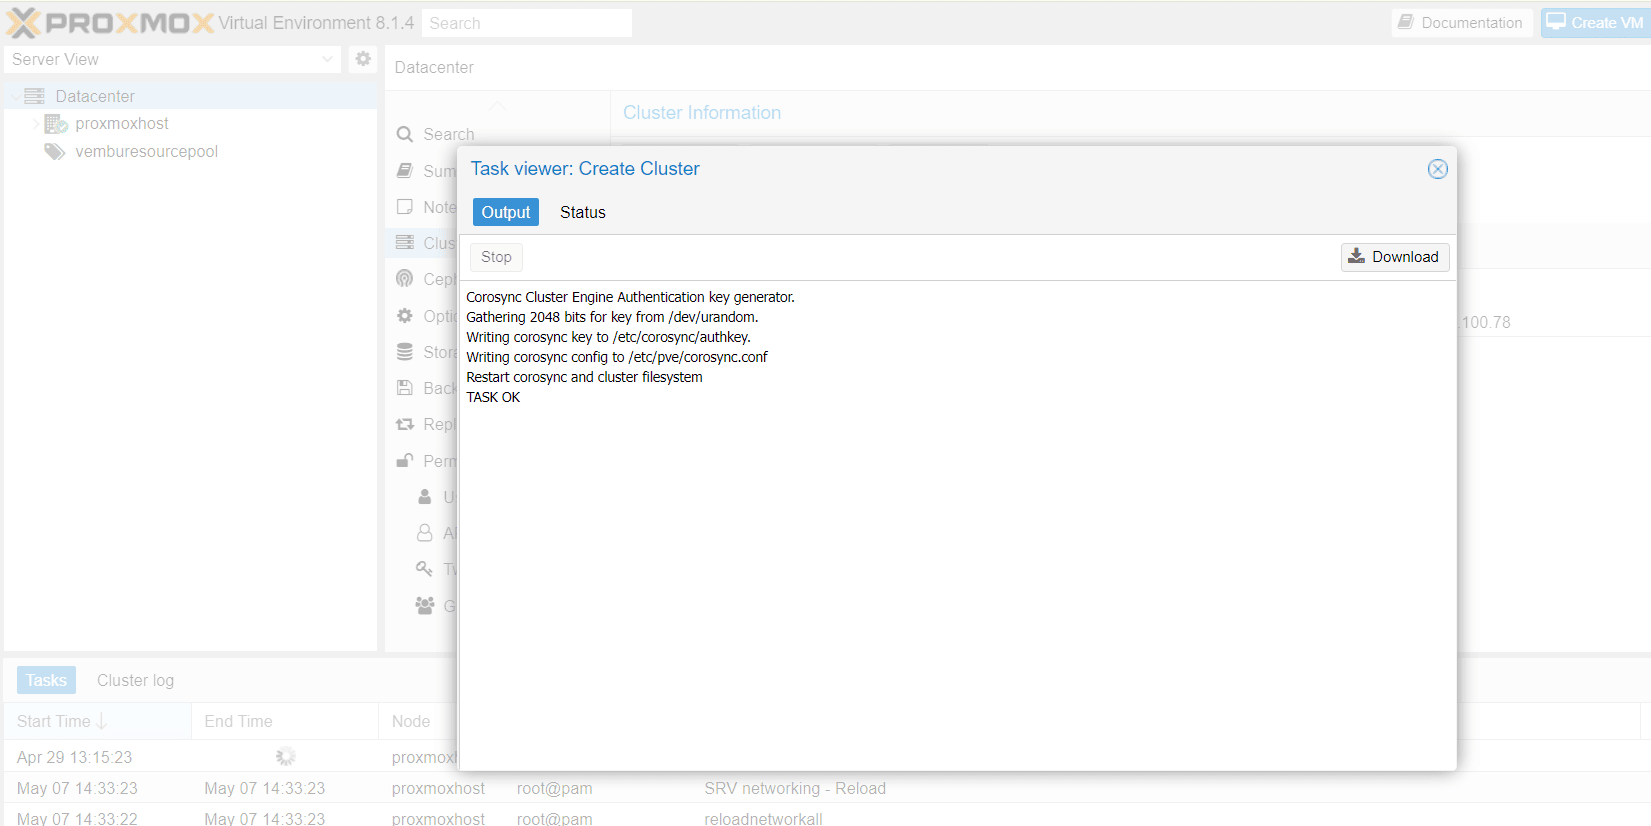
Initiate the cluster creation process by clicking “Create”. A progress indicator will keep you informed as the cluster is deployed.. The below screenshot shows the progress details.
Through CLI
Login via ssh to the first Proxmox VE node and run the following command:
proxmoxhost# pvecm create CLUSTERNAME
To check the state of the new cluster use:
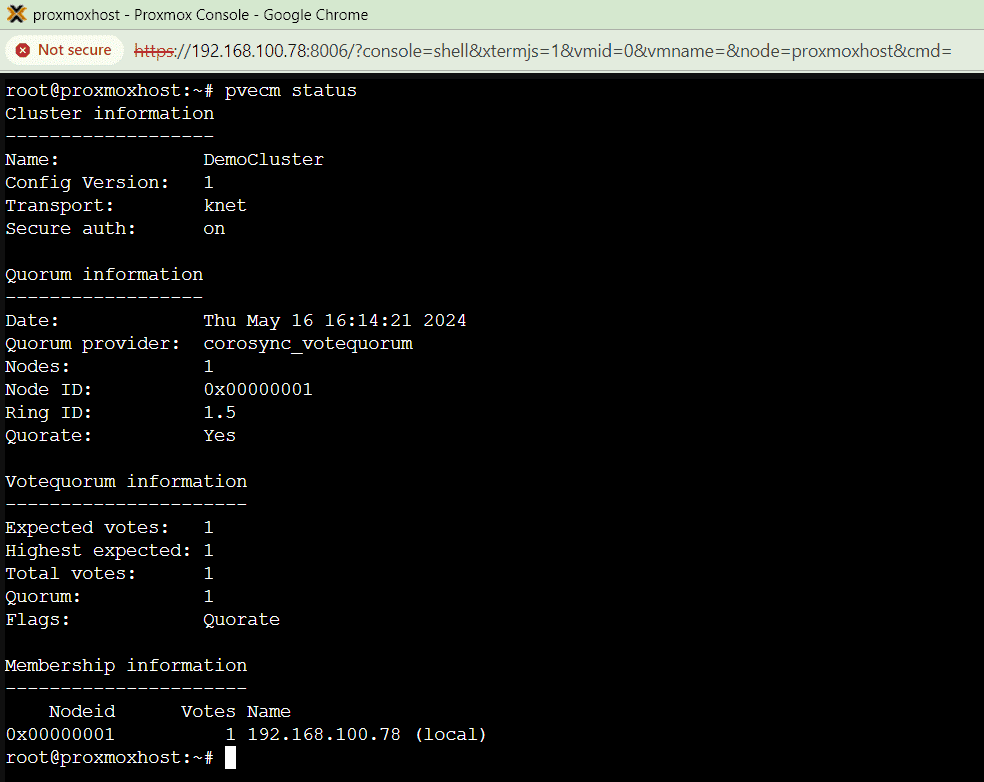
proxmoxhost# pvecm status
The below screenshot shows the status of the cluster “DemoCluster”created through web GUI.
Joining nodes to the cluster
For adding a node to the cluster, users can do so, either through web GUI or through the CLI
Join Node to Cluster via GUI
This involves two steps
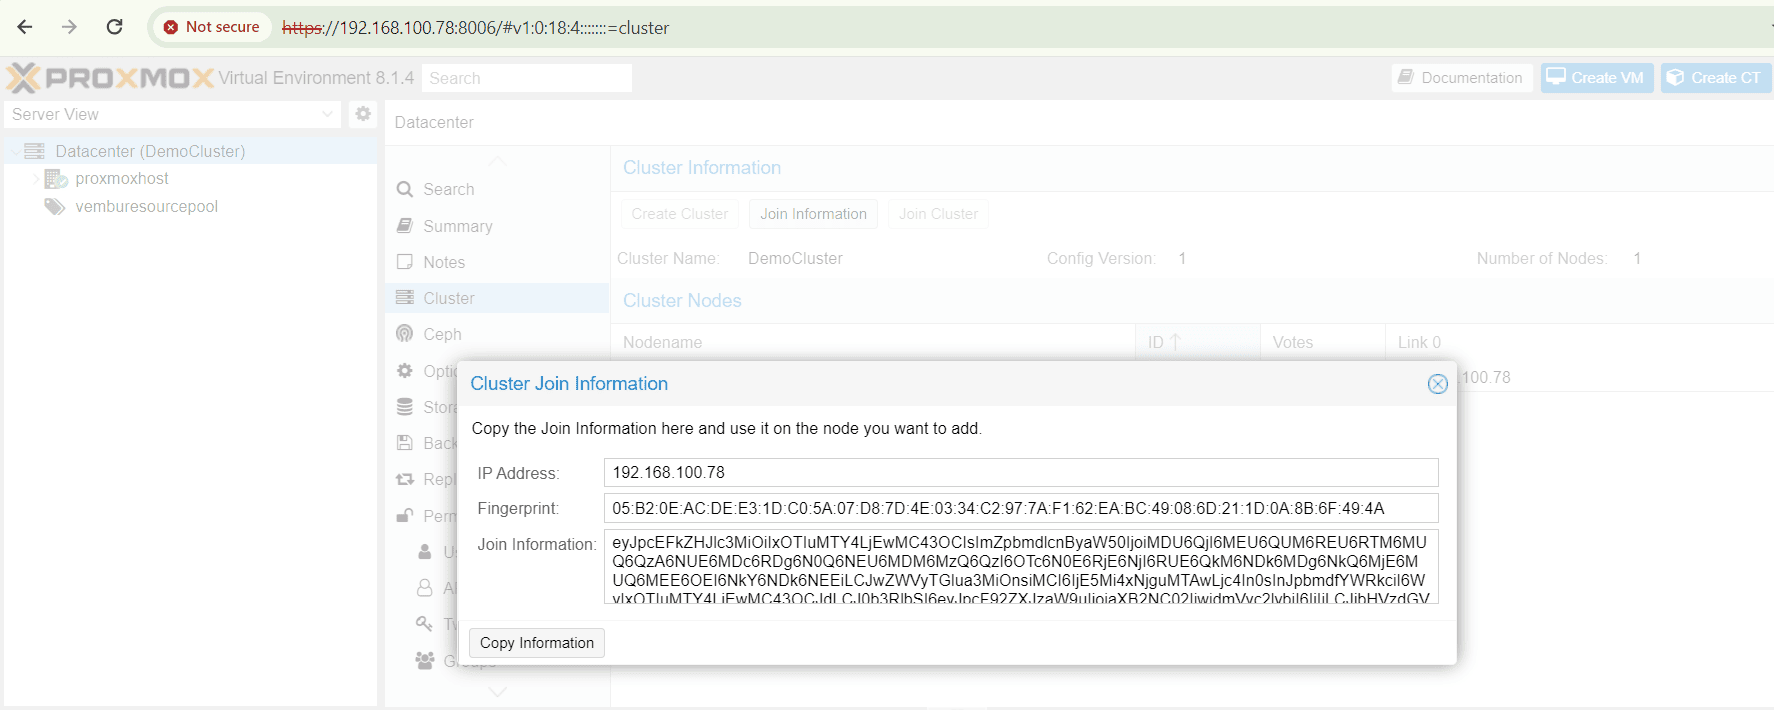
- Log in to the web interface on the first cluster node, where you created the cluster as shown in the previous steps. Under Datacenter → Cluster, click the Join Information button at the top. Then, click on the button Copy Information. Alternatively, copy the string from the Information field manually
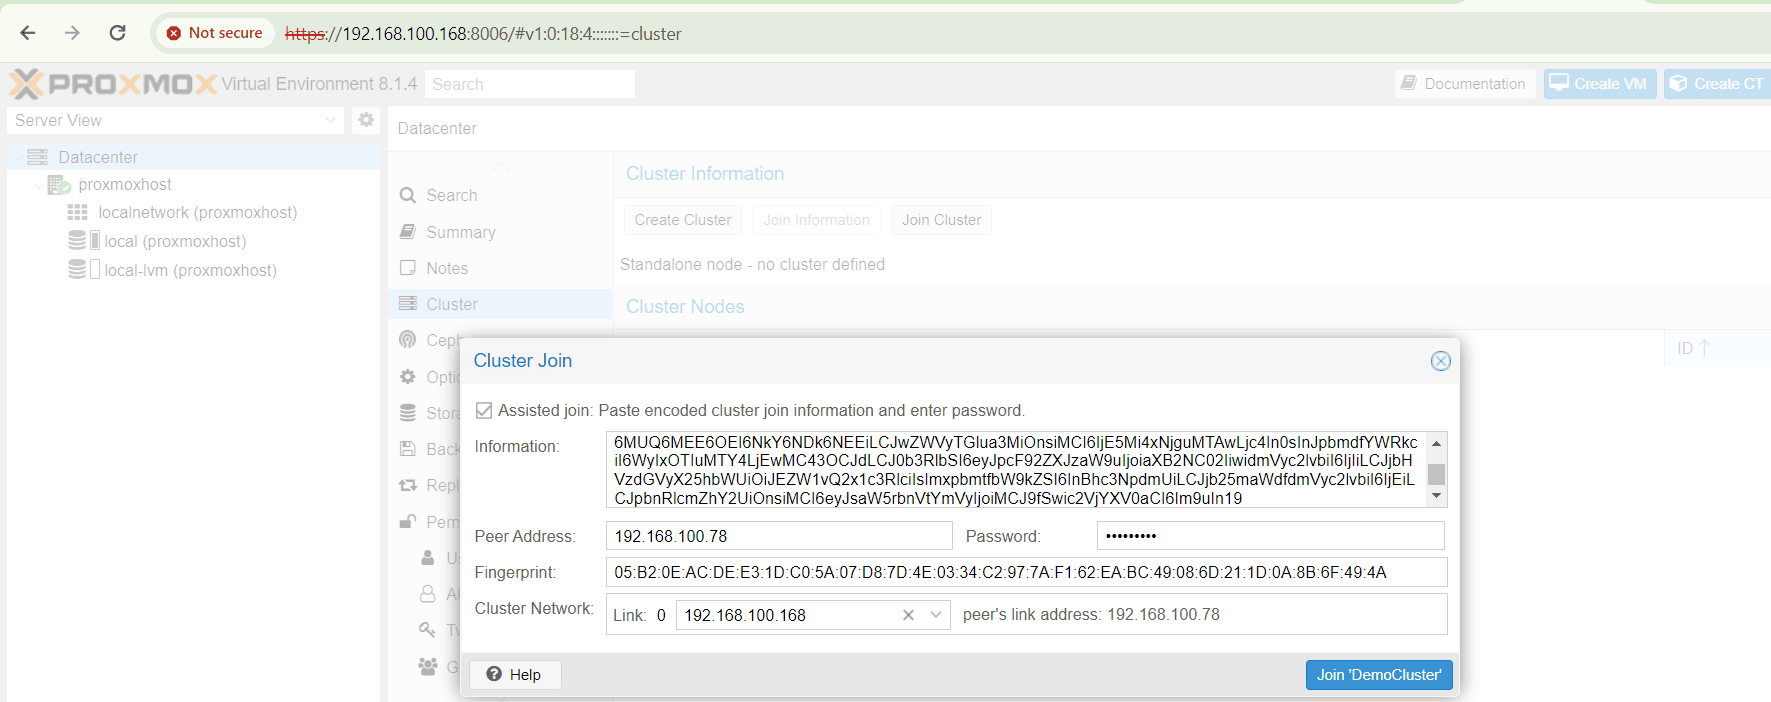
- Log in to the web interface on the second node you want to add. Under Datacenter → Cluster, click on Join Cluster. Fill in the Information field with the Join Information text you copied earlier. Most settings required for joining the cluster will be filled out automatically
The below screenshot details the first step. On clicking the join information button, you will find the information such as IP Address of the first node, Finger Print and Join information. On clicking copy information will be copied into memory, and you can paste it in the second step.
The below screenshot shows the second step in details where you choose Join cluster under Datacenter → Cluster. Here you copy the content in the information box. After copying the Peer address ( IP Address of the first node ) and Fingerprint automatically copied. Choose the cluster network (IP address of the joining node ) and provide the root password of the first node. Then click Join “DemoCluster”
After some time, you can verify the joined cluster nodes on both Proxmox VE servers by going to the “Cluster” section. It’s important to note that you might encounter connection or SSL errors even if both nodes run the same version. To avoid these issues, it’s recommended to update both servers to the latest version, ensuring they have the most recent security patches.
The process of adding a third node to the cluster is similar. Once the existing nodes are updated and verified, follow the same steps to integrate the new server into the cluster.
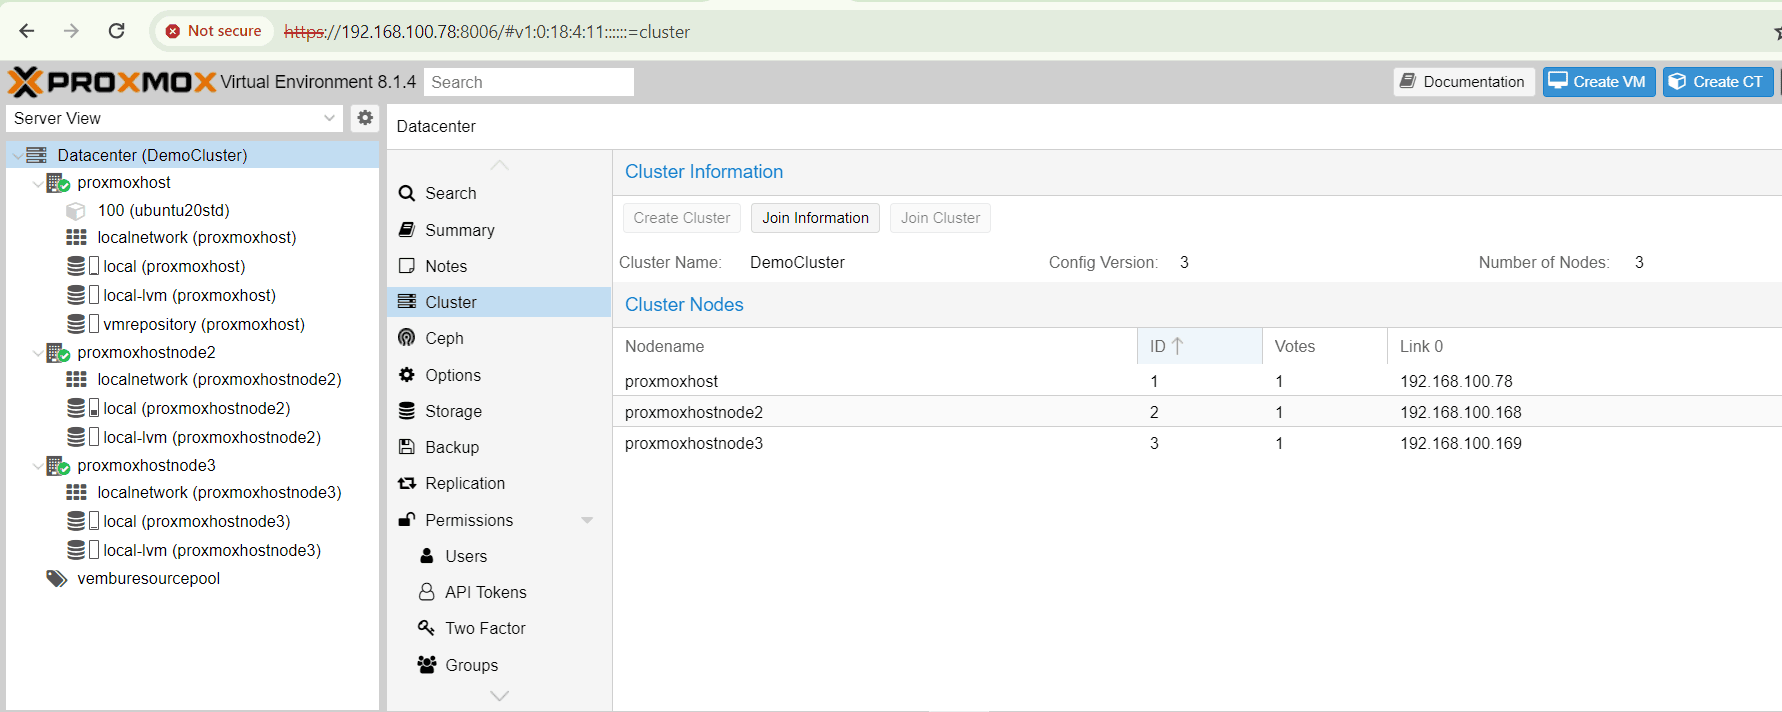
The below screenshot shows the cluster page, after joining the three nodes under the “Demo cluster”
Checking the cluster status after joining the two additional nodes
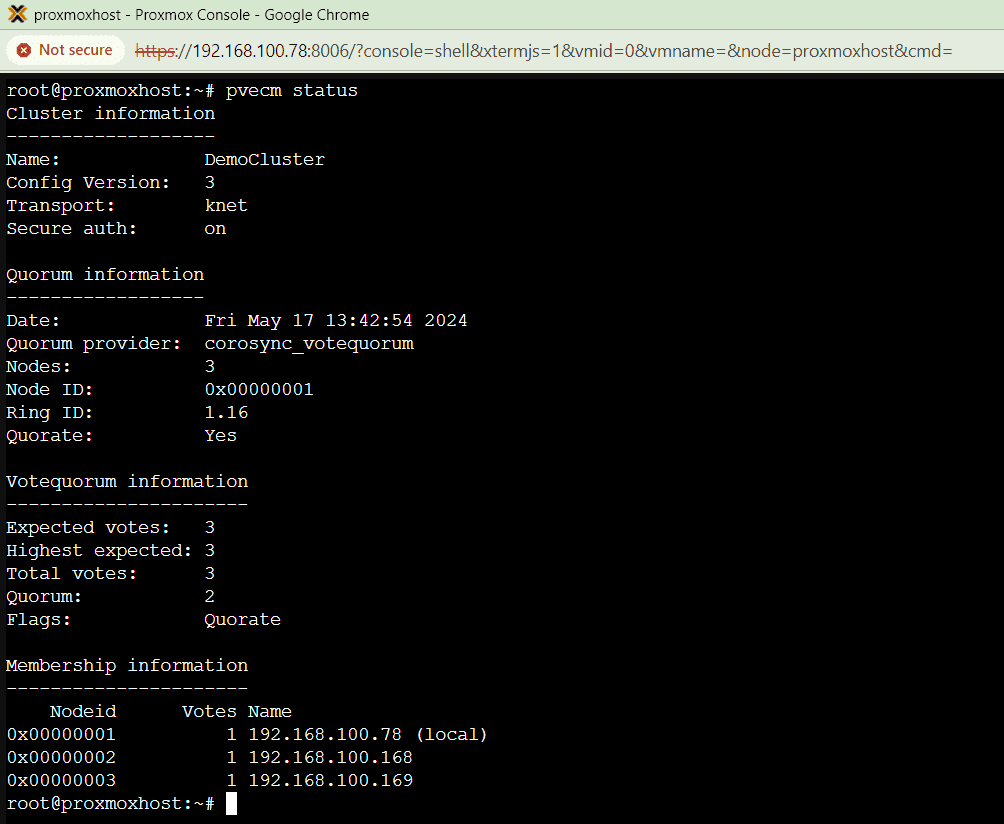
Now you can verify the cluster staus in CLI after adding the two cluster nodes successfully. You can run the below command in any of the nodes and verify.
# pvecm status
Removing a cluster node
In case of any hardware failure in the node or any other issues that causes the performance issue of the node, you may require to remove the cluster node from the cluster and fix the issue or replace the faulty hardware component to rejoin again. This will facilitate a smooth transisiton of workloads and no down time for running VMs and Containers.
Before removing the cluser node, user must relocate all virtual machines from the node to any other cluster node. Prior to doing so, kindly confirm you have created duplicates of all local data or backups that require retention. Furthermore, ensure to eliminate any scheduled replication tasks connected to the node slated for removal.
After making the cluster node empty, user should execute the three steps as given below:
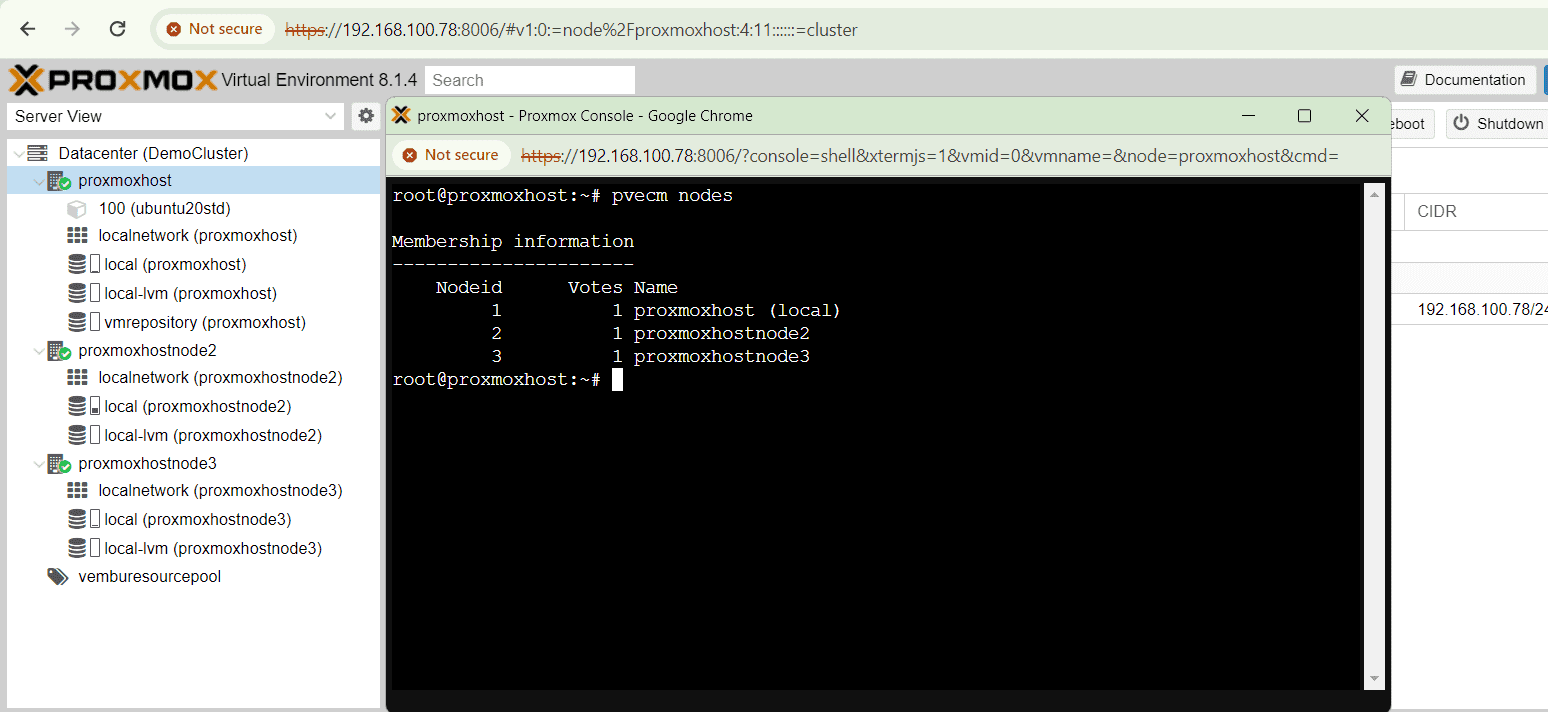
First, log in to a cluster node (any other than the one you’re removing) through the CLI and issue the command pvecm nodes to identify the node ID of each cluster node. In this example, we’re logged in to the first cluster node, “proxmoxhost,” to remove the cluster node “proxmoxhostnode3.” The output will show “local” next to the currently logged-in node, which helps ensure you’re not accidentally removing the node you’re using.
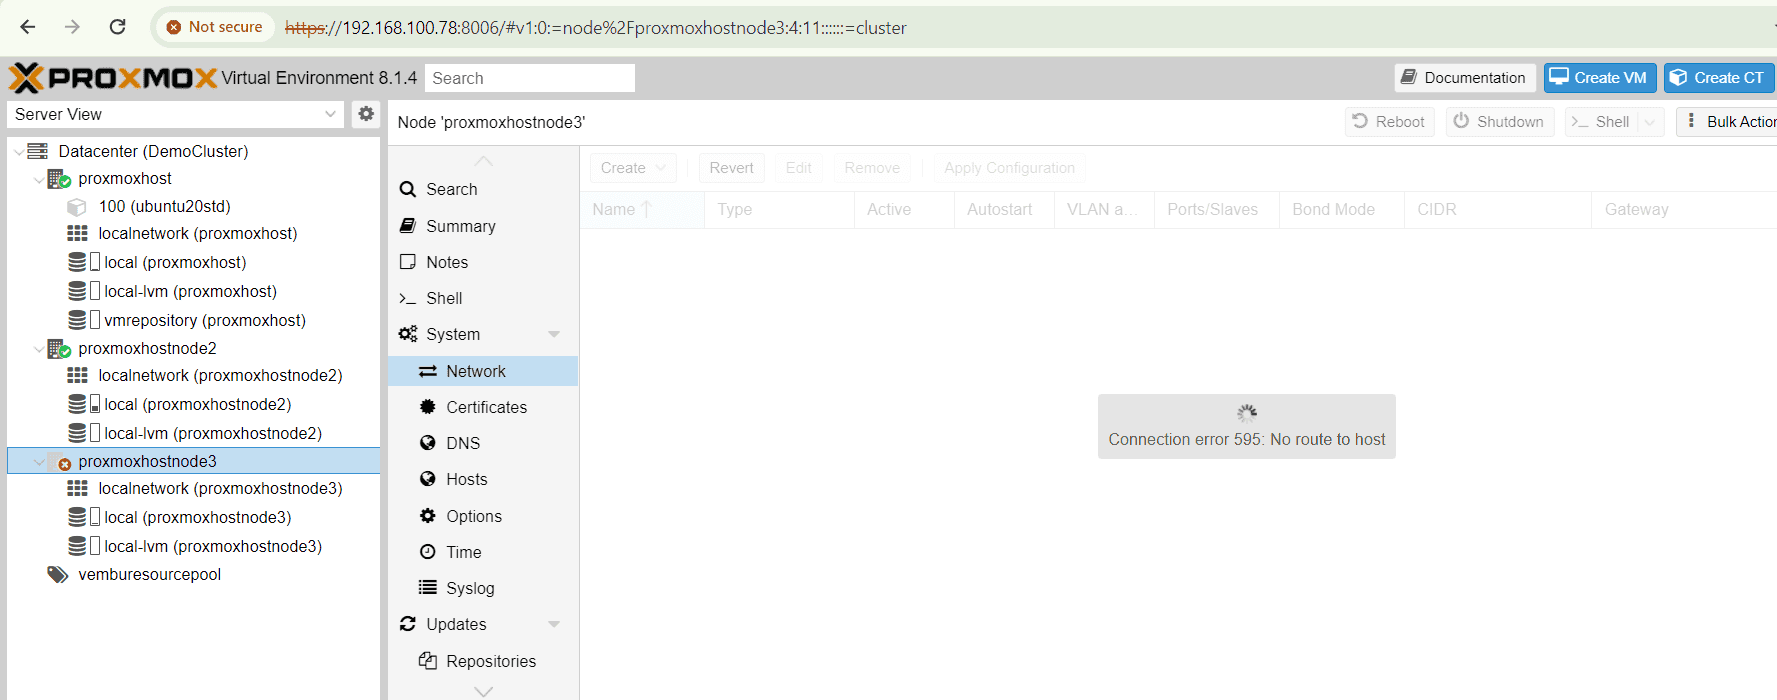
In second step, power off the cluster node you wish to remove ( in our case “proxmoxhostnode3”. Below screenshot shows the cluster node “proxmoxhost” running and the second node “proxmoxhostnode3” is powered off.
Finally in the third step, issue the below command in the running cluster node “proxmoxhost”
pvecm delnode proxmoxhostnode3
At this point, it is possible that you will receive an error message stating “Could not kill node (error = CS_ERR_NOT_EXIST)”. This does not signify an actual failure in the deletion of the node, but rather a failure in corosync trying to kill an offline node. Thus, it can be safely ignored.
You can verify with the command pvecm status which shows only two active nodes now as shown in the below screeshot:
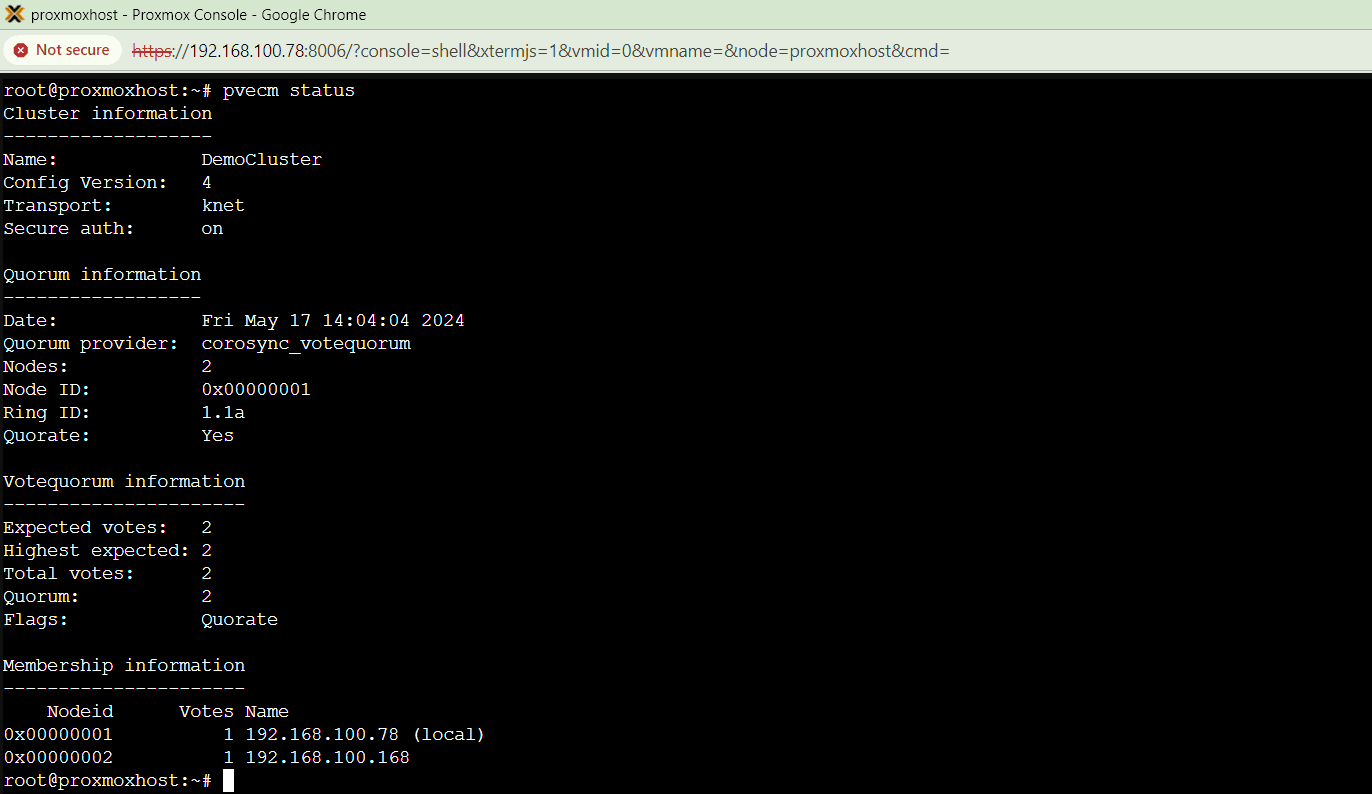
Thus a proxmox VE node is removed from the cluster.
Note : A node can be detached from a cluster without requiring a fresh installation. However, it is important to address the issue of retaining access to shared storage after the node is removed from the cluster. This concern must be resolved prior to initiating the removal process. Keep in mind that a Proxmox VE cluster cannot share the same storage with another cluster, as storage locking does not operate across the cluster boundary.
It is recommended to install a fresh proxmox VE in the node and join to the cluster for error free operations.
Conclusion
In conclusion, delving into the Proxmox Cluster and its intricate File System (PMXCFS) offers a profound understanding of the robust infrastructure that powers efficient data management. By thoroughly comprehending the steps to seamlessly integrate nodes into the cluster and adeptly removing a cluster node when necessary, users can harness the full potential of this cutting-edge technology.
Follow our Twitter and Facebook feeds for new releases, updates, insightful posts and more.

Leave A Comment