What is a Virtual Appliance?
Virtual Appliance (VA) is a ready-to-use package with an Operating System and an Application. In general, Virtual Appliance is an image file of a Virtual Machine (VM) which is usually built to host a single application. VA can be directly deployed on Virtualization Platforms like VMware, Hyper-V, Citrix that provides a new way to employ applications on a network.
Virtual Backup Appliance
The Virtual Backup Appliances are pre-built by the vendors. Primarily, the OS is built and then all required components are patched to it at a specific supported level of configuration to deploy the backup product.
Why you really need a Virtual Backup Appliance(VBA)?
- It is an incredibly easy method in a Virtual Server environment
- The deployment is quicker and requires only minimum configuration
- Effortless creation and deletion of the backup appliance
- Reduced risks of deployment or configuration errors
- Enhanced backup security through dedicated virtual networks for backups
- VBA allows scaling the backup infrastructure in a virtual server environment
- Ignoring VBA will cost you time and money
Vembu BDR Suite – Virtual Backup Appliance (VBA)
To Download Vembu BDR Suite, you have options for the Windows installers, Linux installers, as well as the Virtual Appliance for VMware and Hyper-V.
Why would you choose the Virtual Appliance over the other two options?
Getting Started with Vembu Backup Appliance is a straightforward process, that lets you quickly setup backup for any environment. The Virtual appliance download size is approximately 6 GB and will take no time to download if you have a good broadband connection. The Backup Appliance can be deployed in minutes through which you can start the backup application instantly. This reduces the time taken for installation when choosing over the other two options and also lowers the risk of errors that might occur during backup server installation. Virtual Appliance eases the work of administrators and saves their time.
Virtual Machine Specifications
The following lists the supported versions of VMware and Hyper-V for Virtual Appliance deployment along with the specifications of the virtual machine that will be created on it.
VMware Appliance
The Vembu VMware VBA is an OVF formatted appliance that can be imported into a vSphere environment to quickly start backing up the critical machines in your environment.
- Guest OS – Ubuntu 16.04
- Memory – 16 GB
- 1 Hard Disk – 500 GB
- CPU – 8 core
- Supported VMware vSphere versions – ESXi 5.5 and above
Hyper-V Appliance
The Vembu Hyper-V VBA is a VHD formatted appliance that provides the ability to be up and running quickly in a Hyper-V environment to backup the critical machines in your environment
- Guest OS – Ubuntu 16.04
- Memory – 16 GB
- 1 Hard Disk – 500 GB
- CPU – 8 core
- Supports deployment in Windows 2012 R2 and above
Steps to deploy Vembu backup appliance
Now, let’s take a look at the step by step procedure of how to deploy Vembu Virtual Backup Appliance in VMware and Hyper-V
Deploying the Backup Appliance in a VMware Environment
The Vembu VMware VBA download file will be in zip format. Unzipping the file will have the following:
- Virtual appliance template file (OVF)
- User Guide on How to deploy VMware Virtual Appliance
- ReadMe file
The OVF template allows you to create a virtual machine instantly on VMware virtual environment with OS and Vembu BDR Server pre-installed on it. This eliminates the manual steps like VM creation or separate installation of the operating system or Vembu BDR server
Step 1: Download the Virtual Appliance zip file
Step 2: Login to an ESXi server through vSphere Client
Note: It is recommended to have an equivalent configuration or more in the underlying ESXi Host on which the Virtual Appliance needs to be deployed
Step 3: In the vSphere console, Navigate to File option and choose Deploy OVF Template
Step 4: Now, choose the .ovf file location
Note: Once the right path location of .ovf file is given, the details of the Virtual appliance will be listed in the next window
Step 5: Name the deployed template after which the Virtual Machine will take up the same name when it is created
Step 6: Then, configure the storage location from the listed Datastores to store the virtual machine files
Step 7: Next, choose the disk format for the virtual machine to be created, to store its virtual disks
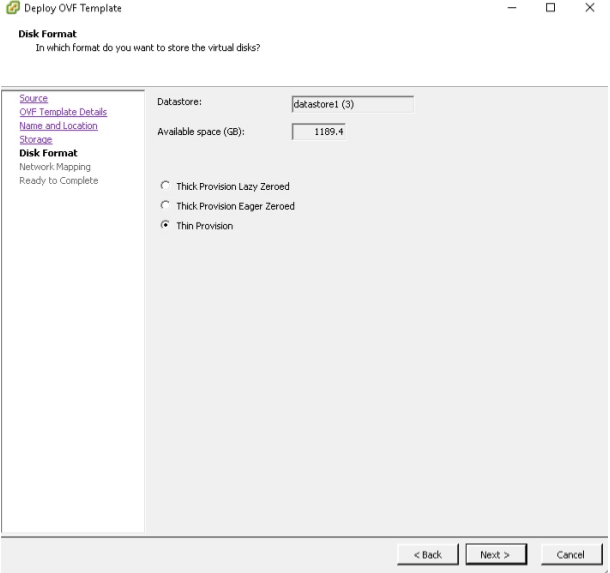
Step 8: In the Network Mapping window, select the network for the virtual machine and map the networks used in the OVF template to the networks in the inventory
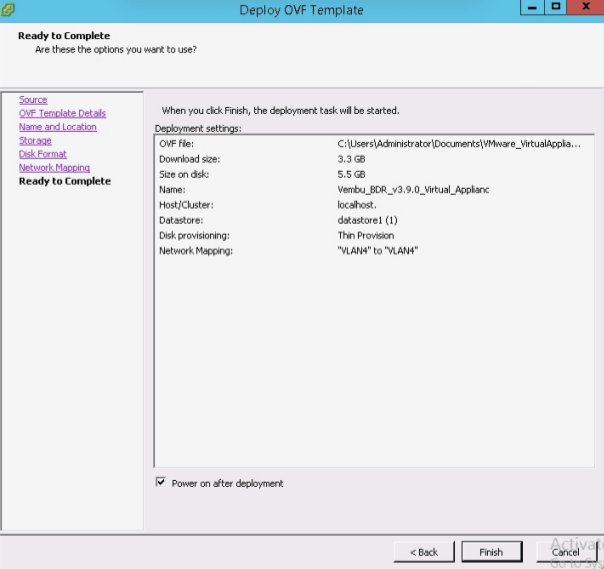
Step 9: Finally, the Read to Complete window will show all the deployment settings. Now, review all your configurations, and then click Finish to start the deployment task
Note: Enabling the checkbox “Power ON after deployment” will automatically turn on the new VM created with the OVF template
Step 10: Once the virtual appliance deployment is completed, you will be notified with a Pop-up that shows “Deployment Completed Successfully”
After the successful deployment, all you need to do is to start the Vembu BDR Server.
Step 11: Initially login to the VM with the following credentials:
Username: Vembu
Password: password
Root password: password (sudo -s)
Step 12: After logging into your VM, the first thing you should do is, check the status of all the services (PostgreSQL and Vembu BDR).
If the ports are not listening, then try to start the VembuBDR service. Navigate to the installation location of VembuBDR to execute the following commands
sh stopVembuBDRSetup.sh
sh startVembuBDRSetup.sh
Note: Installation location – (cd/home/vembubdr/Vembu/VembuBDR)
Step 13: Open any web browser (Chrome/Firefox) and then enter localhost:6060 to open the Vembu BDR web console.
Note: Once the machine IP is defined, you can access the Vembu BDR web console via
If you want to access the web console without logging into the VM, enable the VM networking and then assign static IP to the VM
Step 14: Then, Log into the Vembu BDR Server console with the default credentials – username: admin and password: admin
Step 15: To proceed with Backup and Recovery configurations, you need to set up the following:
- Choose the TimeZone Settings
- Give a unique Vembu BDR ID, by default it takes the hostname and machine name as ID
- Configure the storage repository details to store the backup data
Thus, the deployment of VMware virtual appliance has been completed successfully. Also, the initial settings for Vembu BDR Server are done.
Deploying the Backup Appliance in a Hyper-V Environment
The procedures for the deployment of Hyper-V Virtual Appliance remains the same as VMware Appliance except for the below steps
The Vembu Hyper-V VBA download file will be in zip format. Unzipping the file will have the following:
- Virtual appliance template file (VHD)
- User Guide on How to deploy Hyper-V Virtual Appliance
- ReadMe file
The VHD template allows you to create a virtual machine instantly on Hyper-V virtual environment with OS and Vembu BDR Server pre-installed on it. This eliminates the manual steps like VM creation or separate installation of the operating system or Vembu BDR server.
Step 1: Download the Virtual Appliance zip file
Step 2: Open the Hyper-V manager console and right click the Hyper-V host
Note: It is recommended to have an equivalent configuration or more in the underlying Hyper-V Host on which the Virtual Appliance needs to be deployed
Step 3: Check whether the Virtual Appliance folder contains these 3 folders: Snapshots, Virtual Hard Disks, and Virtual Machines. And then, Choose the Import Virtual machine option and select the folder containing VHD and XML files.
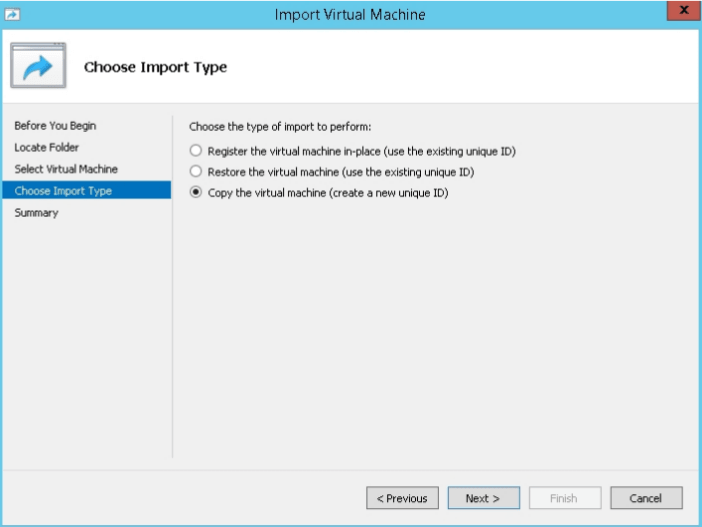
Step 4: In the select machine window, choose the machine to import and then proceed to choose the type of import that needs to be performed
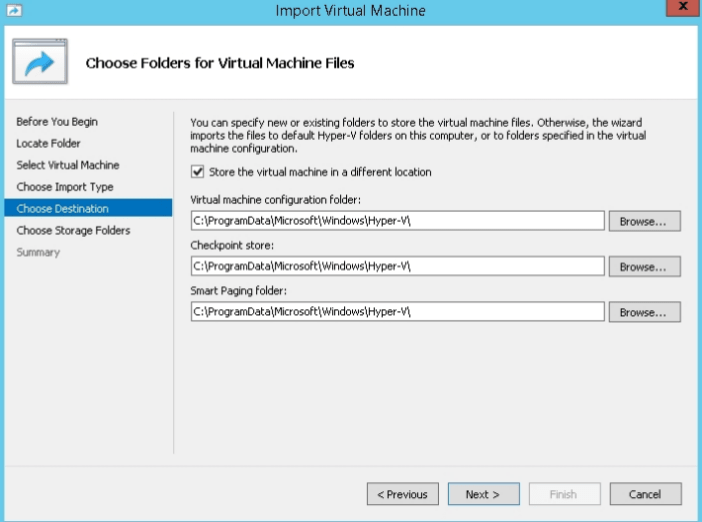
Step 6: In the next window, choose the destination to store the Virtual Machine files that include virtual machine configuration folder, checkpoint store, and smart paging folder
Step 7: Choose the location to store the Virtual Hard Disk (VHD) files. This will store the imported VHD file of the virtual machine in the given location
Step 8: Finally, the complete Import Wizard appears that lets you review all the configurations and operations that you are about to perform. Now, Click Finish to start the deployment task
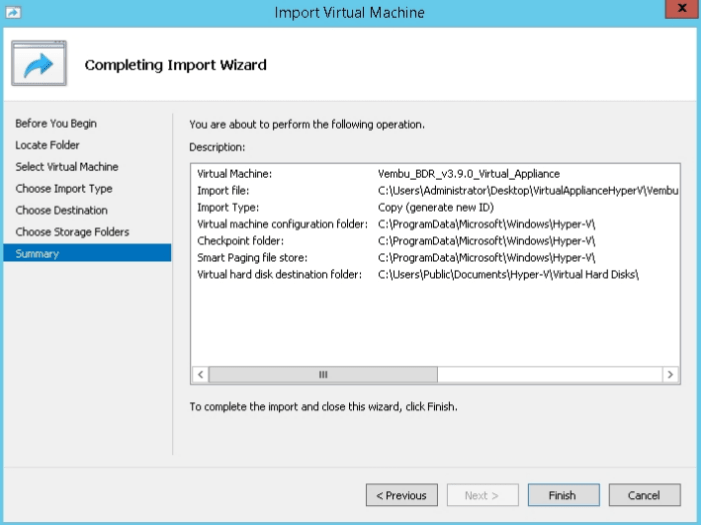
Once the deployment is finished successfully, start the virtual machine and then start the Vembu BDR Server.
Now repeat the procedures from step 11 to step 15 from VMware Environment to complete the deployment of Hyper-V virtual appliance.
Thus, after deploying the VMware/Hyper-V Virtual Appliance, you can use the Vembu BDR Server for Backup and Disaster Recovery.
Conclusion
Start Virtual Appliance and Save Time!
With Vembu Virtual Appliance for VMware and Hyper-V, you can instantly setup the Vembu BDR Server for Backup and Disaster Recovery and can experience the following:
- Free Deployment
- Start running your backup server in minutes
- Hassle Free setup
- Supports backup storage of different storage media such as Local drives, NAS(NFS and CiFS) and SAN(iSCSI and FC)
- Instant Recovery of VMs for continuous business operations
- Offsite/Cloud Replication
I hope this article throws some light on the basics of Virtual Appliance and gives out a constructive explanation on how to deploy Vembu Virtual Backup Appliance in your VMware/Hyper-V environment.
Experience modern data protection with this latest Vembu BDR Suite v.3.9.1
Follow our Twitter and Facebook feeds for new releases, updates, insightful posts and more.


Leave A Comment