Table of Contents
- Introduction
- Basic tools for interacting with the Cloud storage
- Prerequisites for creating a storage bucket
- Creating a storage bucket in GCP
- Conclusion
Introduction :
What is GCP Cloud storage?
Google Cloud provides three main services for different types of storage:
- Persistent Disks for block storage
- Filestore for network file storage and
- Cloud Storage for object storage
In this blog, we are discussing the third Cloud storage for object storage in detail.
Cloud Storage is a service for storing your objects in Google Cloud. An object is an immutable piece of data consisting of a file of any format. You store objects in containers called buckets. All buckets are associated with a project, and you can group your projects under an organization. Thus the Google cloud storage hierarchy will be
Organization → Project → Bucket → Object.
- Organization – A company name that owns the GCP Subscription
- Project – Any Google Cloud resources that you allocate and use must belong to a project. You can think of a project as the organizing entity for what you’re building. A project is made up of the settings, permissions, and other metadata that describe your applications. Before creating a storage bucket, it is necessary to create a project
- Bucket → Each project can contain multiple buckets, which are containers to store your objects. For example, you may create an Installer bucket to hold all your application installers or create a Document bucket to hold all your company’s documents in doc or txt format
- Object → An individual file, such as company-owned documents or user documents Example: customerlist.doc or any presentation file introduction.ppt, etc
Basic tools for interacting with the Cloud storage
After creating a bucket, users can upload/download and access the objects in different ways using the below tools.
- Console: The Google Cloud Console provides a visual interface for you to manage your data in a browser
- gsutil: gsutil is a command-line tool that allows you to interact with Cloud Storage through a terminal. If you use other Google Cloud services, you can download the Cloud SDK, which includes gsutil along with the gcloud tool for other services
- Client libraries: The Cloud Storage client libraries allow you to manage your data using one of your preferred languages, including C++, C#, Go, Java, Node.js, PHP, Python, and Ruby
- REST APIs: Manage your data using the JSON or XML API
Prerequisites for creating a storage bucket
As discussed above, you require a valid GCP subscription and a project under the Organisation. Here in this blog, we are not going to describe how to create a project. Since we already have a valid subscription and a working project, straightaway will go to the steps involving creating a bucket.
Creating a storage bucket in GCP
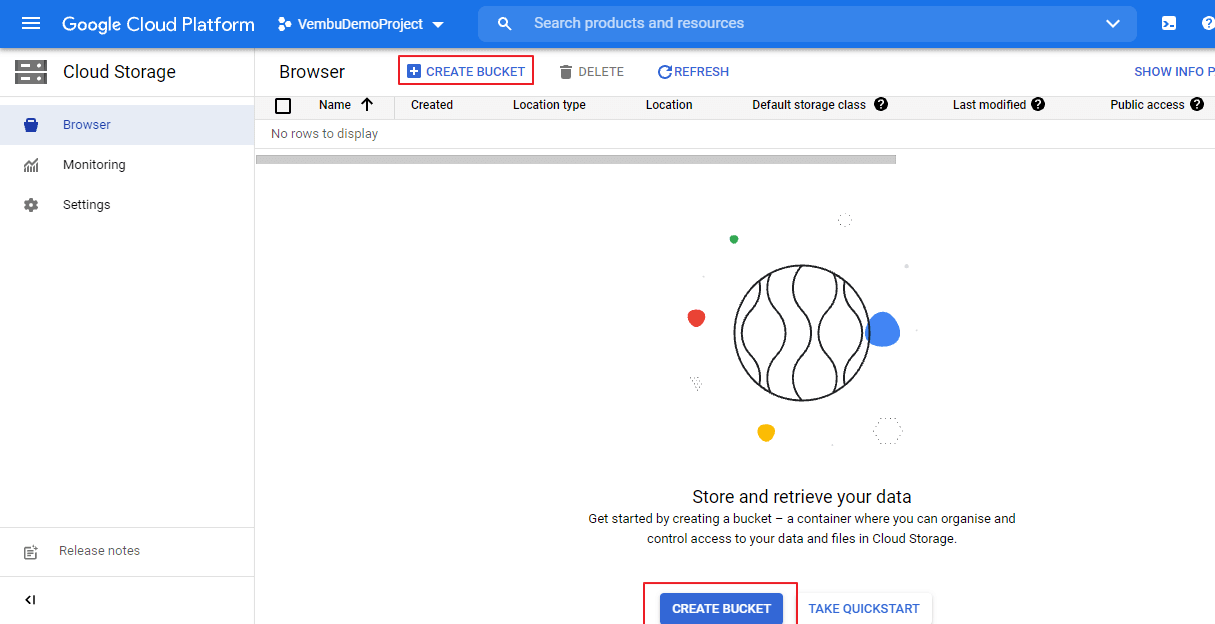
Login to the GCP console with your GCP subscription credentials. Choose the Project name at the top of the page, if you have not already created one, create a new project. Choose the top left navigation menu and choose Cloud Storage → Browser. Here we have chosen the project VembuDemoProject, below screenshot shows these details, Click Create Bucket either at the top or bottom of the page shown in the Redbox.
Creating a storage bucket in GCP involves 5 steps namely,
- Name your bucket
- Choose where to store your data
- Choose a default storage class for your data
- Choose how to control access to objects
- Choose how to protect object data
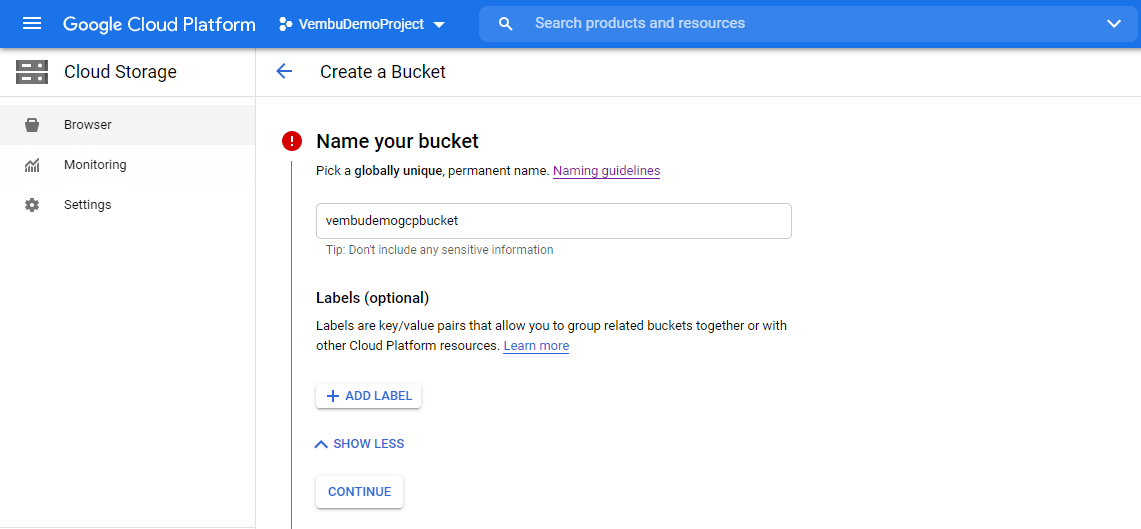
Name your bucket — Provide a globally unique permanent name for the bucket. You should follow the naming guidelines when creating buckets in Cloud Storage. Bucket names must contain only lowercase letters, numbers, dashes (-), underscores (_), and dots (.). Spaces are not allowed.Bucket names must contain 3-63 characters and cannot be represented as an IP address in dotted-decimal notation. Here we provide a bucket name as “vembudemogcpbucket” You may provide Labels also for the optional bucket Click continue to the second step.
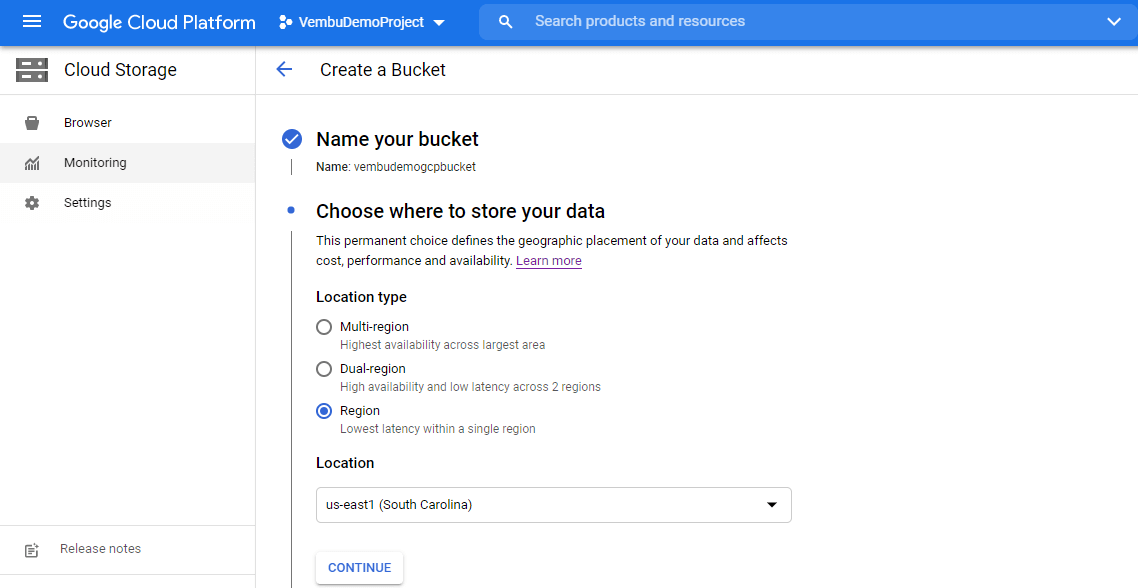
Choose where to store your data – This step is to configure the bucket location. When you create a bucket, you permanently define its geographic location, which is the physical place where object data in the bucket resides. You can select from the following location types:
- Region – A region is a specific geographic place, such as us-central1 ( Iowa )
- Dual Region – A dual-region is a specific pair of regions, such as Tokyo and Osaka
- Multi-Region – A multi-region is a large geographic area, such as the United States, multiple regions in the European Union, multiple regions in Asia that contain two or more geographic places
Here we are going to choose a region us-east1 ( South Carolina )
Click continue to the step3
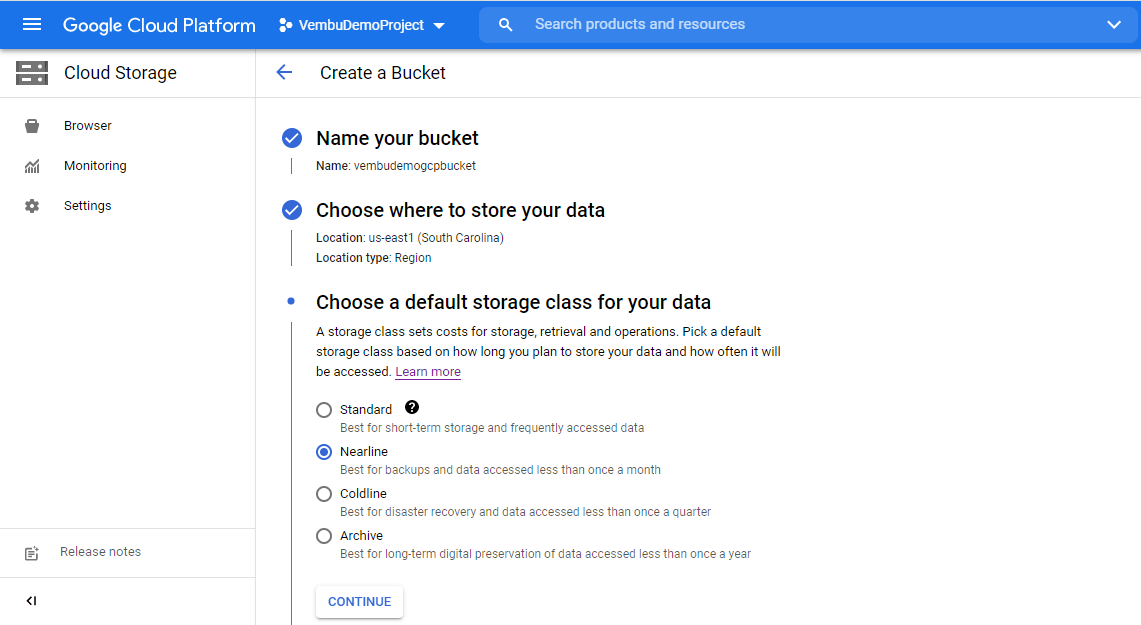
Choose a default storage class for your data – A storage class is a piece of metadata that is used by every object. The storage class set for an object affects the object’s availability and pricing model. When you create a bucket, you can specify a default storage class for the bucket. When you add objects to the bucket, they inherit this storage class unless explicitly set otherwise. A storage class sets costs for storage, retrieval, and operations. Pick a default storage class based on how long you plan to store your data and how often it will be accessed. The primary storage classes offered by Cloud Storage are
Standard – No minimum storage duration. 99.99% availability in all the above storage region
Nearline – 30 days minimum storage duration. 99.95% availability in all the storage regions
Coldline – 90 days minimum storage duration. 99.95% availability in all the storage regions
Archive – 365 days minimum storage duration. 99.95% availability in all the storage regions.
We have chosen the Nearline storage class. Click Continue to the next step 4
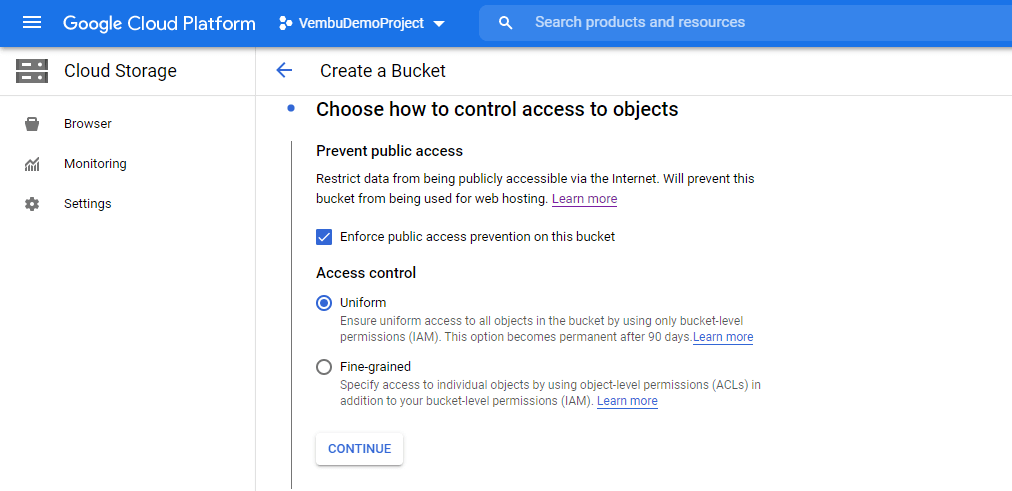
Choose how to control access to objects – In this step, you can control who has access to your Cloud Storage buckets and objects and what level of access they have. When you create a bucket, you should decide whether you want to apply permissions using uniform or fine-grained access.
Uniform access – Uniform bucket-level access allows you to use Identity and Access Management (IAM) alone to manage permissions. IAM applies permissions to all the objects contained inside the bucket or groups of objects with common name prefixes. IAM also allows you to use features that are not available when working with ACLs, such as IAM Conditions and Cloud Audit Logs. This is the recommended access for the newly created bucket.
Fine-grained: The fine-grained option enables you to use IAM and Access Control Lists (ACLs) together to manage permissions. ACLs are a legacy access control system for Cloud Storage designed for interoperability with Amazon S3. You can specify access and apply for permissions at both the bucket level and per individual object.
In this step, you can also prevent public access. You can restrict data from being publicly accessible via the Internet. Will prevent this bucket from being used for web hosting. Here we are enforcing public access prevention on this bucket, and we are selecting the default option “Uniform” access. Click Next to continue to the last step 5.
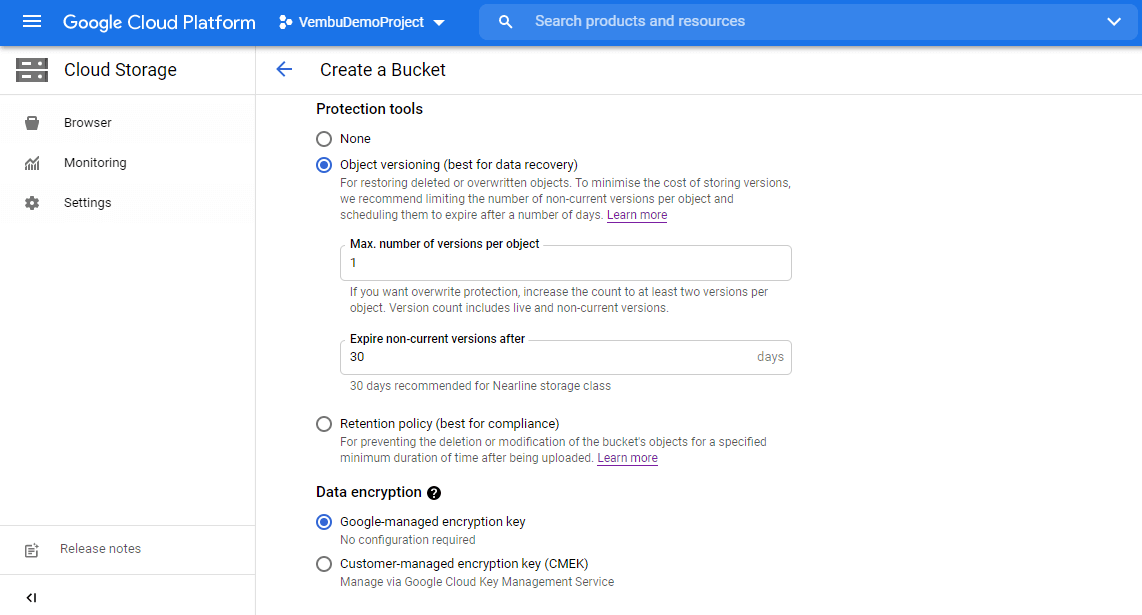
Choose how to protect object data – In this step, you can configure additional data protection options to prevent data loss by choosing the protection tools available. Available tools are :
Object versioning – To support the retrieval of objects that are deleted or replaced, Cloud Storage offers the Object Versioning feature. You can enable or disable this feature. Once enabled, Cloud Storage retains a noncurrent object version each time you replace or delete a live object version, as long as you do not specify the generation number of the live version.
You permanently delete versions of objects by including the generation number in the deletion request or by using Object Lifecycle Management.
Retention policy – You can configure a data retention policy for a Cloud Storage bucket that governs how long objects in the bucket must be retained. The feature also allows you to lock the data retention policy, permanently preventing the policy from being reduced or removed.
You could also enable encryption of your data by providing the key either a Google-managed encryption key or a customer-managed encryption key.
Here we have selected object versioning and Google managed encryption key for protection and encryption of the data available in the bucket.
This is the final step, and you can click the Create button to create the storage bucket. Within a few minutes, your storage bucket will be created. You can view the newly created bucket under the Storage → Browser → Name of the bucket ( by selecting the name of the bucket ). You can view all the details of the storage bucket similar to the picture given below.
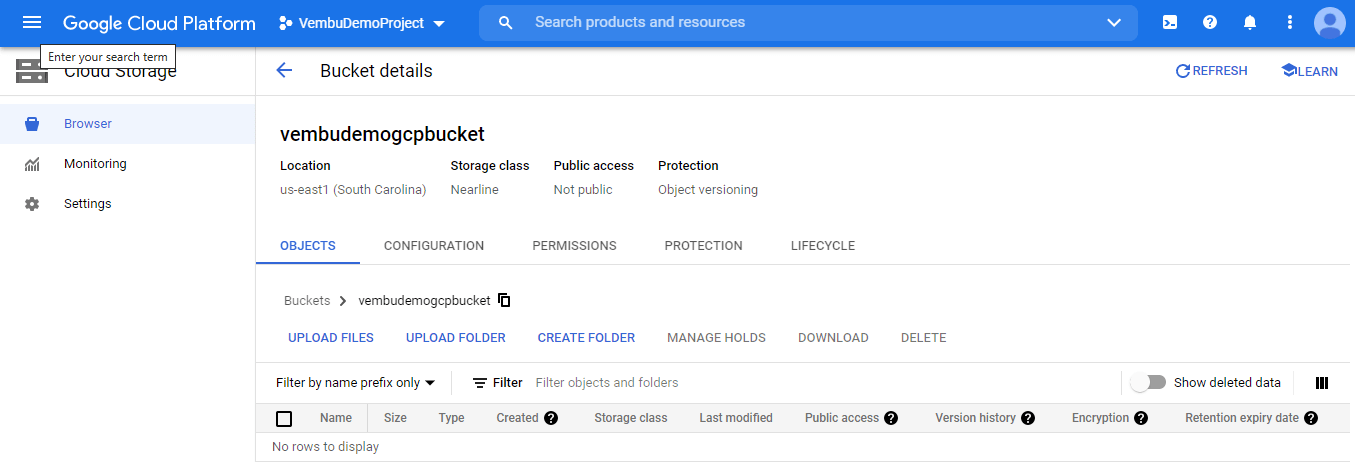
Here you can have 5 tabs to use for editing the bucket details. They are
- Objects tab
- Configurations tab
- Permissions tab
- Protection tab and
- Lifecycle tab
The Objects tab is to create folders and upload files and folders into it from your computer.
Configuration tab – It provides an overview of the storage bucket. You can also edit or change the storage class, access control, and encryption key settings. The below screenshot shows these details
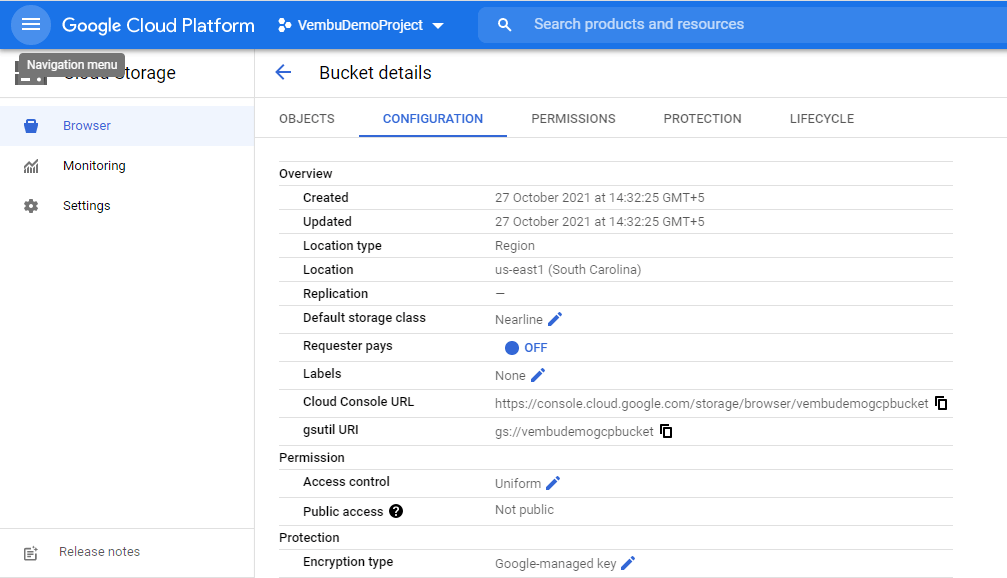
Permissions tab – Here you can change the settings for public access and access control methods. You can also add or remove principles and roles here.
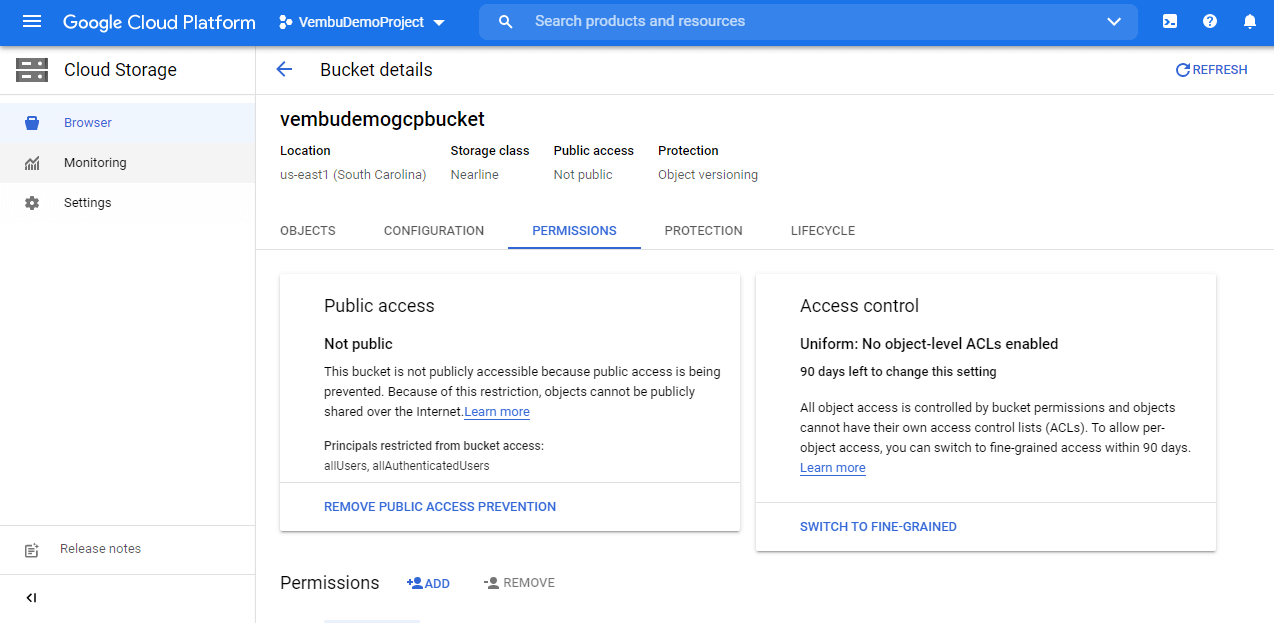
Protection tab – Here you can change the settings for object versioning, retention policy, and event-based hold options.
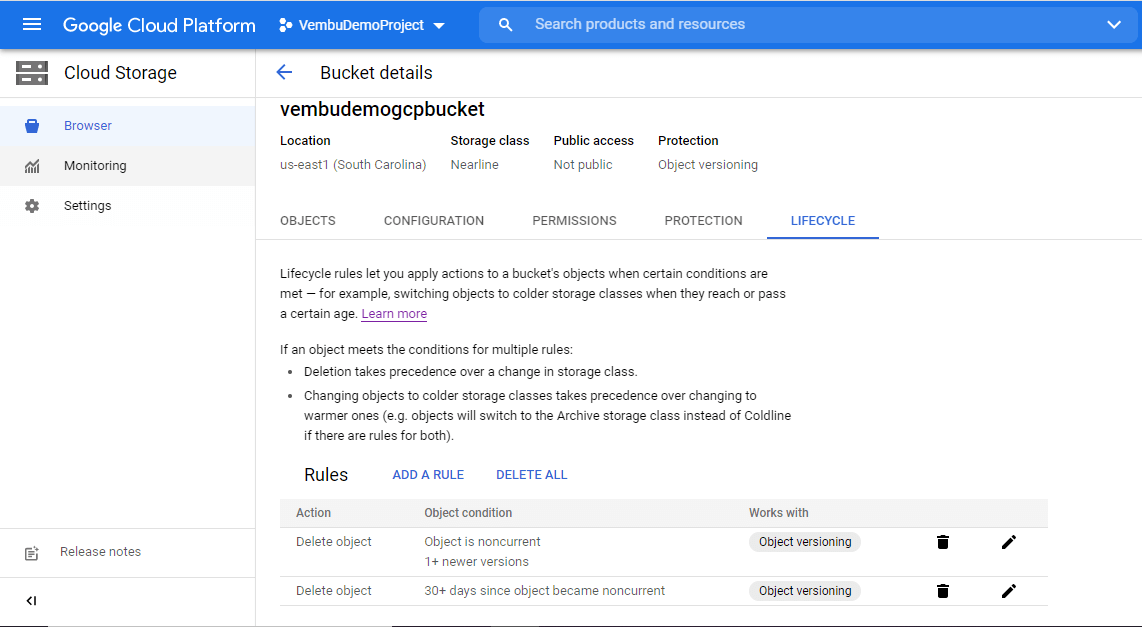
Lifecycle Rules – Lifecycle rules let you apply actions to a bucket’s objects when certain conditions are met. When defining a rule, you can specify any set of conditions for any action. If you specify multiple conditions in a rule, an object has to match all of the conditions for the action to be taken. If you specify multiple rules that contain the same action, the action is taken when an object matches the condition(s) in any of the rules. Each rule should contain only one action. You can add or delete a rule from this page.
Conclusion
GCP Cloud storage is reliable and secure object storage. You can make a transition to lower-cost classes easily when it meets the criteria you specify, such as when it reaches a certain age or when you’ve stored a newer version of the data. Through “storage transfer service” and “transfer service for on-premise data” easily transfer your on-premise data to any GCP storage bucket easily. Also, the GCP console provides ease of setting up the storage bucket in a few steps and can initiate the data transfer easily. For any SMB or enterprise company, this becomes a cost-effective storage location for backup and disaster recovery solutions.
Related Posts:
The Ultimate Guide to Amazon S3 and S3 Compatible Object Storage
Data protection with Google Cloud (Object) Storage
Follow our Twitter and Facebook feeds for new releases, updates, insightful posts and more.


Leave A Comment