Introduction :
What is Azure Managed Disk Sharing?
Microsoft introduced Azure Shared Disk in Q1 of 2022. Azure shared disks is a feature for Azure managed disks, that allow you to attach a managed disk to multiple virtual machines (VMs) simultaneously. Shared Disk allows you to attach a managed disk to more than one host. Effectively, this means that Azure now has the equivalent of SAN storage, enabling Highly Available clusters to use shared disk in the cloud.
Enabling shared disks is only available to a subset of disk types. Currently only ultra disks, premium SSD v2 managed disks, premium SSD managed disks, and standard SSDs can be enabled as shared disks.
What is Azure managed disk bursting?
Microsoft document says Azure offers the ability to boost disk storage IOPS and MB/s performance, this is referred to as bursting for both virtual machines (VM) and disks. Users can effectively use VM and disk bursting to achieve better bursting performance on both the VMs and its disks.
Further it adds, bursting for Azure VMs and disk resources aren’t dependent on each other. User doesn’t need to have a burst-capable VM for an attached burst-capable disk to burst. Similarly, user doesn’t need to have a burst-capable disk attached to your burst-capable VM for the VM to burst.
Why you require a disk bursting in a Azure VM ?
There are some common scenarios where users can configure disk bursting to gain performance on certain metrics as below:
- Improve startup times– With bursting, your instance will start up at a faster rate. For example, the default OS disk for premium enabled VMs is the P4 disk, which gives a provisioned performance of upto 120 IOPS and 25 MB/s. With bursting, the P4 can go upto 3500 IOPS and 170 MB/s allowing for startup to accelerate by up to 6X.
- Handle batch jobs – Some application workloads are cyclical in nature. They require a baseline performance most of the time, and higher performance for short periods of time. An example of this is an accounting program that processes daily transactions that require a small amount of disk traffic. At the end of the month this program would complete reconciling reports that need a much higher amount of disk traffic.
- Traffic spikes – Web servers and their applications can experience traffic surges at any time. If your web server is backed by VMs or disks that use bursting, the servers would be better equipped to handle traffic spikes.
Types of managed disks that support disk bursting
Currently Microsoft Azure offers the support for disk bursting only for Premium SSD managed disks and standard SSD managed disks. Standard HDD disks do not support disk bursting.
Also Azure supports two models of bursting for the SSD disk, they are :
- An on-demand bursting model, where the disk bursts whenever its usage exceed its current capacity. This model incurs additional charges anytime the disk bursts. On-demand bursting is only available for Premium SSDs larger than 512 GiB.
- A credit-based model, where the disk will burst only if it has burst credits accumulated in its credit bucket. This model does not incur additional charges when the disk bursts. Credit-based bursting is only available for Premium SSD managed disks 512 GiB and smaller, and standard SSDs 1024 GiB and smaller.
Here premium SSD managed disks support both on-demand and credit-based bursting model and standard SSD managed disks supports only credit-based model.
In this blog, we are providing the steps for creating a Premium SSD managed disks, how to share a managed disk and how we can enable disk bursting (Both on-demand and credit based model ):
Creating a premium SSD managed disk in Azure
Login to Azure portal, choose the service Disks, and click Create (+ sign) to create a managed disk.
Choose the subscription and Resource group. If the users don’t have one, a new resource group can be created before creating this managed disk creation step.
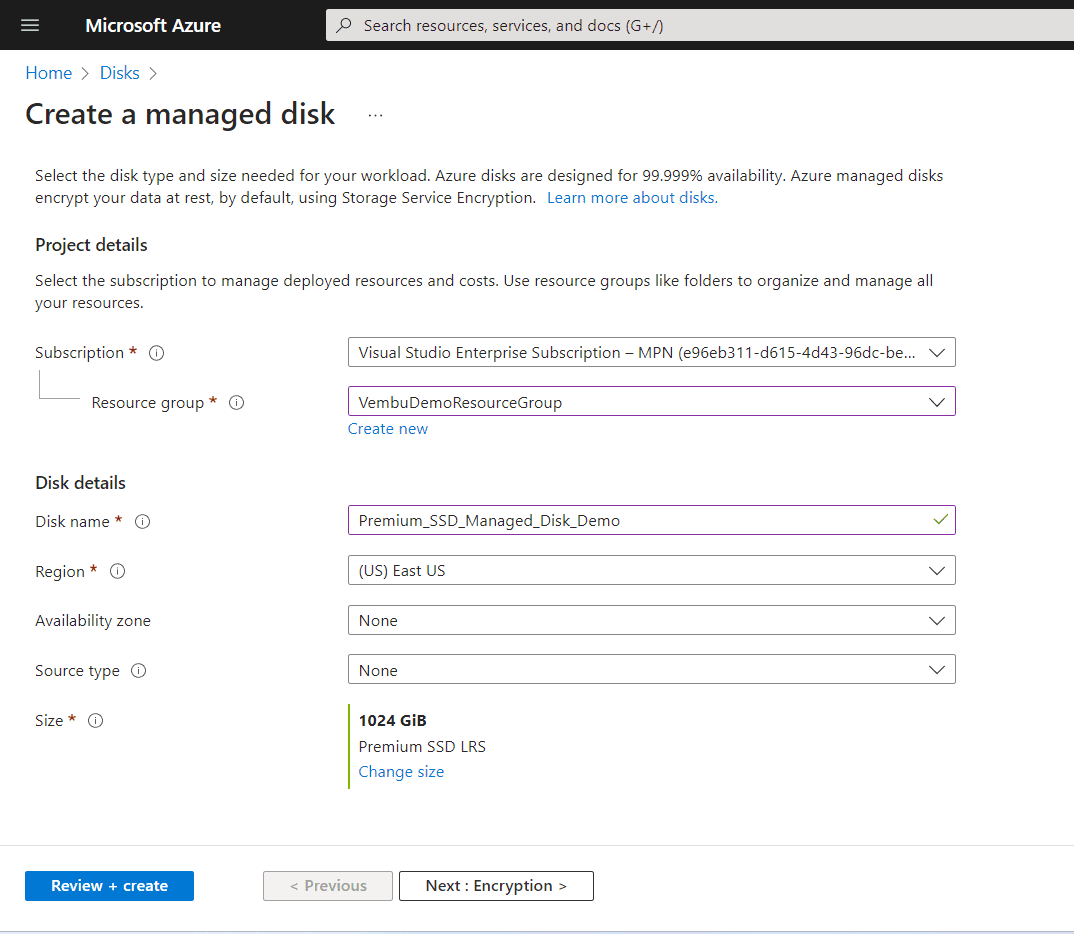
Provide disk details such as a name for the disk, region into which the disk resource should be deployed, availability zone and the size of the disk. Below screenshot shows these details:

If you want to configure Encryption, Networking access for the disk – Go to the next screens, else click the “Review + create ” button. In this step, enabling shared disk and on-demand bursting cannot be done and users can enable separately.

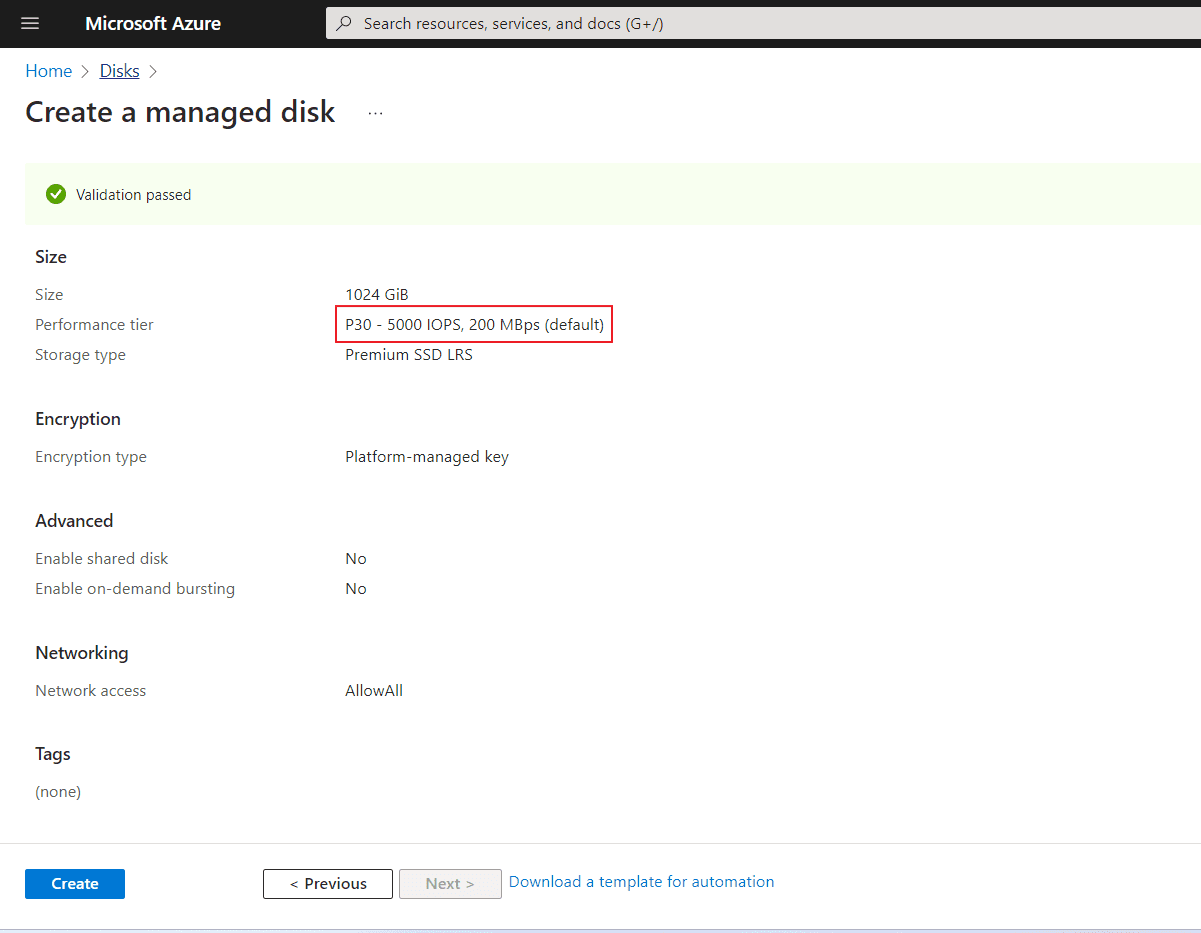
Here you can note down the performance tier metrics such as IOPS and speed as 30-5000 IOPS and 200 MBps. These values are default before enabling the disk burst. click create to finish the disk creation process.
Users will get a “Deployment is in Progress” for a while and finally get the deployment complete message. Now the created disk is available in the Disks list view.
Enabling shared disks :
Enabling shared disks is only available to a subset of disk types. Currently only ultra disks, premium SSD v2 managed disks, premium SSD managed disks, and standard SSDs can be enabled as shared disks. Shared disks can be attached to individual Virtual Machine Scale Sets but can’t be defined in the Virtual Machine Scale Set models or automatically deployed. Each disk type has its own limitations, when you enable shared disk. Users are advised to check with Microsoft documentation for more details to rightly choose the disk type based on the shared disk support for the Operating systems they use, and the billing implications.
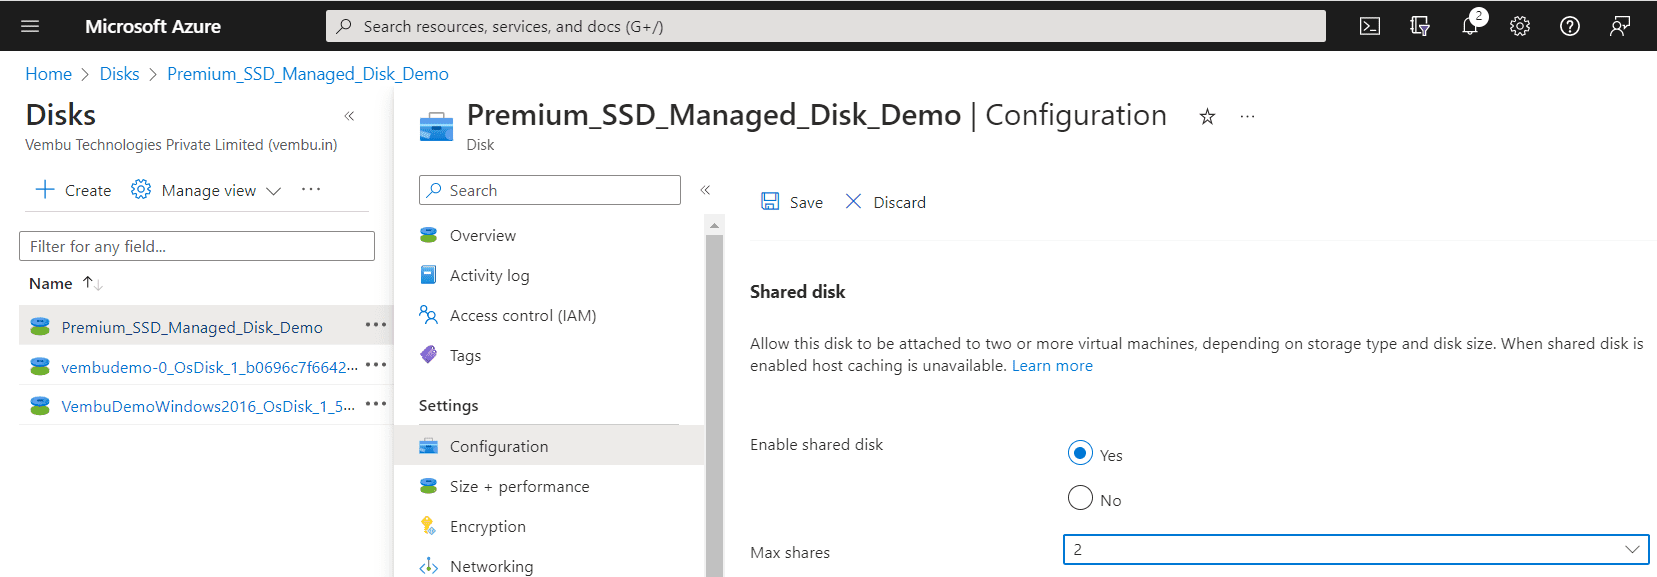
Choose the disk created recently in the Disks view, and choose Configuration under Settings. Here we can see an option ( a radio button ) to enable the shared disk and users can provide a max share value. Users can choose start from 2 to 5. Here if you choose 2, users can mount the disk to 2 VMs and so on.
Below screenshot shows the shared disk is enabled and the Max share count is 2.

Enabling On Demand bursting for a managed disk
On-demand bursting can be enabled with either the Azure portal, the Azure PowerShell module, the Azure CLI, or Azure Resource Manager templates. A managed disk must be larger than 512 GiB to enable on-demand bursting. Also note that a shared disk cannot be enabled for on demand bursting.
To enable on-demand bursting for an existing disk,
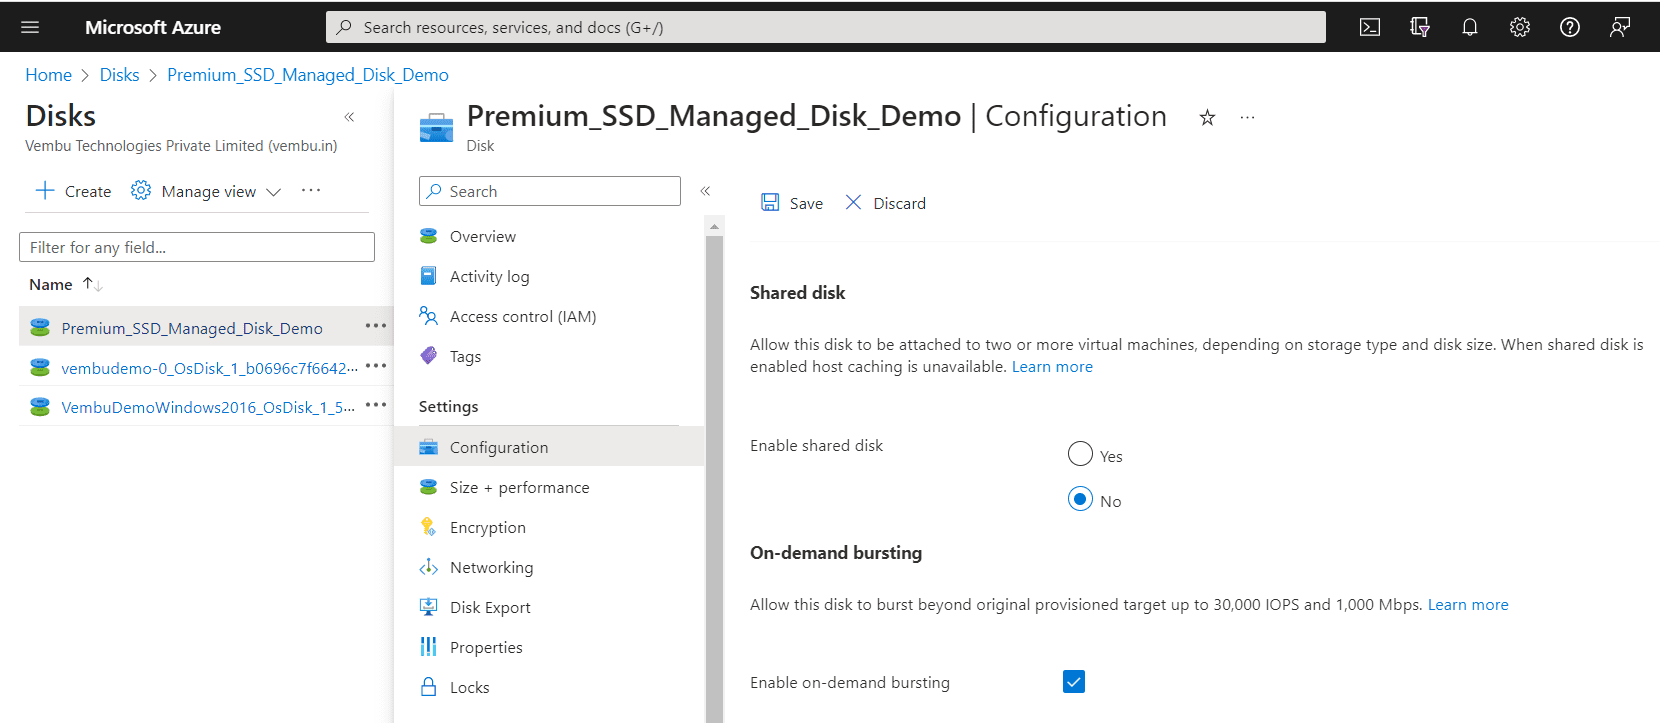
Select the disk from the Disks view, choose configuration under settings and select the “Enable on demand bursting ” option. The below screenshot shows this setting.

Before enabling the on- demand bursting, users should consider the following points.
- On-demand bursting cannot be enabled on a premium SSD that has less than or equal to 512 GiB. Premium SSDs less than or equal to 512 GiB will always use credit-based bursting
- On-demand bursting is only supported on premium SSDs. If a premium SSD with on-demand bursting enabled is switched to another disk type, then disk bursting is disabled.
- On-demand bursting doesn’t automatically disable itself when the performance tier is changed. If you want to change your performance tier but do not want to keep disk bursting, you must disable it.
- On-demand bursting can only be enabled when the disk is detached from a VM or when the VM is stopped. On-demand bursting can be disabled 12 hours after it has been enabled.
Conclusion :
The services Azure Managed Disk sharing and Disk bursting are pretty much useful when you design an eco-system with multiple Azure VMs. When you deploy an application which require a disk cluster based setup having more than one VMs, the Azure managed disk sharing service is essential. When you deploy an application which requires on-demand performance, users can use the service “manged disk bursting”. But currently the cost of enabling these services is not a frugal one, users must understand thoroughly each type of disk they use and must follow the metric they arrived at after implementation for optimal cost and resource utilization.
Follow our Twitter and Facebook feeds for new releases, updates, insightful posts and more.


Leave A Comment