Quick Bites:
- The blog explains the importance of merging Hyper-V checkpoints to ensure optimal performance and data integrity.
- It distinguishes between production and standard checkpoints and details why checkpoints should not be permanent fixtures.
- It provides step-by-step guides on how to merge Hyper-V checkpoints using Hyper-V Manager, PowerShell, and manual methods.
- The blog highlights best practices and the necessity of managing checkpoints to prevent performance degradation and data protection issues.
Hyper-V checkpoints play a key role in the overall lifecycle management of Hyper-V virtual machines as they allow for effectively managing and performing software updates, upgrades, and installations with an effective rollback mechanism when things go badly.
In the latest releases of Hyper-V, Microsoft has enhanced and added to the checkpoint functionality with even more robust features including production checkpoints and utilizing the benefits of the ReFS file system. After Hyper-V checkpoints are used however, getting rid of the checkpoints once they have served their purpose is certainly the best practice procedure in managing Hyper-V checkpoints.
Table of Contents
- Production checkpoints vs standard checkpoints on a virtual machine Virtual hard disk
- What is a production checkpoint?
- What is a standard checkpoint?
- Why Hyper-V Checkpoints Need to be Merged
- What does this involve?
- Checkpoint Merge Operations
- Checkpoints Should Not Be permanent
- Clearing Checkpoints Helps Ensure Performance
- Data Protection Issues
- A Necessary Best Practice
- Merge Hyper-V Checkpoints with Hyper-V Manager
- Hyper-V checkpoint structure
- What is Hyper-V merge Hyper-V Snapshots
- Merge Hyper-V Checkpoints with Windows PowerShell
- Using a PowerShell one-liner cmdlet
- Removing Hyper-V checkpoints with a script
- The Merge VHD cmdlet
- How to Manually Merge Checkpoints in Hyper-V Virtual Machines by using Edit Disk
- Concluding Thoughts
We have covered How to create Hyper-V Checkpoints and Managing Hyper-V Checkpoints in our previous posts.
In this post we’ll take a look at the following:
- Why Hyper-V Checkpoints need to be merged
- How to merge Checkpoints using Hyper-V Manager, and PowerShell
- How to manually merge Hyper-V Checkpoints
Production checkpoints vs standard checkpoints on a virtual machine Virtual hard disk
What is a production checkpoint and how does it compare with a standard checkpoint tree? Microsoft has added additional checkpoint capabilities in Windows Server 2016 and Windows 10. Now, you can choose between standard and production checkpoints for virtual machines. What do the production checkpoints offer compared to standard checkpoints when you create checkpoint files on a VM?
What is a production checkpoint?
Production checkpoints, or production snapshots, are described by Microsoft as “point in time” images of a VM that can be restored at a later time in a way that is supported for production workloads. So, this type of Hyper-V snapshot provides advantages.
Essentially, the production checkpoint is handled like a true backup where Hyper-V leverages VSS inside the guest operating system to quiesce and ensure data consistency compared to the saved state checkpoint.
The VM checkpoints created with production checkpoints do not contain the virtual machine memory state and carry out a file system freeze. These can be leveraged as a part of an overall reliable backup strategy.
However, with the interaction with VSS, a Linux Virtual machine will not be able to take advantage of the integration between VSS and the production checkpoint. If the production checkpoint fails, it may be due to limitations with the guest operating system.
What is a standard checkpoint?
A standard VM checkpoint tree is the type of Microsoft Hyper-V VM snapshot files most are familiar with as it captures the memory state with the Hyper-V snapshots along with the hardware configuration of a running virtual machine memory state.
These are useful when creating a specific point for rollbacks in Dev/Test environments or troubleshooting a problem. However, without care, these can create data inconsistency issues.
Why Hyper-V Checkpoints Need to be Merged
While checkpoints provide tremendously powerful functionality for remediating failed software updates or other issues related to changes made to a Hyper-V VM, they need to be managed properly. Proper management of Hyper-V virtual machines involves making sure Hyper-V snapshots are merged back into the base disk.
What does this involve?
Checkpoints work by creating “delta” disks that house all the new writes to a virtual machine disk. This ensures that any new data changes are made to the delta or “differencing” disk.
This provides the protection against failed software updates or other changes made to the virtual machine as if these are not successful, the checkpoint can simply be reverted and the virtual machine is back to the state it was in before the changes were made.
Checkpoint Merge Operations
If it is decided to keep the changes made to a virtual machine after a checkpoint was created and the software update or other changes were deemed successful, it is time to merge the checkpoint. The merge operation basically integrates all the changes made to the virtual machine captured in the differencing disk (AVHDX filefiles) back into the base virtual disk. The end result is the base disk contains all the data and changes made to the virtual machine as if the checkpoint was never created and all changes were simply captured in the base disk. Even though we know this was not the case, this is the magic of virtualization and Hyper-V checkpoints.
Checkpoints Should Not Be permanent
Checkpoints are not meant to be a permanent fixture of a Hyper-V virtual machine. In fact, keeping checkpoints around long-term can lead to undesirable effects such as performance degradation. Having multiple checkpoints on a Hyper-V virtual machine leads to inefficiency in the way disk I/O is performed on a Hyper-V virtual machine.
Even though all writes on the virtual machine are captured in the current checkpoint AVHDX files, data that is read from the virtual machine may have to traverse numerous checkpoints and the base disk which leads to disk latency and poor performance after time. Checkpoints will continue to grow on disk the longer they are left on a Hyper-V virtual machine.
You can backup your Hyper-V VMs for free with no feature restriction. Download BDRSuite Now
Clearing Checkpoints Helps Ensure Performance
Keeping checkpoints merged and the virtual machines clear of longstanding checkpoints ensures performance is optimal and space is not unnecessarily being consumed. When unnecessary checkpoints are in existence on a Hyper-V virtual machine, there is more likelihood of corruption of the virtual disks.
Data Protection Issues
Additionally, unnecessary checkpoints in existence on a Hyper-V virtual machine can lead to data protection solutions not being able to effectively make use of Resilient Change Tracking mechanisms to ensure only the changes are copied across since the last backup operation was performed.
A Necessary Best Practice
These are some of the more important reasons that Hyper-V checkpoints need to be managed in such a way that unnecessary checkpoints are merged appropriately and in a timely manner. Lingering checkpoints lead to issues across multiple fronts.
Since it is well established that Hyper-V checkpoint merge operations are a necessary best practice to keeping a Hyper-V environment running efficiently and performing as expected, let’s take a look at the various methods for merging Hyper-V checkpoints.
Merge Hyper-V Checkpoints with Hyper-V Manager
Generally, most Hyper-V administrators will resort to using Hyper-V Manager as the tool of choice if they have only a single Hyper-V checkpoint that needs to be merged on a single virtual machine. Hyper-V Manager provides an easy and intuitive GUI interface to merge checkpoints.
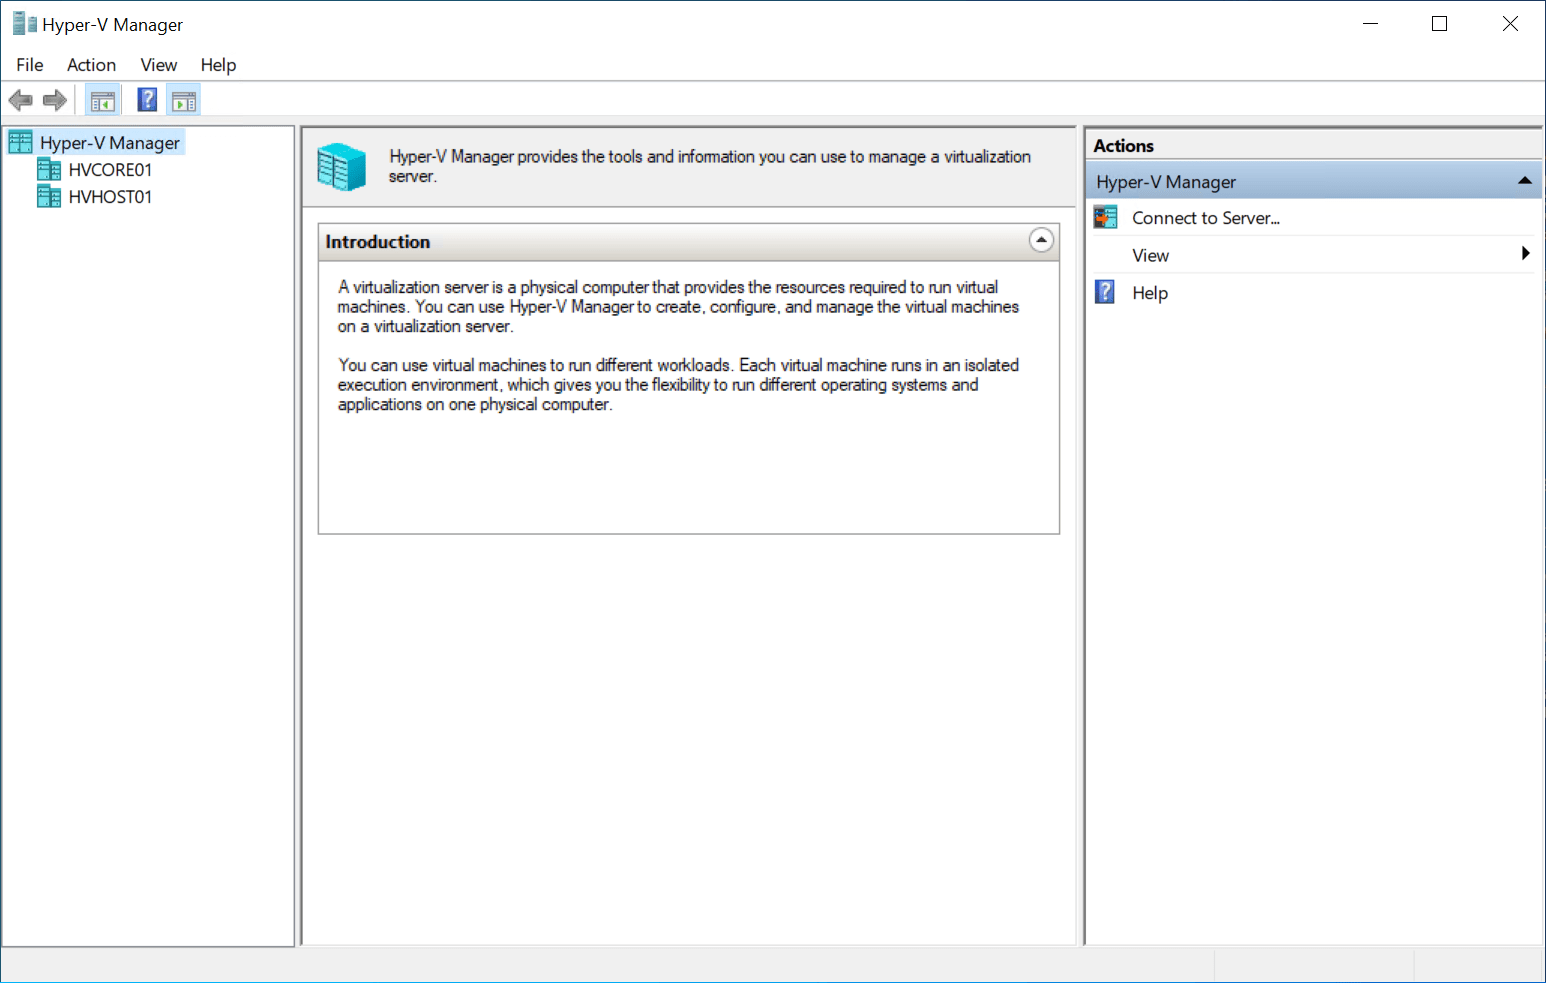
Hyper-V checkpoint structure
The checkpoint tree as it is called provides a hierarchical view of the checkpoints in existence on a Hyper-V virtual machine. Hyper-V can house 50 checkpoints per VM using Hyper-V Manager.
With System Center Virtual Machine manager or SCVMM, this limit can be extended out to 64 checkpoints. The checkpoint tree is based on the parent disk.
Note the checkpoint tree below.
What is Hyper-V merge Hyper-V Snapshots
A merge operation is simply a deletion of the snapshot with the realization in the background – the process is merging the data into the base disk instead of simply deleting the data.
To perform this deletion/merging of a Hyper-V checkpoint, open Hyper-V Manager, and you can simply right-click on the snapshot in question and it will yield the Delete Checkpoint and the Delete Checkpoint Subtree option.
Delete Checkpoint – This deletes the single checkpoint that you have focused on.
Delete Checkpoint Subtree – This option will delete the currently highlighted checkpoint and everything after it. This is due to the “subtree” checkpoints are built from the checkpoint previously created.
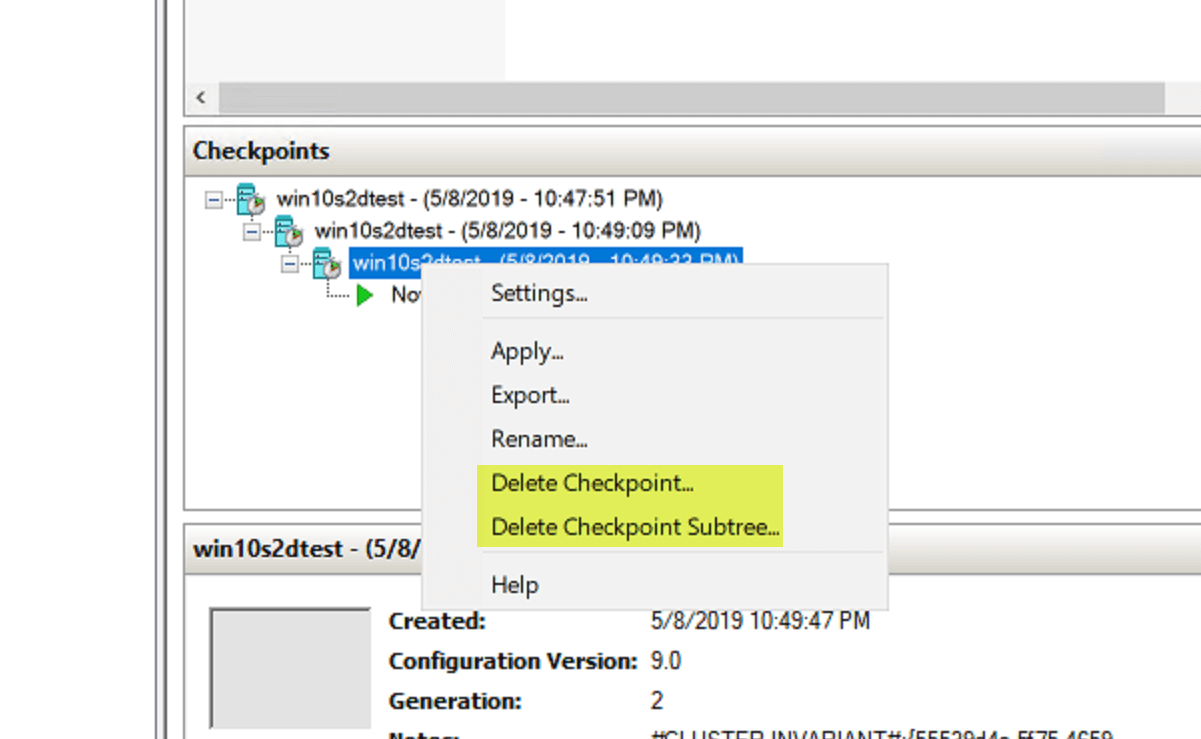
Deleting a Hyper-V Checkpoint by using the Delete Checkpoint or Delete Checkpoint Subtree options
Merge Hyper-V Checkpoints with Windows PowerShell
Using PowerShell to manage and merge checkpoints is a great way to perform these operations in Hyper-V at scale.
GUI management certainly has its place and can be used effectively for one-off checkpoint management tasks. However, if you are dealing with dozens or maybe even hundreds of hosts with virtual machines running checkpoints that may need to be merged, PowerShell is a great way to perform merge operations in an automated way.
Using a PowerShell one-liner cmdlet
To remove all the checkpoints found on all VMs on the current Hyper-V host, it is a simple one-line PowerShell command:
- Get-VM | Get-VMSnapshot | Remove-VMSnapshot
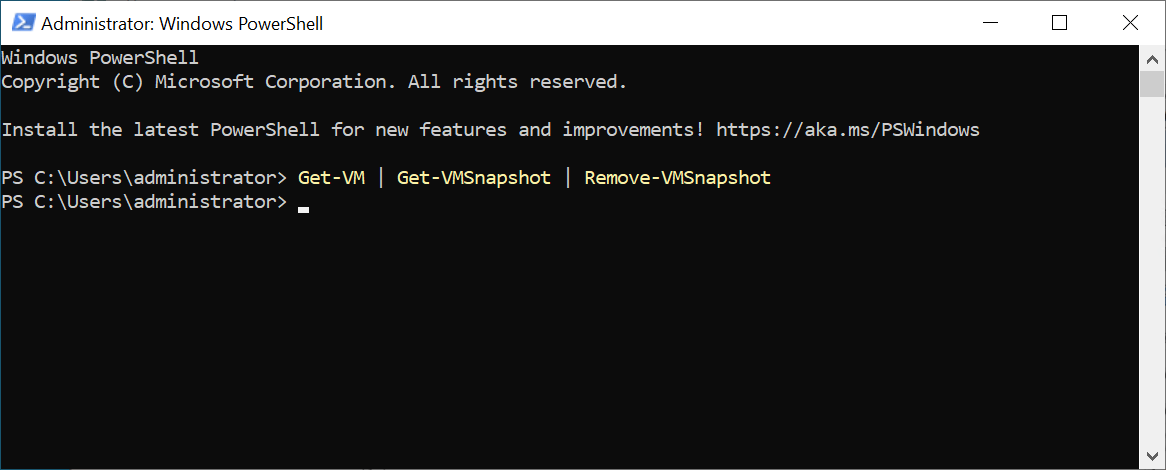
Removing the Hyper-V snapshot chain from your virtual machine will help to create additional space on the virtual machine storage.
Removing Hyper-V checkpoints with a script
If you wanted to remove a checkpoint across multiple hosts, you can use a simple “for” loop to accomplish this, why in a script file, while getting the nodes in a cluster and then looping through these to get a list of VMs and then deleting any checkpoints that exist.
$hvnodes = get-clusternode | select name -expandproperty name
foreach ($hvnode in $hvnodes) {
Get-VM -computername $hvnode | Get-VMSnapshot | Remove-VMSnapshot
}
The Merge VHD cmdlet
The Merge-VHD cmdlet merges VM hard disks in a differencing virtual hard disk chain. The merge is carried out from a source child disk to a destination child disk. The Merge-VHD operation is an offline operation that requires the disk chain to not be in use when merge hyper v snapshots operation is carried out.
How to Manually Merge Checkpoints in Hyper-V Virtual Machines by using Edit Disk
There may be cases where you need manual merge of your Hyper-V checkpoints in the case of corruption or failure with merging your checkpoints via the normal means.
Let’s look at how you perform a manual merge a Hyper-V checkpoint(s) into the parent disk.
As you can see, we have a VM with an existing checkpoint. After you open Hyper-V Manager, select the VM in Hyper-V Manager, under Actions click Edit Disk. Note you can inspect disk as well from this menu.
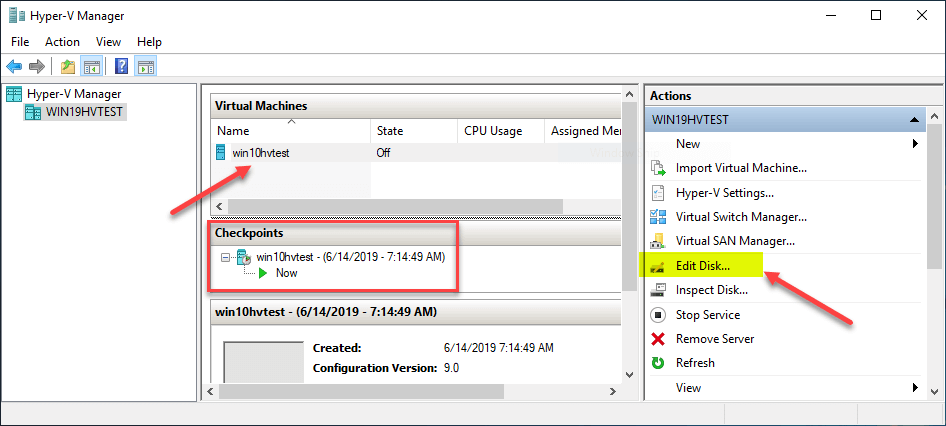
Beginning the process to manually merge a checkpoint for a virtual hard disk
Click Next to proceed manually merging the checkpoint.
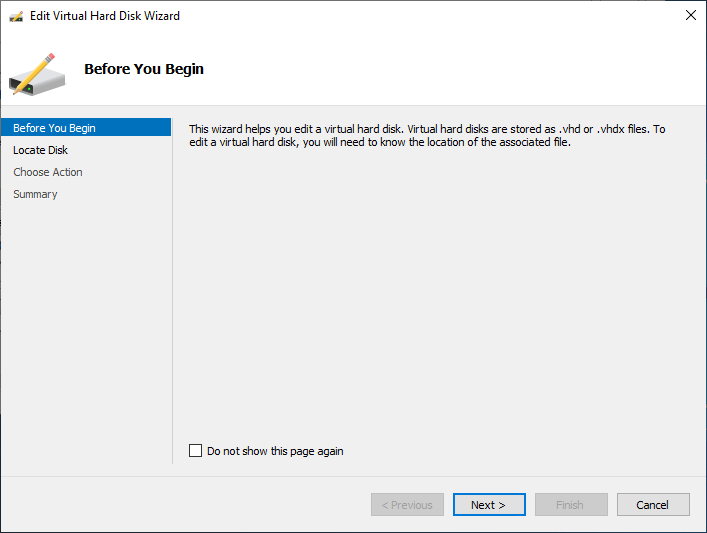
Beginning the Edit Virtual Hard Disk Wizard
You will be presented with the Locate Virtual Hard Disk screen. Click Browse to locate the AVHDX files you want to merge in the same folder.
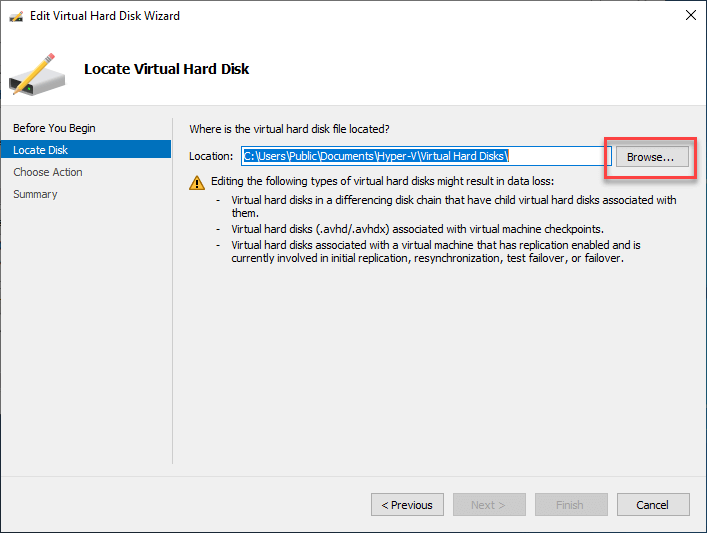
Browse to locate the AVHDX or AVHD files.
After you have selected the AVHDX file, click Open. This will return you back to the Locate Virtual Hard Disk
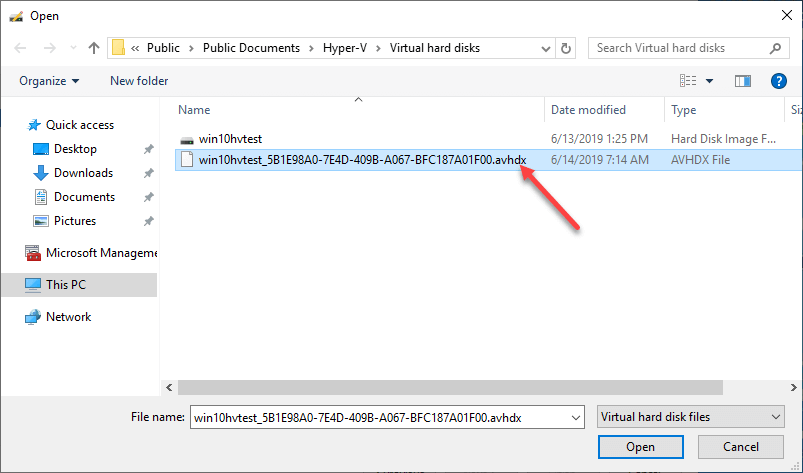
Select the AVHDX file
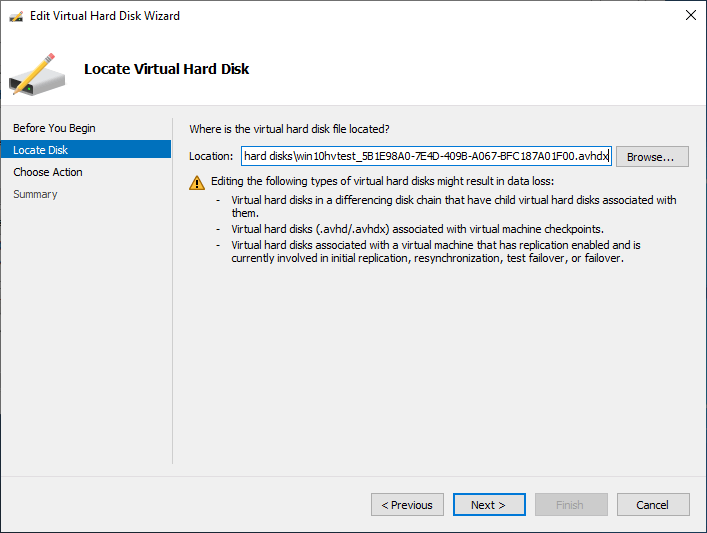
The AVHDX selected and read to merge
The next screen is the Choose Action screen. Here select the Merge option
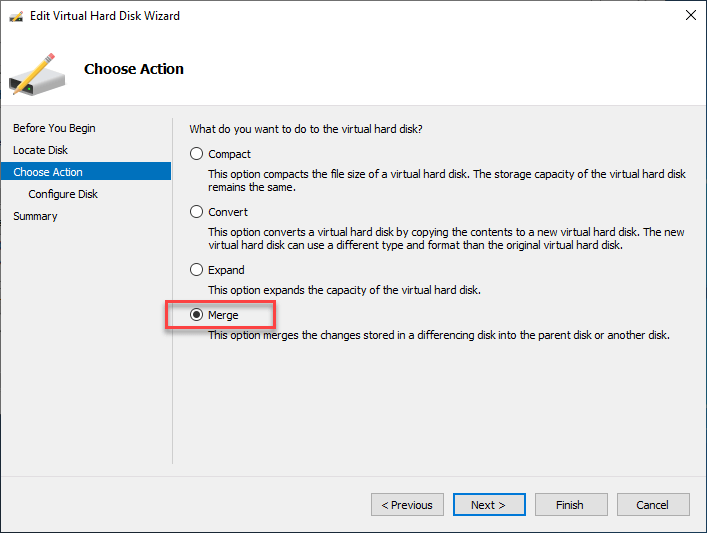
Selecting the Merge action for the AVHDX file
We are merging the changes from the differencing disk back into the parent virtual hard disk. However, you can merge it into a completely new virtual hard disk also.
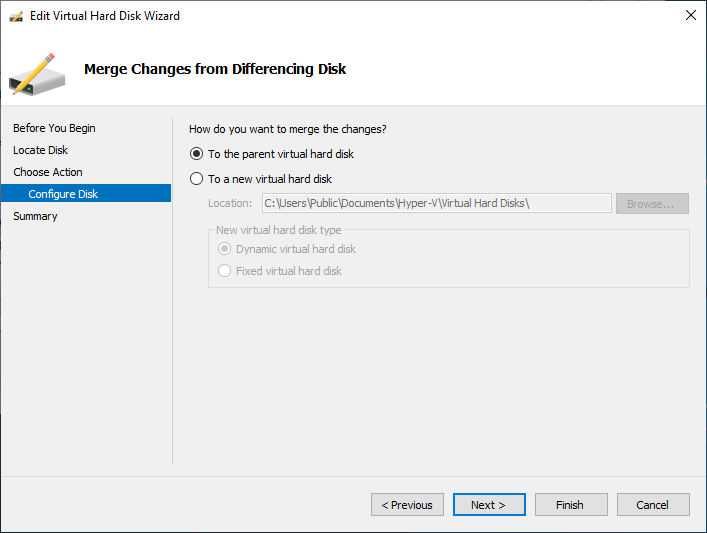
Select the Parent virtual hard disk
One the last screen, click Finish or select merge to begin the merge operation.
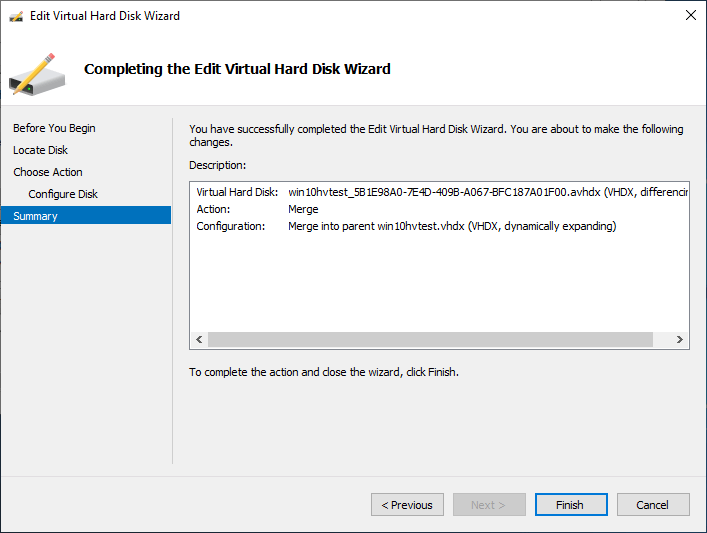
The merge operation ready to complete and will take more than a few seconds on large VM disks.
The AVHDX file is successfully merged back into the parent disk. As you can see, when you look at the disk files after the merge operation, there is no longer an AVHDX file, only the VHDX.
To use the newly merged file, create a new virtual machine and point the virtual machine to the manually merged file.
If you simply keep it on the original VM, you will receive an error regarding the checkpoint chain. Below, we are creating a new virtual machine and will point it to the merged VHDX.
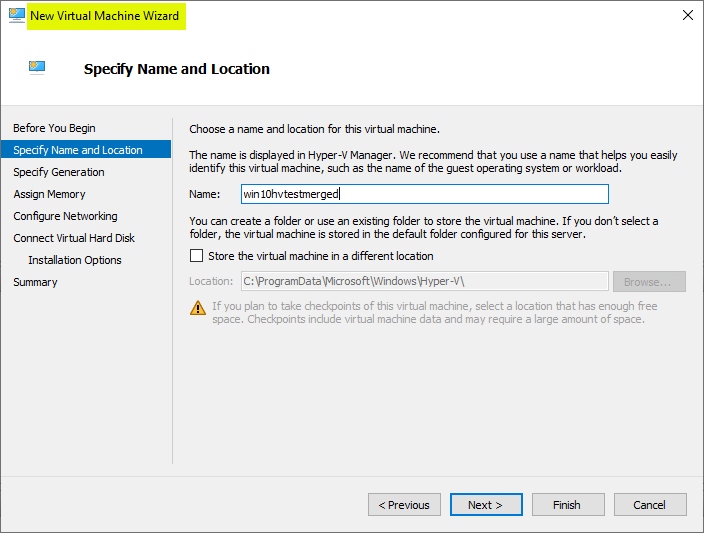
Creating a new Hyper-V virtual machine for the merged VHDX
On the Connect Virtual Hard Disk screen, select Use an existing virtual hard disk and Browse to the VHDX that has been merged.
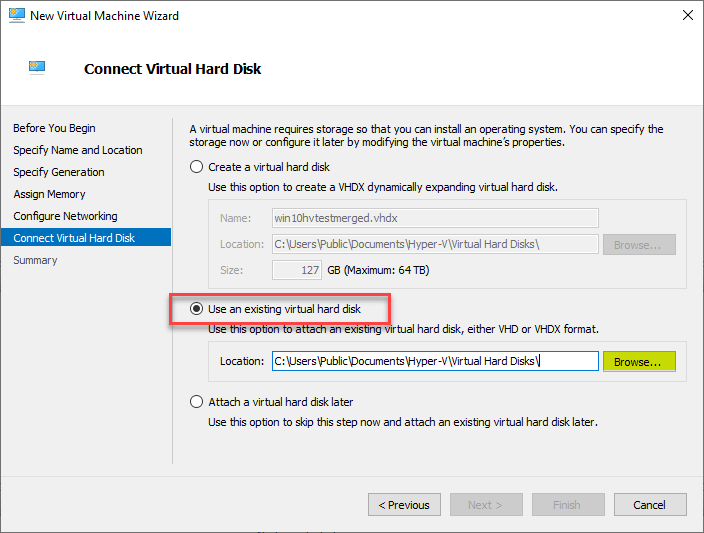
Pointing the virtual machine to the merged VHDX
Select the VHDX file and select Open
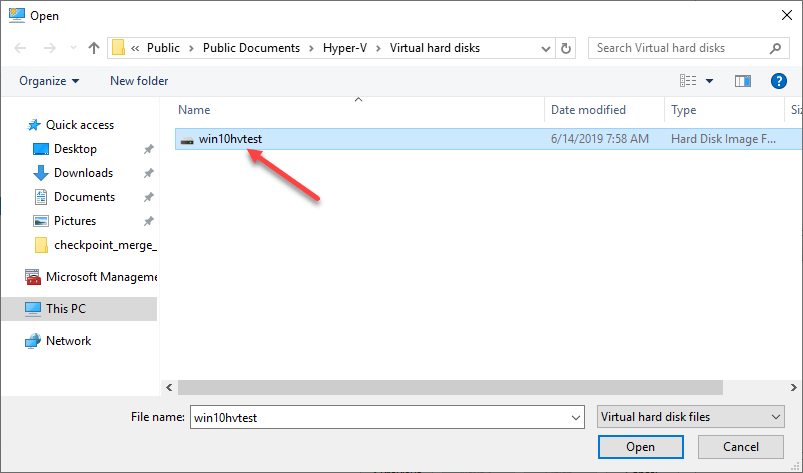
Selecting the merged VHDX file
Complete the New Virtual Machine Wizard.
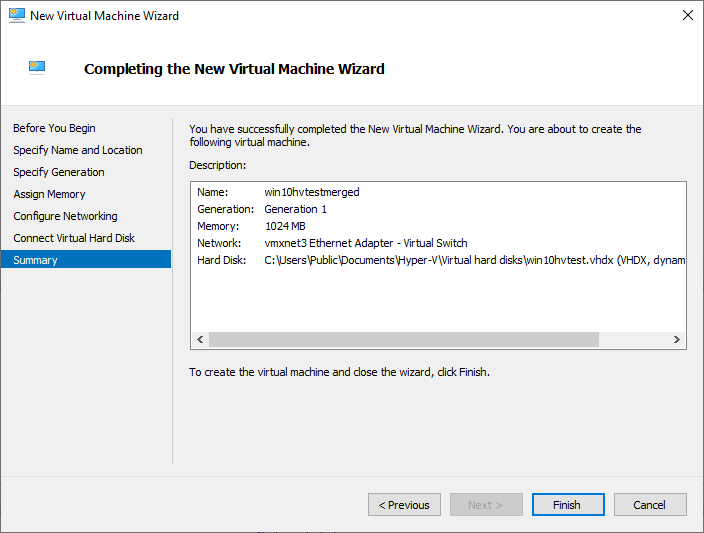
Finishing the new virtual machine wizard with the merged VHDX attached
Power ON the new virtual machine and you will have access to the merged VHDX data.
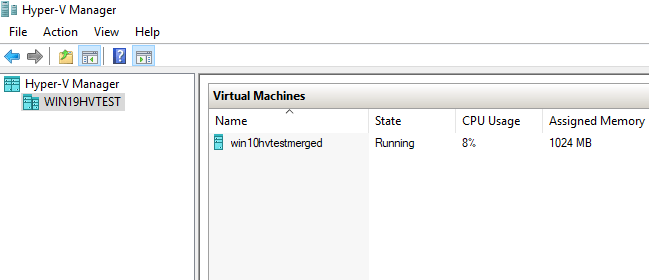
After merging the AVHDX file into the VHDX the new Hyper-V virtual machine is powered on. It is a complex operation that needs to be performed in a specific way to avoid errors.
As a note, the process to merge hyper v snapshots does not really fix checkpoints if these are corrupted.
Concluding Thoughts
The Hyper-V checkpoint merge operation is an extremely important process that allows checkpoints to be removed properly and the data held in the delta AVHDX disks to be merged back into the base disk for the Hyper-V virtual machine.
This helps to keep performance optimal for the virtual machine, corruption possibilities minimal, and allows data protection solutions to properly track changes made to the virtual machines since the last backup operation.
There are many great tools that can be used for managing and merging Hyper-V checkpoints such as the Hyper-V Manager GUI tool as well as PowerShell which allows programmatically managing and merging checkpoints in Hyper-V. Additionally, manual Hyper-V checkpoint merges can be performed for various use cases.
Embark on an Epic Quest: Unleash the Marvels of Hyper-V Backup Magic!
Empower your critical data with the enchantment of secure and seamless Hyper-V backup, forging an unbreakable shield of protection. Unlock the true potential of your virtual realm, preserving your invaluable information with unwavering confidence. This thrilling opportunity awaits — step into the realm of limitless possibilities and safeguard your data with a free trial today!
Ready to embark on this captivating adventure? Download BDRSuite now and take the first stride towards securing your Hyper-V environment. Embrace tranquility and immerse yourself in the realm of unparalleled Hyper-V backup excellence!
Want to delve deeper into the secrets of Hyper-V backup? Discover the wonders of Hyper-V Checkpoints – Part 2 – Working and Management and unravel the magic of seamless checkpoint management.
Before you go, don’t forget to explore What are Hyper-V Checkpoints – Part 1: Why and how to use them?, as we unravel the first chapter in mastering Hyper-V checkpoint wizardry. Unleash the true power of your virtual realm and shield it from any unforeseen challenges with the wisdom of BDRSuite!
Related Posts:
Beginner’s Guide for Microsoft Hyper-V: What are Hyper-V Checkpoints – Part 21
What are Hyper-V Checkpoints-Part 1: Why and how to use them?
Hyper-V Checkpoints – Part 2 – Working and Management
Beginners Guide for Microsoft Hyper-V: How to Install Microsoft Hyper-V with PowerShell – Part 3
Hyper-V Mastery: A Step-by-Step Guide for Beginners to Elevate Your IT Skills and Boost Your Career
Follow our Twitter and Facebook feeds for new releases, updates, insightful posts and more.


Leave A Comment