What are shared drives?
Google Workspace shared drives is a new feature in Google Drive, where you can share the contents of the shared drive with your colleagues or your team members. You can use shared drives in Google Drive to store, search, and access files with a team collaboratively.
The shared drive files belong to the team and not to the individual members.
Google Workspace shared drive will be useful when you and your team collaborate on a few files like documents, sheets, presentations, and forms. Similar to My Drive, you can share the files outside of the Organization also if the Organization settings permit. Even if members leave, the files stay in the shared drive, so your team can keep sharing information and work anywhere, from any device.
Currently, Google Workspace shared drive supports these subscriptions: Business Standard and Business Plus; Enterprise; Education Fundamentals, Education Standard, Teaching and Learning Upgrade, and Education Plus; Nonprofits; G Suite Business; Essentials.
Older versions of GSuite Basic and Google Workspace starter subscription do not support Google Workspace shared drive.
Shared Drive vs My Drive: A Comparison
In My Drive, when you create a file, the ownership belongs to you. You need to provide permission to access (read & write) to other users to collaboratively work.
In a Shared drive, when you create a file, your organization is the owner. Even if your account is deleted from the Organisation, members of the shared drive can access the file. So, your organization owns the files in a shared drive, not an individual. When an employee leaves and an admin deletes their account, their files still remain in shared drives.
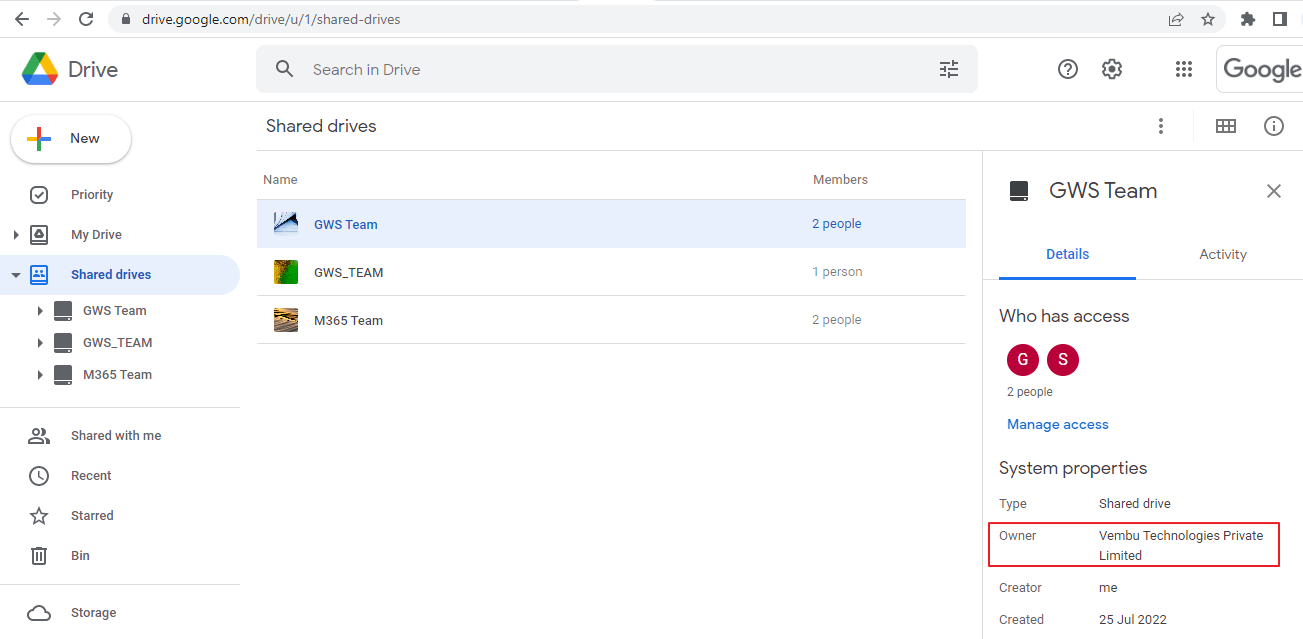
The below screenshot shows a shared drive with its details. Under system properties, you can see the owner of the shared drive which is the Organization, and not the user who created the shared drive.
Creating a Shared Drive
Any user can create a shared drive (If the Drive is turned ON for the Organisation & the OU permission he belongs to) on his Google Drive. Along with My Drive, you can see the shared drive on the left.
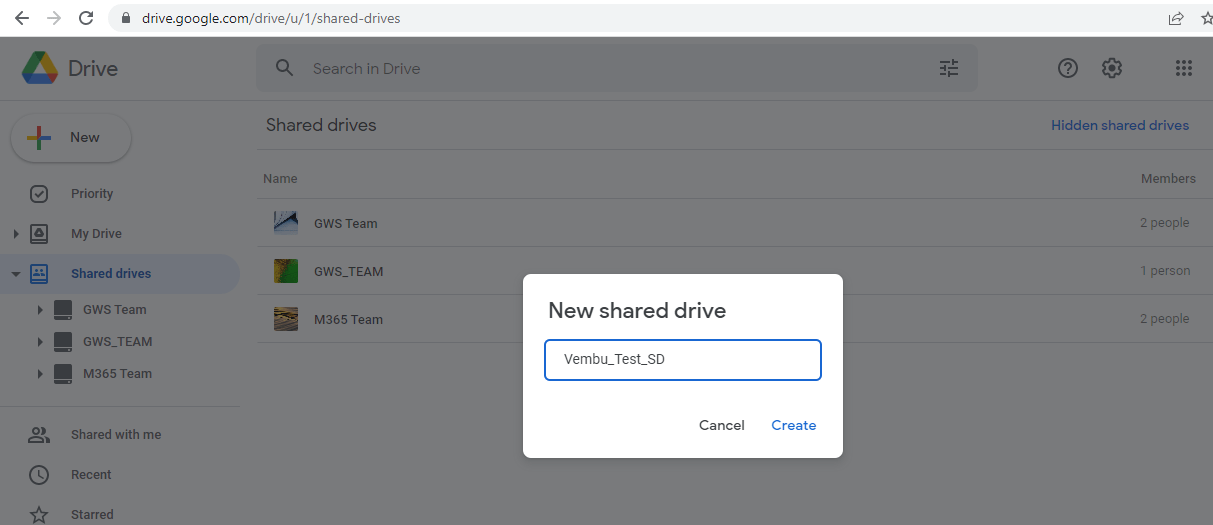
After choosing the shared drive, click the ‘New’ button on top to create a new shared drive. This will ask for a name for the shared drive. Provide a name and click “Create” to create a new shared drive. (Refer to screenshot below)
Assigning members to the Shared drive
Once the shared drive is created, the next step is assigning team members to the shared drive. For any Shared drive, the Organization’s users & groups can be added. Also, you can provide access levels for each user and group.
Follow the steps below to add users & groups to a shared drive:
- Choose the shared drive, you want to add the team members
- Click “Manage Members” available at the top of the shared drive page
- Add the email address of the user(s) on the pop-up page
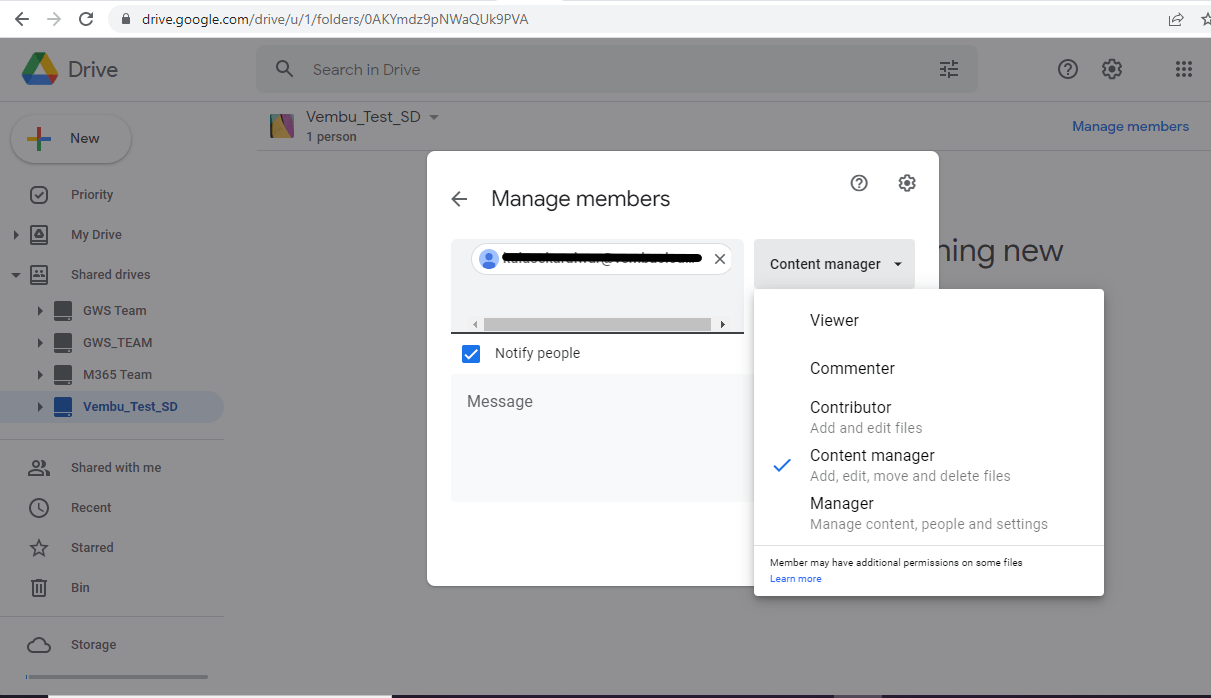
- After adding the email address of the user, you can set the access level for the shared drive for the user
- Enable Notify people
- Click “Send” to complete the process
While adding the user, you can set the access level for the user. There are five access levels to choose from in the menu.
- Viewer – Can only view files/folders in the shared drives
- Commenter – Can view and comment on files in shared drives
- Contributor – Create files/folders and Upload files/folders. Make, approve and reject edits made by other users. Also, he can add or remove users and groups on specific files in shared drives. Additionally, he can restore files and folders from the trash
- Content Manager – In addition to contributor permissions, he can move files and folders within a shared drive & Move shared drive files and folders into the trash
- Manager – In adipose tissue content manager permissions, he can add or remove people and groups on specific folders in shared drives, move files and folders from a shared drive to My Drive, move files and folders from one shared drive to another shared drive and permanently delete files and folders in the trash
Moving files to Shared Drive from My Drive
For collaboration work with your team members, you can create a new file in the shared folder or can move files from My Drive. All the members of your team can create a new file, or move their files from their respective “My Drive” locations.
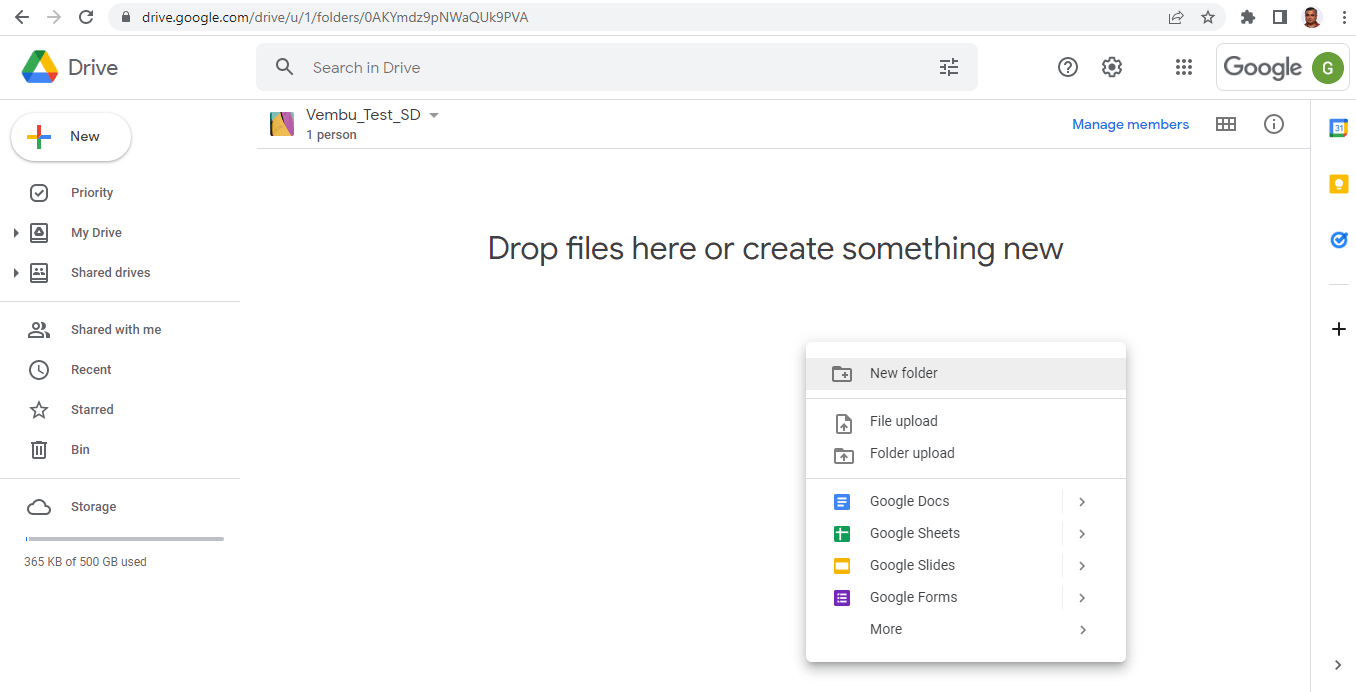
The below screenshot shows the user’s shared drive location. You can create a new folder, do a file/folder upload or even create any other files like Docs, Sheet, Slides, Forms, etc.
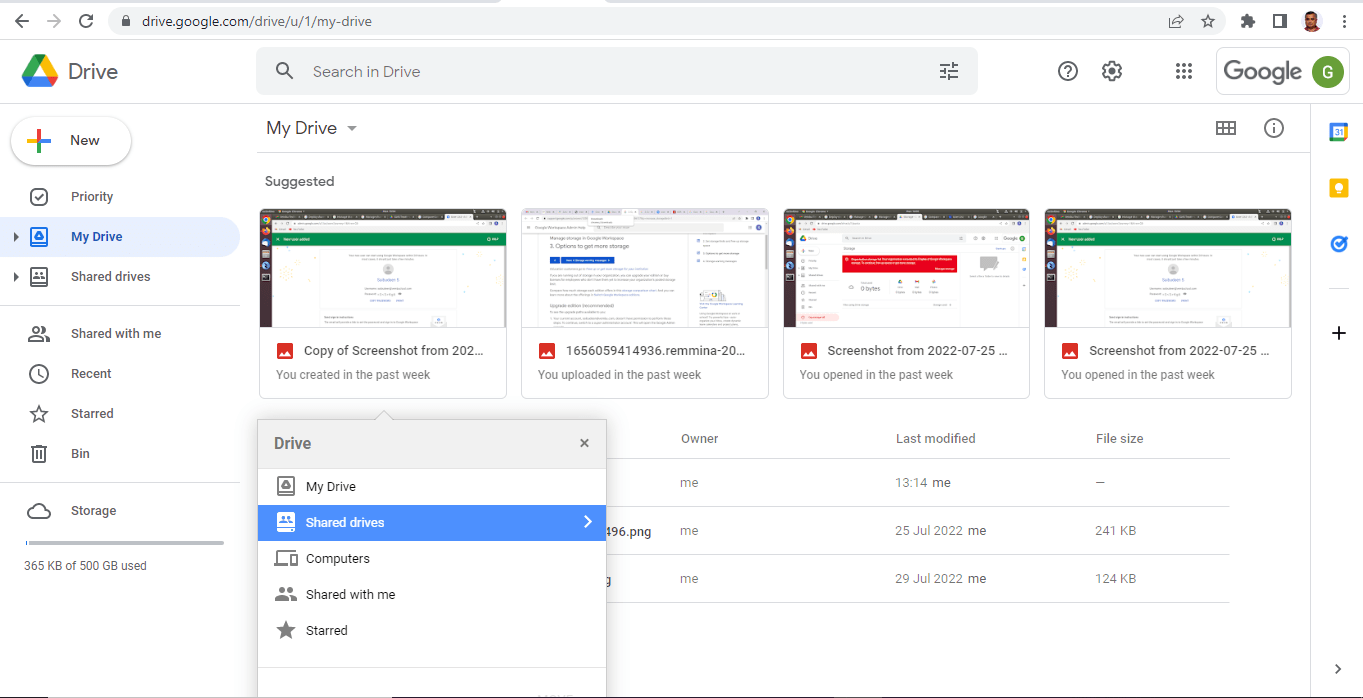
Also, you can move files from My Drive or upload files from your laptop. Perform the steps below to move files from My Drive to the Shared Drive.
- Open your My Drive, and select the particular file to move
- Right-click, and select the “Move to” action
- This will open the Drive list, choose “Shared drive”
- Clicking the arrow lists the shared drive folders
- Choose the shared drive folder, and click Move
Other shared drive settings to know
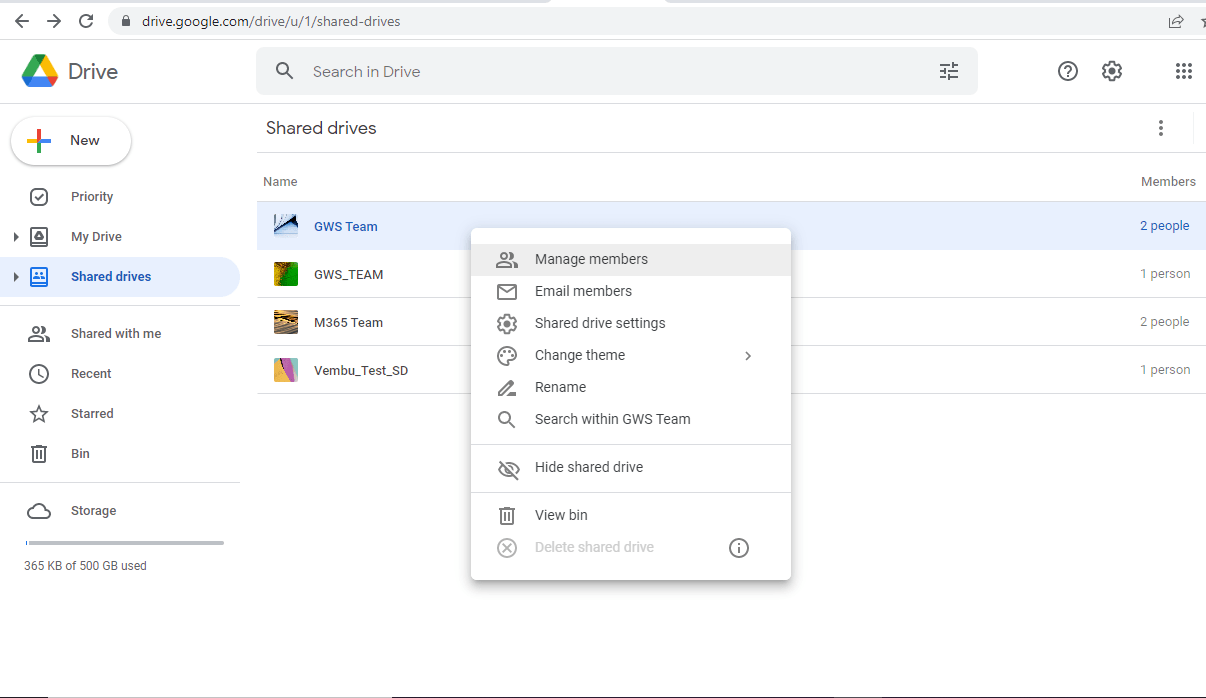
On clicking the “More action” button or left-clicking the shared drive folder, you can see various settings pertaining to each shared drive folder. Below are those useful settings
- Manage members – You can add or remove one or more users or groups to this shared drive. You can also modify the assigned user’s access level
- Email members – Using this wizard you can send emails to the members of the shared drive. This will allow you to type your text message, choose the team members included and you can send
- Shared drive settings:
- Outside Organization – You can allow or restrict people outside of the Organisation to access files in the shared drive. By default, for people outside the organization, access is restricted
- Sharing with non-members – You can provide access to the files in the shared drive for the users who aren’t members of the shared drive
- Download, copy and print – You can allow viewers and commenters in the shared drive to download, print, and copy files
- Change theme – You can change the theme of the shared folder or can pick a theme from the gallery or can create a custom theme
- Rename – Rename the shared folder name
- Search within the shared folder – You can search any file inside the shared folder based on File type, Team member’s name, and last modified time
- Hide share drive – You can hide a shared drive from the list. After hiding the shared drive, you can not view the shared drive in its place. You can choose the Hidden shared drive to view the shared drive.
View bin – Items moved to the bin appear here. After 30 days, the files in the bin are deleted permanently - Delete shared drive – This action will remove the shared drive. The shared drive cannot be deleted until its contents are deleted or moved
Conclusion
MyDrive serves the purpose of personal storage for Google account users, which allows them to store any type of files in their My Drive storage and manage them. But, when it comes to the collaboration of the user’s file, having a SharedDdrive wins the scenario completely.
If you are looking for the right public cloud solution in the Google Cloud ecosystem that allows team members to collaborate efficiently and effectively using the same centralized storage location, Shared Drives is going to be the standout choice over MyDrive. Though the shared drive is limited on support from Business, Enterprise and Education it eventually allows multiple users who have access to Shared Drives to edit and make changes to the files to form a complete collaboration ecosystem.
If you are looking for a Google Workspace Backup Solution to protect Gmail, Calendars, Contacts, and Google Drive – Consider looking at the industry-leading backup solution – BDRSuite for Google Workspace
Follow our Twitter and Facebook feeds for new releases, updates, insightful posts and more.


Leave A Comment