Microsoft’s Hyper-V hypervisor is a powerful virtualization platform for enterprises today looking to run their production workloads on top of Hyper-V. Especially with Windows Server 2019, Hyper-V has continued to mature and contains many tremendously powerful features and enhancements that allow implementing, maintaining, and provisioning servers and other business-critical workloads in a very effective and efficient manner.
One of the very handy and extremely useful features of Hyper-V is the ability to create checkpoints on virtual machines. Checkpoints can be used for many useful purposes in the environment.
This post will be a two-part series.
In this first part, we will take a much closer look at what Hyper-V checkpoints are exactly, why use them, and how to create them using Hyper-Manager and PowerShell.
In part two, we will dig deeper into the inner-workings of checkpoints, types of checkpoints and how they are each used, managing them, and looking into checkpoints vs backup technologies.
How to Use Hyper-V Virtual Machine Checkpoints
Hyper-V Checkpoints are an extremely useful feature in the realm of Hyper-V infrastructure.
In fact, they serve an extremely important role in the lifecycle management of Hyper-V virtual machines.
Let’s take a look at the following important aspects of Hyper-V checkpoints and why each are important to consider.
- What are Hyper-V Checkpoints?
- Why Use Hyper-V Checkpoints?
- How to Create Hyper-V Checkpoints
By understanding these topics in part one, it will lay the foundation of the fundamental basics of Hyper-V checkpoints before moving on to more advanced topics of consideration.
What are Hyper-V Checkpoints?
Before delving into the various topics about Hyper-V checkpoints, let’s first get an understanding of “what” they really are.
“A Hyper-V checkpoint is a “snapshot” of a virtual machine at a point in time”.
In other words, checkpoints give you the ability to “freeze” time for a virtual machine and capture that “state” in a point in time mechanism that you can save for use later, and then revert back to at any time.
Hyper-V checkpoints can typically contain the memory state of the virtual machine, but they can also be created without capturing the memory state of the VM. Another great feature or ability of the Hyper-V checkpoint is, they can be created while a virtual machine is running. So, this point of frozen time and state for the virtual machine can be created without any downtime to the VM or any disruption to end users who may be connecting to the virtual machine for resources. This creates some very interesting and powerful use cases for utilizing the Hyper-V checkpoint functionality.
Why Use Hyper-V Checkpoints?
Now that we understand what a Hyper-V Checkpoint is, “why” and “how” do you use them?
Let’s first look at the why part of the question.
If you have the ability to create a point in time capture of a specific virtual machine state and save that for later, what would you use it for? Actually, there are many potential use cases for having this ability.
However, perhaps the most powerful use of a Hyper-V checkpoint is to have a quick rollback mechanism to use during software updates or upgrades.
A classic example of this is applying Windows Updates to Windows Servers. If you have managed any number of Windows Servers over the years, you know this is a necessary evil that must be taken care of. For the most part, Windows Server patches are fairly stable, however, from time to time, bad patches are released. By utilizing the Hyper-V checkpoint, a checkpoint of the VM can be taken before software patches, updates, or upgrades are performed. If something fails or things go badly, the VM can simply be reverted back to the checkpoint taken prior to the upgrade. This provides an extremely easy and powerful rollback mechanism for applying software patches, updates, and upgrades.
Here are some other use cases for Hyper-V virtual machine checkpoints:
- Installing new software – Before installing software, especially if it isn’t known what interactions the software may have with other software coexisting on the system, it is a great idea to create a checkpoint just in case problems arise
- Changing the system configuration – Changing Windows Roles or Features, changing IIS configuration, or even network configuration, route tables, driver changes/updates, file changes, directory moves, DLL registrations, etc warrants having a good state to roll back
- Apply registry changes – Modifying the registry can be powerful but also dangerous. If the wrong key is modified, deleted, or added, it can lead to major system issues
- Before troubleshooting an issue – If steps are taken during a troubleshooting session to resolve an issue that ultimately may not resolve the issue, it is good to have a point to go back to before changes were made
- Dev/STG/UAT environments – Checkpoints are a great tool to use in DEV/STG/UAT environments. Before code is rolled in or changed or testing is implemented, checkpoints provide very quick rollbacks to known good states for virtual machines. This allows developers to roll in code, revert, roll in code again, and keep running this process until the code is at a good point for testing
The above use cases provide really good examples of when checkpoints may be utilized by a Hyper-V administrator. By having a checkpoint in place in the above scenarios, administrators can have extremely quick rollback mechanisms in place that can potentially save hours or days’ worth of time.
Are there virtual machines or situations where it would be best practice not to use Hyper-V checkpoints?
The following points come to mind:
- Never use checkpoints as a replacement for proper backups (we will address this further in part two)
- Don’t use checkpoints on domain controllers
- Be selective when using checkpoints on multi-tiered applications
Not Backups
As mentioned we will look at this in more depth in part two, however, checkpoints are not designed to be or supported as a replacement for properly backing up Hyper-V virtual machines.
Domain Controllers
Using any type of “snapshot” technology on domain controllers can result in very bad things happening in the domain environment. It is always best never to use checkpoints on domain controllers. Rolling back to a checkpoint on a domain controller can lead to a situation called a “USN Rollback” that can result in Active Directory replication being broken.
Multi-tiered applications
Certain applications that are multi-tiered are very difficult if not impossible to properly place a checkpoint due to the highly connected and dependent way the web/application servers are tied to the backend database servers. Using checkpoints in this design architecture can potentially lead to data loss.
Now that we understand the powerful benefits and capabilities that are possible with Hyper-V checkpoints. For those servers where checkpoints do make sense and would be supported, how are Hyper-V checkpoints used?
In examining how Hyper-V checkpoints are used, we will look at the scenario presented above – software updates.
To use Hyper-V checkpoints, a checkpoint would be created before applying the software changes to a target virtual machine. After the checkpoint is applied, the software updates can be run as the failsafe in place with the checkpoint created on the virtual machine. If the software updates are successful, the checkpoint can be deleted. If the software updates fail or create problems on the virtual machine, the checkpoint can be reverted back to in order to return the virtual machine to a pristine condition prior to the updates being applied.
How to Create Hyper-V Checkpoints
Let’s see how to do this using both the Hyper-V Manager and PowerShell to create the Hyper-V checkpoint.
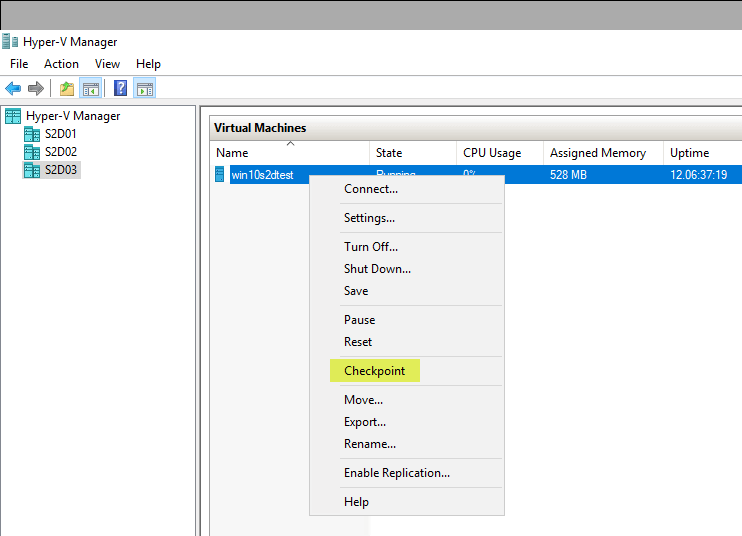
Open Hyper-V Manager, right-click on a virtual machine running on a Hyper-V host and select Checkpoint.

The checkpoint creation process begins. You will see the Creating Checkpoint with a percentage displayed under the Status column.

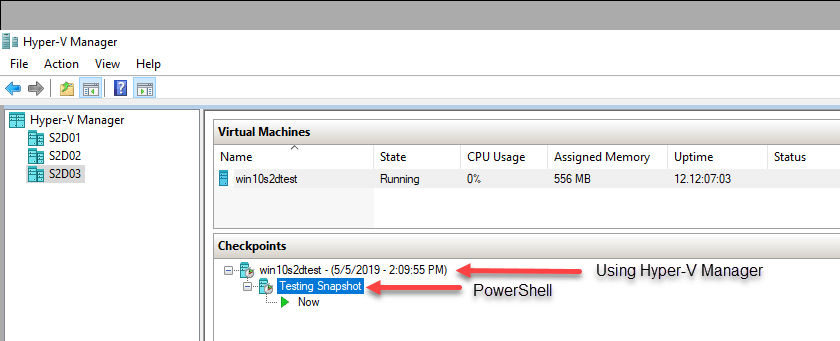
After the checkpoint is created, you will see the checkpoint appear under the Checkpoints window pane in the Hyper-V Manager when the focus is on the virtual machine running on a Hyper-V host.

The process to create a Hyper-V virtual machine checkpoint using PowerShell is very easy as well. This is a simple one-liner PowerShell command. Also worthy of note, using PowerShell you can dictate the name of the snapshot, whereas in Hyper-V Manager you cannot.
The PowerShell code to create a new Hyper-V checkpoint is as follows:
Checkpoint-VM –Name < VM Name > –SnapshotName ‘Testing Snapshot’

Below, you can see the two snapshots that have been created so far using the Hyper-V checkpoint functionality. The first was created using Hyper-V Manager. The second was created with PowerShell.

Wrapping Up
In this first part of the Hyper-V checkpoints series, we have looked at the basics of what Hyper-V checkpoints are, why they are used, and how to use them with either the Hyper-V Manager or PowerShell.
In part two of looking at Hyper-V checkpoints we will take a look at the following topics:
- Types of Hyper-V Checkpoints
- How do Hyper-V Checkpoints Work?
- Managing Hyper-V Checkpoints
- Differences between Hyper-V Checkpoints and Hyper-V Backup
Follow our Twitter and Facebook feeds for new releases, updates, insightful posts and more.


Leave A Comment