What is NAT?
NAT is an acronym for Network Address Translation. It’s a method of mapping multiple local private addresses to one single public IP before transferring the data. NAT is used by organizations that want multiple devices to share a single IP address. As a result, a single device can act as an intermediary or agent between the local, private network and the public network. Before forwarding packets between networks, NAT converts private internal network addresses into legal, globally unique addresses.
As part of this capability, NAT configurations can reveal only one IP address for an entire network to the outside world, effectively hiding the entire internal network and providing additional security. The primary goal of NAT is to reduce the number of public IP addresses in use, for both security and economic reasons.
What is the Purpose of NAT?
To communicate with the internet, a networking system requires a unique IP address. This 32-bit number identifies and locates network devices, allowing users to communicate with them. Although the IPV4 addressing scheme provides billions of IP addresses, not all of them can be assigned to devices for communication; some IP addresses are reserved for broadcasting, testing, and military purposes.
Approximately 3 billion IPV4 addresses are available for communication, but the number of devices connecting to the internet outnumbers the number of IP addresses available. NAT was introduced by Cisco to address this problem.
Routing all of these devices through a single NAT connection aids in the consolidation of multiple private IP addresses into a single public IP address. This contributes to the availability of more public IP addresses even as private IP addresses proliferate.
IPv6 was officially launched on June 6, 2012, to meet the demand for more IP addresses. IPV6 employs 128-bit numbered IP addresses, allowing for exponentially more possible IP addresses. This process will take many years to complete, so NAT will be a useful tool until then.
NAT in Hyper-V
Microsoft introduced a new virtual switch type called “Network Address Translation” in Windows server 2016 & Windows 10. NAT Network helps Virtual Machines to access the External Host/Virtual Machines using Host IP address and port through Internal Switch (NAT Switch). You cannot create a NAT virtual switch from the UI, but it can be created using Powershell. Below are steps to create a NAT virtual network in your Hyper-V
How to create a NAT virtual network in Hyper-V?
In the sample NAT setup diagram below, We have three Windows 10 VMs running on the Hyper-V of Windows Server 2016 and three 3 application servers running different applications.

Step 1:
Creating Internal NAT Virtual Switch:
To create NAT switch, we need to run the below command on Windows Administrator PowerShell and check the status.
PS C:\> New-VMSwitch -Name NATSWITCH -SwitchType Internal
After running the command you will get the display shown below.

Run the Get-NetAdapter command to get the ifindex (connected interface) and Virtual Switch details.

Step 2:
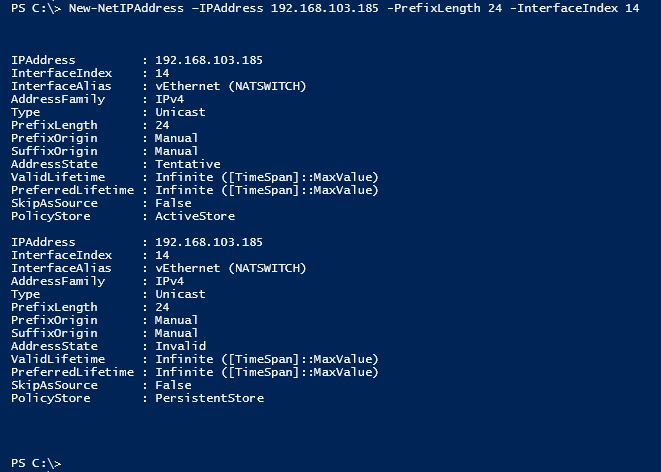
Run the below command to configure NAT Gateway IP.
PS C:\> New-NetIPAddress –IPAddress 192.168.103.185 -PrefixLength 24 -InterfaceIndex 14
For above command:
NAT Switch IP Address is: 192.168.103.185(NAT GATEWAY IP)
Prefix Length: 24 (Subnet mask)
Interface Index: 14 Connected interfaces (See above screenshot for interfaces)
After running this command and it displays the required brief details, refer below screenshot.
Step3:
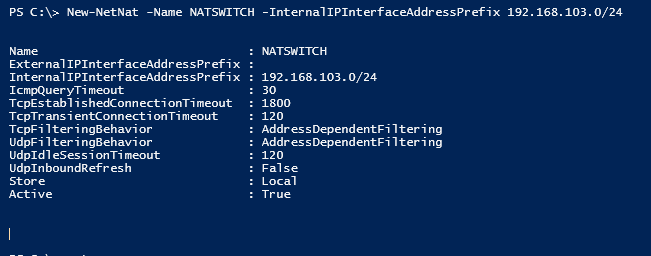
Now run the below command in order to configure NAT Network. To assign NAT IP segment(192.168.103.0/24), we have to use Host Machine VMs.
PS C:\> New-NetNat -Name NATSWITCH -InternalIPInterfaceAddressPrefix 192.168.103.0/24
InternalIPInterfaceAddressPrefix: Internal NAT Network IP Range with the Subnet mask.
Once completed the above commands, and the Virtual Machines is created on Hyper-V Host, they need to be configured. Virtual Machines are configured as 103.xx series IP range, and Gateway is configured as 192.168.103.185. Since NAT Gateway is already configured in Step2.
- Hyper-V host, Virtual Adaptor configured as 192.168.102.190
- NAT Gateway configured on NATSWITCH (Internal Switch) 192.168.103.185
- 3 three Win10 Virtual Machines configured in Hyper-V host and IP address configured as 192.168.103.186, 187 & 188
Now we need to check if the Virtual Machines are able to ping the External IP or not.
Pinging from VM1
Virtual Machine 1 configured IP address as 192.168.103.186 and trying to ping destination IP 192.168.102.25 are able to ping.
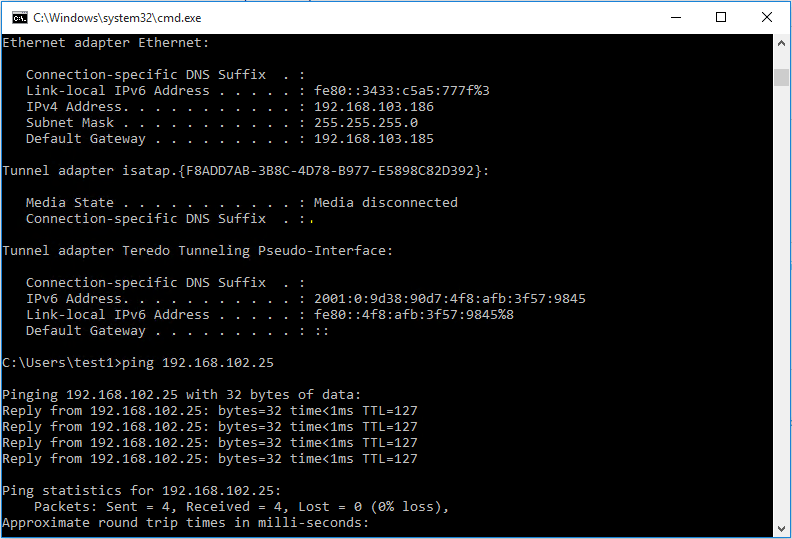
We can see the NAT session from Hyper-V Host Machine. Refer the below screenshot.

Pinging from VM2
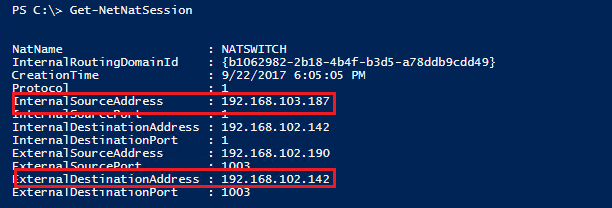
Virtual Machine 2 configured IP address as 192.168.103.187 and trying to ping destination IP 192.168.102.142 are able to ping.
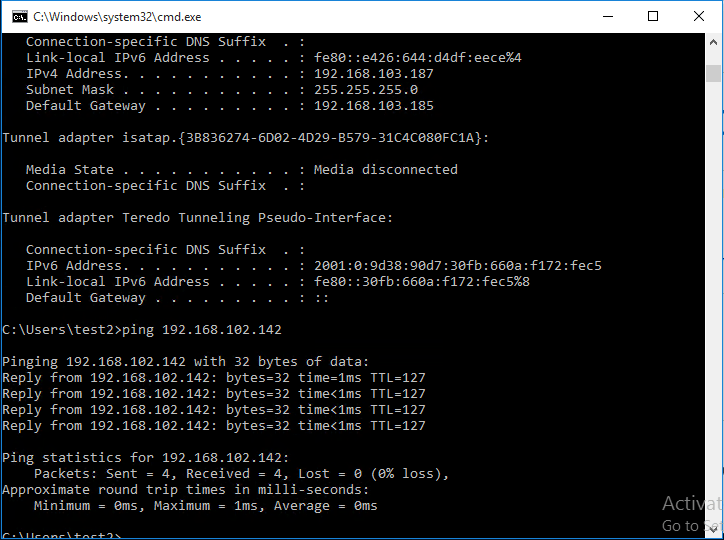
Now we will be able to see the NAT session from Hyper-V Host Machine. Refer the below screenshot.
Conclusion:
NAT Setup using Hyper-V Virtual Switch is a very easy process. NAT setup using Hyper-V Virtual Switch connects the External or Public Network to the Internal Virtual Machine Network.
Got questions? Email us at: vembu-support@vembu.com for answers.
Follow our Twitter and Facebook feeds for new releases, updates, insightful posts and more.


Leave A Comment