
One of the aspects of managing Linux virtualization is understanding the networking side of things. Libvirt networking in Linux and Kernel Virtual Machine (KVM) is a great tool for managing networking in virtualized environments. Let’s look at Libvirt networking, including its options and how it works.
Libvirt Networking
As we have previously described, Libvirt is an open-source API, daemon, and management tool for managing your virtualization environment. It supports many different hypervisors. KVM provides a unified interface for virtual network configuration, storage, and machine management.
When you create a virtual machine and configure it with a virtual network card, you are allowing it to connect to a virtual switch that then connects to the physical network card in the virtualization host that uplinks to the physical network switch.
It supports several different types of networks for KVM, including the following:
- NAT
- Bridged
- Isolated
- Open vSwitch
Libvirt NAT network
In a Libvirt NAT network, the virtual machine sits behind a Libvirt switch in NAT mode. This is the default configuration. It means that virtual machines running on the virtualization host can connect with anything connected to the physical network using the host’s IP address.

However, other devices can’t connect directly back to the VM running on the virtualization host by default. A special port forward would have to be configured to allow this to happen, or the VM would have to initiate the communication.
The NAT configuration is the default configuration as it is one of the easiest to start with where network connectivity “just works.” It allows users to start creating VMs and connecting them to the default network without the users having to handle this configuration out of the box.
Below is a high-level look at traffic flow with a NAT’ed virtual switch.
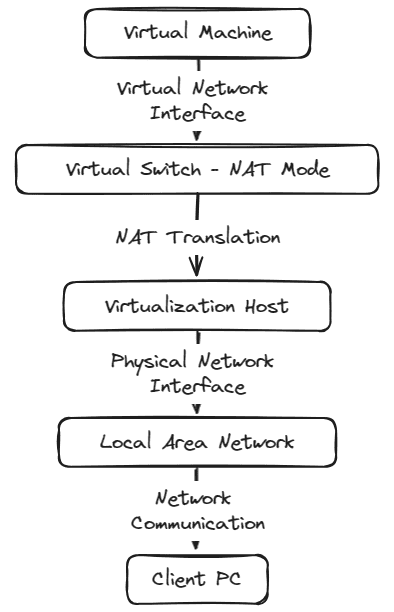
The NAT configuration simplifies the network communication process since we don’t have to worry about any type of routing that would otherwise be needed to communicate from a separate network sitting behind the virtual switch.
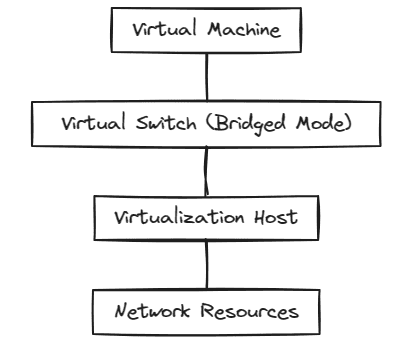
Libvirt Bridged network
In the Libvirt bridged network, the virtual machine is connected directly to the virtual switch and the physical network. The VM is, in essence, on the same layer 2 and 3 networks as the physical virtualization host. While it makes network communication a bit less straightforward from a routing perspective, this is a common way to connect virtual machine resources to the physical network.
In this mode, the virtual machine networks will have to have the routes in place like any other device to communicate with external resources.
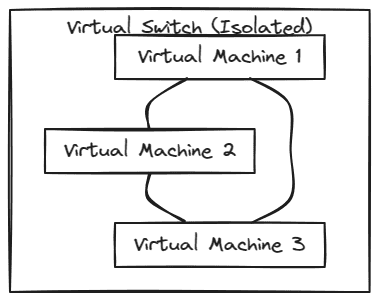
Libvirt Isolated network
In the isolated virtual switch configuration with Libvirt networking, virtual machines connected to the same isolated switch can communicate with each other, but they cannot communicate with anything outside the host they are running on.
This configuration is a great way to isolate traffic from one or many virtual devices from the rest of the physical network. You might think of use cases like development environments, lab environments, training environments, and others.
How do you get traffic outside an isolated network? Part of the reason for an isolated network is to prevent traffic from getting out. So, that is by design. However, there are ways to do this as well. You can use a simple workstation configuration with a network adapter connected to the external physical network and one connected to the isolated network.
In this configuration, the workstation will be able to communicate with the isolated network and the external network. It allows you to have a jump box connecting to isolated resources. You can also use a simple virtual router connected to both networks. It will allow traffic to route outside the isolated network and other traffic to be allowed ingress.
Open vSwitch (OVS)
With the Open vSwitch configuration in Kernel Virtual Machine (KVM) environments, you have a similar construct to the vSphere Distributed Switch (VDS) in the VMware world. It is an advanced switch configuration that exists in software.
It can enable network automation using programmatic extensions and supports standard interface management and protocols. It operates at both Layer 2 and Layer 3 of the OSI model and is designed to work with the virtualization host kernel.
Benefits of Open vSwitch
- Advanced Network Control: OVS allows for advanced control over network traffic. It supports features like VLAN tagging, quality of service (QoS), and network overlays
- Scalability: It can be used for large-scale environments, OVS can handle complex network topologies and a large number of VMs
- Flexibility: OVS can be tailored to specific needs with its support for a wide range of network protocols and configurations
- Performancef: OVS is optimized for performance and it can handle high-throughput and low-latency requirements
Wrapping up
Libvirt networking supports many different types of networks with Kernel Virtual Machine (KVM). These include NAT, bridge, isolated, and Open vSwitch (OVS). The wide variety of network configurations allows organizations to configure their environments as needed with the flexibility in network configuration needed for different use cases. NAT is a simple configuration that serves as a good default for most. Bridge allows directly connecting your virtual machines to the physical network. Isolated networks are great for labs or development environments. Open vSwitch provides an enterprise solution for the data center.
Read More:
KVM for Beginners – Understanding oVirt in relation to KVM – Part 3
Follow our Twitter and Facebook feeds for new releases, updates, insightful posts and more.

Leave A Comment