Microsoft Azure Active Directory allows organizations to register modern applications to take advantage of Microsoft Azure’s identity services and use the Microsoft Graph API permissions. However, you must register your Azure application to take advantage of authentication and authorization capabilities and provide resources for your clients. Azure App Registration is a fundamental step in setting up your Azure applications. Registering an app tells Azure Active Directory (Azure AD, now Entra ID) about its existence and specific requirements.
The Role of Azure Active Directory (now Entra ID)
Azure Active Directory (Azure AD), now rebranded to Entra ID, is Microsoft’s cloud-based identity and access management service. It allows admins to manage users, grant permissions, and ensure secure resource access for supported account types.
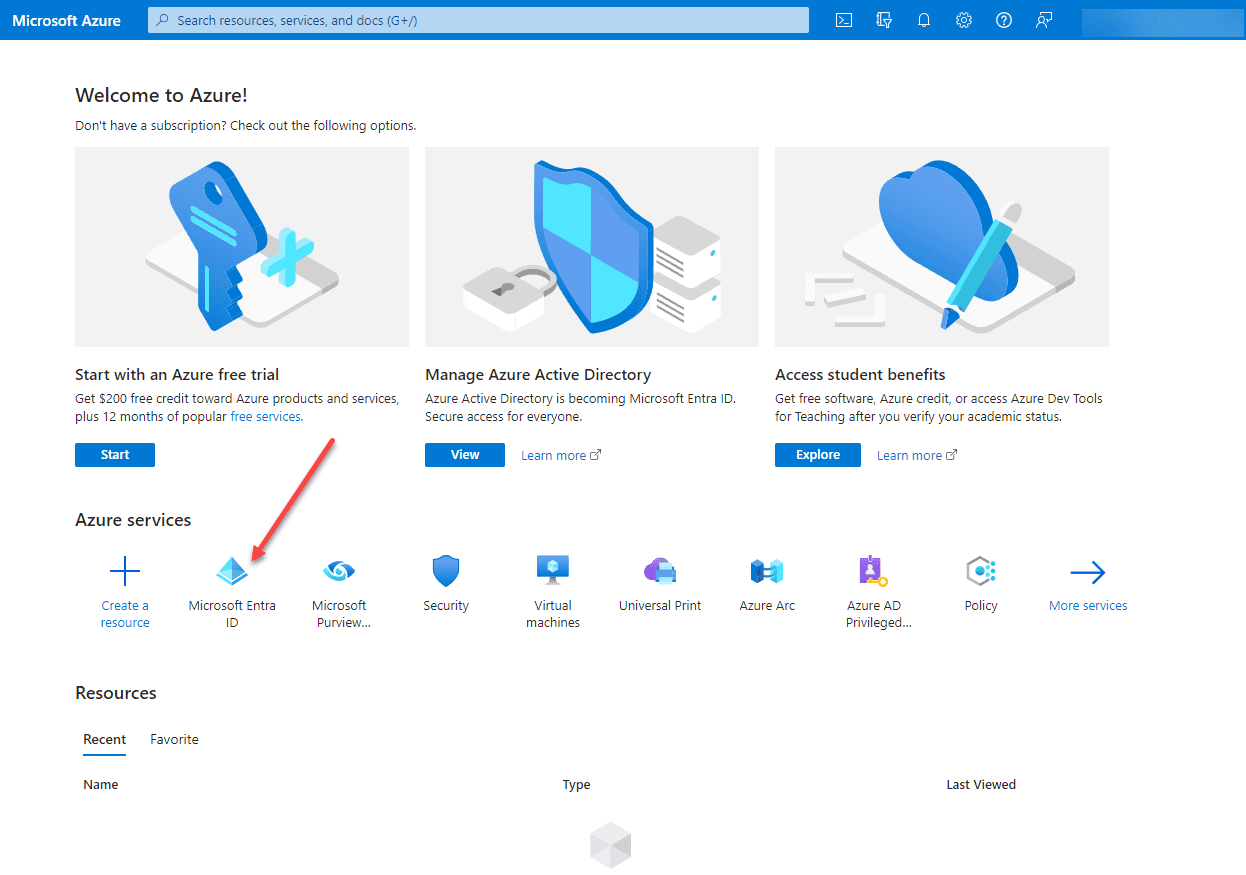
In addition, it is also the spot in Azure where you provision modern applications to integrate with your Azure environment. You will likely see Microsoft Entra ID in your Azure portal on the home page. If not, you can search for Entra ID.
Distinguishing Between App Registrations and Application Permissions
While “app registrations” and “application permissions” might sound similar, they serve different purposes.
App registrations are about defining your application in Azure AD
Application permissions pertain to what an application can do or access
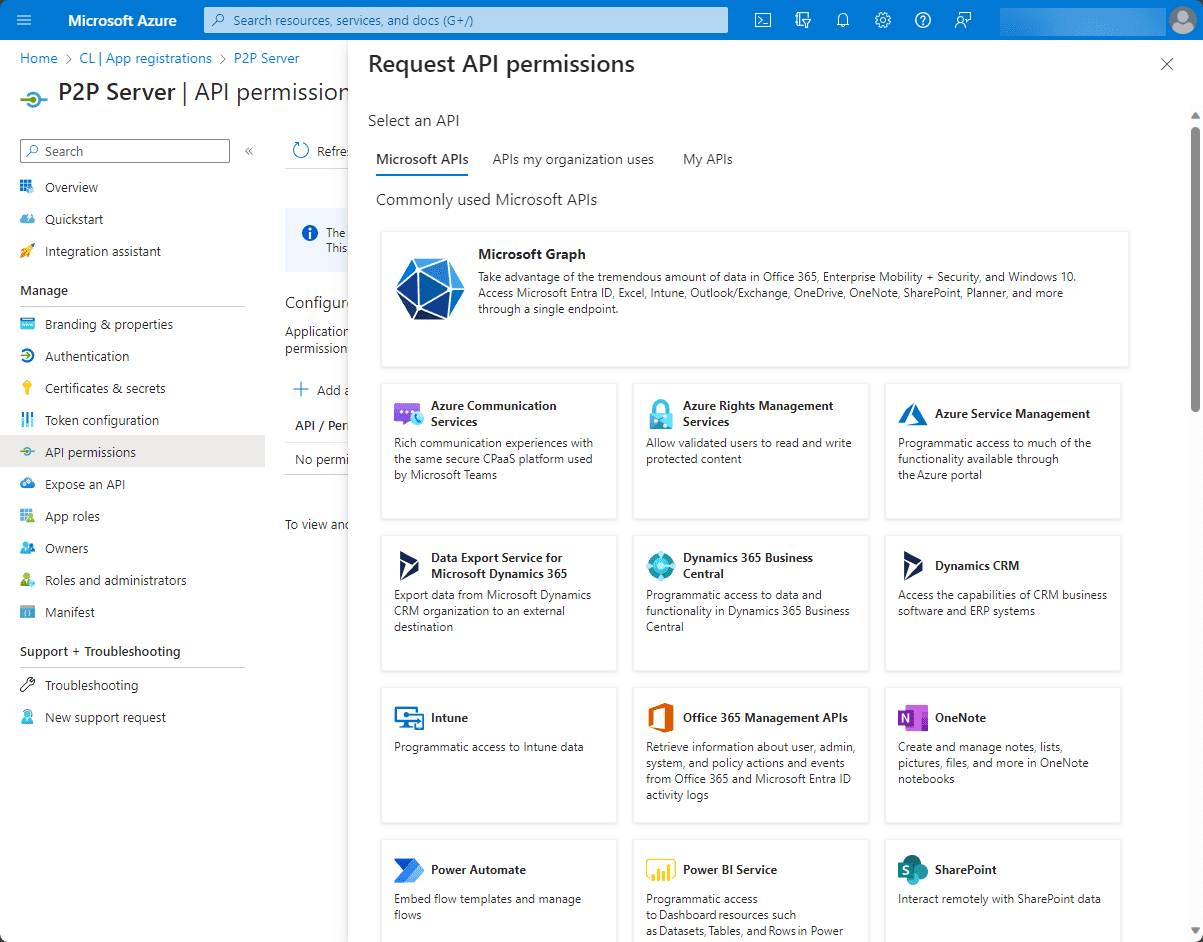
Both are needed. You will register your app in Entra ID and then you will grant the app the application permissions it needs to interact with Microsoft Graph APIs and other resources.
Navigating the Azure Portal for App Management
The Azure Portal is your one-stop shop for managing all Azure resources, including app registrations. You can create a new registration, configure permissions, and even set up client secrets here.
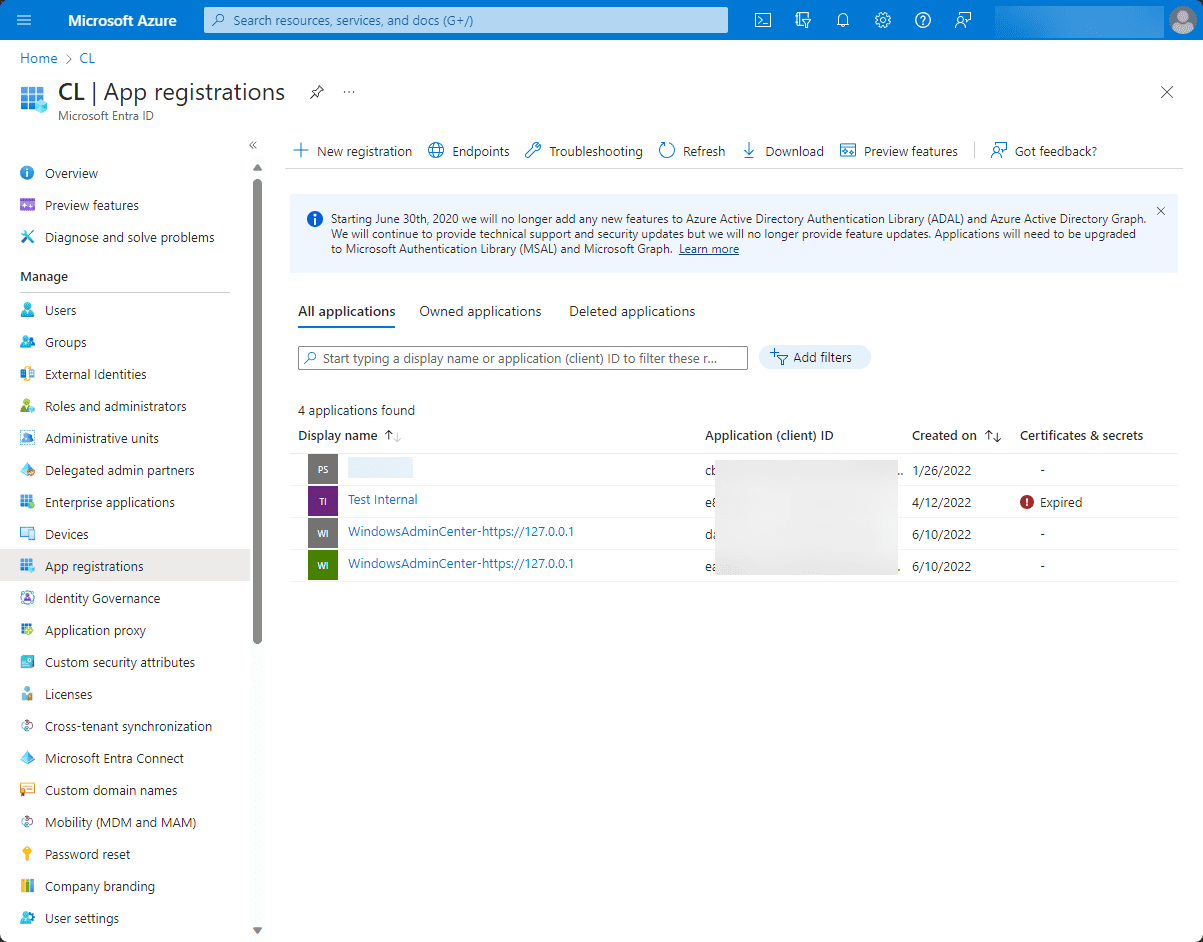
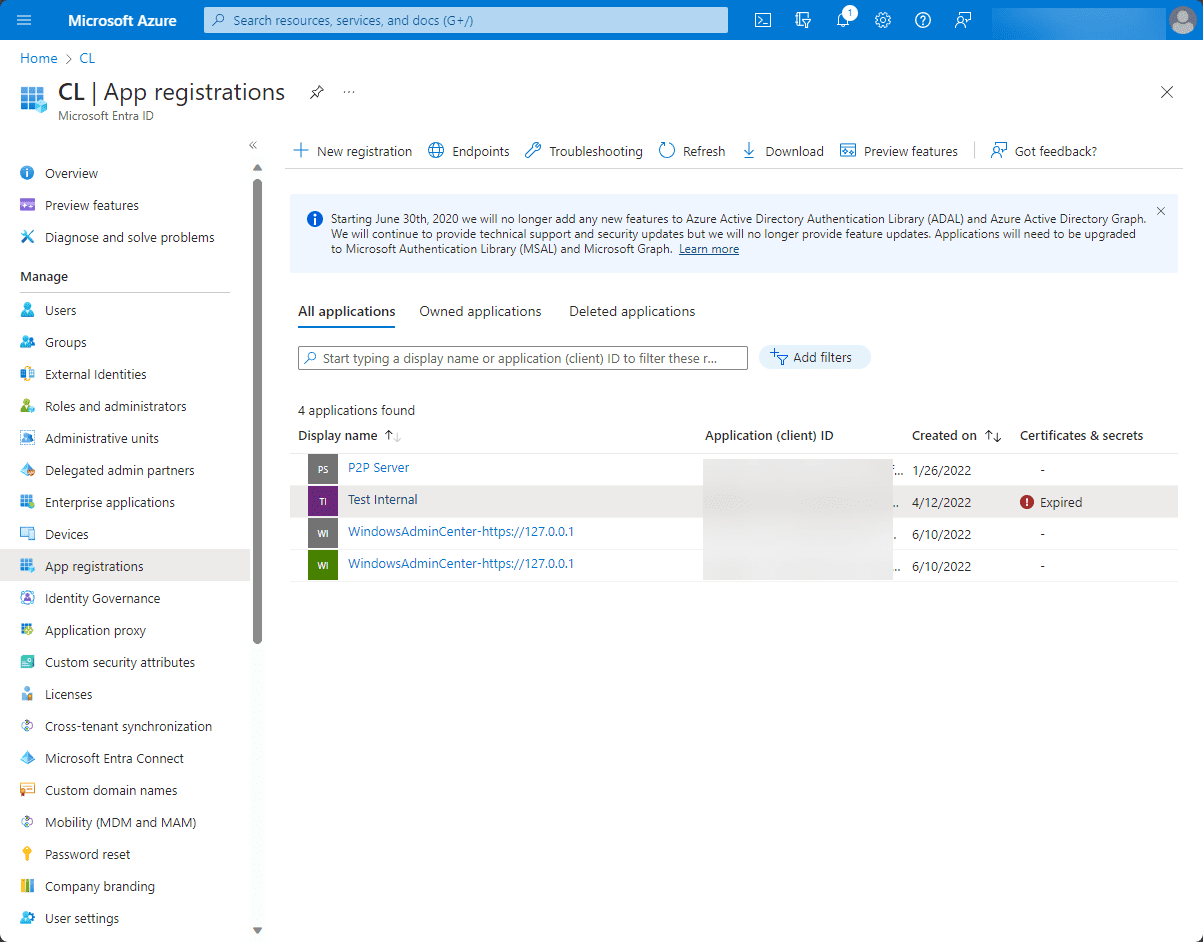
Below, you see multiple applications that are integrated into Azure Active Directory. If you have integrated Windows Admin Center or other Azure hybrid apps into your Azure environment, in the background, these are simply creating Azure apps to integrate with the various APIs.
Delegated Permissions vs. Application Permissions
There are two primary types of permissions in Azure: delegated permissions and application permissions. Understanding the distinction between them is crucial for setting up the right access controls.
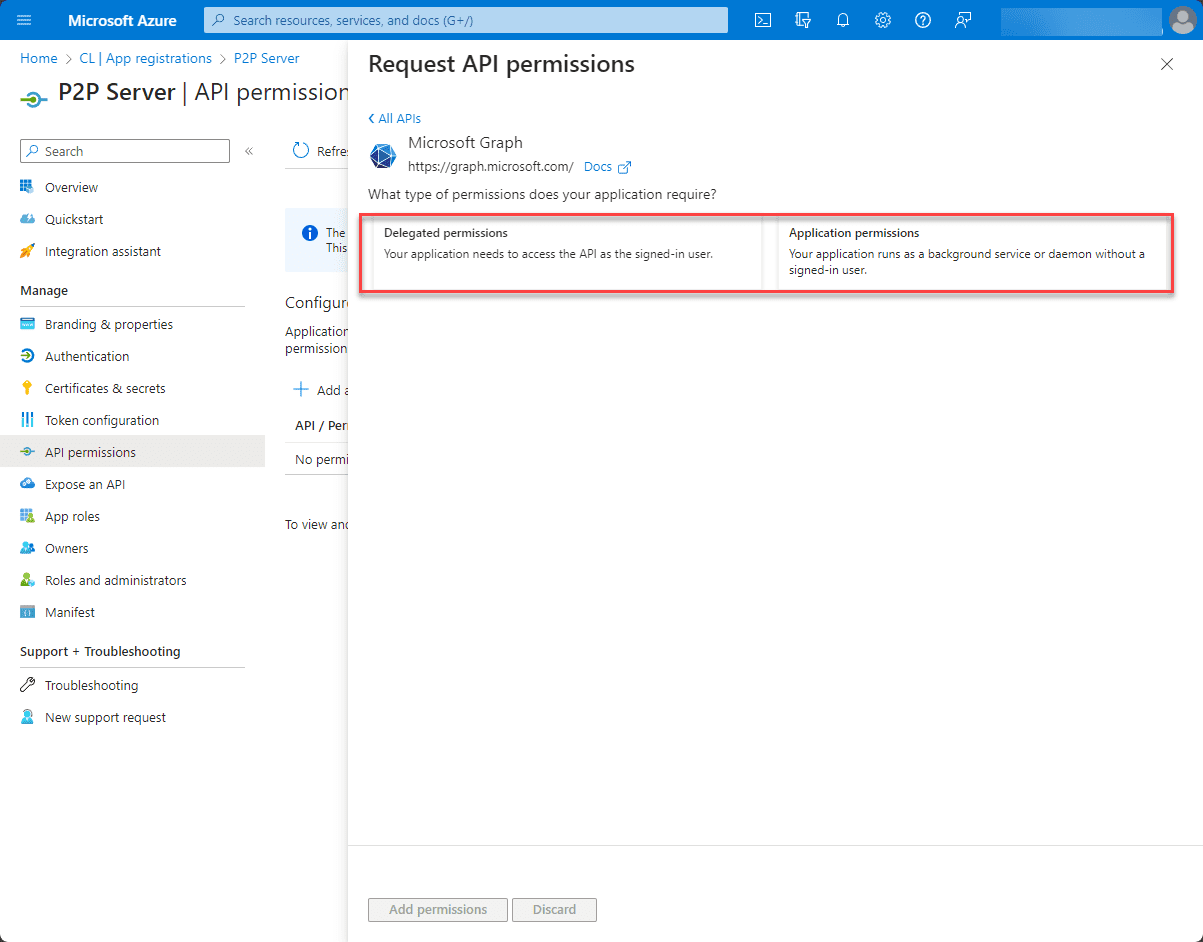
Delegated Permissions
Delegated permissions are used when you want an application to have the rights and permissions of specific users. These permissions are used when an application acts on behalf of a specific user.
User Context: Delegated permissions always run in the context of a signed-in user. The application essentially “borrows the user’s identity and permissions to perform a specific task.
Consent: Typically, the user is prompted to grant the required permissions to the app. This ensures that the user knows the kind of access the application requests.
Scenarios: Common scenarios for delegated permissions include reading a user’s calendar, sending email on behalf of a user, or accessing user files in OneDrive.
Limitations: By default, when you grant delegated permissions, the application only can act using the permissions granted to the user that is delegated to the app. If the user cannot access certain data or APIs, then the app will be limited as well.
Application Permissions
On the other hand, application permissions are used by apps that run without a signed-in user present, often referred to as daemon apps or background services.
App Context: These permissions are granted directly to the application’s identity. The app doesn’t act on behalf of a user but rather on its own.
Admin Consent: Due to the potentially broad reach of application permissions, they often require an administrator to grant consent, especially if they allow access to a wide range of data or actions across multiple users.
Scenarios: Common use cases include server processes that need to access an Azure AD tenant, background jobs, or services that need to read data from Microsoft Graph, such as user details or organization charts.
Broad Access: Unlike delegated permissions, application permissions grant broad access. For example, if an app has the application permission to read mail in Microsoft Graph, it can read mail in all mailboxes in the organization.
Granting Admin Consent: Why and How?
At times, certain permissions require approval from an administrator. This process, known as granting admin consent, ensures that applications don’t overstep their boundaries.
Microsoft Graph: The Gateway to Data
Microsoft Graph is a unified API endpoint that provides access to various Microsoft 365 services. It’s often involved when dealing with app registration permissions, especially when accessing data across the suite.
Key Features and Capabilities
Unified Data Model: Microsoft Graph presents data from various services using a consistent, unified schema. This means whether you’re accessing user data from Azure AD or files from OneDrive, the structure and approach remain consistent.
Intelligent Insights: Beyond just data access, Microsoft Graph offers insights derived from patterns in data. For instance, it can suggest meeting times based on participants’ calendars or recommend files based on user activity.
Delta Queries: This feature allows applications to recognize changes in the data since the last request, making it efficient for apps to stay updated with the latest data without excessive polling.
Webhooks: Microsoft Graph supports real-time notifications. Instead of constantly polling for data changes, apps can subscribe to specific data changes and get notified instantly.
Integration with Azure App Registration Permissions
When registering an application in Azure, permissions to access Microsoft Graph are often required, especially if the app needs to interact with user data or other Microsoft 365 services.
API Permissions: Within the Azure Portal, under the “API permissions” section of an app registration, developers can specify the exact permissions their app needs on Microsoft Graph. This can range from reading user profiles to more sensitive actions like reading emails.
Granular Control: Microsoft Graph permissions are finely grained. For instance, there’s a difference between reading a user’s email and reading an organization’s entire mailbox. This granularity ensures apps only get the access they genuinely need.
Consent Flow: When an app requests certain permissions on Microsoft Graph, users or administrators are presented with a consent screen. This screen details the exact permissions the app is requesting, ensuring transparency and user awareness.
Real-World Use Cases
Collaboration Tools: Apps that facilitate collaboration might use Microsoft Graph to access and display shared files from OneDrive or SharePoint, or show upcoming events from Outlook calendars.
Organization Insights: HR platforms or intranet solutions might leverage Microsoft Graph to visualize organization structures, pulling data from Azure AD.
Automated Workflows: Workflow automation tools can use Microsoft Graph to trigger processes based on changes in data, like the arrival of a new email or a calendar event reminder.
Granting Access: A Step-by-Step Process
Various ways and tools exist to grant access, from the Azure Portal to the Microsoft Graph. This section will provide a clear, step-by-step guide on how to ensure your application has the right permissions.
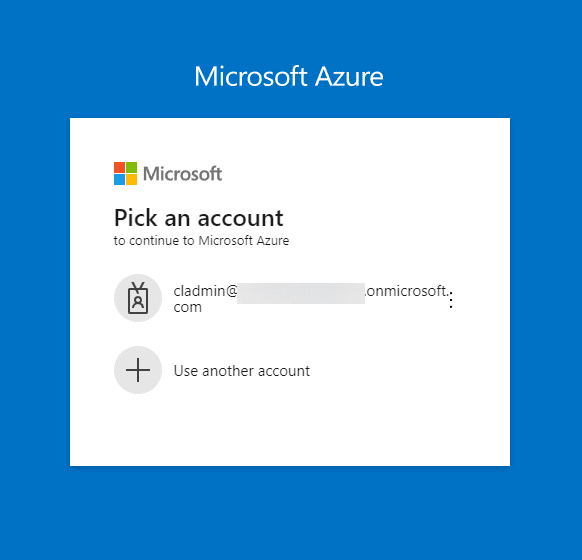
1. Sign in to the Azure Portal
Begin by signing into the Azure Portal using an account that’s been granted the necessary administrative permissions.
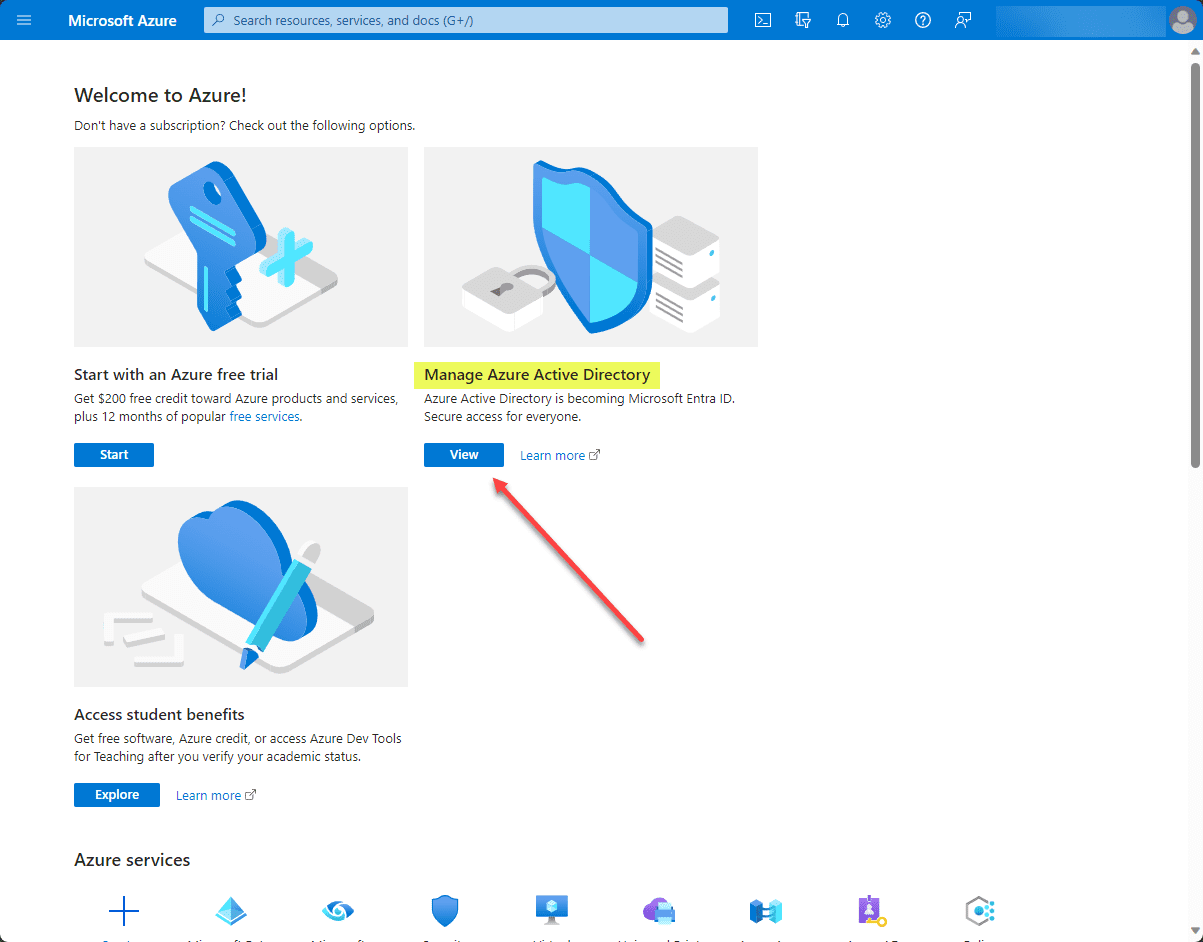
2. Navigate to Azure Active Directory
Select “Azure Active Directory” to access the directory’s dashboard.
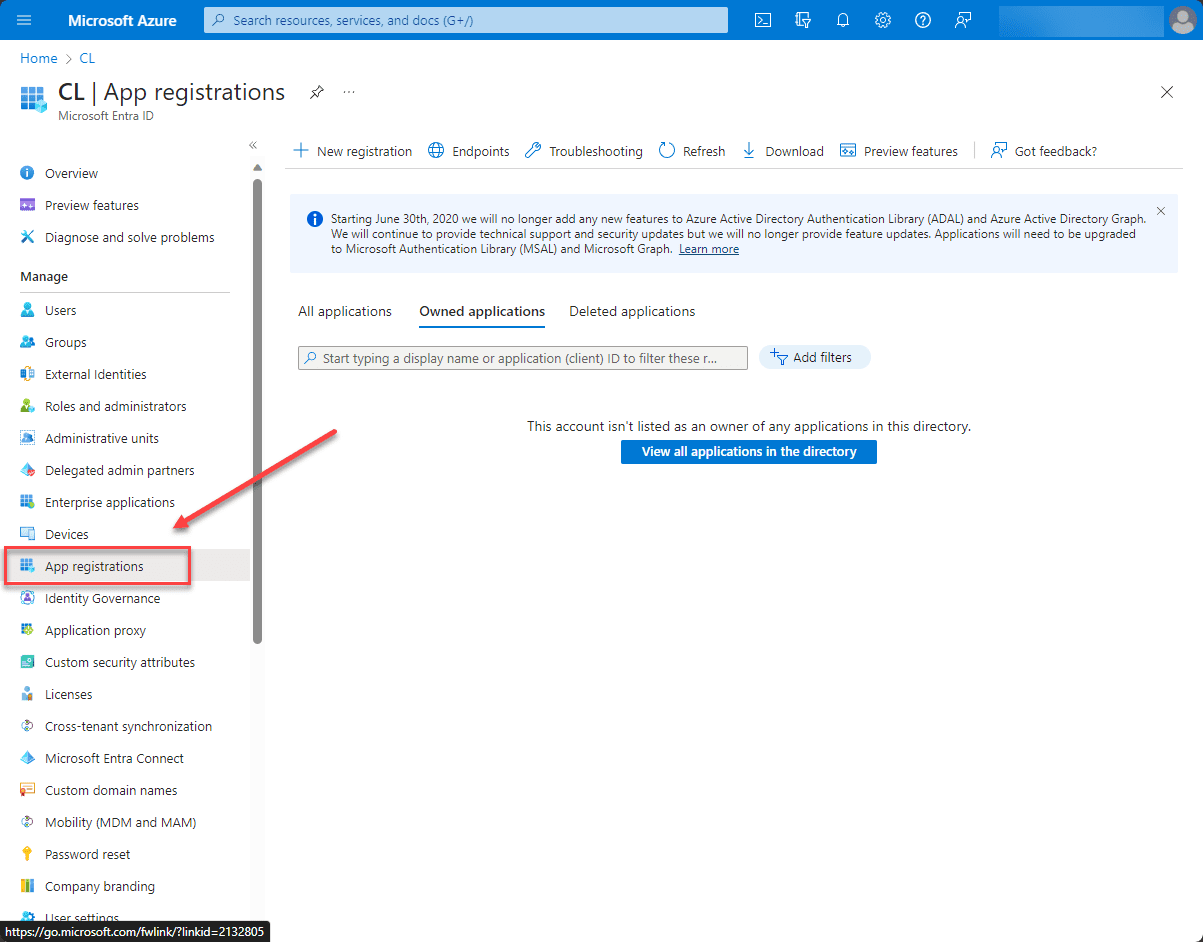
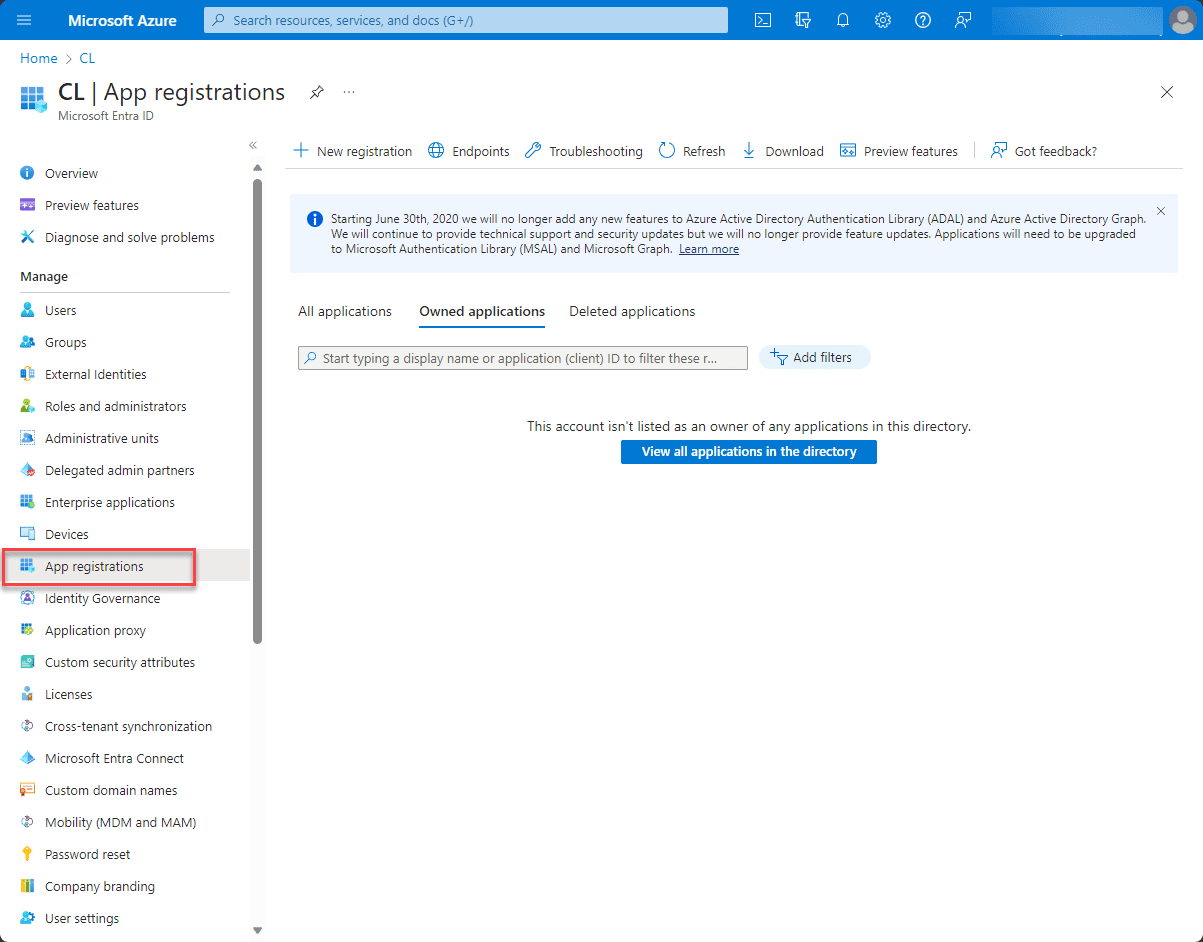
3. Choose “App Registrations”
Within Azure AD, click on “App Registrations” to view a list of all registered applications in your directory.
4. Select Your Application
Select your application in the list of applications in the dashboard to which you want to grant permissions. If you’ve just created a new registration, it should be listed here.
5. Go to “API permissions”
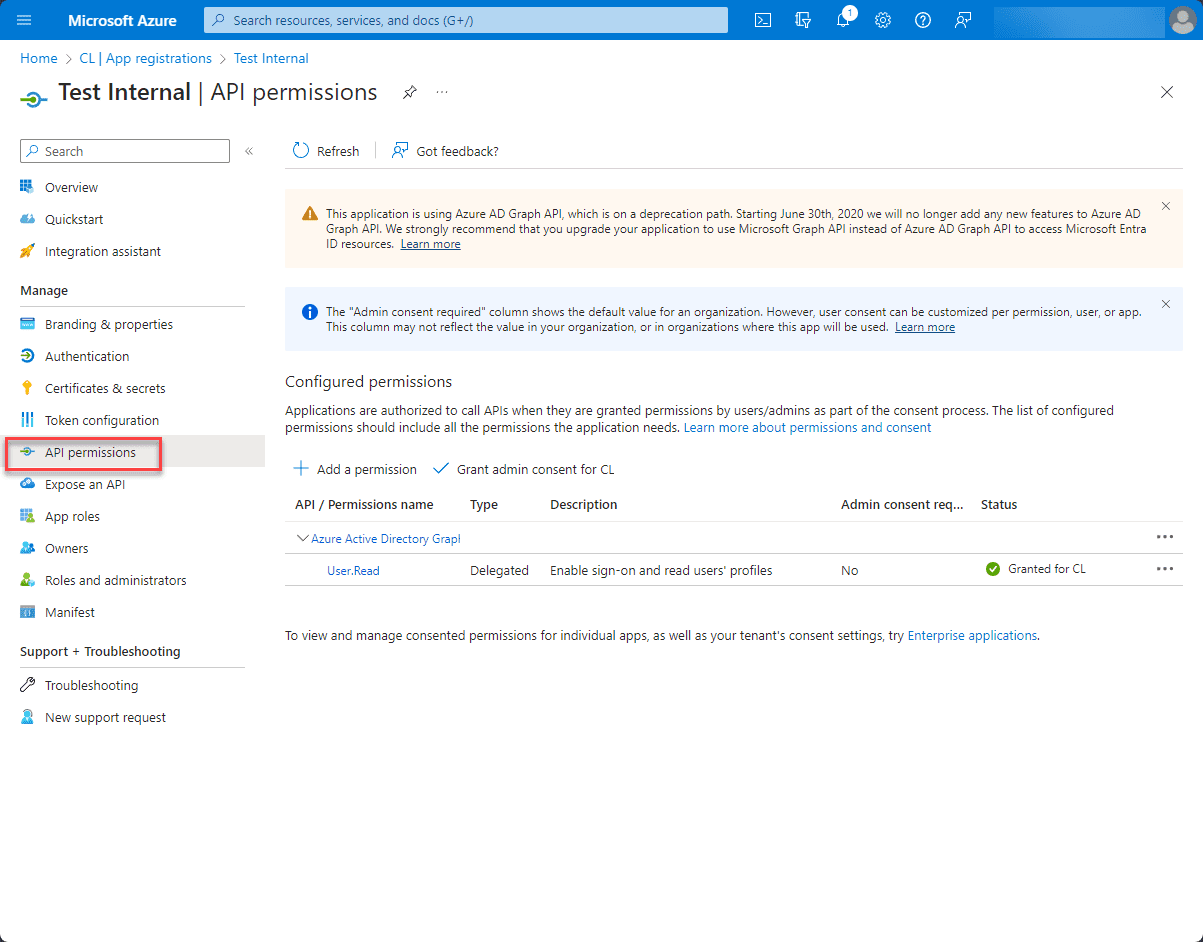
After navigating to settings, click on the “API permissions” tab. This is where you’ll specify the permissions for your application.
6. Click “Add a permission”
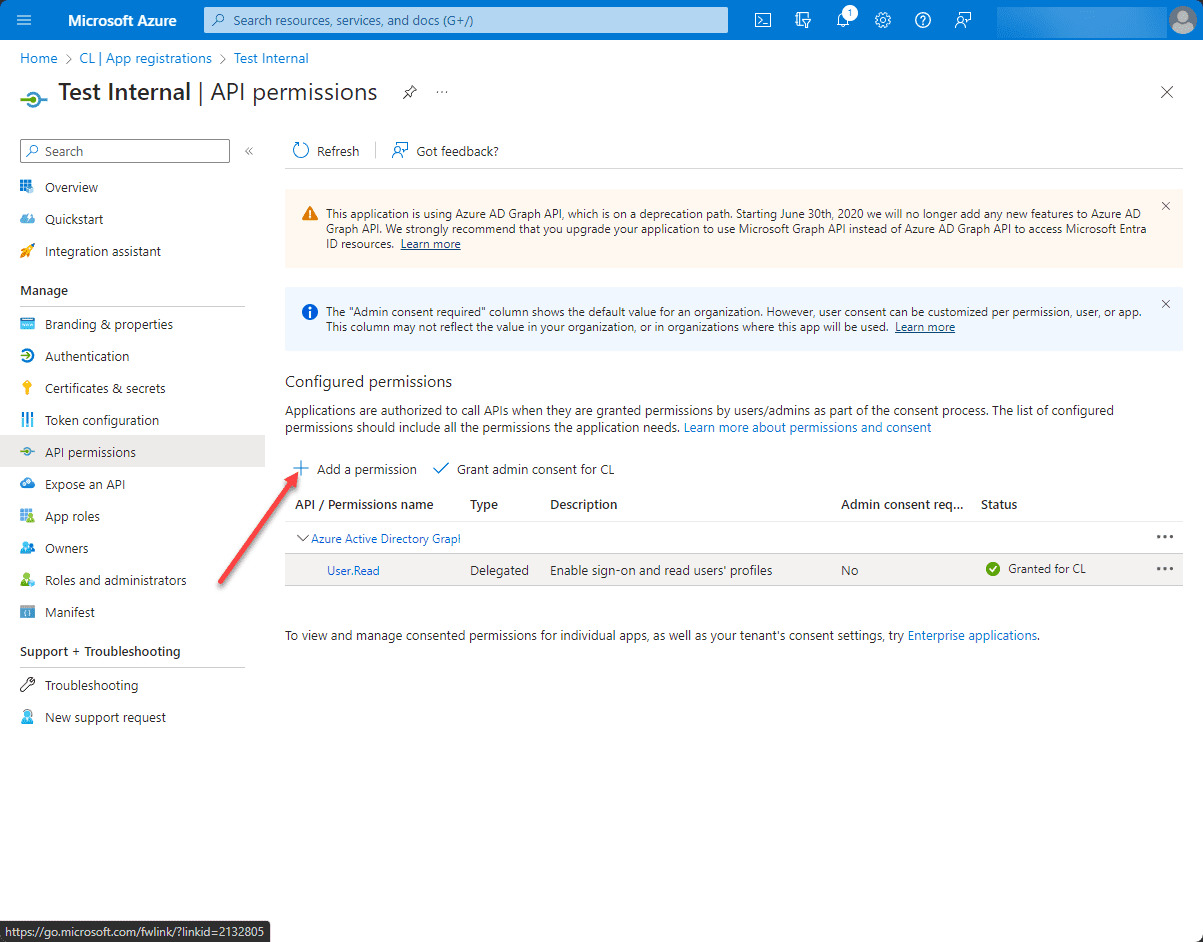
A blade will open where you can choose which APIs your application can access. For instance, if you want to access Microsoft Graph, select “Microsoft Graph” from the list.
7. Choose the Type of Permission
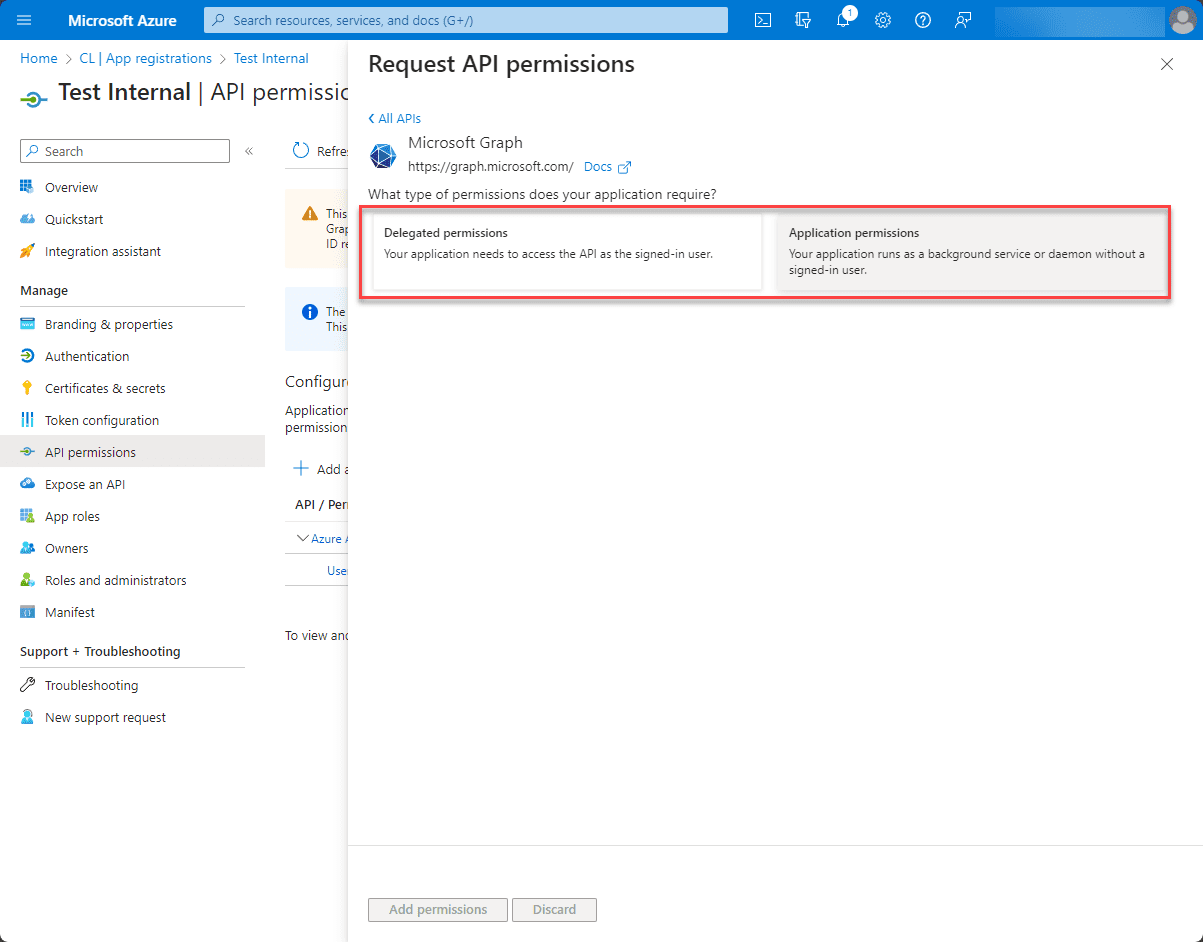
Select between “Delegated Permissions” and “Application Permissions”. As discussed earlier, choose the appropriate type based on your application’s needs.
8. Select Specific Permissions
After choosing between delegated and application permissions, you’ll see a list of all available permissions for that API. Check the boxes next to the permissions your application requires.
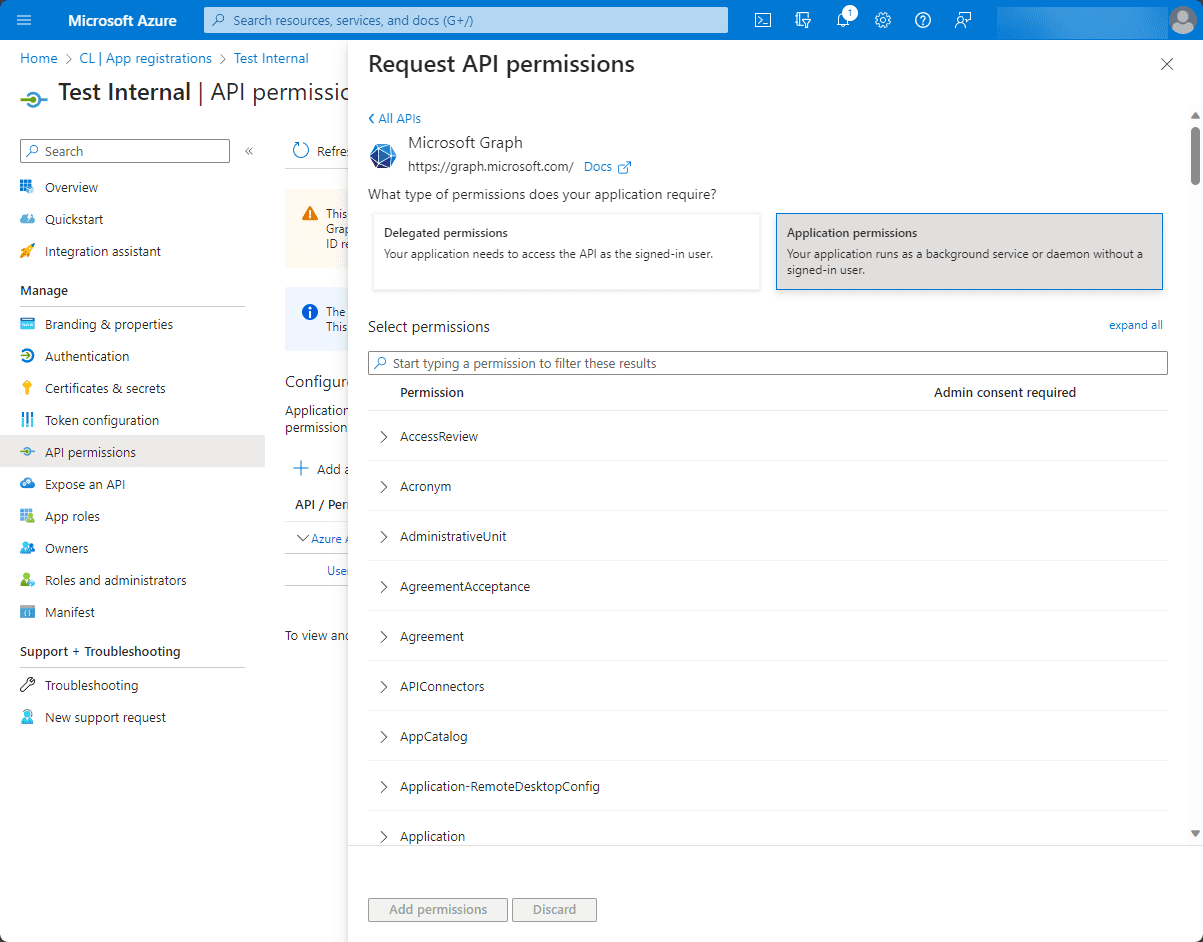
9. Click “Add permissions”
After selecting the necessary permissions, click the “Add permissions” button to save your choices.
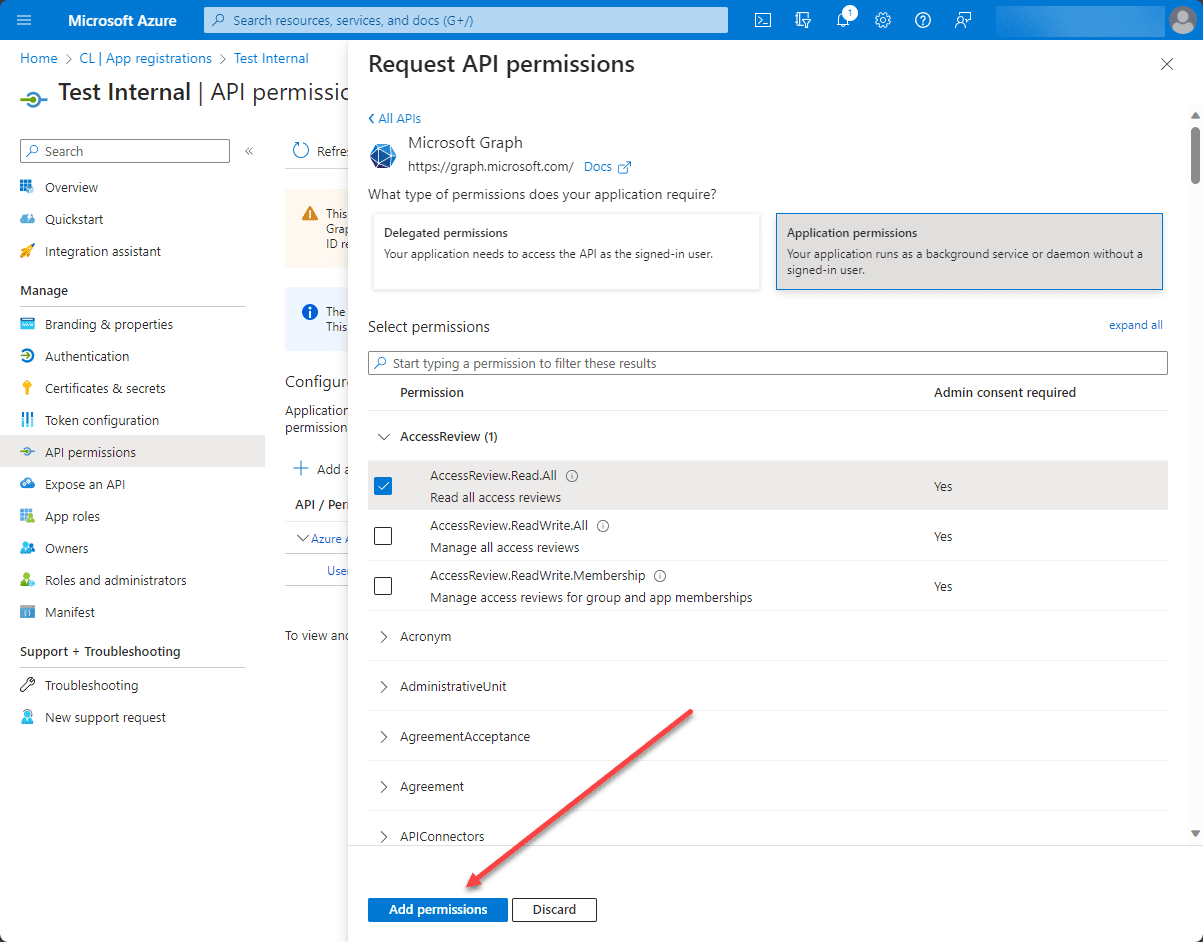
10. Grant Admin Consent (if required)
For permissions that require admin consent, you’ll notice an “Exclamation” icon next to them. To grant consent for these permissions:
Click on the “Grant admin consent for [Directory Name]” button.

A confirmation prompt will appear. Confirm to grant the permissions.
11. Verify Permissions
After granting permissions, you can review them in the “API permissions” tab to ensure everything is correctly set up.
12. Test the Application
Finally, test your application to ensure it can access required resources without issues.
Final Thoughts on Azure App Registration and Permissions
Azure App Registration and registration permissions allow administrators to integrate applications with Azure Active directory and grant apps permissions on behalf of users or explicit application permissions that are global in nature. It provides a way to have granular permissions on Azure AD resources and ensure applications have access to the data and APIs needed in a secure fashion.
Related Posts:
Microsoft 365 for Beginners – What is Microsoft Power BI? Part 37
Follow our Twitter and Facebook feeds for new releases, updates, insightful posts and more.


Leave A Comment