Quick Bites:
- Azure Managed Disks are like virtual hard drives managed by Azure, offering features like encryption and high availability
- Managed disks provide excellent durability with 99.999% availability, thanks to triple-replica storage ( Azure maintains three replicas of each managed disk you created, in three different regions)
- They support encryption, with server-side and customer-managed keys for security
- You can create managed disks and configure snapshots for backup in the Azure portal
- Snapshots offer point-in-time copies for backup or troubleshooting VM issues
- Azure PowerShell enables you to create new VMs from managed disk snapshots easily
- Azure Managed Disks and snapshots together offer a comprehensive solution for backup and disaster recovery with high security and availability
What is Azure Managed Disks?
Azure Managed disks are block-level storage disk volumes managed by Azure and are often used when you create Azure VMs. Managed disks are similar to physical disks in on-premise environments, provided with additional features such as encryption, high availability, security, and covered with disaster recovery plans. Currently Azure offers various disk types for Azure Managed disks that include premium & standard SSDs and standard HDDs.
Table of Contents
- Creating a managed disk in the Azure portal
- Creating a snapshot for the Azure managed disk
- Creating an Azure VM from a Managed Disk snapshot using Azure PowerShell
- Conclusion
Benefits of managed disks in Azure
Managed disks are having high availability and durability. Azure managed disks are designed with the availability of 99.999% in all its available regions. Azure maintains three replicas of each managed disk you created in three different regions achieving the highest durability. If any one or two of these disks experience any issues, a third copy of the disk will ensure data availability and high tolerance against any failures.
Using managed disks service you can create up to 50,000 numbers of managed disks in one subscription per region, and this allows you to create 1,000 numbers of VMs in one subscription.
Each managed disk is offered to use Azure Disk backup service for additional protection. Using Azure Disk backup service, you can create a backup policy to schedule your backup, that takes automated snapshots of each disk regularly.
You can encrypt your managed disks while creating, and this will meet your organizational security and compliance commitments. Managed disks offer two different kinds of encryption. The first is Server Side Encryption (SSE), which is performed by the storage service. The second one is Azure Disk Encryption (ADE), which you can enable on the OS and data disks for your VMs.
In this blog, we are going to describe the steps involved in creating a managed disk and configuring disk snapshots for the managed disk in the Azure portal using a subscription.
Creating a managed disk in the Azure portal
Log in to the Azure portal using valid credentials which has a valid subscription. Choose All Services → Disks → Create a disk
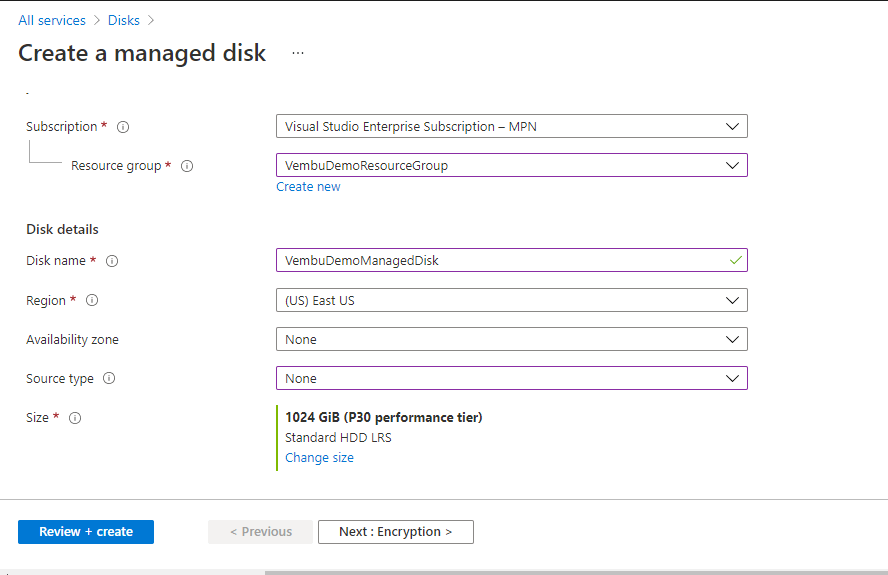
In the first step, Provide a valid subscription and resource group. On the “Disk Details “ section provide a disk name and choose the region where you want to deploy this managed disk. You can create a disk from a snapshot of another disk, a blob in a storage account, or create an empty disk. In our case we are creating a new disk, so choose the source type none.
Then choose the size of the managed disk from the available list depending on your requirement. In our case, we have chosen 1024 Gib Standard HDD to create a managed disk.

Click Next: Encryption step
In this step, you can choose the “Encryption type”. Azure offers server-side encryption with platform-managed keys by default for managed disks. You may optionally choose to use a customer-managed key, or you can choose double encryption type by choosing the options mentioned below.
- Encryption at rest with a platform managed key ( Default )
- Encryption at rest with a customer-managed key
- Double encryption with a platform managed key & customer-managed key
We have selected default encryption at rest with a platform-managed key. Click next to Networking settings.
In this step, we have configuring network connectivity, i.e. how the created managed disk can be connected over the internet. Available connectivity method is:
- Public endpoint (all networks)
- Private endpoint (through disk access)
- Deny all
Public endpoint – All networks will be able to access this managed disk.
Private endpoint – You can associate your managed disk with a disk access resource, which allows you to protect your disk with a private link. The disk access will only allow import and export operations through private endpoints.
Deny all – You can’t access the disk over the internet, and is accessible only through the attached Azure VM.
You can choose any one of the above options, and click Next: Advanced settings.
In Advanced Settings, you can enable shared disk settings. Enabling this setting allows this disk to be attached to two or more virtual machines, depending on the storage type and disk size. When the shared disk is enabled host caching is unavailable
Next option Tags settings, you can skip to the final step. click the Review+Create button.
Azure runs a final validation process and will get the message “validation passed” on the screen, now click create to confirm the creation of a new Azure-managed disk. In a few minutes, you can see the deployment progress message, and then the deployment complete message.
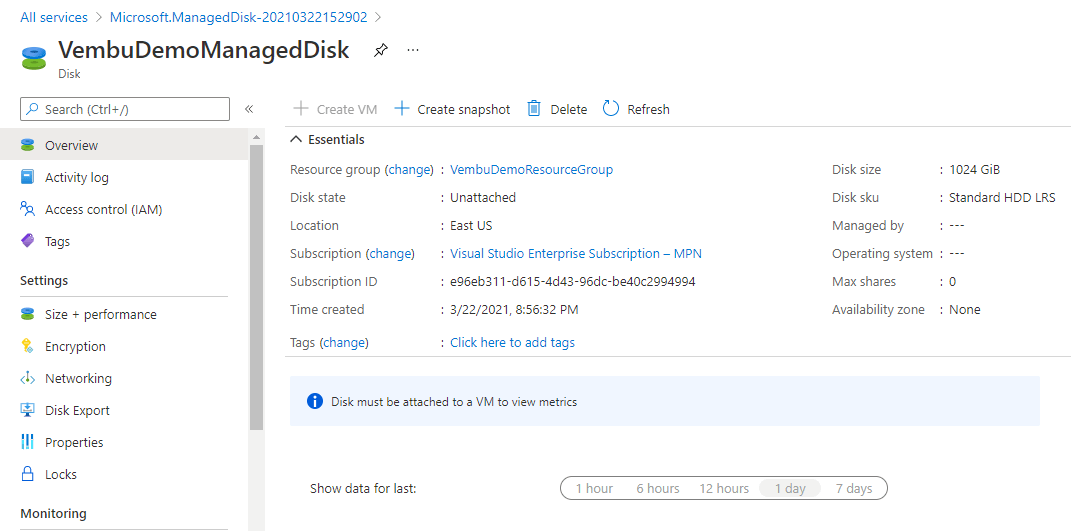
Click the GotoResouce button, and you will find all the details about the newly created azure managed disk as shown in the screenshot below

Here you can see Disk state as Unattached and you can see a message “Disk must be attached to a VM to view metrics. Once you attach this managed disk to an existing VM, you can view the disk metrics such as Disk IOPS, Disk throughput and Disk Queue depth, etc.
Creating a snapshot for the Azure managed disk
A Managed Snapshot is a full point-in-time copy of a VM Managed Disk. Taking a snapshot of a Managed Disk will be useful for backup or create a Managed Disk from the snapshot and attach it to a test virtual machine to troubleshoot production virtual machine issues.
Log in to the Azure portal using a valid credential that has a valid subscription. Choose All Services → Compute → Snapshots. Click Create snapshot
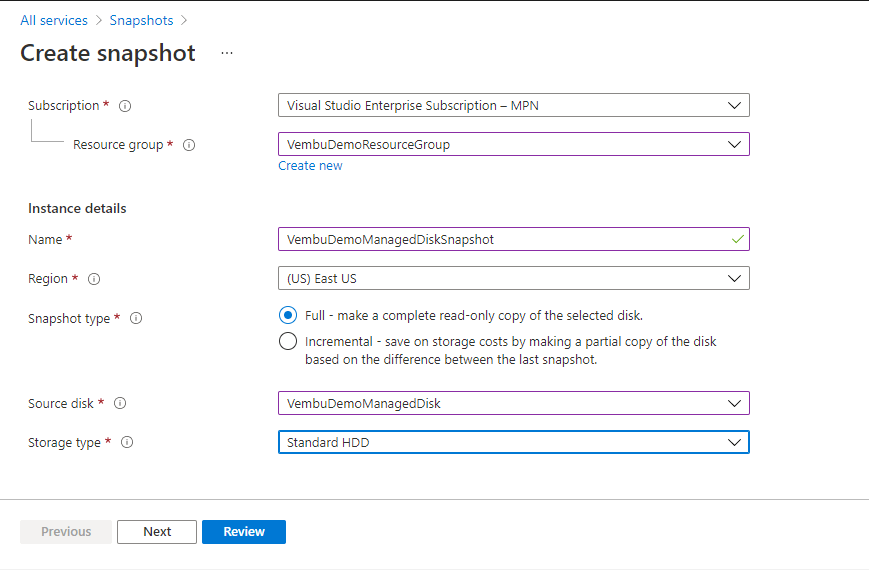
In the first step, on the project details section, select the subscription to manage deployed resources and costs & choose the resource group where you want to place this managed disk resource.
In the instance details section, provide a name for the snapshot resource. Choose the region, where this snapshot resource should reside. On the snapshot type, you can choose any one of two options Full and Incremental
- Full makes a complete read-only copy of the selected disk
- Incremental makes a partial copy of the disk-based on the difference between the last snapshot
Choose the source disk, ie the name of the managed disk that you want to take a snapshot. In our case, we are taking the snapshot of the managed disk “VembuDemoManagedDisk” created in the above steps.
On storage disk selection, you can choose the storage type in any of three types Standard HDD, Premium HDD, and Zone redundant depending on your workload and cost. Here we are choosing Standard HDD.

Click Next to configure the encryption option for the snapshot.
Here too, the encryption option will be similar to the encryption option, when creating an Azure managed disk. You can use any of the three options listed below
- Encryption at rest with a platform managed key ( Default )
- Encryption at rest with a customer-managed key
- Double encryption with a platform managed key & customer-managed key
We are choosing the default option “Encryption at rest with a platform managed key” Click Next to configure Networking
In networking configuration, you are providing the option for the connectivity method. Available options are
- Public endpoint (all networks)
- Private endpoint (through disk access)
- Deny all
You can import or export your disk either publicly or privately, using a private endpoint. To support disks at scale, a disk access resource is created to manage the private endpoints.
We are choosing the public endpoint option. Click Next to configure Tags. Tags are name/value pairs that enable you to categorize resources and view consolidated billing by applying the same tag to multiple resources and resource groups, and this is an optional step. Click Next to review your configuration, and will check the validation process.
After successful validation, click create to confirm the snapshot process.
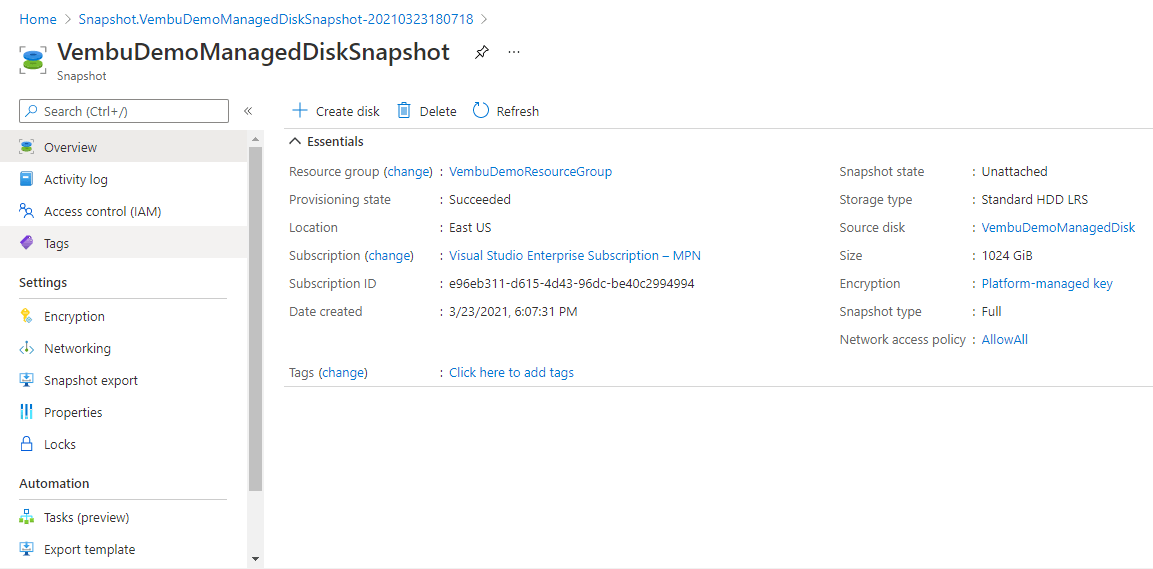
You will get deployment in progress message for a few minutes, later you get a deployment completed message. Click the “Goto Resouce” button to find more details of the snapshot as shown below.

Creating an Azure VM from a Managed Disk snapshot using Azure PowerShell
You can create an Azure VM from a Managed Disk snapshot using Azure Powershell. You can create a new VM by attaching a specialized managed disk or its snapshot as the OS disk. This specialized disk is a copy of a virtual hard disk (VHD) from an existing VM that contains the user accounts, applications, and other state data from your original VM.
Using an existing managed disk or its snapshot you can delete the VM and then reuse the managed disk to create a new VM. If you had a VM that you deleted and you want to reuse the OS disk to create a new VM, use Get-AzDisk.
Powershell command example :
$resourceGroupName = ‘myResourceGroup’
$osDiskName = ‘myOsDisk’
$osDisk = Get-AzDisk `
-ResourceGroupName $resourceGroupName `
-DiskName $osDiskName
For more information on working with Azure Managed Disks and their snapshot, you can refer to Microsoft Azure tutorial on Managed disks documentation.
Conclusion
Combining Azure Managed disks and snapshots, Azure provides a complete solution for customers and Independent solution providers to build backup and disaster recovery solutions quickly and easily. Also Managed disks use premium SSD level of enterprise disks you can have high availability and durability on your OS and data. In a way of private link access Azure managed disks cover full security to the customers.
Related Posts:
How to Enable Sharing and Disk Bursting of Managed Disks in Azure?
Microsoft Azure – Virtual Machine Types
How to Automate AWS EC2 Instance Backup?
Follow our Twitter and Facebook feeds for new releases, updates, insightful posts and more.


Leave A Comment