What is Azure Blob Backup ?
Azure Blob provides a simple, cost effective backup solution for Business critical object data. Users may wish to leverage this object data backup and so Microsoft Azure offers blob backup solution in two distinct ways described as Operational backup and Vaulted backup. Users can choose to configure vaulted backups, operational backups, or both on their storage accounts using a single backup policy in Azure backup center. In this blog, we will distinguish these two blob backup solutions in detail and create a blob backup after creating a storage vault and a backup policy.
Operational backup – Operational backup of blobs is a local backup solution that maintains data for a specified duration in the source storage account itself. This solution doesn’t maintain an additional copy of data in the vault. This solution allows you to retain your data for restore for up to 360 days. This can be used to perform restores to the source storage account only and may result in data being overwritten.
Vaulted backup – Vaulted backup of blobs is a managed offsite backup solution that transfers data to the backup vault and retains as per the retention configured in the backup policy. You can retain data for a maximum of 10 years.
Users can choose the above backup solutions based on different criteria such as supported scenarios, limitations, and availability of each of these backup solutions. Though operational backup of blobs is a local backup and doesn’t “store” data in the vault, the vault is required for various management operations.
Prerequisites for configuring a Blob backup
Before configuring a blob backup user must have a Storage vault and a Backup policy. According to Microsoft Documentation, a Backup vault is a management entity that stores recovery points created over time and provides an interface to perform backup related operations. These include taking on-demand backups, performing restores, and creating backup policies. Users can create Storage vault and Backup policy during the backup configuration, or can create separately and use at the time of blob backup configuration.
Creating a storage vault in Azure portal
1. Login to Azure portal with valid credentials
2. Type Backup Vaults in the search box available at the top
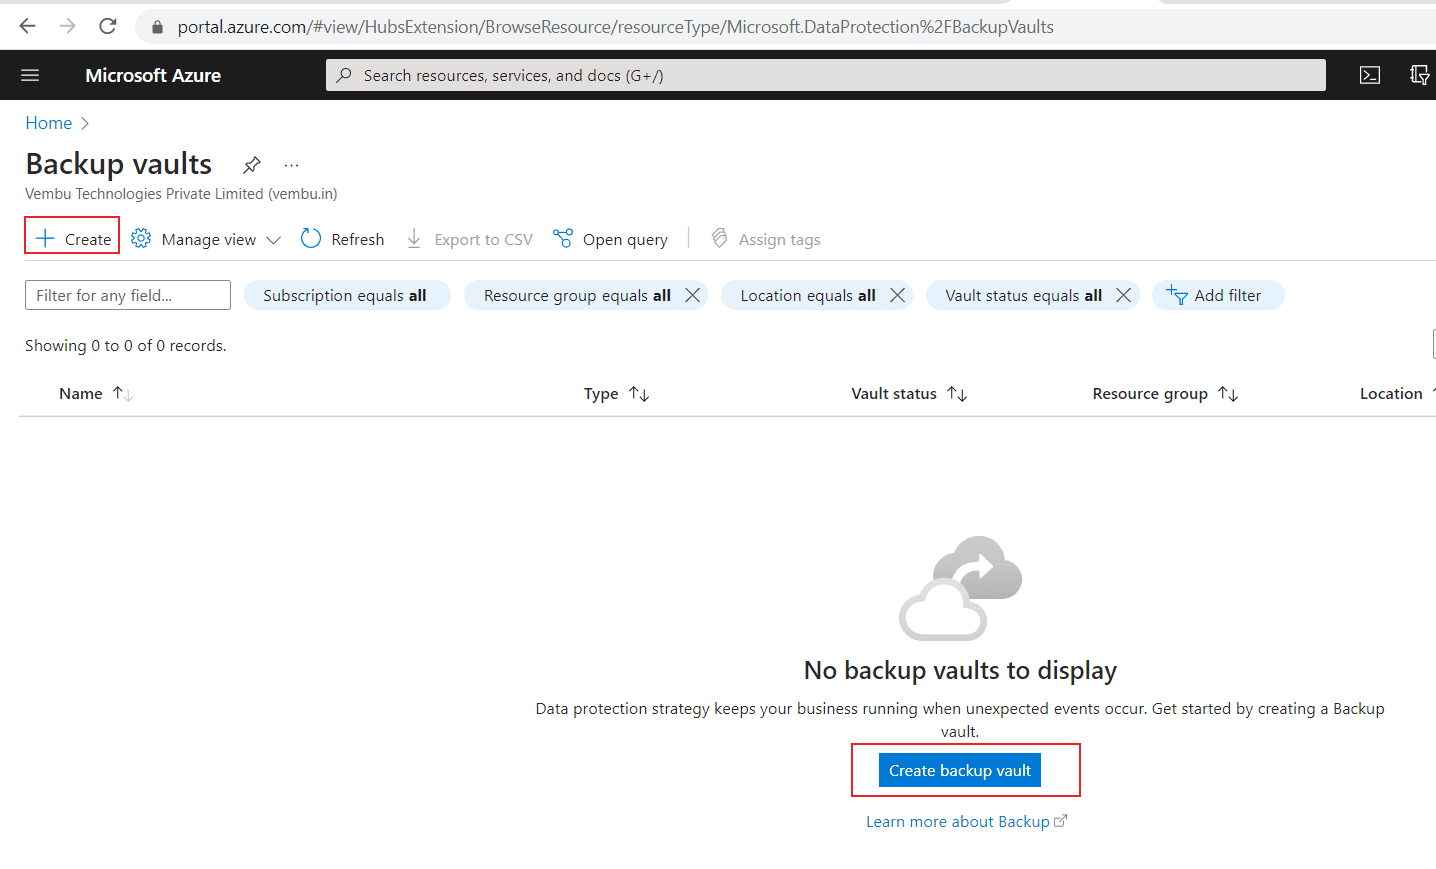
3. If you don’t have any existing backup vaults, you can see the action box “create backup vault”, or you can click the plus sign symbol to create the backup vault
The below screenshot shows this step.
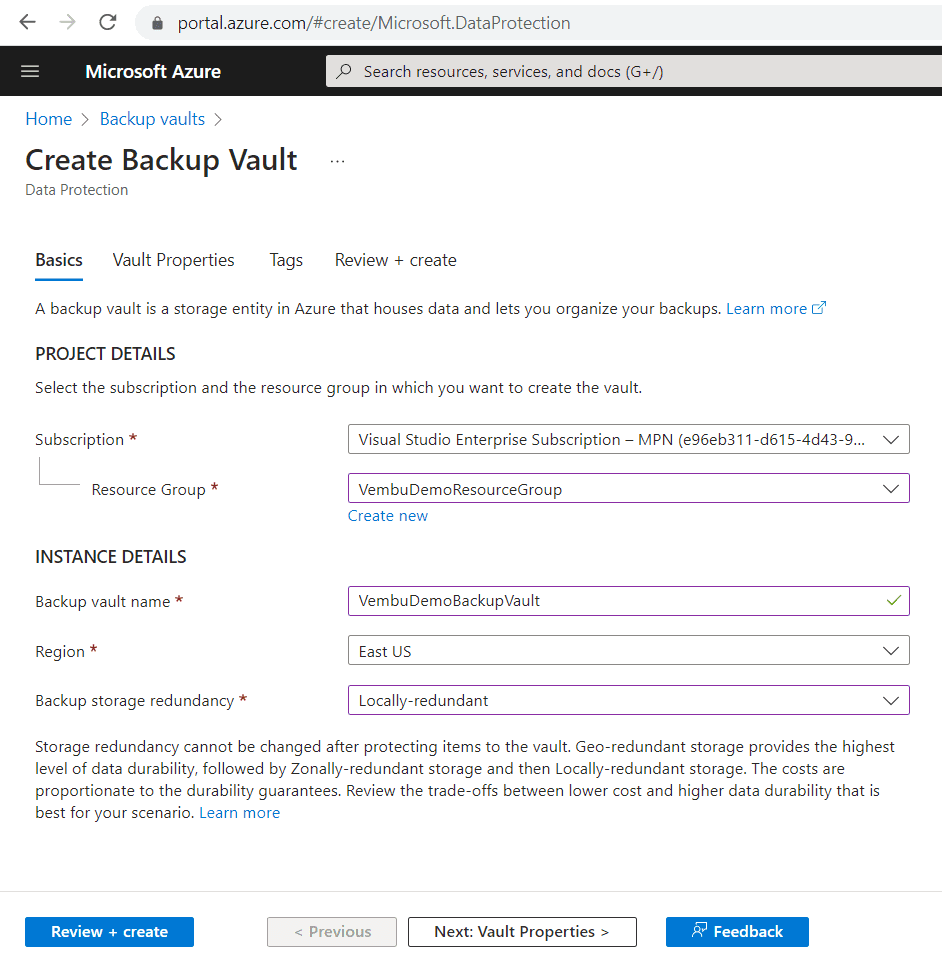
4. On the basics tab, Under project details, choose the subscription and the resource group. If you don’t have a resource group, create one
5. Under the instance details, provide a backup vault name. Choose the region to host this created vault
6. Choose the backup storage redundancy. You can choose any of the options local, global and zone redundancy
Note : Storage redundancy cannot be changed after protecting items to the vault. Geo-redundant storage provides the highest level of data durability, followed by Zonally-redundant storage and then Locally-redundant storage.
The below screenshot shows this step
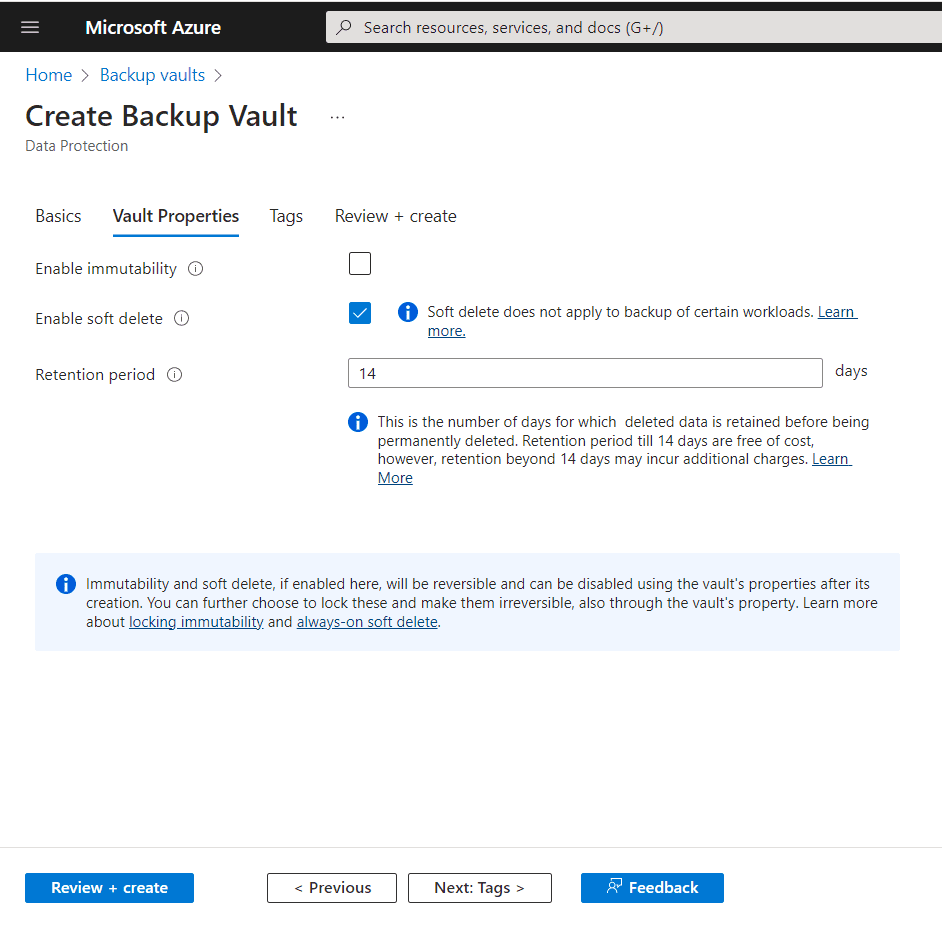
7. Click Next Vault Properties. Here you can enable / disable immutability and soft delete features for the backup vault. By default soft delete is enabled. Here you can provide the retention period in days for the soft delete. 14 days is the default retention period
The below screenshot shows this step
8. Click Review+create button to create the backup vault. After a while, your deployment is ready and you can see the backup vault in the list
Creating a backup policy in Azure portal
1. Login to Azure portal. Choose Backup Center –> Backup policies
2. Click Add to create a new policy
3. Choose data source type as “Azure Blobs ( Azure storage ) and choose the backup vault you created previously
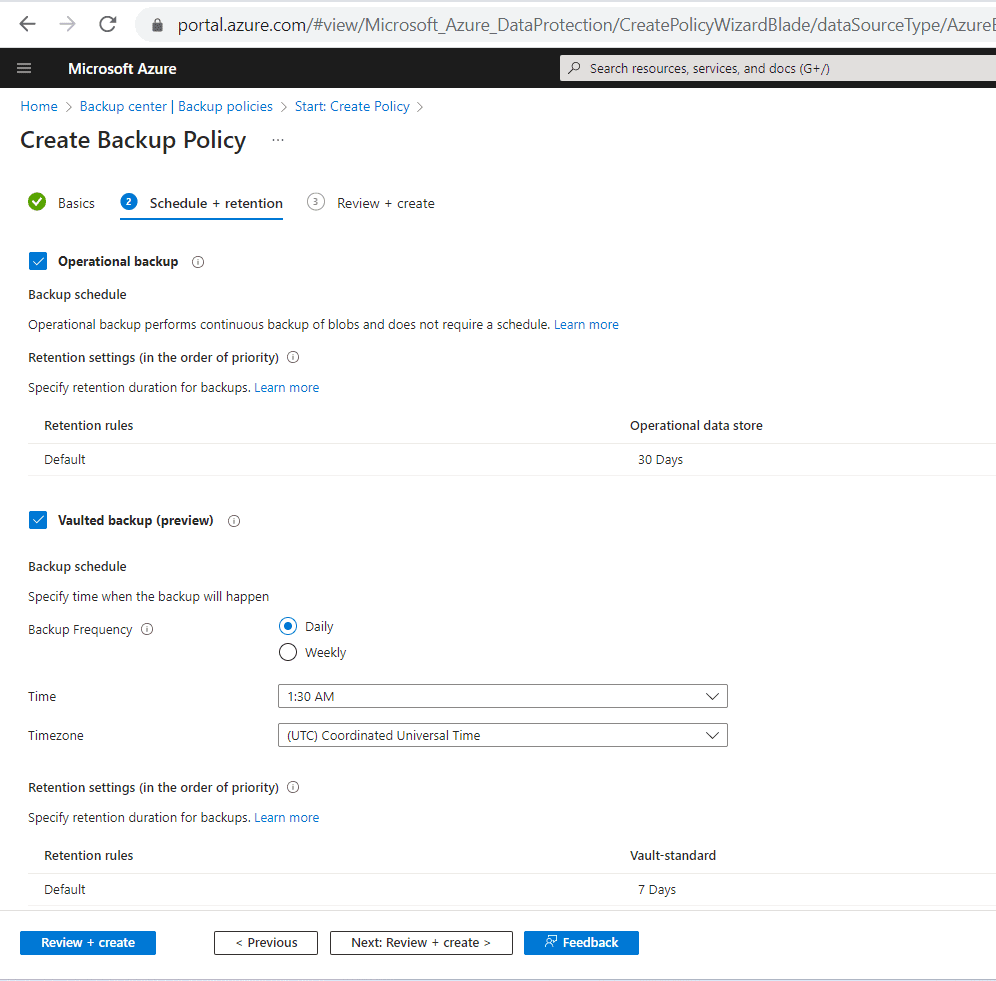
4. Click Next to schedule and retention. Here you can choose Operational backup and vaulted backup, or can choose any one of the backup methods. In our demo, we have chosen both the backup methods to show the details of each method
5. Here, you can edit the retention rule and backup frequency as per your requirement
Below screenshot shows this
6. Click Review + create to complete the process. Now a new policy is added and can be visible under “Backup policies”
Configuring a Blob backup
1. Login to Azure portal. Under Backup center, click Configure backup ( + sign )
2. Select data source type as Azure blob, click continue
3. Select the new vault we created. Click Next
4. Select the new backup policy we created. Click Next
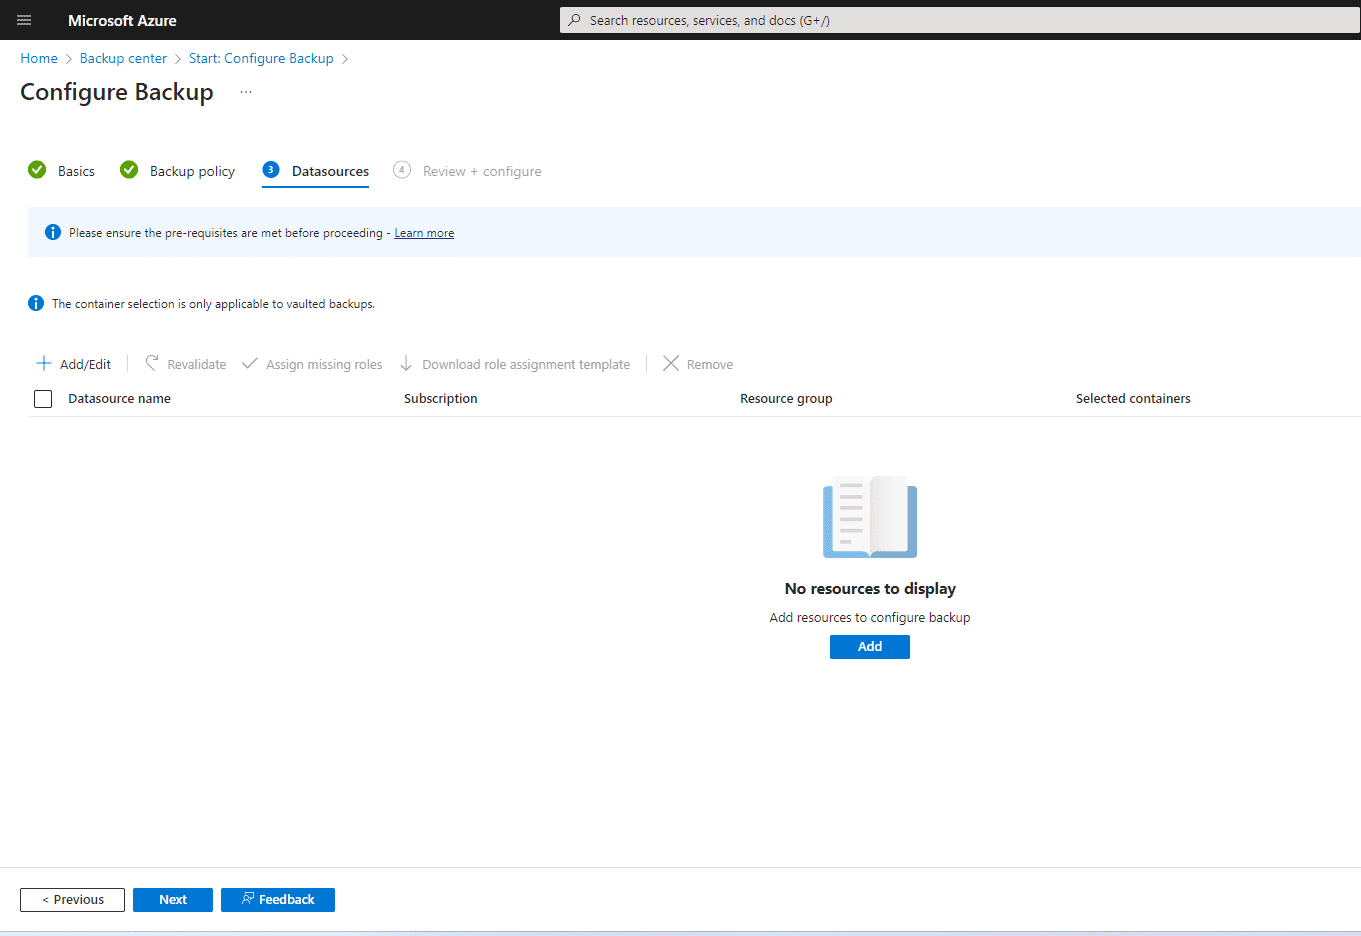
5. Finally, users need to provide the resource to configure the backup
6. After adding the resource you want to backup, click next to finish the backup configuration
Attached screenshot shows these steps
Conclusion
Azure Blob storage provides a cost-effective solution for storing a large amount of data compared to other storage solutions. Azure backup provides flexible backup options tightly integrated with other Azure services. With built-in security features and scalability, one can choose Azure backup for all the resources without any doubt. On the other hand, users should have a higher bandwidth in case of download. Also, due to lack of detailed APIs it is hard to integrate the backup solution to any third party solutions.
Related articles:
Azure File Storage vs Azure Blob Storage
Amazon S3 vs Azure Blob Storage – Comparison
BDRSuite v5.3 New Feature Update: How to Store Backup Data on Azure Blob
Follow our Twitter and Facebook feeds for new releases, updates, insightful posts and more.


Leave A Comment