
Introduction
The world of virtualization and server management comes with its complexity, and, therefore, a proper appreciation of User Management’s importance in Proxmox VE is essential to the overall formation of a comprehensive and secure system of running operations. Businesses are always on their way to enhancing their digital systems, and the management of user access rights and how they use the said rights is fundamental.
This blog delves into the heart of User Management, emphasizing its importance, how it should be managed, and what files it plays in ensuring data protection and the running of smooth operations.
Users and Groups in Proxmox User Management
Users and groups play an important role in Proxmox user management, serving as core components for organizing and controlling access within the system. Users represent individual entities granted with specific permissions and rights, allowing them to interact with the Proxmox environment based on defined parameters. On the other hand, groups function as a mechanism to efficiently manage users by categorizing them into logical units with shared access privileges.
By assigning users to appropriate groups, administrators can streamline access control processes, simplify permission assignments, and maintain a structured user management framework within Proxmox. Understanding the distinctions between users and groups is crucial for effectively managing access control and ensuring secure operations within the Proxmox environment.
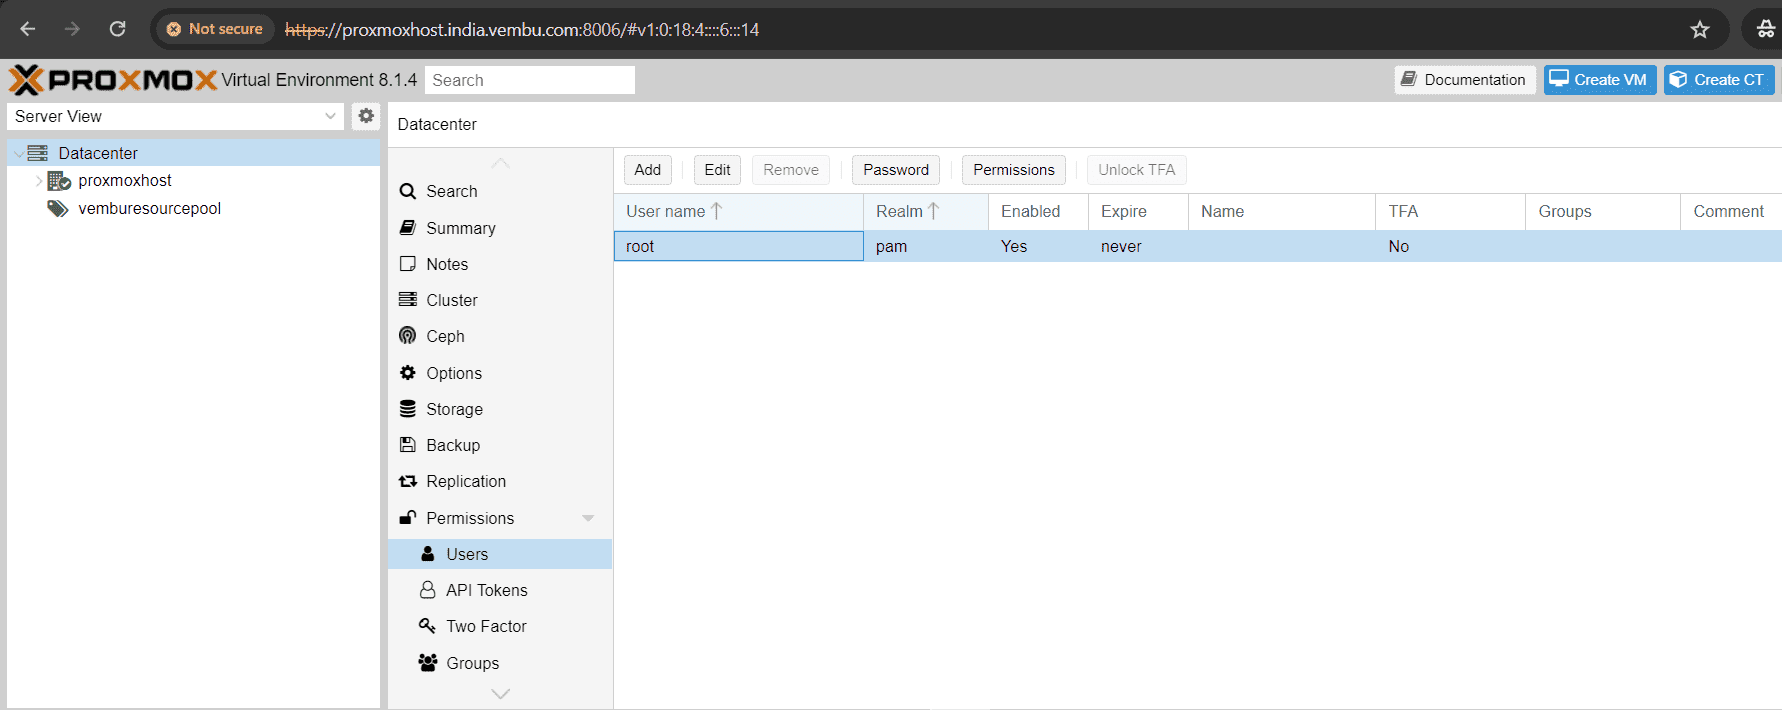
Note: The user “root” is a default confined administrator and this user cannot be deleted, but attributes can still be changed.

You can add User or Group at the Datacenter level and is listed under the Permission tab. Below screenshot shows this page with the default root user.
Groups vs Resource pools in Proxmox VE
A Resource pool is a collection of virtual machines, containers, and storage devices. This concept proves valuable in managing permissions efficiently, especially when restricting specific users’ access to designated resources. By applying a singular permission to a group of elements, rather than managing them individually, resource pools streamline access control processes. Frequently utilized in conjunction with groups, resource pools enable group members to have permissions over a defined set of machines and storage in the proxmox VE ecosystem.
Types of Authentication Realms available in the Proxmox VE
Authentication realms on Proxmox VE server play a crucial role in ensuring secure access to the system and its resources. In simple terms, an authentication realm defines a scope within which users’ credentials are verified and authorized. By setting up authentication realms on your Proxmox VE server, you can control who has access to what parts of the system based on their roles and permissions. This not only enhances security but also helps in organizing and managing user access more effectively. Understanding the significance of authentication realms is essential for maintaining a robust and secure environment on your Proxmox VE server.
Below are the types of authentication realms supported by the proxmox VE
Linux PAM standard authentication : Linux PAM serves as a system-wide user authentication framework. Users are generated on the host system using commands like adduser. If PAM users are present on the Proxmox VE host system, compatible entries can be incorporated into Proxmox VE to enable these users to authenticate using their system username and password.
Proxmox VE Authentication Server : This system functions as a Unix-like password repository, securely storing hashed passwords in /etc/pve/priv/shadow.cfg. Utilizing the SHA-256 hashing algorithm, it offers a high level of security. Particularly suitable for small to mid-scale installations, it confines user access exclusively to Proxmox VE. Users in this setup are effectively managed by Proxmox VE and can independently modify their passwords through the graphical user interface.
The above two authentication realms are supported by default. You can also use third party or open source authentication mechanism to use in the proxmox server. Below are the few widely used commerical or free autentication realms supported in the proxmox VE
LDAP : LDAP (Lightweight Directory Access Protocol) is an open, cross-platform protocol utilized for authentication through directory services. OpenLDAP stands as a widely utilized open-source implementation of the LDAP protocol. You may require to have a external LDAP server to implemet this authentication mechanism.
Microsoft Active Directory : Microsoft Active Directory (AD) functions as a directory service designed for Windows domain networks and is endorsed as an authentication realm for Proxmox VE. It operates with LDAP as an authentication protocol.
OpenID Connect : OpenID Connect serves as an identity layer built upon the OATH 2.0 protocol, enabling clients to authenticate the user’s identity through interactions with an external authorization server.
Adding a User in proxmox VE
You can add a user in Proxmox web GUI, by choosing the “Datacenter” → Permissions.
Under Permission, Choose User and Click Add.
Below screenshot shows where to choose the authentication realm when you create a new user in proxmox VE. As mentioned, the last three authentication realms have to be added manually, and is not shown here.
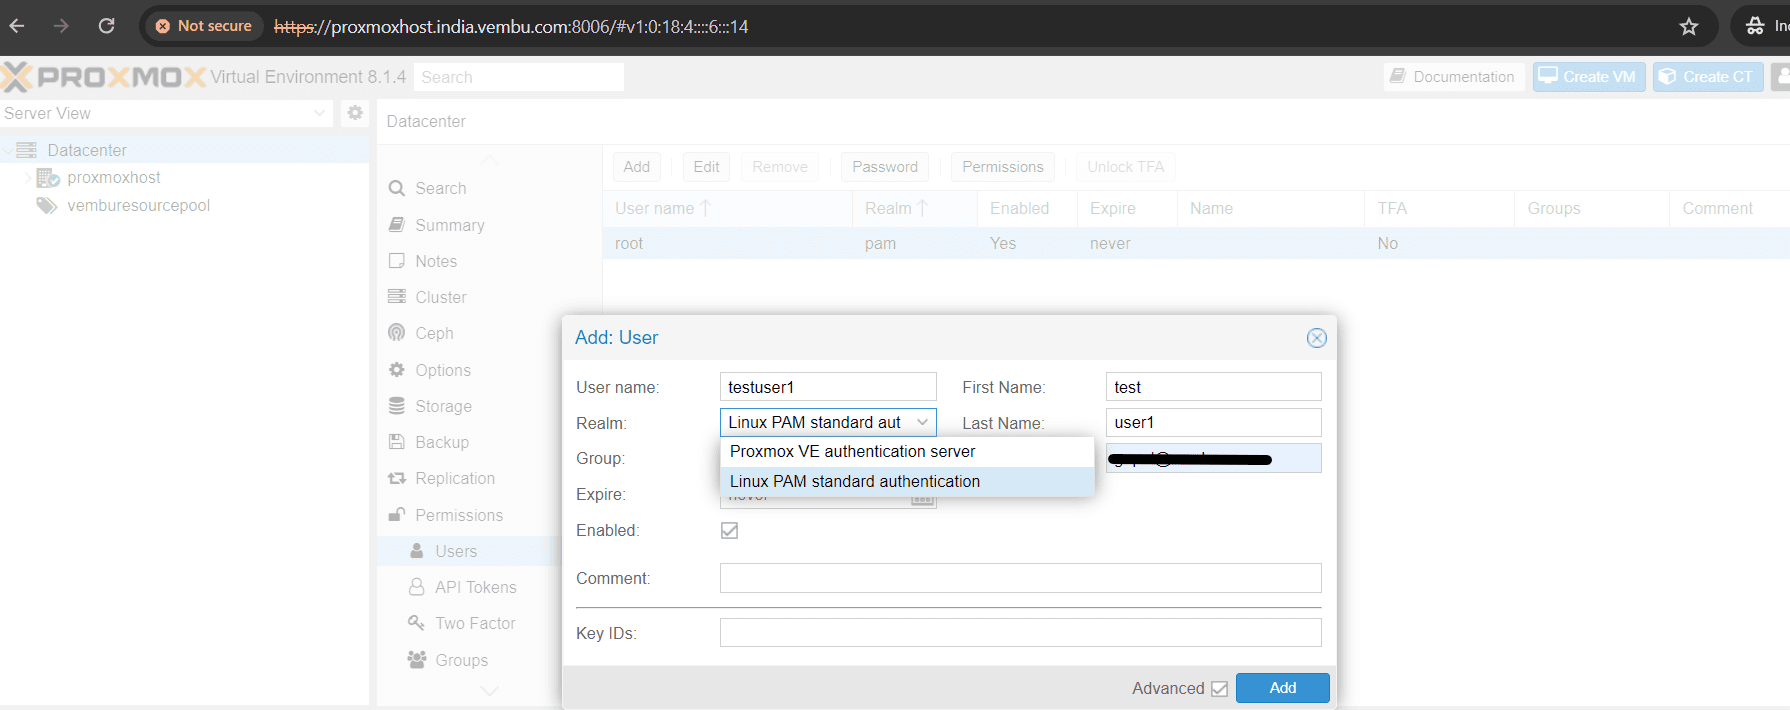
- Provide details such as FirstName, LastName and Email ID for the added new user
- Realm : Select the Realm you would like to use
- Group : Choose the Group if you want to accomodate the user, if you already have a Group. Or let the user be a non group member
- Expire : Set the expiry date for the user. By default it is never expire, you can also set a particular date, beyond that date the user gets the notificaiton that he could not login due to expiry
- Enabled : Set the user session enabled to login, else you can set it later
Click Add to finish the task.
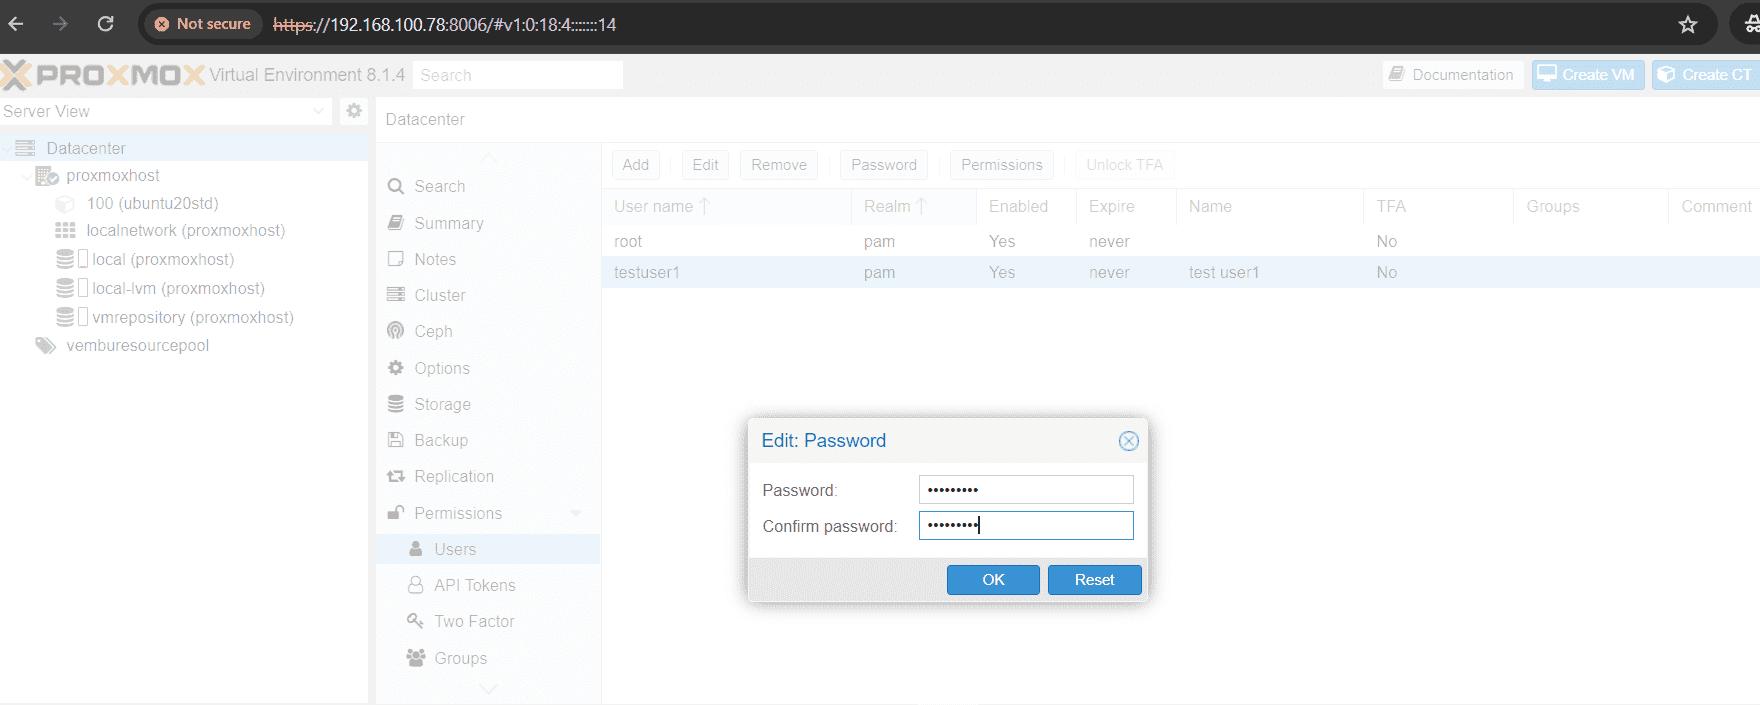
After creating the user, you can set the password for the user. Follow the below steps to add the password for the newly created user.
- Select the desired user under Permissions → Users
- Click the Password box available on top of the users list
- On edit password screen provide the password and confirm password
- Click OK to finish the task
Permission Management
To carry out actions such as listing, modifying, or deleting parts of a VM’s configuration, users must possess the relevant permissions. Proxmox VE employs a permission management system based on roles and paths. Within the permissions table, an entry enables a user, group, or token to assume a specific role when interacting with an object or path. This setup entails the representation of access rules as a triple of (path, user, role), (path, group, role), or (path, token, role). The role comprises a set of permissible actions, while the path denotes the target of these actions.
Roles
A role comprises a set of privileges. Proxmox VE includes several pre-defined roles that cater to most requirements. You have the ability to view the complete set of predefined roles within the graphical user interface. You can also introduce new roles using either the graphical user interface or the command line.
Below are the examples of pre-defined roles
- Administrator: has full privileges
- NoAccess: has no privileges (used to forbid access)
- PVEAdmin: can do most tasks, but has no rights to modify system settings (Sys.PowerMgmt, Sys.Modify, Realm.Allocate) or permissions (Permissions.Modify)
- PVEAuditor: has read only access
- PVEDatastoreAdmin: create and allocate backup space and templates
- PVEDatastoreUser: allocate backup space and view storage
- PVEMappingAdmin: manage resource mappings
- PVEMappingUser: view and use resource mappings
- PVEPoolAdmin: allocate pools
- PVEPoolUser: view pools
- PVESDNAdmin: manage SDN configuration
- PVESDNUser: access to bridges/vnets
- PVESysAdmin: audit, system console and system logs
- PVETemplateUser: view and clone templates
- PVEUserAdmin: manage users
- PVEVMAdmin: fully administer VMs
- PVEVMUser: view, backup, configure CD-ROM, VM console, VM power management
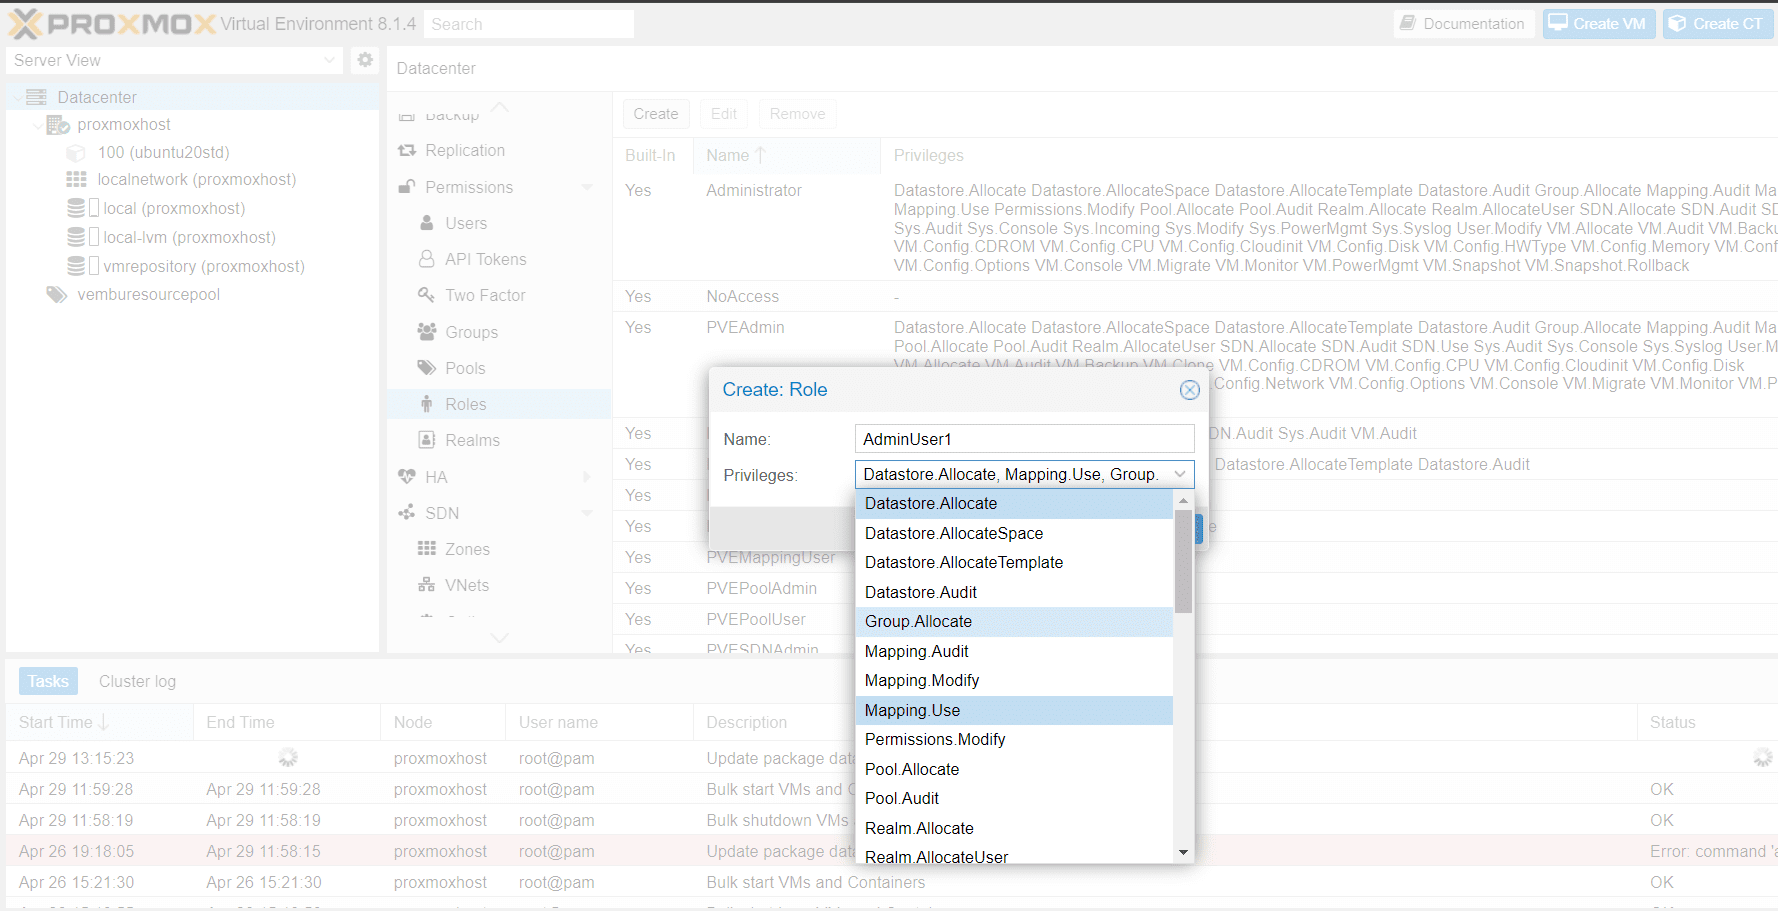
Using the graphical user interface, proceed to the Permissions → Roles tab within the Datacenter and then click on the Create button. From there, you have the option to define a role name and choose any necessary privileges from the Privileges drop-down menu.
Privileges
A privilege encompasses the right to execute a specific action. To streamline administration, collections of privileges are organized into roles, which can subsequently be applied in the permission table. It is important to recognize that privileges cannot be directly allocated to users and paths without first being associated with a role.
Proxmox currently supports the following privileges:
Node / System related privileges
- Group.Allocate: create/modify/remove groups
- Mapping.Audit: view resource mappings
- Mapping.Modify: manage resource mappings
- Mapping.Use: use resource mappings
- Permissions.Modify: modify access permissions
- Pool.Allocate: create/modify/remove a pool
- Pool.Audit: view a pool
- Realm.AllocateUser: assign user to a realm
- Realm.Allocate: create/modify/remove authentication realms
- SDN.Allocate: manage SDN configuration
- SDN.Audit: view SDN configuration
- Sys.Audit: view node status/config, Corosync cluster config, and HA config
- Sys.Console: console access to node
- Sys.Incoming: allow incoming data streams from other clusters (experimental)
- Sys.Modify: create/modify/remove node network parameters
- Sys.PowerMgmt: node power management (start, stop, reset, shutdown, …)
- Sys.Syslog: view syslog
- User.Modify: create/modify/remove user access and details
Virtual machine related privileges
- SDN.Use: access SDN vnets and local network bridges
- VM.Allocate: create/remove VM on a server
- VM.Audit: view VM config
- VM.Backup: backup/restore VMs
- VM.Clone: clone/copy a VM
- VM.Config.CDROM: eject/change CD-ROM
- VM.Config.CPU: modify CPU settings
- VM.Config.Cloudinit: modify Cloud-init parameters
- VM.Config.Disk: add/modify/remove disks
- VM.Config.HWType: modify emulated hardware types
- VM.Config.Memory: modify memory settings
- VM.Config.Network: add/modify/remove network devices
- VM.Config.Options: modify any other VM configuration
- VM.Console: console access to VM
- VM.Migrate: migrate VM to alternate server on cluster
- VM.Monitor: access to VM monitor (kvm)
- VM.PowerMgmt: power management (start, stop, reset, shutdown, …)
- VM.Snapshot.Rollback: rollback VM to one of its snapshots
- VM.Snapshot: create/delete VM snapshots
Storage related privileges
- Datastore.Allocate: create/modify/remove a datastore and delete volumes
- Datastore.AllocateSpace: allocate space on a datastore
- Datastore.AllocateTemplate: allocate/upload templates and ISO images
- Datastore.Audit: view/browse a datastore
Objects and Path
Access permissions are mapped to entities such as virtual machines, storage resources, or resource pools through the use of file system-like paths. These paths naturally form a hierarchical tree structure, and permissions set at higher levels (shorter paths) can optionally be inherited by lower levels within this hierarchy.
Paths can be templated, meaning that when an API call requires permissions on a templated path, the path may include references to parameters of the API call enclosed in curly braces. Certain parameters are implicitly derived from the API call’s URI. For example, the permission path “/nodes/{node}” when making a call to “/nodes/mynode/status” necessitates permissions on “/nodes/mynode”, while the path “{path}” in a PUT request to “/access/acl” refers to the method’s “path” parameter.
Below are a few examples of objects and path
- /nodes/{node}: Access to Proxmox VE server machines
- /vms: Covers all VMs
- /vms/{vmid}: Access to specific VMs
- /storage/{storeid}: Access to a specific storage
- /pool/{poolname}: Access to resources contained in a specific pool
- /access/groups: Group administration
- /access/realms/{realmid}: Administrative access to realms
Inheritence
In the file system tree, object paths follow a hierarchical structure, and permissions can be inherited by objects lower down the tree by default (using the propagate flag). The following rules govern the inheritance of permissions:
- User permissions always take precedence over group permissions
- Group permissions are applied when the user is a member of that group
- Permissions set at deeper levels override those inherited from higher levels
- The NoAccess designation nullifies all other roles associated with a specific path
Furthermore, tokens with privileged separation are restricted from having permissions on any given path that their corresponding user does not possess.
Conclusion
In conclusion, understanding the crucial role of user and permission management in Proxmox VE is paramount for efficient server maintenance and security. By intricately managing user access levels and permissions within the Proxmox VE environment, organizations can uphold data integrity, prevent unauthorized access, and streamline administrative processes.
Read More:
Proxmox Virtualization Series: VE Firewall – Part 6
Follow our Twitter and Facebook feeds for new releases, updates, insightful posts and more.

Leave A Comment