Introduction
Proxmox VE firewall, a highly reliable and versatile solution in the Proxmox VE ecosystem, offers robust security measures for individuals and businesses alike. It serves as a powerful tool to safeguard the entire Proxmox network infrastructure from potential threats, ensuring data integrity and confidentiality. With its advanced features, the Proxmox VE firewall empowers users to set up and configure firewall rules efficiently, allowing for granular control over network traffic flow.
It offers seamless integration with Proxmox Virtual Environment, providing a comprehensive and unified solution for virtualization and firewall management. Furthermore, Proxmox VE firewall is equipped with state-of-the-art technologies, such as packet filtering, network address translation (NAT), and intrusion detection and prevention systems (IDPS), enabling users to mitigate risks and fortify their network against cyber attacks
Proxmox VE Firewall offers a convenient solution for protecting users IT infrastructure through the setup of firewall rules for hosts within a cluster, as well as for virtual machines and containers. Its features such as firewall macros, security groups, IP sets, and aliases simplify the task of configuring rules. Configuration data is stored on the cluster file system, while the iptables-based firewall service operates on each cluster node, ensuring complete isolation between virtual machines.
This distributed system also enables higher bandwidth compared to a central firewall setup. The firewall fully supports both IPv4 and IPv6, with transparent IPv6 support and default traffic filtering for both protocols, eliminating the need for maintaining separate rule sets for IPv6.
Proxmox Firewall Zones
The Proxmox VE firewall groups the network into host level or a VM level zones. Host level configuration zones regulate the traffic from/to a cluster node, where as the VM level configuration zones regulate the traffic from/to a specific VM. For each zone, user can define the firewall rules for the incoming and or outgoing traffic
Firewall configuration Files & IPTables
All firewall-related configuration is securely stored within the proxmox cluster file system. These files are automatically distributed to every cluster node, ensuring consistency across the network. The diligent pve-firewall service updates the underlying iptables rules automatically whenever changes are made.
Users have the flexibility to configure the firewall settings using the user-friendly GUI interface accessible through Datacenter → Firewall or directly on a specific Node → Firewall. Alternatively, user may choose to directly edit the configuration files using user preferred text editor.
The firewall configuration files are structured using sections of key-value pairs, allowing for easy organization and management. Comment lines, denoted by a # at the beginning, and blank lines are included to provide additional context or explanations. Each section is marked by a distinctive header line enclosed within square brackets [ ] for clear identification.
Enabling and configuring Datacenter Firewall
In Datacenter Firewall, you can setup cluster wide firewall configuration through editing the configuration file or through webGUI. Configuration of this firewall applies to all the nodes available in the cluster. The corresponding configuration file is below
/etc/pve/firewall/cluster.fw
Enabling the firewall
Firewall is disabled by default. User should enable the firewall before configuring it.
Open webGUI, Click Datacenter, Choose Options under Firewall
Click Edit, choose Enable, Click OK. Below screenshot shows this step.
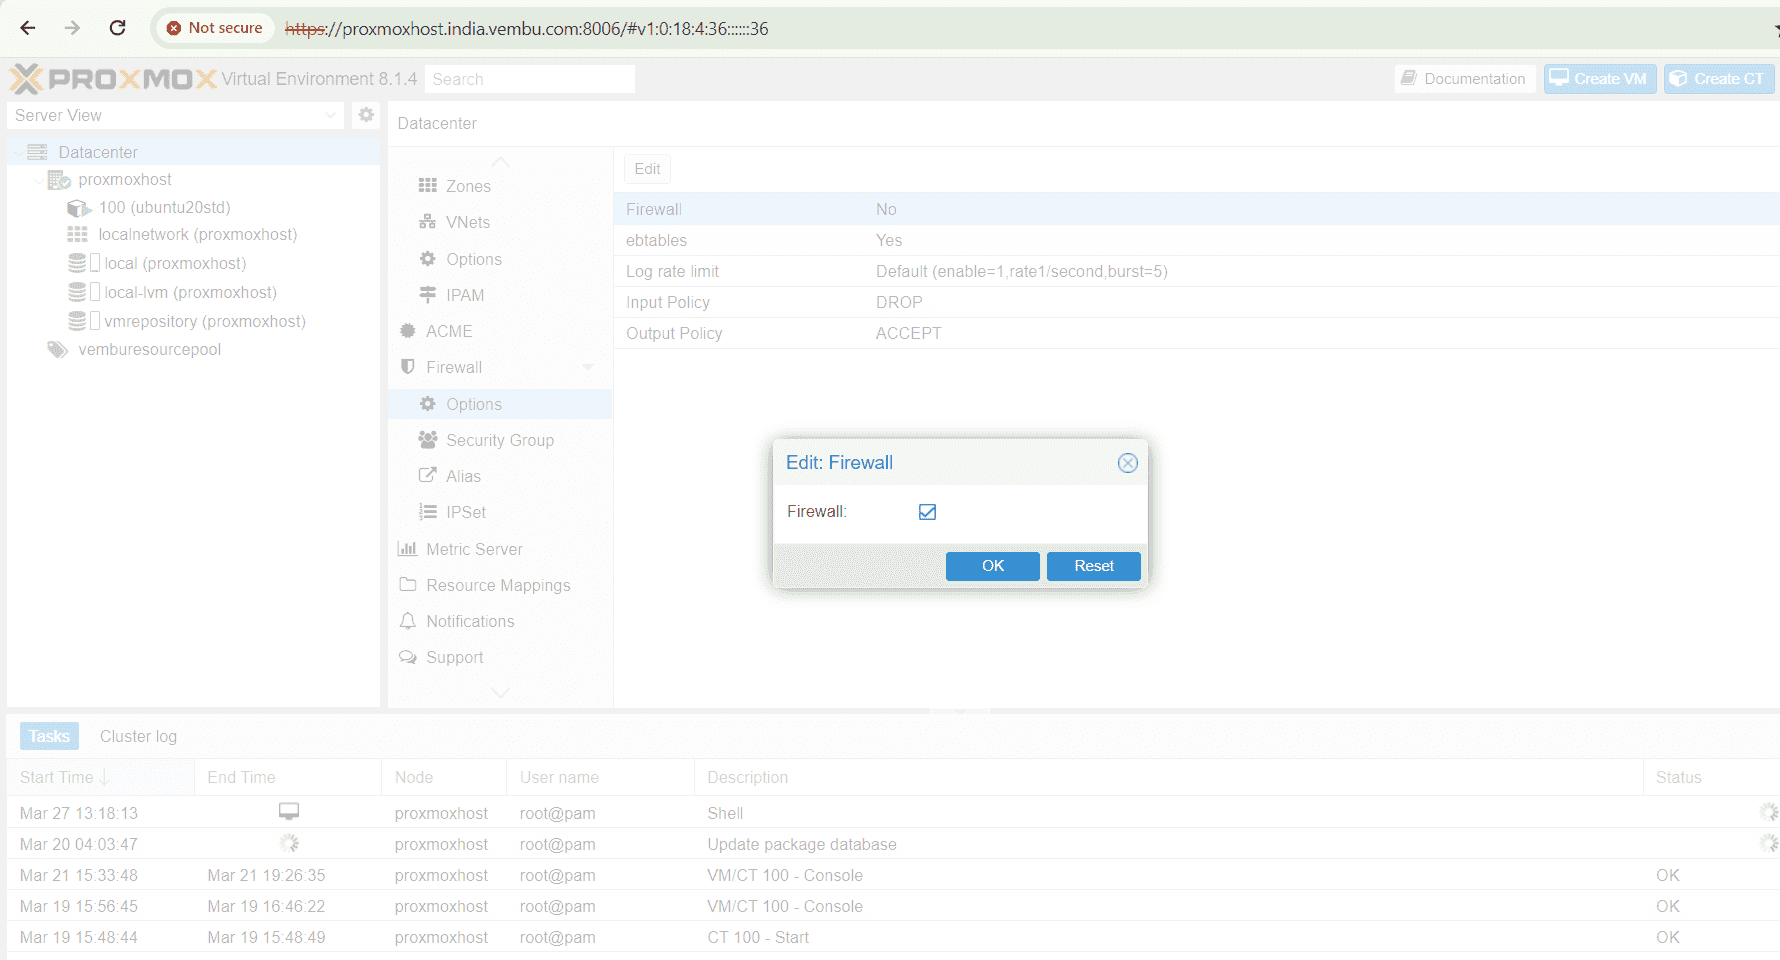
Warning : Before enabling the firewall, user should create a cluster wide IPSET to enable a series of IPs to connect the Proxmox host through SSH (portno 22 ) and WebGUI (portno 8006)
Creating a clusterwide IPSET
Creating a cluster-wide IPSET in Proxmox host can greatly enhance the efficiency and security of your network infrastructure. By consolidating your IP addresses into a single IPSET, you can effectively manage and control access to your network resources. This not only simplifies the administration process but also minimizes the risk of unauthorized access or malicious activities. With Proxmox, setting up a cluster-wide IPSET is a straightforward process. Start by accessing the Proxmox web interface and navigating to the Firewall section. From there, you can create an IPSET object and define the desired IP addresses or ranges. Once configured, the IPSET can be easily applied to virtual machines or containers within the Proxmox cluster.
Below screenshot shows an example of creating an IPSET for enabling access to ssh 22 port and webGUI console 8006 port for the VLAN 192.168.107.0/24 range.
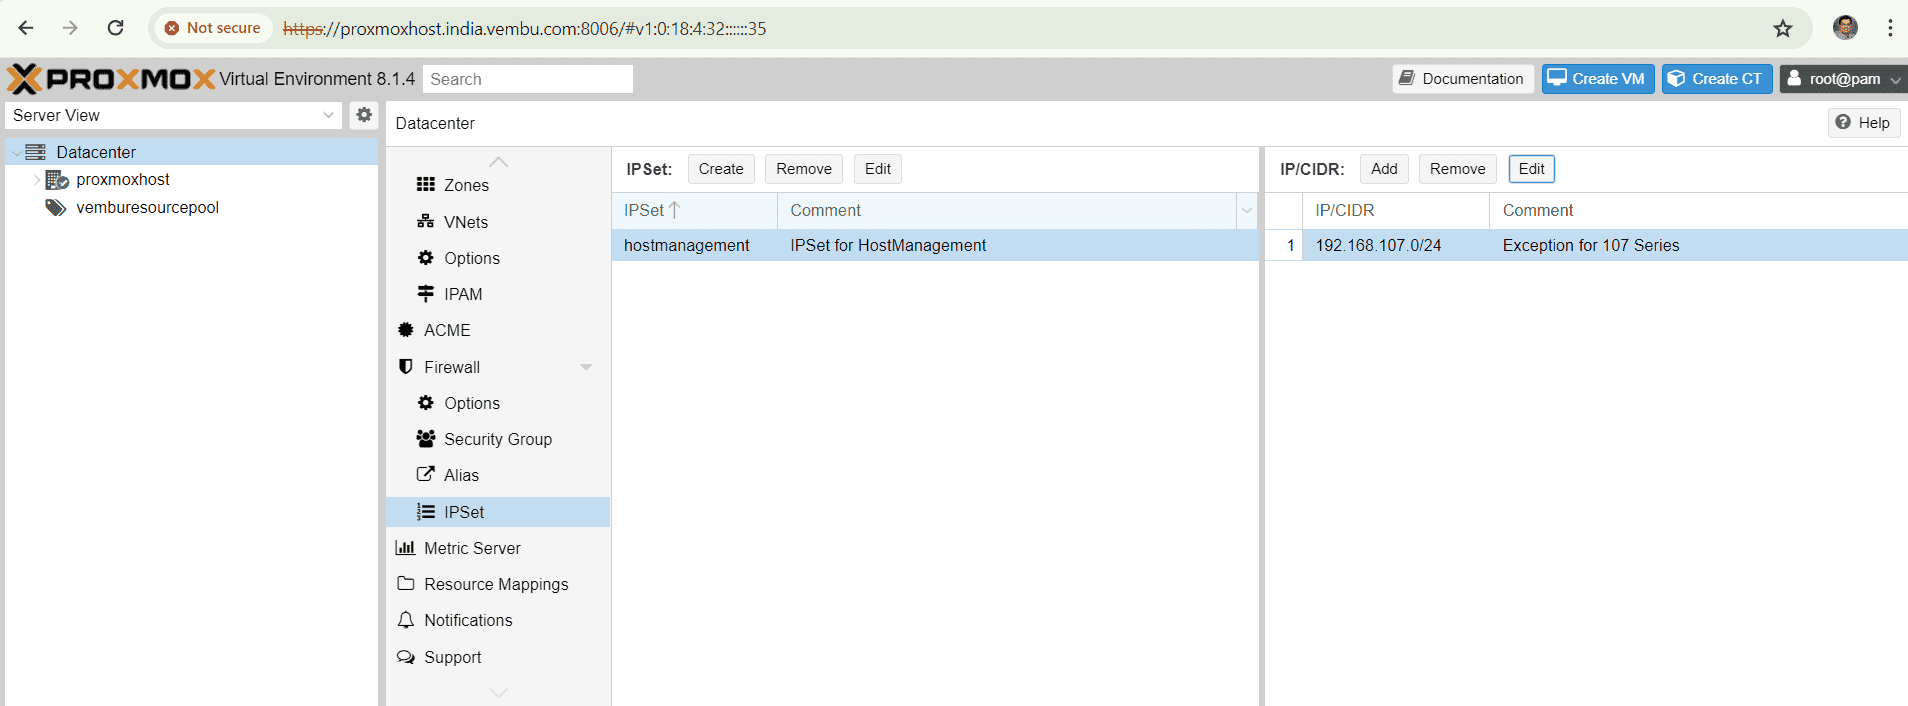
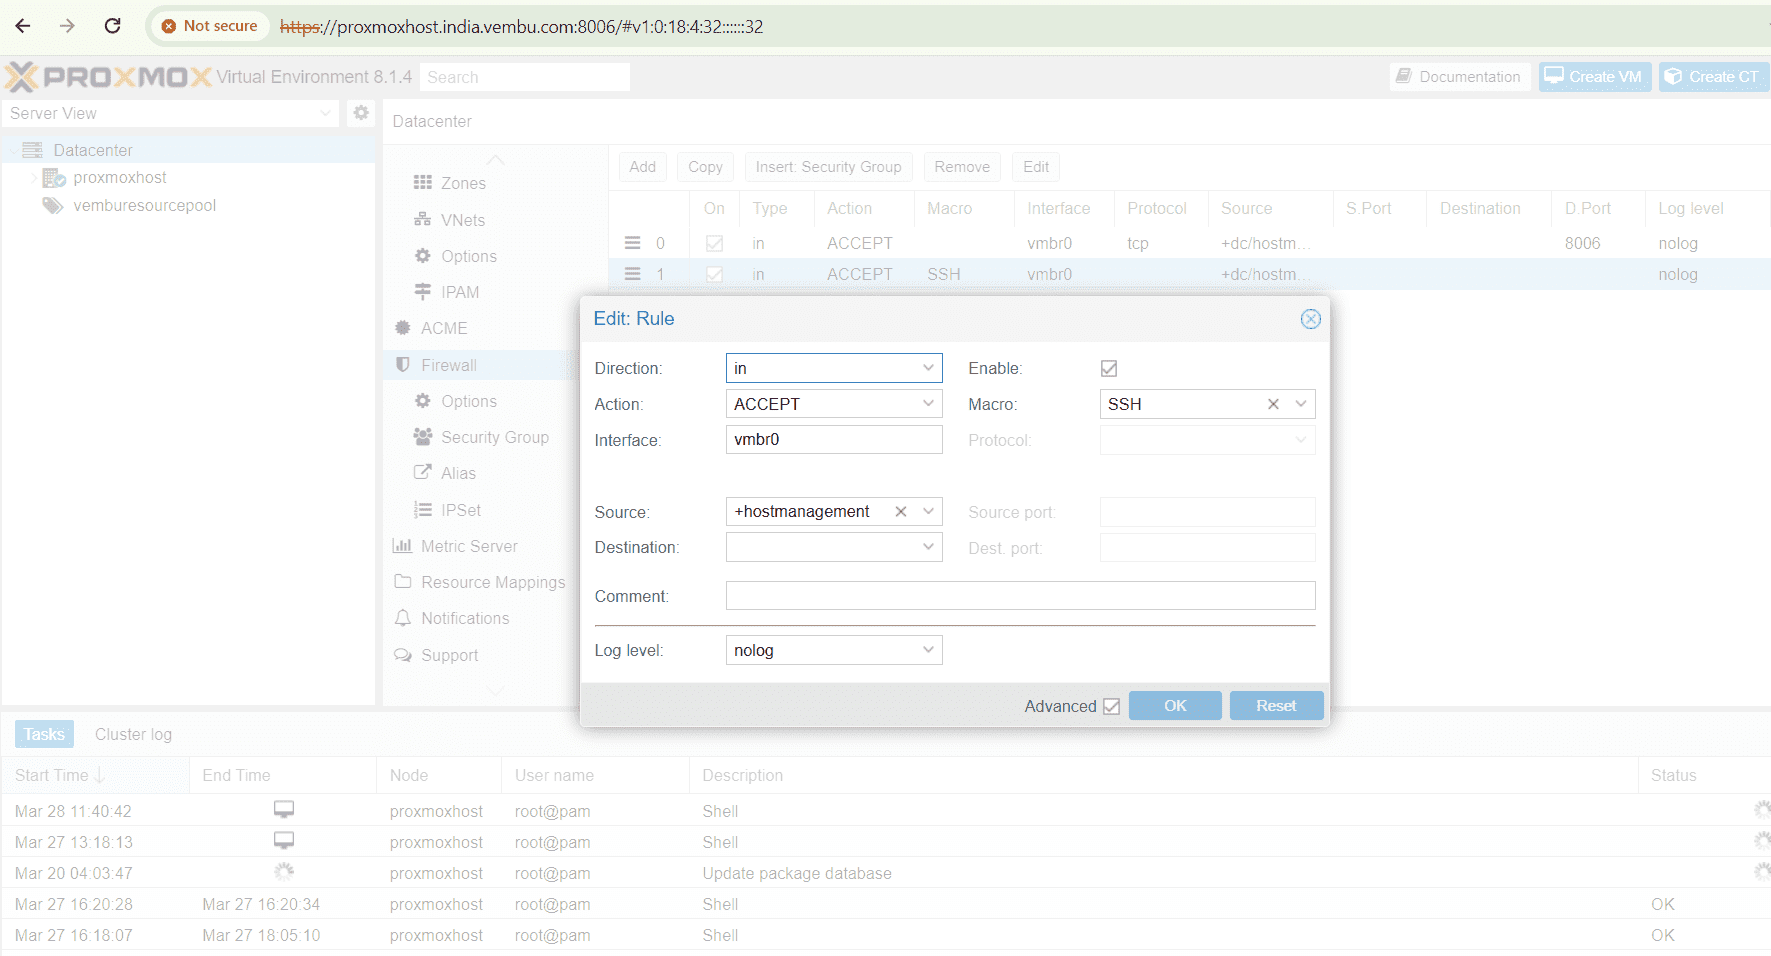
and the same IPSET is applied when you are creating a firewall under the Datacenter firewall settings. Below screenshot shows an example of allowing the IPSET range to access the proxmox host through SSH ( port no 22). Here Macro is nothing but a feature that provides a predefined rule and options when you allow a particular service. Here we have selected the macro SSH, and hence incoming connection is allowed to access the port no 22 using tcp.
Host specific firewall configuration
In some situation, users may require to override the cluster firewall confiugration for a particular host only. In such cases you can use the host specific firewall configuration and the same corresponding file is read from
/etc/pve/nodes/<nodename>/host.fw
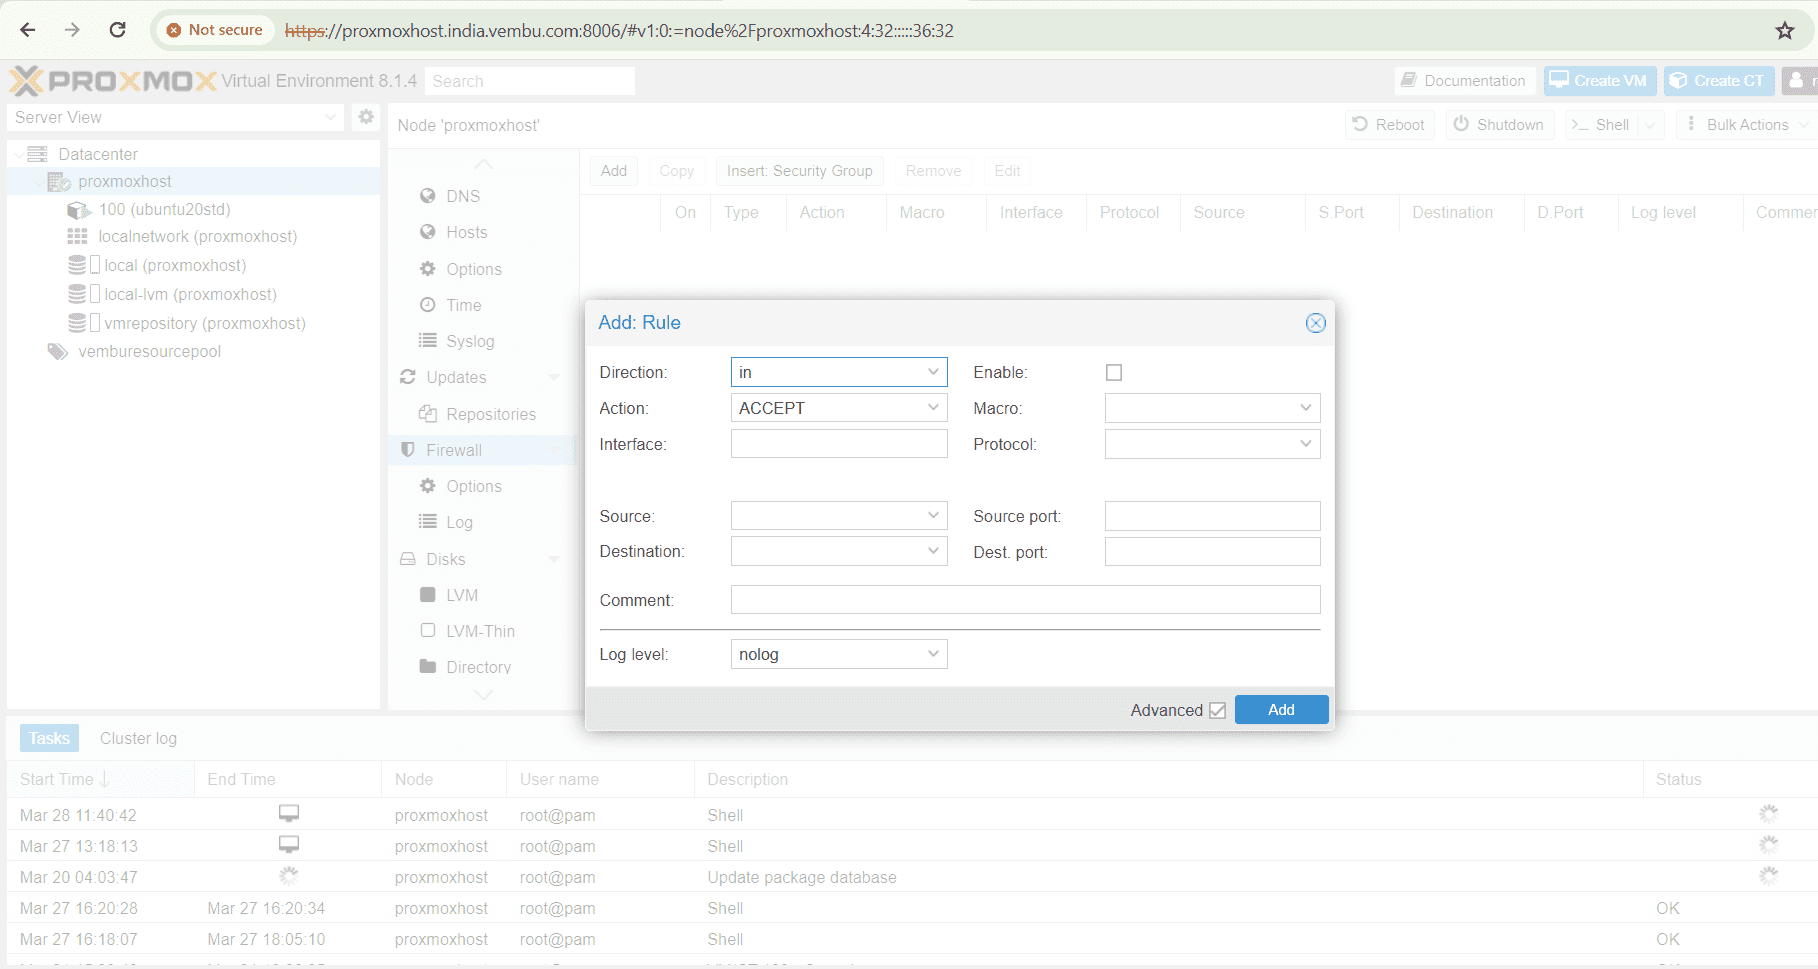
Similarly you can do the same configuration through webGUI console by selecting the proxmost host name. Under the host, choose Firewall and click Add to create a new rule.Then follow the same procedure for creating rules as shown above.
Enabling and Configuring VM & Container firewall
Configuring the virtual machine (VM) and cluster firewall in Proxmox is a critical step in ensuring the security and smooth operation of your virtual infrastructure. By implementing this, you can protect your VMs and cluster nodes from unauthorized access and potential threats. When it comes to configuring the VM firewall, it is essential to define granular rules that allow or deny traffic based on specific ports, protocols, and IP addresses. This level of control ensures that only legitimate traffic reaches your VMs, minimizing the risk of malicious activity. Additionally, setting up the cluster firewall in Proxmox helps safeguard the communication between cluster nodes, making it harder for unauthorized entities to penetrate your infrastructure. Taking the time to configure these firewalls properly is a worthwhile investment that helps protect your virtual environment and ensures its efficient and secure operation for everyone involved.
In the below example, we have enabled SSH Macro for the container ubuntu20std with the IPSET range. Here we have selected the said container, choose firewall and click add rule.
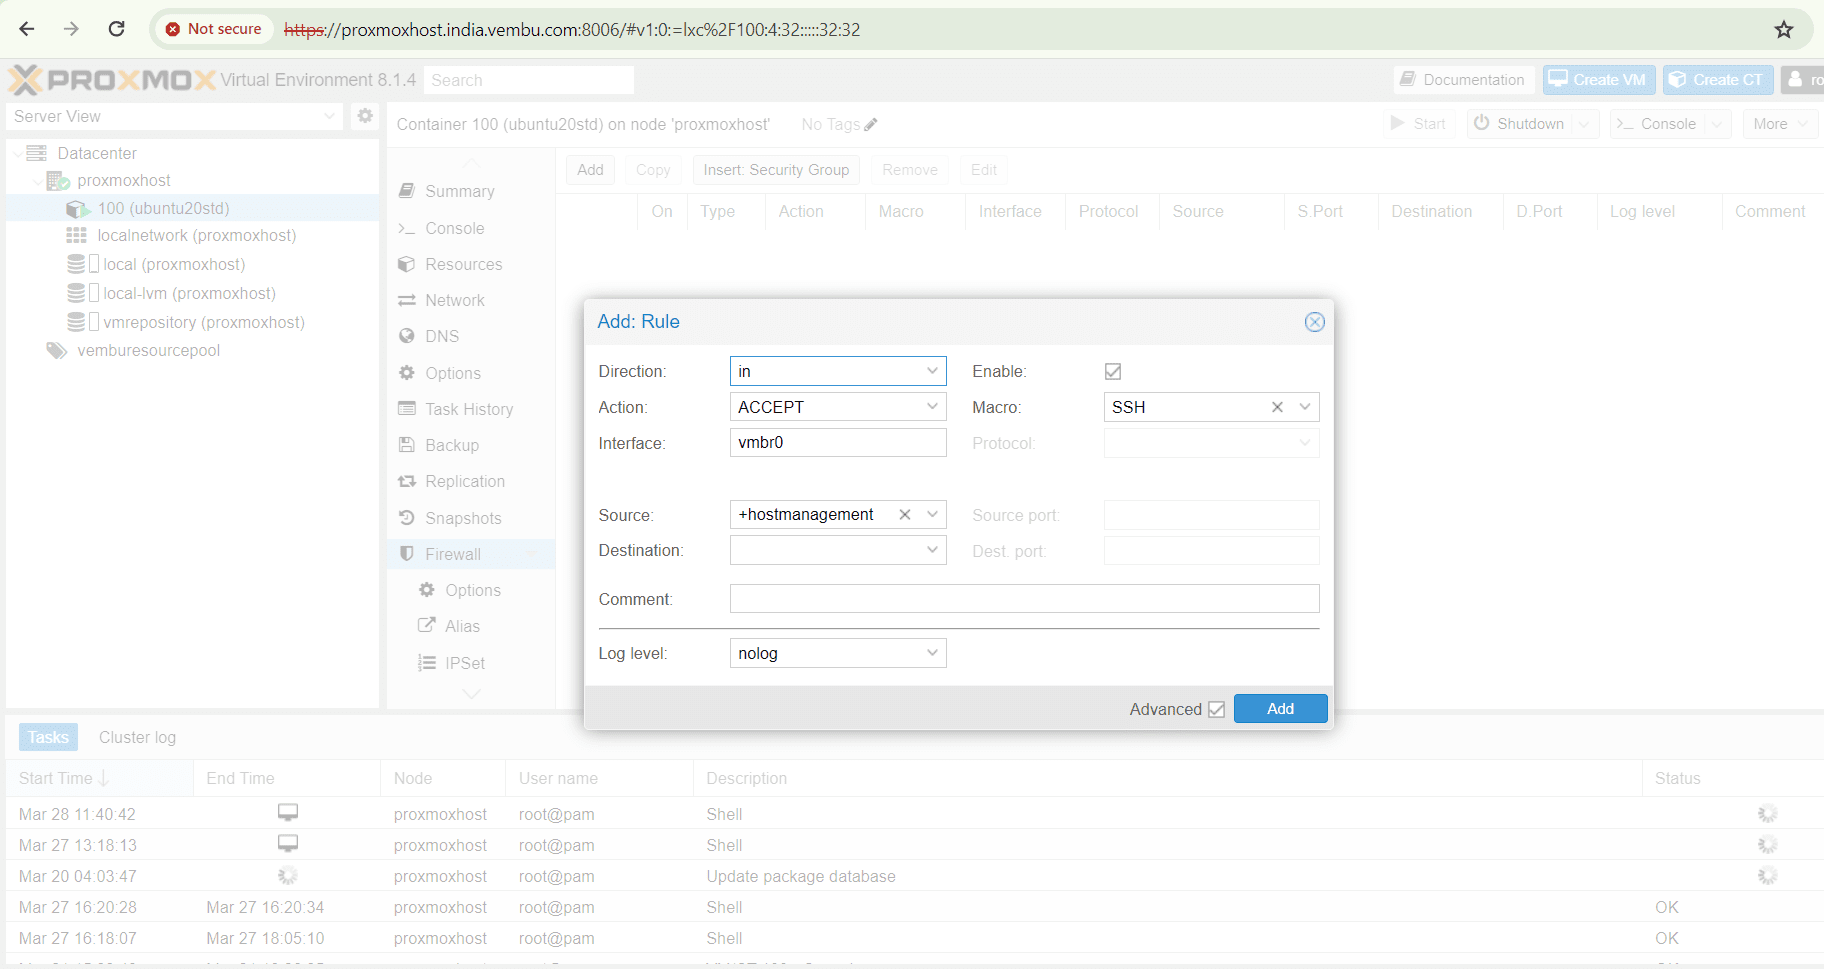
Similarly, user can edit the firewall configuration file
/etc/pve/firewall/<VMID>.fw for VMs and containers.
Here too, you can create and specify the IPSET range, so that only a group of IPs are allowed to access a particular VM or container.
Firewall rule Syntax
Firewall rules comprise a direction (IN or OUT) and an action (ACCEPT, DENY, REJECT). You can also indicate a macro name, which contains predefined sets of rules and options.
The following options can be used to refine firewall rules based on requirement. The below content is taken from Proxmox documentation as it is.
–dest <string>
Restrict packet destination address. This can refer to a single IP address, an IP set (+ipsetname) or an IP alias definition. You can also specify an address range like 20.34.101.207-201.3.9.99, or a list of IP addresses and networks (entries are separated by comma). Please do not mix IPv4 and IPv6 addresses inside such lists.
–dport <string>
Restrict TCP/UDP destination port. You can use service names or simple numbers (0-65535), as defined in /etc/services. Port ranges can be specified with \d+:\d+, for example 80:85, and you can use comma separated list to match several ports or ranges.
–icmp-type <string>
Specify icmp-type. Only valid if proto equals icmp or icmpv6/ipv6-icmp.
–iface <string>
Network interface name. You have to use network configuration key names for VMs and containers (net\d+). Host related rules can use arbitrary strings.
–log <alert | crit | debug | emerg | err | info | nolog | notice | warning>
Log level for firewall rule.
–proto <string>
IP protocol. You can use protocol names (tcp/udp) or simple numbers, as defined in /etc/protocols.
–source <string>
Restrict packet source address. This can refer to a single IP address, an IP set (+ipsetname) or an IP alias definition. You can also specify an address range like 192.168.106.11-192.168.106.180, or a list of IP addresses and networks (entries are separated by comma). Please do not mix IPv4 and IPv6 addresses inside such lists.
–sport <string>
Restrict TCP/UDP source port. You can use service names or simple numbers (0-65535), as defined in /etc/services. Port ranges can be specified with \d+:\d+, for example 80:85, and you can use comma separated list to match several ports or ranges.
Security Groups in Proxmox Datacenter
In Proxmox Virtual Environment (VE), a security group is a feature that allows you to define sets of firewall rules that can be applied to multiple virtual machines (VMs) or containers within your Proxmox environment. These security groups provide a convenient way to manage and enforce network security policies across multiple VMs or containers.
For example if the user wants to allow the webserver port http (port no. 80) and https (port no. 443) for a VM or container, he may create a security group at the datacenter firewall configuration, and apply the security group in the VM’s firewall configuration.
The below screen shotshows creating a security group “allowwebserver” allows only the ports 80 and 443 by using Macro HTTP and HTTPS for the IPSET range of IPAddresses created already.
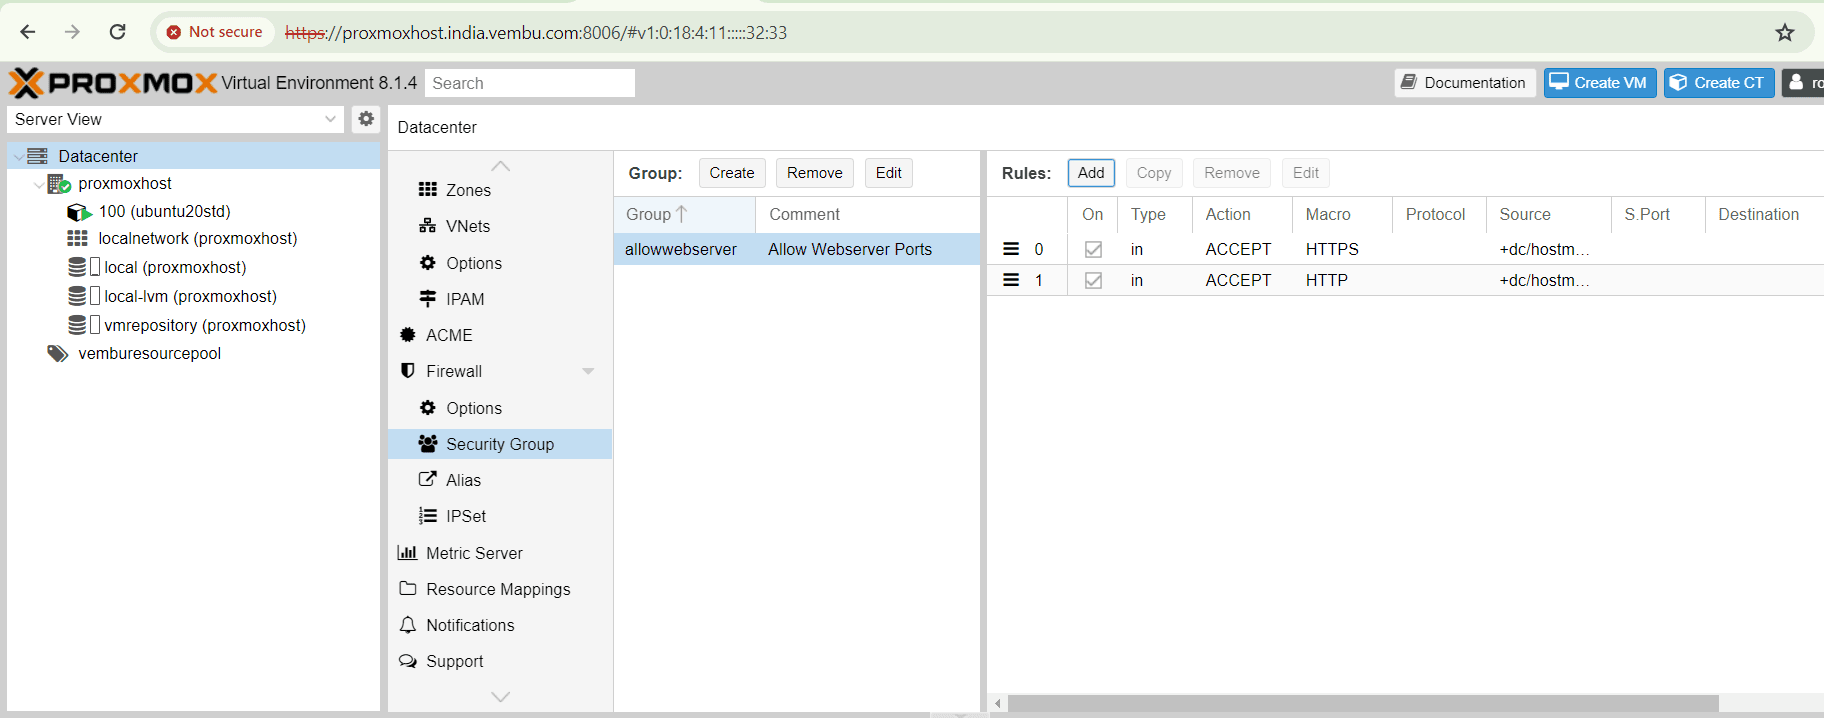
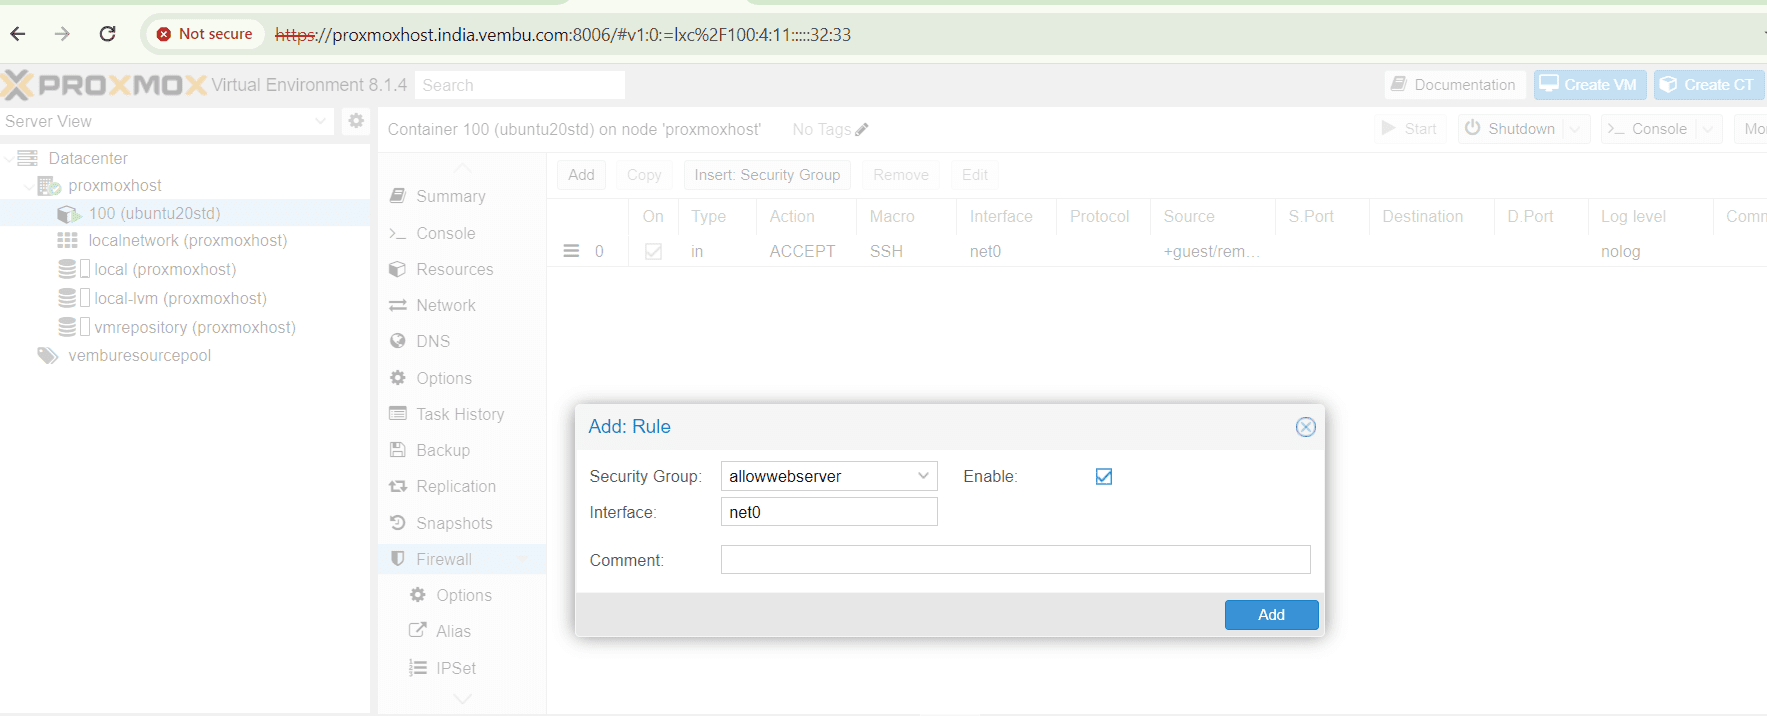
After creating the Security Group, you can apply it on any VMs or Containers, by selecing the particular VM or Container, Choose Firewall and Choose Insert Security Group.
Here the created security group name will be listed and choose the interface you use for the VM or container and enable the rule by selecting the enable box.
Click Add to finish the action. The below screenshot shows this step.
IP Aliases
An IP Alias in Proxmox VE is a feature that allows users to assign IP addresses to a unique name. This can be particularly useful in scenarios where there is a need to segregate network traffic or host multiple services on a single physical machine. By using IP aliases, users can create virtual network interfaces which can have their own IP address, netmask, and gateway. This flexibility enables seamless communication between the virtual machines and the outside world. Additionally, IP Aliases simplify network configuration and management, as they eliminate the need for additional physical network cards. With Proxmox VE’s IP Alias feature, users can efficiently optimize their network infrastructure and enhance the performance and scalability of their virtualized environment.
After creating IP Alias, you can refer this alias as name in these two configurations:
- inside IP set definitions
- in source and destination properties of firewall rules
Adding alias in Datacenter Firewall
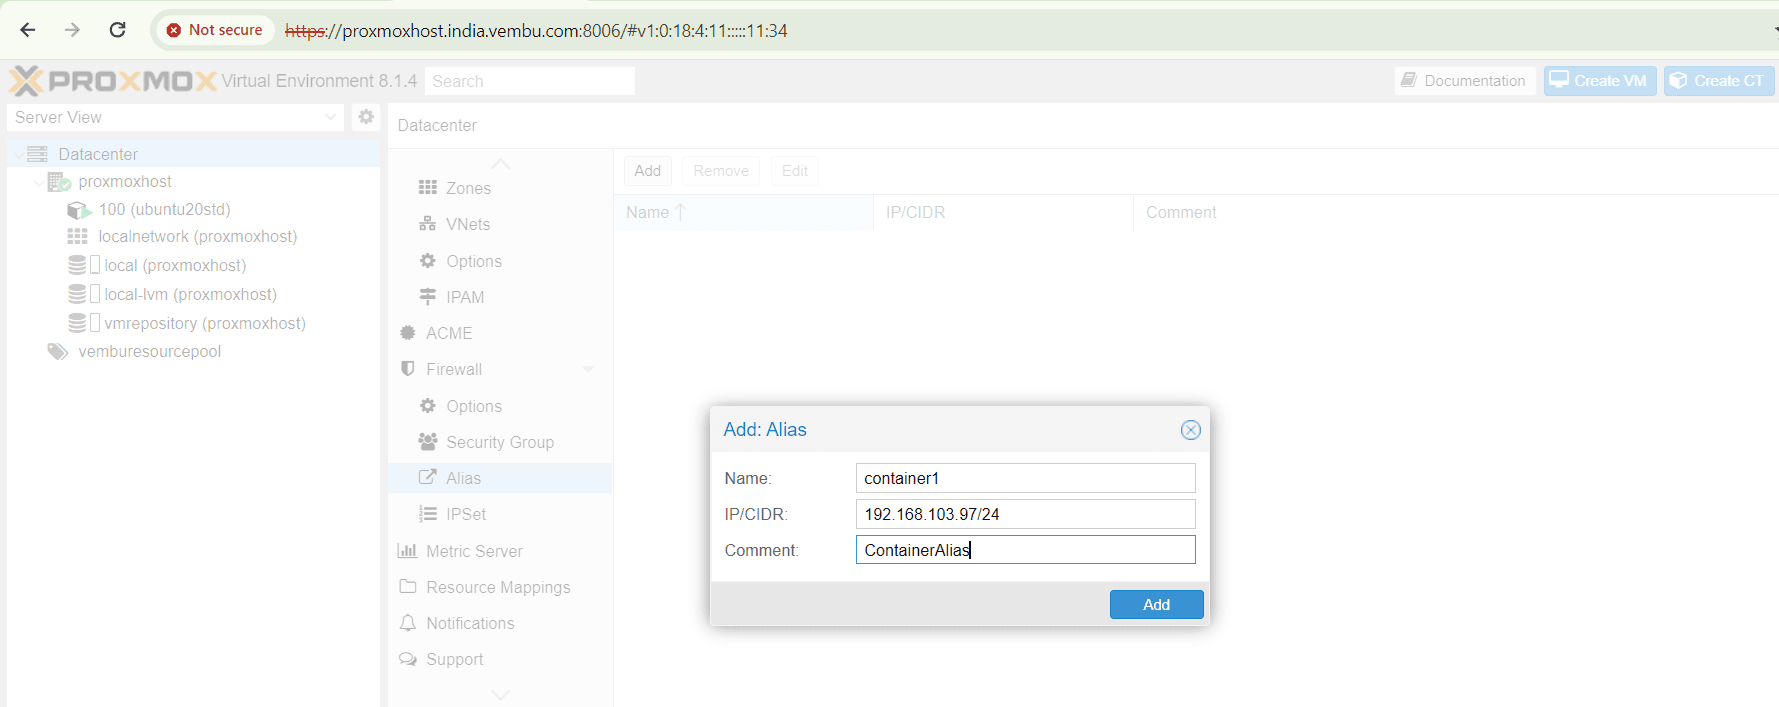
- Under Datcenter, choose Firewall → Alias. Click Add
- Provide a unique name for the Alias
- Give the IP address in IP/CIDR notation
- Provide a comment for the Alias (optional )
- Below screenshot shows this step with an example
Firewall Services & Commands used in Proxmox Server
The Proxmox VE Firewall composes two service daemons running on each host node namely:
- pvefw-logger: NFLOG daemon and
- pve-firewall: updates iptables rules
User can start and stop the firewall service by using the commands in the command shell
# pve-firewall start
# pve-firewall stop
To get the status of the firewall service, user can use the below command
# pve-firewall status
Also the above command reads and compiles the statements included, and through if any error including the syntax error. So whenever the user edits the configuration, it will be useful to run the above command.
If the user wants to view the command entries of the firewall without editing mode, below command can be used:
# iptables-save
Collecting logs for Firewall rules
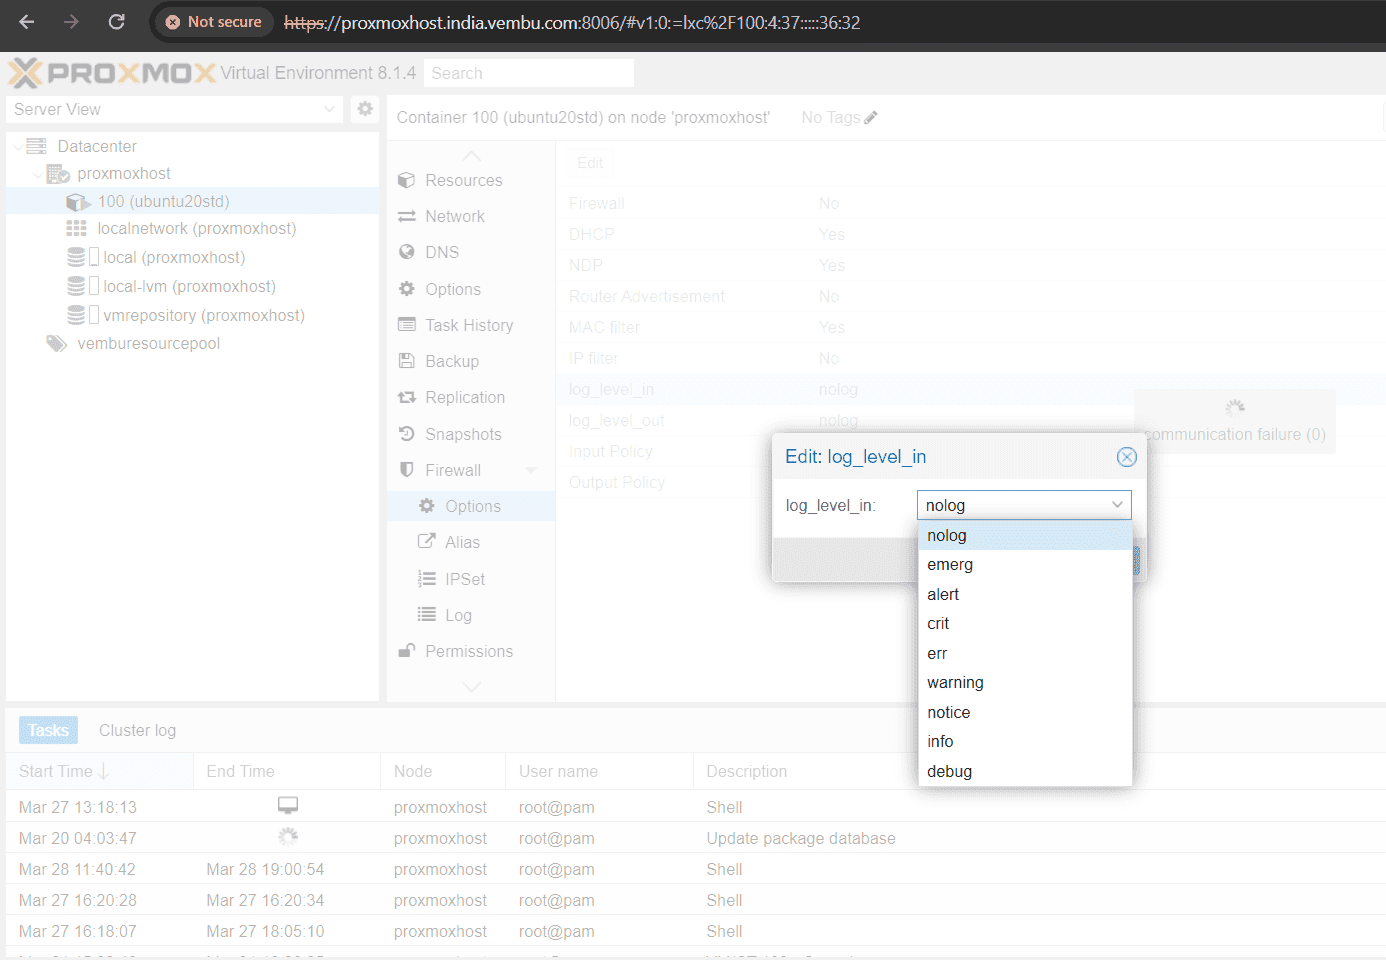
By default, logging for traffic filtered by the firewall rules is turned off. To activate logging, the log level for incoming and/or outgoing traffic must be configured in Firewall → Options. This setting can be applied to the host as well as to the VM/CT firewall individually.
Enabling this setting allows the logging of Proxmox VE’s standard firewall rules, and the results can be viewed in Firewall → Log. Additionally, only specific dropped or rejected packets are logged for the standard rules.
Loglevel has the following flags. Users can enable or use any one of the below flags for both IN/OUT traffic.
Ports used by Proxmox VE host to enable in the Firewall
Here are the collecction of ports assigned to the different services in the proxmox host. Users need to understand these ports and configure in the respective firewall rules as and when needed.
- Web interface: 8006 (TCP, HTTP/1.1 over TLS)
- VNC Web console: 5900-5999 (TCP, WebSocket)
- SPICE proxy: 3128 (TCP)
- sshd (used for cluster actions): 22 (TCP)
- rpcbind: 111 (UDP)
- sendmail: 25 (TCP, outgoing)
- corosync cluster traffic: 5405-5412 UDP
- live migration (VM memory and local-disk data): 60000-60050 (TCP)
Conclusion
In conclusion, mastering the Proxmox VE firewall setup not only enhances the proxmox network system’s security and performance but also empowers the user to safeguard the company’s data more effectively. By understanding how to configure and optimize Proxmox VE firewalls, the administrator can control network traffic efficiently while minimizing external threats.
Read More:
Proxmox Virtualization Series: Creating an LXC Container in Proxmox host – Part 5
Follow our Twitter and Facebook feeds for new releases, updates, insightful posts and more.


Leave A Comment