
Introduction
In today’s virtualized world, seamlessly migrating virtual machines (VMs) is crucial for maintaining uptime, optimizing resource allocation and ensuring business continuity. Proxmox VE, a powerful open-source virtualization platform, offers robust tools for VM migration. This comprehensive guide will equip you with the knowledge and steps to master Proxmox VM migration, empowering you to move your virtual workloads with confidence.
We’ll delve into the different migration methods available in Proxmox, from live migrations for minimal downtime to backup and restore strategies for planned deployments. We’ll also explore best practices for preparing your VMs for migration, ensuring a smooth and successful transfer.
By the end of this guide, you’ll be able to:
- Understand the various Proxmox VM migration methods
- Choose the optimal migration strategy based on your specific needs
- Prepare your VMs for migration to minimize downtime
- Execute a successful VM migration using the Proxmox VE interface or command line
- Verify the functionality of your migrated VMs
Two migration mechanisms in Proxmox VE cluster
Effective virtual machine (VM) migration is vital for any Proxmox VE cluster, ensuring smooth operations and optimized resource utilization. Proxmox offers two primary mechanisms for achieving this:
- Online Migration ( Live Migration )
- Offline Migration ( Backup and Restore )
Online Migration or Live Migration (for Minimal Downtime)
This method shines when minimizing downtime is paramount. Live migration allows you to seamlessly transfer a running VM from one node in the cluster to another without interrupting its operation. Proxmox achieves this by transmitting the VM’s memory and virtualized CPU state over the cluster network to the target node. The target node then takes over execution, ensuring a smooth handover with minimal service disruption.
Offline Migration or Backup and Restore (for Planned Migrations)
This approach is ideal for planned migrations or situations where live migration isn’t feasible. It involves creating a backup of the VM, including its configuration files and disk images, on the source node. This backup can then be transferred to the target node’s storage and restored, effectively creating a new instance of the VM on the target system. While this method involves some downtime during the restore process, it offers greater flexibility as the VM can be powered off on the source node before migration.

Choosing the Right Mechanism
The optimal migration method hinges on your specific needs:
Live Migration: Ideal for critical VMs requiring minimal downtime. However, it requires shared storage and compatible hardware between cluster nodes.
Backup and Restore: Well-suited for planned migrations or less critical VMs. It offers greater flexibility in terms of storage options but may incur more downtime.
Additional Considerations
Shared Storage: Both methods typically require shared storage accessible by all cluster nodes. This ensures the VM’s virtual disks are readily available during the migration process.
Network Bandwidth: Live migrations rely heavily on network bandwidth. Ensure sufficient capacity to handle the data transfer without impacting performance.
Resource Availability: Verify the target node has adequate resources (CPU, memory, storage) to accommodate the migrated VM.
By understanding these mechanisms and their nuances, you can effectively migrate VMs within your Proxmox cluster, ensuring optimal performance and business continuity.
Let us starts with Online Migration
Requirements for Online Migration
- No Locally Attached Devices: Live migration cannot handle devices directly connected to the source host via PCI or USB. These devices need to be detached before migration. However, local disks are migratable as their data is transferred to the target host
- Shared Cluster Membership: The migrating VM and target host must reside within the same Proxmox VE cluster for successful live migration
- Reliable Network Connectivity: A robust and reliable network connection between the source and target hosts is essential for seamless data transfer during migration
- Compatible Proxmox Versions: While live migration may occasionally work with slightly older versions of Proxmox on the target host, it’s highly recommended to maintain identical or newer versions across all cluster nodes for guaranteed compatibility
- Similar CPU Architectures: Live migration functions best with CPUs from the same vendor and with similar capabilities. While different vendors might work in specific scenarios, extensive testing is crucial before deploying such a setup in a production environment
In this blog post, we’ll guide you through the live migration process of a running virtual machine (name VM 103) within a Proxmox VE cluster. We’ll migrate the VM from a source host named proxmoxhost to a destination host named proxmoxhostnode2. Both hosts are members of the same cluster, aptly named Democluster.
This demonstration showcases the power of live migration in Proxmox VE, allowing you to seamlessly move VMs between cluster nodes with minimal downtime.
- Here’s what we’ll cover:
- Prerequisites for live migration (confirmed in previous sections)
- Step-by-step guide to executing the live migration process
- Verification of the migrated VM’s functionality
By following along, you’ll gain the practical skills to confidently migrate VMs within your own Proxmox cluster.
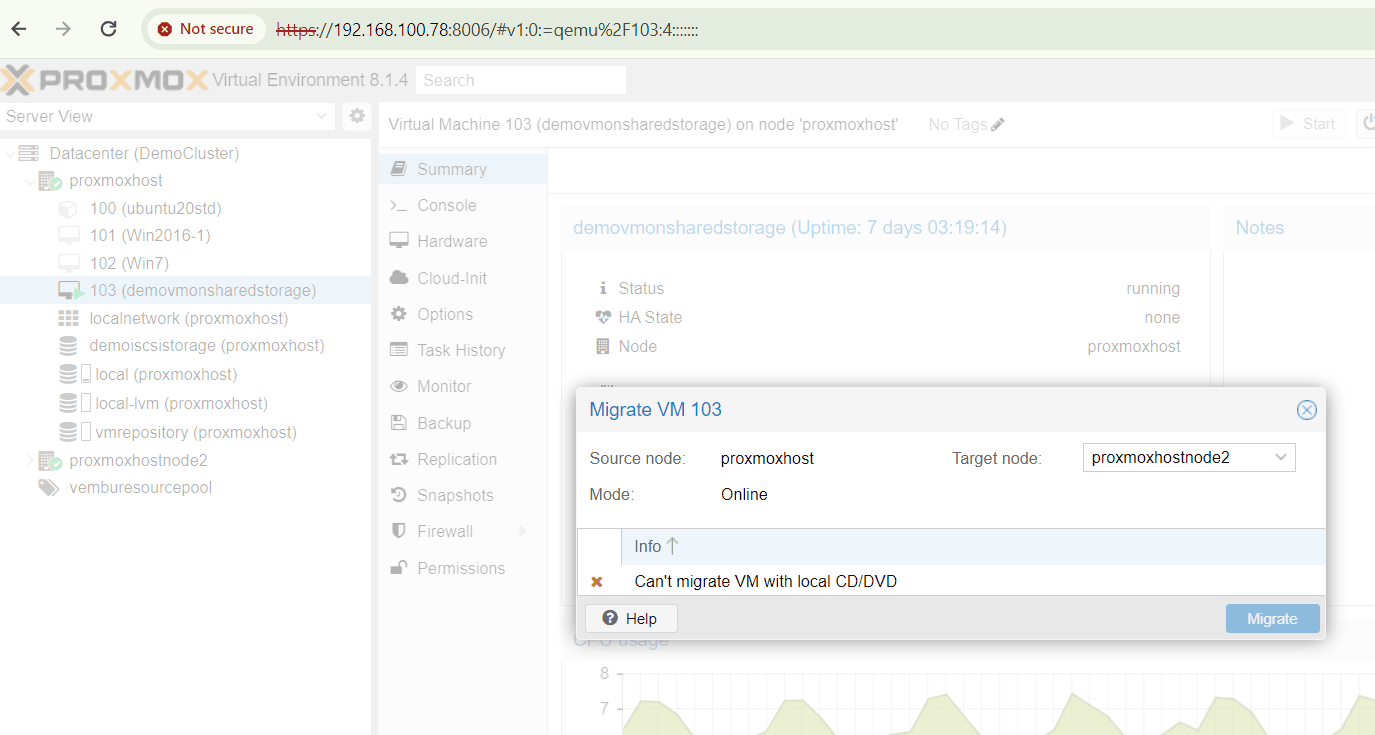
When you right-click the VM and select “Migrate,” you might encounter the error message “Can’t migrate VM with local CD/DVD.” This error aligns with our earlier point: live migration in Proxmox VE cannot handle devices directly attached to the source host, such as local CD/DVD drives.
To proceed with live migration, you’ll need to detach the CD/DVD drive from the VM before initiating the migration process.
Detaching the CD/DVD Drive
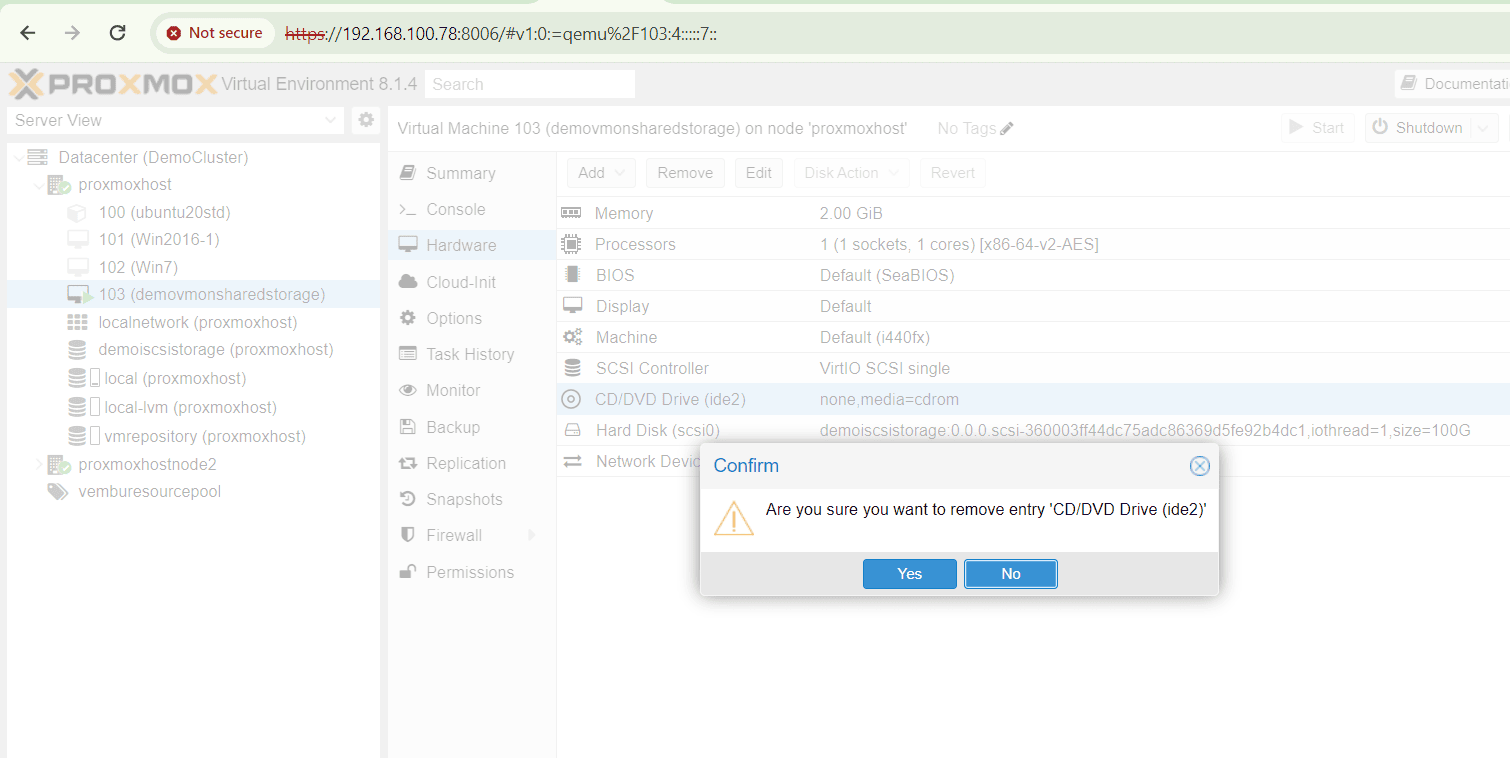
- Navigate to VM Hardware: Locate the virtual machine you intend to migrate. Right-click on it and select “Hardware” from the context menu
- Remove CD/DVD Drive: Within the hardware settings, identify the CD/DVD drive entry. Click on it to highlight it, and then click the “Remove” button displayed in the interface (refer to the accompanying image for reference)
- Confirm Detachment: A confirmation prompt might appear. Click “Yes” to confirm the removal of the CD/DVD drive from the VM
By following these steps, you’ll successfully detach the local CD/DVD drive, allowing you to proceed with the live migration process. Remember, we’ll reattach the drive to the migrated VM after the successful transfer.
Make sure your CD/DVD drive has no media before removing. Edit the configuration and change the option to “Don’t use any media” and try to remove the CD/DVD drive from the VM.
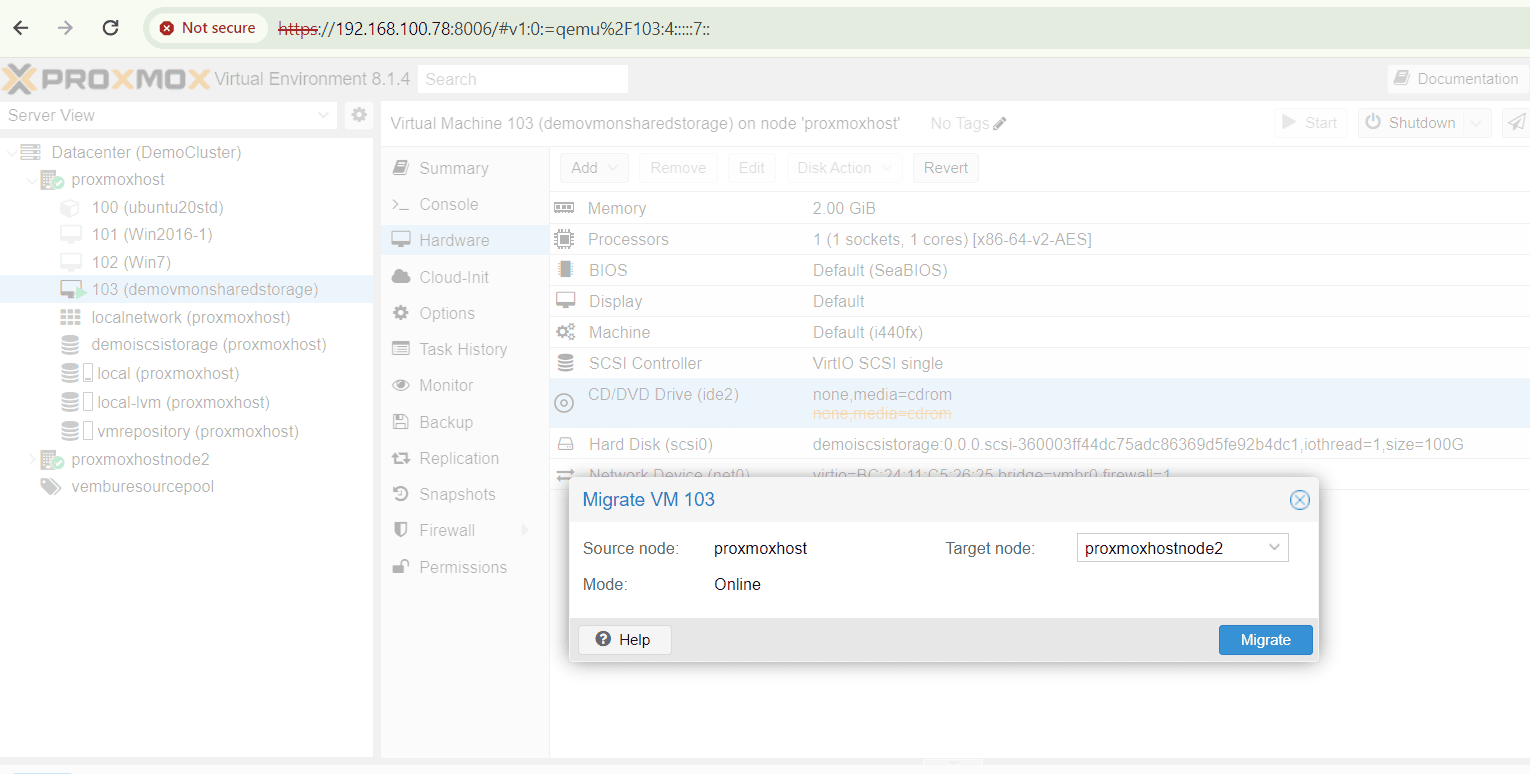
Now, there is no warning and ready to migrate, after removing the local CD/DVD drive.
Selecting the Destination Host
- Choose Target Node: In the migration window, locate the section dedicated to selecting the target host. This will typically display a list of available Proxmox nodes within your cluster, including proxmoxhostnode2
- Initiate Migration: Once you’ve identified the desired target node (proxmoxhostnode2 in this case), click the “Migrate” button to initiate the live migration process
Note
Before migrating virtual machines, it is recommended to verify that the shared storage is accessible by both Proxmox nodes in the cluster, including the source node and the destination node.
Migration through a SSH tunnel
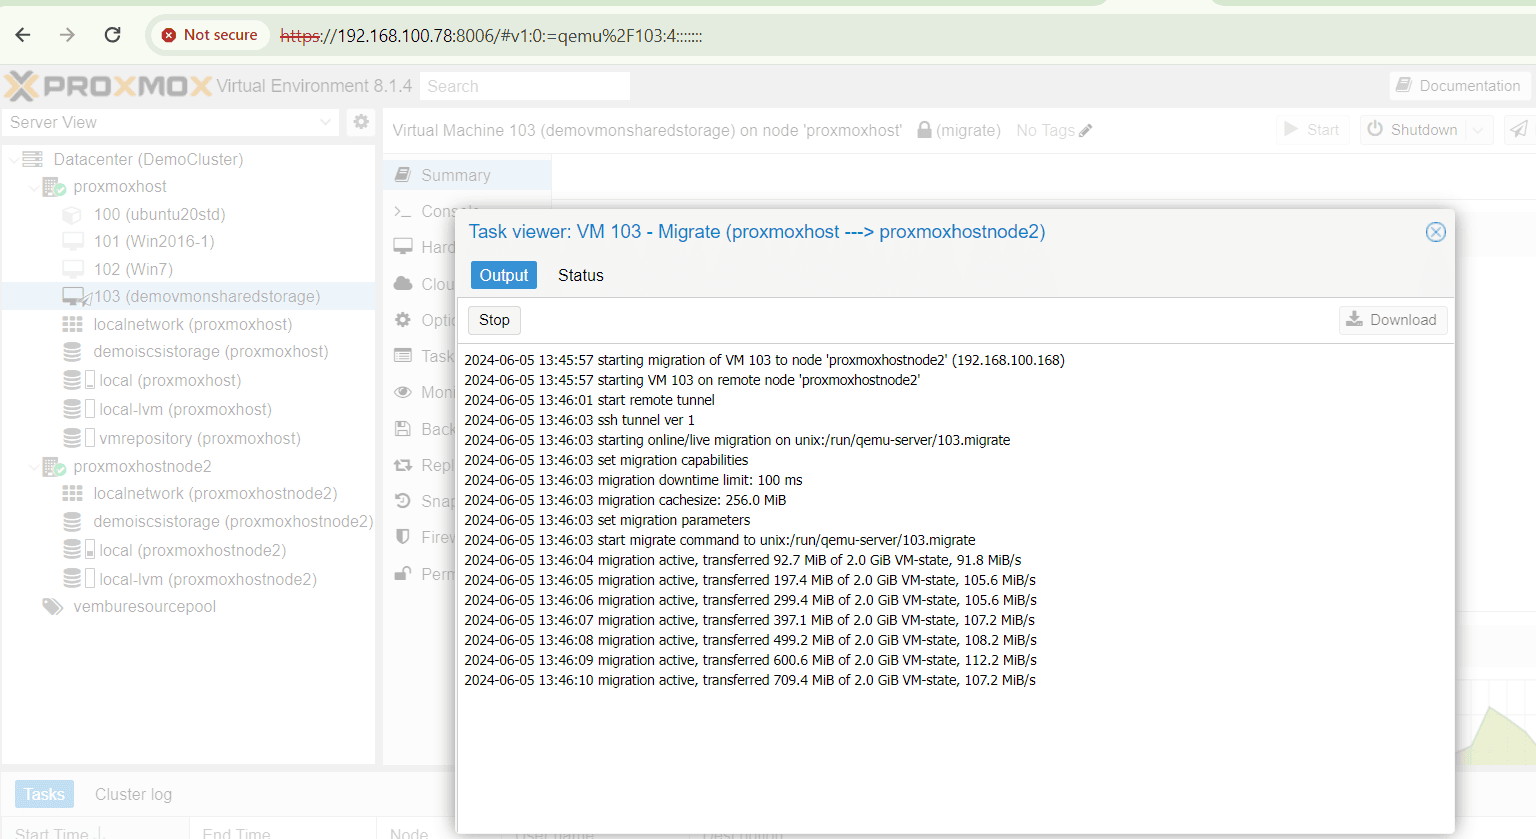
Once the migration process begins, you can monitor the initial transfer’s progress as shown in the screenshot. Notably, before the actual data transfer starts, an SSH secured tunnel is established between the source and destination host networks. This tunnel ensures the secure transfer of virtual machine configuration details.
- The SSH tunnel encrypts the communication between the source and destination nodes, protecting sensitive VM configuration data during migration
- This tunnel is typically a temporary connection established solely for the migration process
- The actual VM data (disks, memory) might be transferred using a separate mechanism depending on the chosen migration method (live migration vs. storage migration)
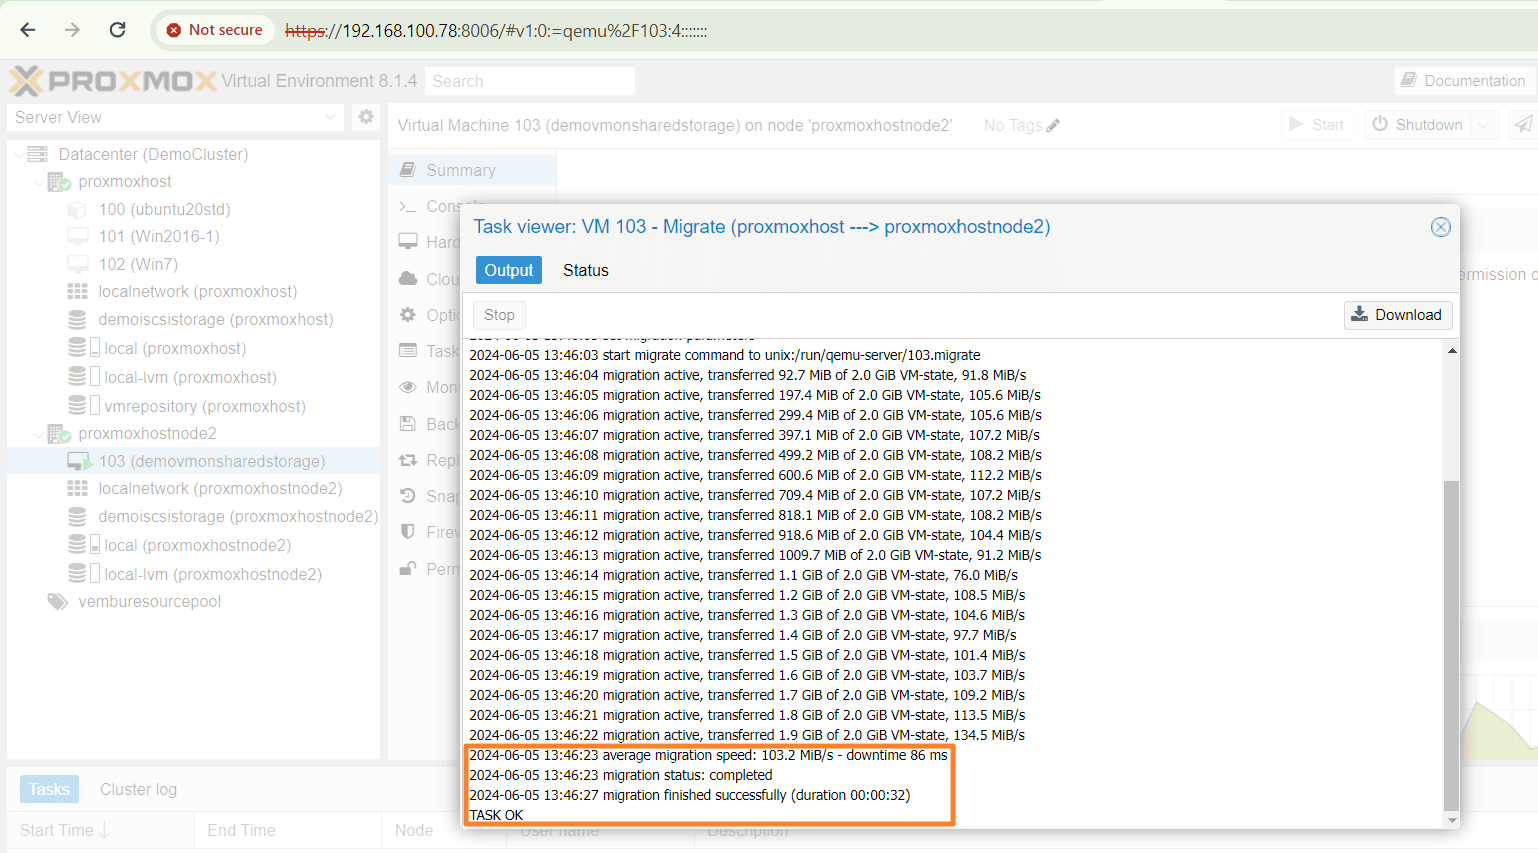
Migration completion
Because both servers reside in the same cluster and utilize shared storage, migrating a virtual machine (VM) primarily involves transferring its state and configuration from the source server to the destination server. This process can be completed within minutes, with minimal downtime often measured in milliseconds, as shown in the screenshot. Once migrated, you can confirm that the VM is running successfully on the destination node.
- Since the VMs share storage within the cluster, the migration process focuses on transferring the VM’s runtime state (memory, CPU) and configuration files
- The speed and minimal downtime are benefits of live migration within a cluster with shared storage
- The screenshot likely shows the migration progress or completion status, including details like transferred data size and downtime
In our next blog post, we’ll discuss another migration method: offline migration. This process involves backing up a virtual machine (VM) from the source Proxmox node and then restoring it on the destination node. However, unlike live migration, offline migration incurs downtime for the VM.
Conclusion
This blog post has equipped you with the knowledge to effectively migrate virtual machines (VMs) within your Proxmox cluster. We’ve explored the two primary migration techniques:
Live Migration: This method offers near-zero downtime, making it ideal for seamless VM movement within the cluster. It leverages shared storage to transfer VM states and configurations securely and efficiently.
Offline Migration: This approach involves backing up the VM from the source node and restoring it on the destination node. While offline migration introduces downtime for the VM, it provides a reliable alternative when live migration isn’t suitable.By understanding these methods and their unique advantages, you can choose the most appropriate approach for your specific VM migration needs within your Proxmox cluster.
Remember
- Regularly backing up your VMs is crucial for ensuring data integrity and facilitating disaster recovery
- Proxmox offers a user-friendly interface and powerful tools to streamline VM migration processes
We hope this comprehensive guide has empowered you to confidently manage VM migrations within your Proxmox environment. Stay tuned for our next blog post, where we’ll delve deep into offline migration.
Read More:
Proxmox Virtualization Series: Deploying Linux on Shared Storage with Proxmox VE – Part 11
Follow our Twitter and Facebook feeds for new releases, updates, insightful posts and more.

Leave A Comment