Overview
In many VMware environment, the management networks where infrastructure components reside such as vCenter servers and ESXi hosts are mostly isolated from internet for obvious security reasons. In such a highly secured environment, the administrators may have a dedicated workstation in there which can be a challenge to manage the patching of your servers efficiently, as the administrator needs to manually download the latest patches, transfer them to the management station and upload them to every vCenter server.
Update Manager Download Service (UMDS) is a component of vSphere Update Manager that acts as a Patch repository for one or multiple vSphere Update Manager (vCenter) instances. By giving the UMDS server access to *.vmware.com/* via a DMZ proxy, you benefit from a highly secure and up to date patch repository in your management network.
This greatly simplifies the process of patching the vSphere hosts and virtual appliances:
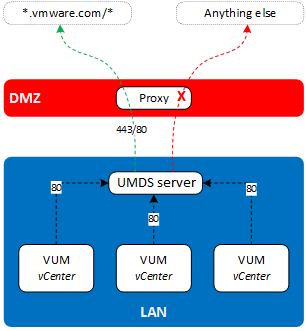
Security: Proxy access to vmware.com open on a single server instead of all vCenter servers.
Reduced operational overhead: No need to manually download the patches, transfer them to a management station, upload them to VUM on each vCenter.
Configuration consistency: Avoids inconsistencies by having all vCenter pull from the same location
Up to date updates: Receive VMware patch recalls and other notifications
What’s new in Update Manager 6.7
https://docs.vmware.com/en/VMware-vSphere/6.7/rn/vsphere-update-manager-67-release-notes.html
There was no changes to UMDS in version 6.7, however vSphere Update Manager benefits from the following new features:
- VUM is now available in the HTML5 web client with limited functionalities. Here is a list of the VUM features unavailable in the HTML5 client:
- Configuration settings
- Create a VM baseline group
- Add and Remove Baselines to a Baseline Group
- Scan Hosts, cluster and VMs
- Attach/Detach VM baselines
- Select patches to stage to hosts (all or nothing)
- Limited remediation functionality
- Monitoring of Update Manager notifications are unsupported
- Schedule scan and remediate operations from Task & Events under the vSphere Web Client Monitor tab
- It uses .NET framework in version 4.7 (which is included in the vCenter iso)
- Leverages the new Quick Boot feature of vSphere 6.7 that does a “soft” host reboot to dramatically shorten the remediation time. Note that at the moment Quick Boot is supported on a limited range of hardware, see KB52477
- Virtual appliances patch and upgrade is deprecated
Note that UMDS 6.7 can only be used with vSphere Update Manager 6.7. If you have VUM 6.5 in your environment, a separate UMDS server must be created.
Prerequisites
System
Depending on the size of your environment you might want to change these figures but for most people, this should already be plenty.
| OS | Windows Server 2008R2 -> 2016 |
| Database | SQL Server 2008 -> 2016 (express supported for small infrastructures) |
| UMDS | 6.7.0 |
| Memory | 2GB |
| CPU | 2 vCPU (1 core per vCPU) |
Disks
It is always tricky to size the disks, however if you already have Update Manager in production you can have a look at the space used by the patches and the db and add something like 30% for good measure (you can always increase them later if needed). It will give you directions on how to size the disks.
Here is how I sized my UMDS server for a fairly big environment. I am not too stressed about it as I can resize the disks easily.
| Letter | Label | Block size | Role | Capacity |
| C: | SYSTEM | 4K | Windows / Binaries | 40GB |
| D: | UMDS | 4K | Patches store | 120GB recommended |
| G: | UMDS_DB | 64K | SQL DBs | 5GB |
Proxy
You must configure your proxy to give the UMDS server access to *.vmware.com/*
Firewall
All vCenter servers must have access to the UMDS server on port 80 (http).
| Source | Destination | Protocol / port |
| vCenter servers | UMDS server | http / 80 |
Preparation of the db
The UMDS database is fairly small so we will host it on the UMDS server, it doesn’t make much sense to have a dedicated server unless if there are specific requirements.
You can choose to install SQL server or let the UMDS installation wizard install SQL Server 2012 Express. Note that SQL Express has limitation and is only recommended for small scale deployments (5 hosts, 50 VMs). This article will cover the use of SQL server 2012 Standard.
Installation of SQL Server
This post doesn’t cover the full installation steps of SQL server as it may not be relevant to your company’s policies, however watch for the following when installing it:
- Add the following features:
- Database engine services
- Client Tools Connectivity
- Management Tools – Basic
- Management Tools – Complete
- In “Service Accounts” tab, Set the SQL Server Agent service startup to “automatic”
- In database engine configuration, Data Directories tab, configure the SQL DB disk in Data root directory
Database preparation
Open SQL Server Management Studio and log in your SQL Server.
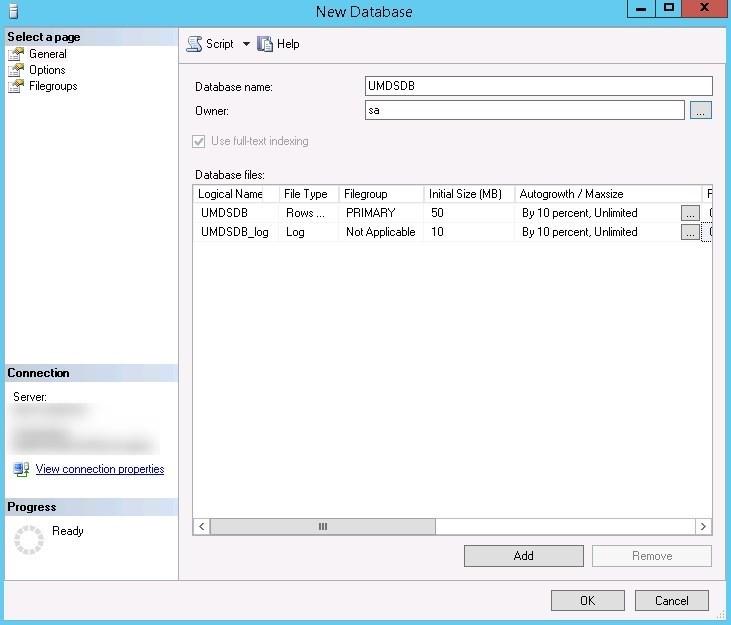
- Create a new database:
- Name : UMDSDB
- Owner : SA
- Recovery model : Simple (You may leave the default ‘Full’ if you plan to run regular transaction log backups)
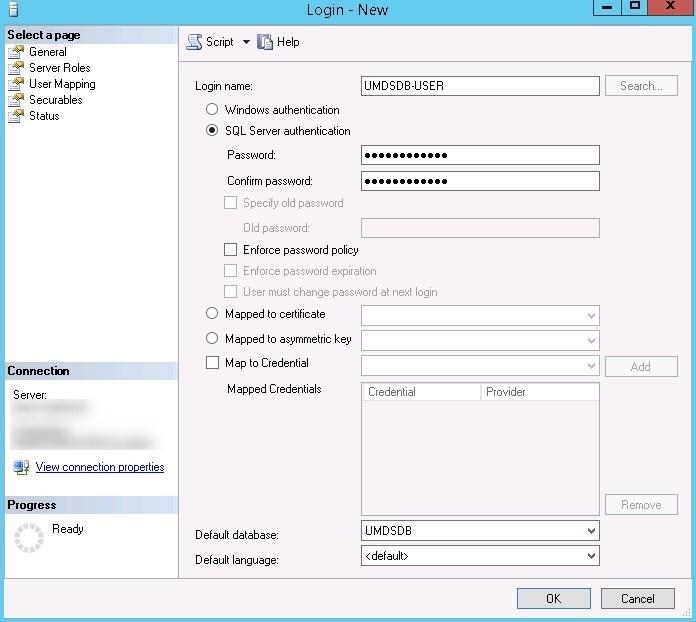
- Create a new SQL user:
- Name : UMDSDB-USER
- SQL Server authentication checked
- Enforce password policy unchecked
- Default database : UMDSDB
- Server role : sysadmin
- Dbowner on UMDSDB & msdb with dbo as default schema
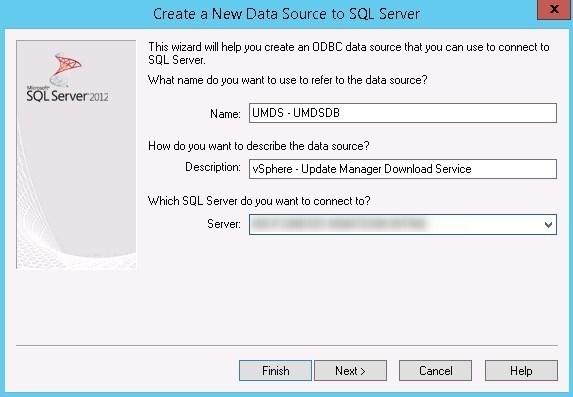
- Name : UMDS – UMDSDB
- Server : FQDN of UMDS server
- SQL Server authentication (login previously created)
- Default database : UMDSDB
- The Test Data Source check should be successful



Create 64 bits ODBC connector


Update Manager Download Service (UMDS)
Installation of UMDS
I will skip the “next, next” type of windows.
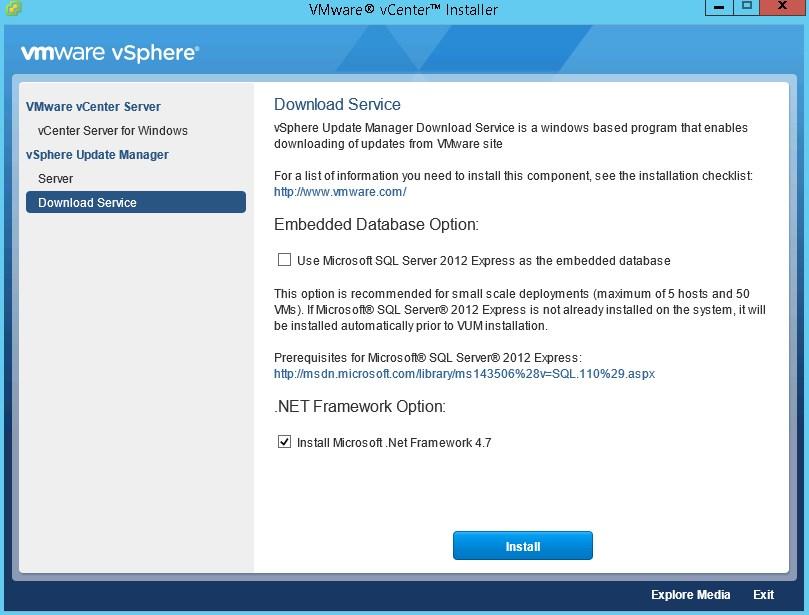
- Mount the vCenter ISO and select Download Service with .Net 4.7 checked
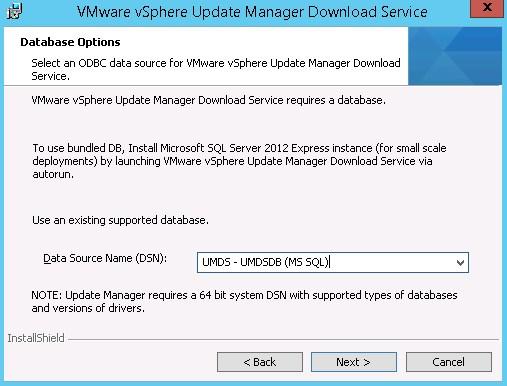
- Select the Data Source Name (DSN) previously created
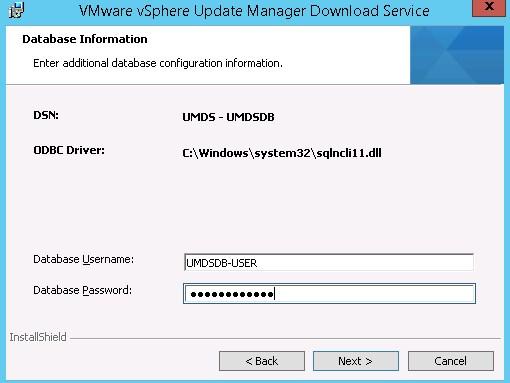
- Type in the SQL user credentials created earlier
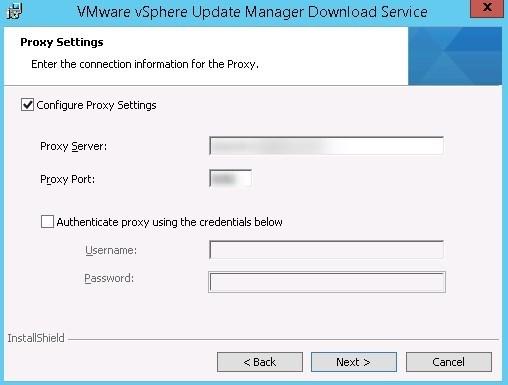
- Configure the proxy (See Prerequisite chapter)
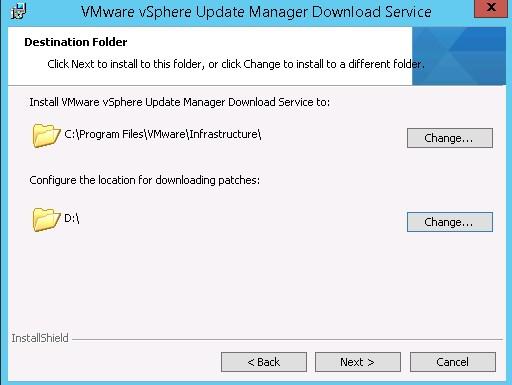
- You can amend the location of the patches now but it will be changed when we configure UMDS. You can still discard the space warning.
- Finish and complete the installation
- Open a command prompt as administrator and cd to the UMDS installation folder
- Remove all ESX versions that are not relevant to you. In this example I left version 6.7 only.
- Change the patches download location
- Change the Patches store location
- Check the configuration – it should look like this
- Download the patches (as of the date of this writing there is no vSphere 6.7 patches out)
- Export the patches to the store location (default location specified above)

Cd C:\Program Files\VMware\Infrastructure\Update Manager

Download and Export patches

IIS
- Install IIS role with default Role Services
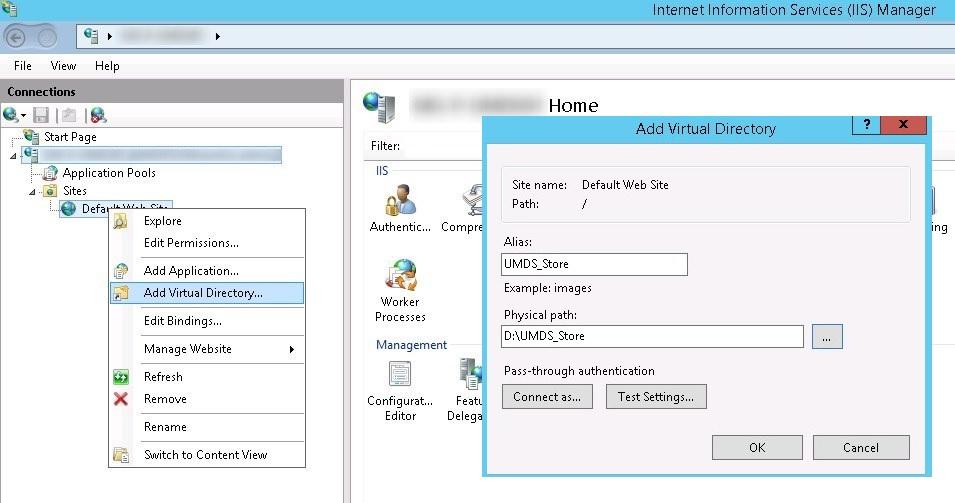
- Add virtual directory:
- Alias: UMDS_Store
- Physical path: D:\UMDS_Store
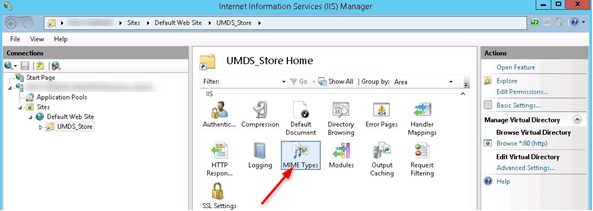
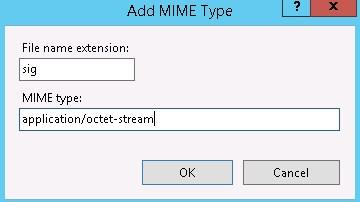
- Add MIME Types:
- Vib > application/octet-stream
- Sig > application/octet-stream
- Enable Directory browsing
- Edit UMDS_Store folder permissions
- Advanced > Check Replace all child […] entries for this object
- Click Yes to apply permission on all descendants


- The repository and its sub folders should now be accessible on http://srv-umds/umds_store
UMDS Scheduled task
To download the new patches and serve them on the store automatically, a scheduled task must be created.
For this purpose, I wrote a simple Powershell script that is called by a batch file. A dated log file is generated in the same location containing all the output of the script. The Powershell script will keep the latest 8 log files (2 months if once per week) and delete the others.
- Create a local user SRV-LOCAL-UMDS member of local administrators
- Create a task with explicit name and description:
- Run the task as .\SRV-LOCAL-UMDS
- Check Run whether user is logged on or not
- Check Run with highest privileges
- Trigger : Set at your convenience
- Action : Path to the .bat script C:\UMDS\Schedule-UMDS.bat

C:\UMDS\Schedule-UMDS.ps1
$InstallPath = “C:\Program Files\VMware\Infrastructure\Update Manager”
$Start = Get-Date
Write-Output “`n— SCHEDULING UMDS : $(Get-Date -Format u)”
if (!(Test-Path “$InstallPath\vmware-umds.exe”)) {Throw “$InstallPath not found”; break}
cd $InstallPath
Write-Output “`n— Downloading Patches”
.\vmware-umds.exe -D
Write-Output “`n— Exporting Patches”
.\vmware-umds.exe -E
$Duration = New-TimeSpan -Start $Start -End (Get-Date)
Write-Output “`n— Execution completed at $(Get-Date -Format u)”
Write-Output “— Execution time: $([string]$Duration)”
$KeepLogs = Get-ChildItem “C:\UMDS\Schedule-UMDS-*.log” | Sort-Object -Property CreationTime | select -last 8
Get-ChildItem “C:\UMDS\Schedule-UMDS-*.log” | where {$KeepLogs.name -notcontains $_.name} | Remove-Item -Confirm:$false
C:\UMDS\Schedule-UMDS.bat
CD %~dp0
SET runDate=%DATE:~6,4%_%DATE:~3,2%_%DATE:~0,2%
C:\Windows\System32\cmd.exe /c powershell.exe -noninteractive -noprofile -file %~dp0\%~n0.ps1 >> %~dp0\%~n0-%runDate%.log


vSphere Update Manager configuration
These steps are to be performed on all the vCenter server that need to be configured with UMDS as a download source.
- Log in the vSphere web client and go to the configuration of Update Manager
- In Download Settings click Edit
- Check Use a shared repository and enter the url to the UMDS store and click OK
http://fqdn-umds-server/umds_store - The Validating screen may take a few minutes to complete, the final output should be as follows
- Check that everything works by downloading the latest patches in Manage > Patch Repository > Download now. The new ones should arrive quickly.
- You can now configure the download and notification schedule at your convenience.

From then on the updates will be downloaded from the UMDS server.

Read more: How to Install UMDS on a Linux OS
Follow our Twitter and Facebook feeds for new releases, updates, insightful posts and more.



10 Comments
Leave A Comment
Schedule a live demo with one of our product experts
Start your full-featured 30-day free trial
Explore detailed pricing, editions & features


Is it possible to enable https for shared repository?
Https is supported indeed.
This is very cool. Just what I needed. Only thing I was thinking about doing is adding another UMDS node for HA purposes. And perhaps using linux versus Windows. (Just a thought) :)
This is cool stuff nice walk thru. I was thinking about adding another UMDS node for HA purposes as I will be using an HA Proxy and perhaps use Linux versus windows. Just a thought. :)
Thanks :)
Because UMDS is not heavily used on a regular basis and not a critical service I personaly think vSphere HA is enough for availability but this is just my opinion, every use case is different. Also I’m curious how would you make UMDS work in HA, load balanced?
You can certainly use Linux/PostGre instead of Windows/MSSQL if it works better for you.
I agree that 2 of them in HA behind an HA Proxy is a bit over kill. As mentioned it was a thought. However – I definitely would prefer the Linux version. Not that many walk throughs out there as I wish to use RHEL.
You’re right there’s not a lot of content about UMDS in general which is why I came up with this how to. I’ll try to write about UMDS in RHEL as it might be useful.
I started looking into UMDS 6.7 on red hat but had issues with the ODBC and I didn’t really follow through with this. However the latest version 6.7 update 1 is simplified and removes the need for a database. https://blogs.vmware.com/vsphere/2019/02/using-the-vmware-update-manager-download-service-umds.html
Hi, i’m trying to install UMDS 6.5 in our environment.(Windows Server 2016, MS SQL 2012) The test connects succsessfull but in the installation procedure the error 25003 occures. Failed to create database tables. I found this KB at VMWare https://kb.vmware.com/s/article/1006038 but nothing of it helps me.
Maybe you know something more and can help me?
Thanks!
Hi, i am trying to install UMDS 6.5 on a windows server 2016 machine. I prepared the database like your instructions but i keep getting the error 25003.Setup failed to create database tables. Ive found this kb article at vmware but both suggestions are not the case: https://kb.vmware.com/s/article/1006038
Maybe you have additional ideas.
Thanks!