
Introduction
Proxmox VE offers a robust virtualization platform, but standalone hosts have a single point of failure. This is where High Availability (HA) comes in, ensuring your VMs stay online even when hardware issues happen. But to unlock the full power of HA, you need shared storage.
This blog will guide you through setting up shared storage for your Proxmox cluster. We’ll explore iSCSI option and walk you through the steps to create a resilient and highly available virtual environment. Get ready to maximize uptime and keep your critical VMs running smoothly!
Setting up shared storage using open-iSCSI initiator in Proxmox VE and Configuring an iSCSI target on a Windows Server
Need to expand storage for your virtual machines in a Proxmox environment? Look no further than iSCSI! This guide dives into configuring an iSCSI target on a Windows Server and connecting to it as shared storage using the open-source iSCSI initiator in Proxmox VE.
By leveraging iSCSI, you can transform readily available storage on a Windows Server into a centralized resource for your Proxmox VMs. This approach offers several benefits:
- Scalability: Easily add more storage to your Proxmox cluster as needed
- Flexibility: Utilize existing Windows Server storage for virtual machines
- Cost-Effectiveness: Avoid purchasing dedicated storage solutions
We’ll walk you through the process step-by-step, from setting up the iSCSI target on Windows Server to configuring the iSCSI initiator in Proxmox. Get ready to unlock the potential of iSCSI for shared storage in your virtual environment!

Prerequisites
- Our storage solution utilizes a Windows Server 2019 Datacenter edition configured as an iSCSI target. This enables us to present block-level storage over a standard TCP/IP network to various client machines
- Within our Proxmox VE server cluster, one node functions as an iSCSI initiator, enabling it to access block-level storage presented by a separate iSCSI target
- The iSCSI target on the Windows Server 2019 Datacenter should provide ample storage capacity. New iSCSI virtual disks can be easily created on this storage server to meet future storage demands while creating VMs on Proxmox Server
Configuring a Proxmox VE Cluster Node as an iSCSI Initiator
In this guide, we’ll prepare a Proxmox VE cluster node to function as an iSCSI initiator. This will allow the node to access block-level storage presented by a separate iSCSI target, expanding your storage capacity for virtual machines and containers.
We’ll achieve this by installing the open-iscsi package, a widely used open-source iSCSI initiator, on the chosen Proxmox VE server node. This package provides the necessary tools to discover and connect to iSCSI targets on your network.
Next Steps
- Accessing the Proxmox VE Shell: We’ll detail the steps to access the specific node’s shell using either the built-in web interface or a dedicated SSH client depending on your preference
- Installing the open-iscsi Package: We’ll provide the precise command to install the open-iscsi package using the Proxmox VE package manager
- Configuring the iSCSI Initiator: We’ll guide you through configuring the iSCSI initiator connection details, including the target’s IP address, port, and authentication credentials (if required)
Verifying the Connection: We’ll explain how to verify if the Proxmox VE node successfully connected to the iSCSI target and can access the presented storage.
This guide will equip you with the steps to transform a Proxmox VE cluster node into an iSCSI initiator, unlocking additional storage potential for your virtualized environment.
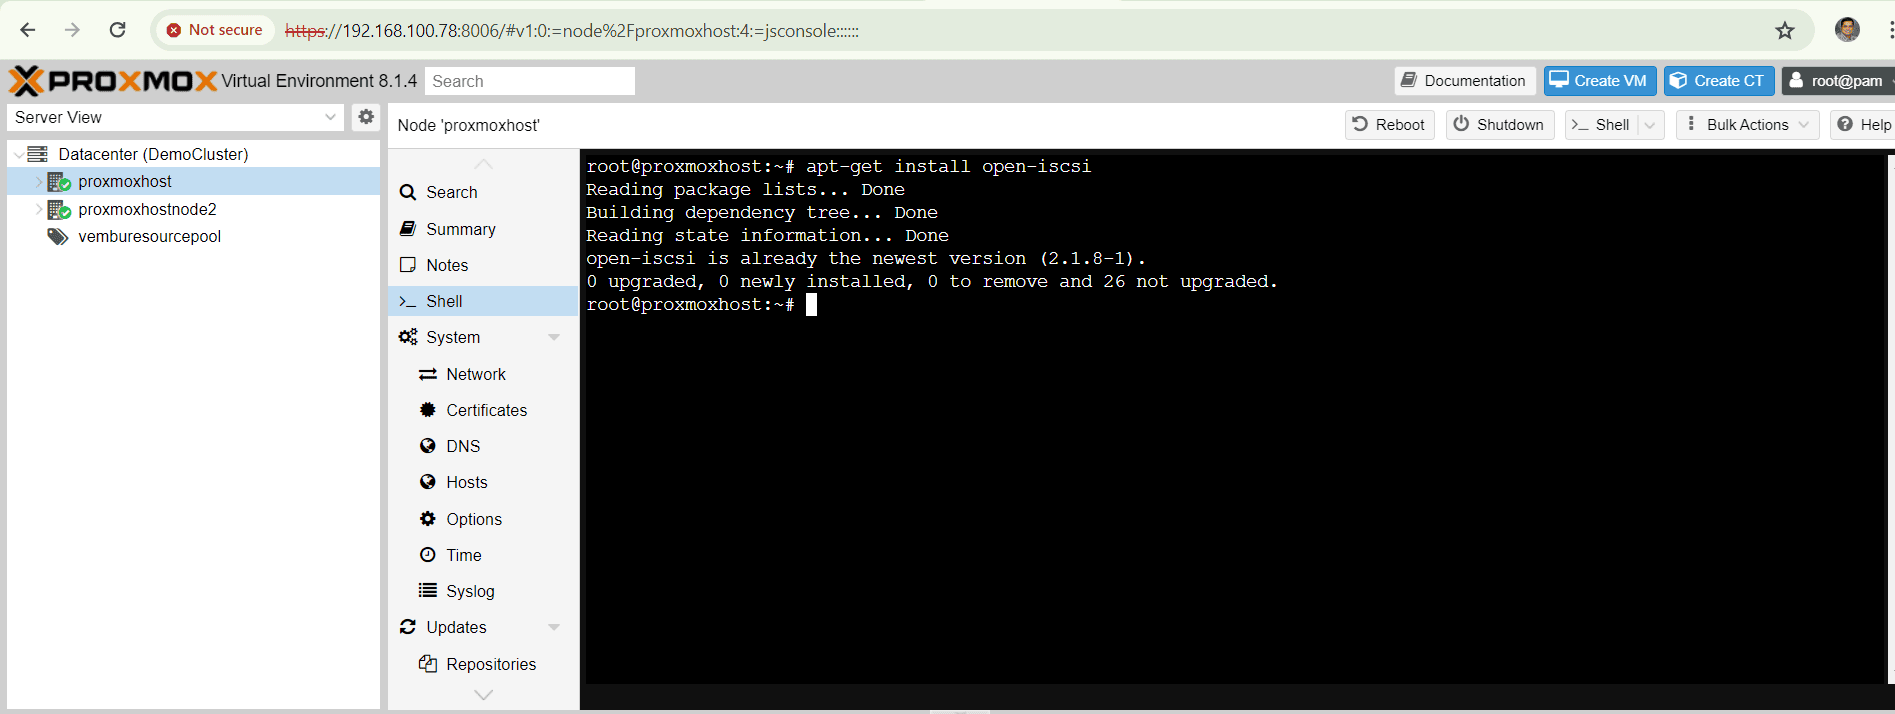
Command in CLI
# apt-get install open-iscsi
By default this package cannot be installed, so install it manually. You can verify if the package is installed or not using the same command. If the package is installed, the output will display its version and installation status. Otherwise, this command will initiate the download and installation process for open-iscsi and its dependencies. You may be prompted to confirm the installation by entering “y” and pressing Enter.
The below screenshot shows this step.
Retrieving the Proxmox VE iSCSI Initiator Name
This guide outlines the steps to find the iSCSI Qualified Name (IQN) assigned to your Proxmox VE server. This IQN is crucial when configuring the iSCSI target on your Windows Server 2019 Datacenter machine. The IQN acts as a unique identifier for your Proxmox VE server within the iSCSI network.
1.Accessing the Initiator Name File
We’ll utilize the vim text editor to access the file containing the initiator name information. However, if you’re unfamiliar with vim, alternative text editors like nano are also available on Proxmox VE.
Here’s the command to open the file using vim:
# vim /etc/iscsi/initiatorname.iscsi
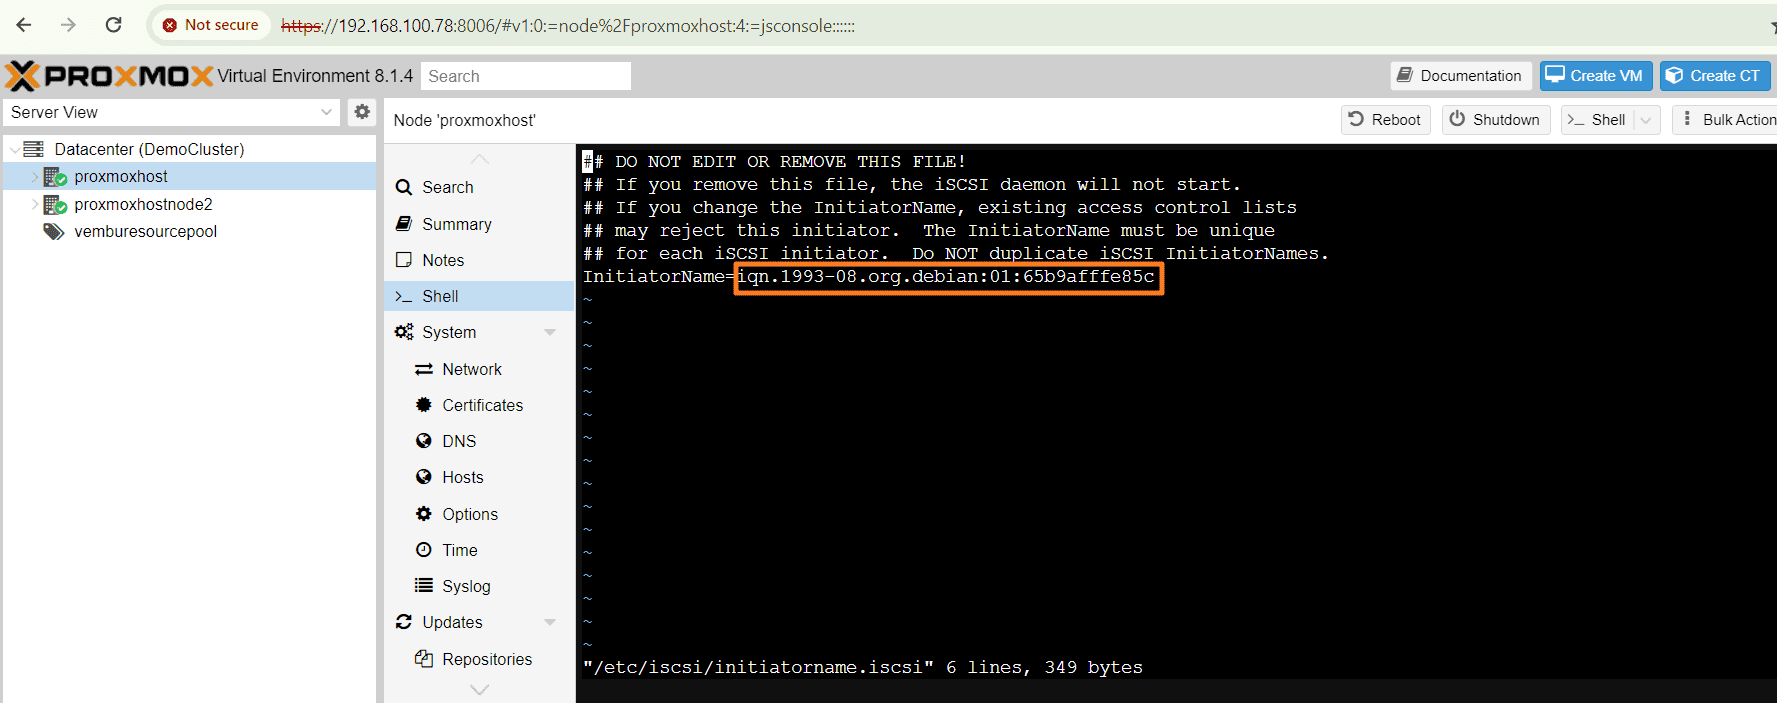
2. Locating the InitiatorName Field
Once the file opens in the editor, locate the line labeled InitiatorName. This line will display the IQN assigned to your Proxmox VE server. It typically follows the format iqn.YYYY-MM.dd.ORG:identifier.
3. Copying the IQN
Within the editor, you can copy the IQN for easy reference. The specific key combinations for copying and pasting will vary depending on your terminal emulator. Common methods involve using the mouse or keyboard shortcuts like Ctrl+C to copy and Ctrl+V to paste.
The below screenshot shows this configuration file and copying of the iqn part as marked in the coloured box.
Here the IQN is “iqn.1993-08.org.debian:01:65b9afffe85c”
Enabling iSCSI Storage Access for Proxmox VE with Open-iSCSI
Within the Server Manager on Windows Server 2019 Datacenter machine, navigate to the iSCSI service configuration. Here, under File and Storage Services, expand the iSCSI section and locate the option to “Create a new iSCSI target.” This will launch the iSCSI Target Server Wizard, guiding you through the process of setting up a new virtual disk for iSCSI access.
On the next step, provide a Target Name. Here we have provided a target name “ProxmoxSharedStorageDemo” . Below screenshot shows this step
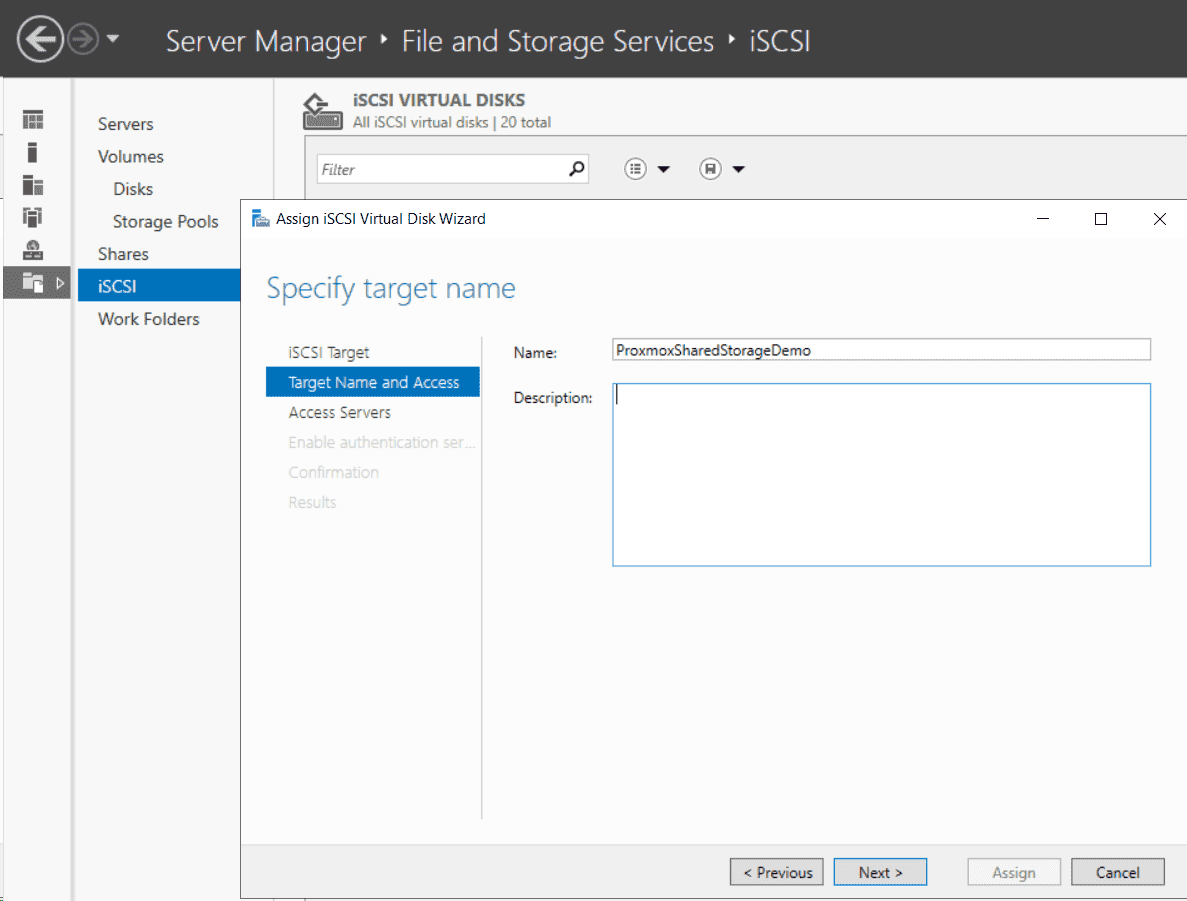
Click Next to Continue
Within the “Specify Initiator” dialog of the iSCSI Target Server Wizard, click the “Add” button to grant access to the newly created iSCSI target. Here, you’ll need to enter the iSCSI Qualified Name (IQN) of your Proxmox VE server, which you retrieved in the previous step. This IQN acts as a unique identifier for your Proxmox server on the iSCSI network. After entering the IQN, click “OK” to confirm. You can then verify that the Proxmox server’s IQN is listed under the “Value” tab within the “Specify Initiator” window. This confirmation ensures that only authorized initiators, in this case, the Proxmox VE server, can access the storage presented by the iSCSI target.
The below screenshot shows this step.
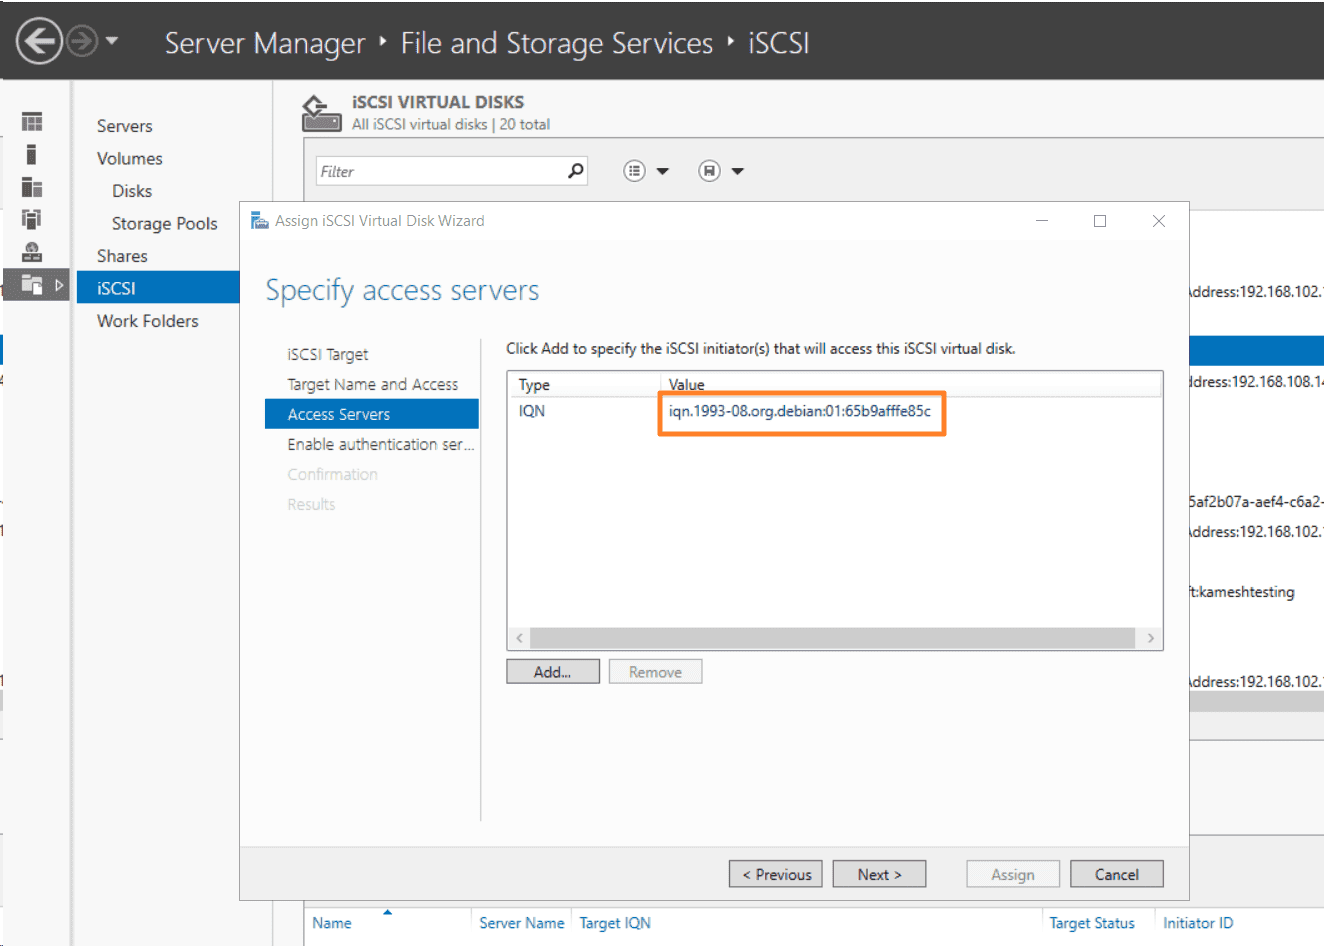
Click Next to Continue.
Under “Enable Authentication”, optionally you can enable CHAP protocol to authenticate initiator connections or enable Reverse CHAP protocol to allow the initiator to authenticate the iSCSI target.Here we don’t have such authentications, so can skip the step. Click Next to Continue
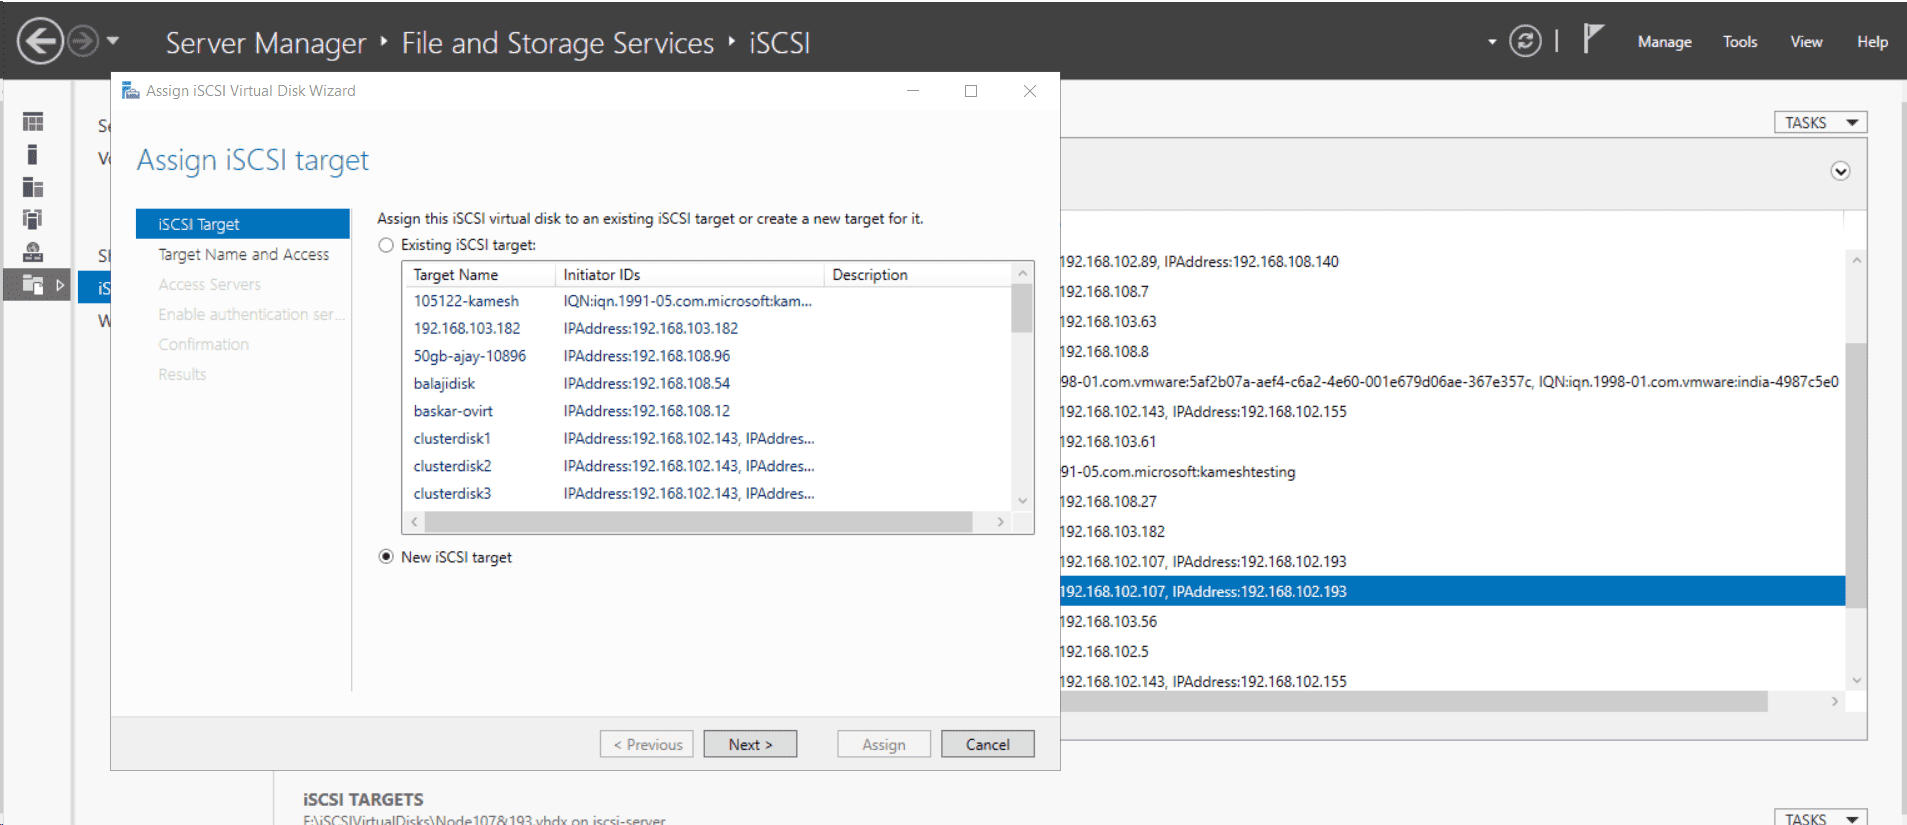
On the Final step, give the confirmation for the configuration details provided. Click Asssign to finish the step.
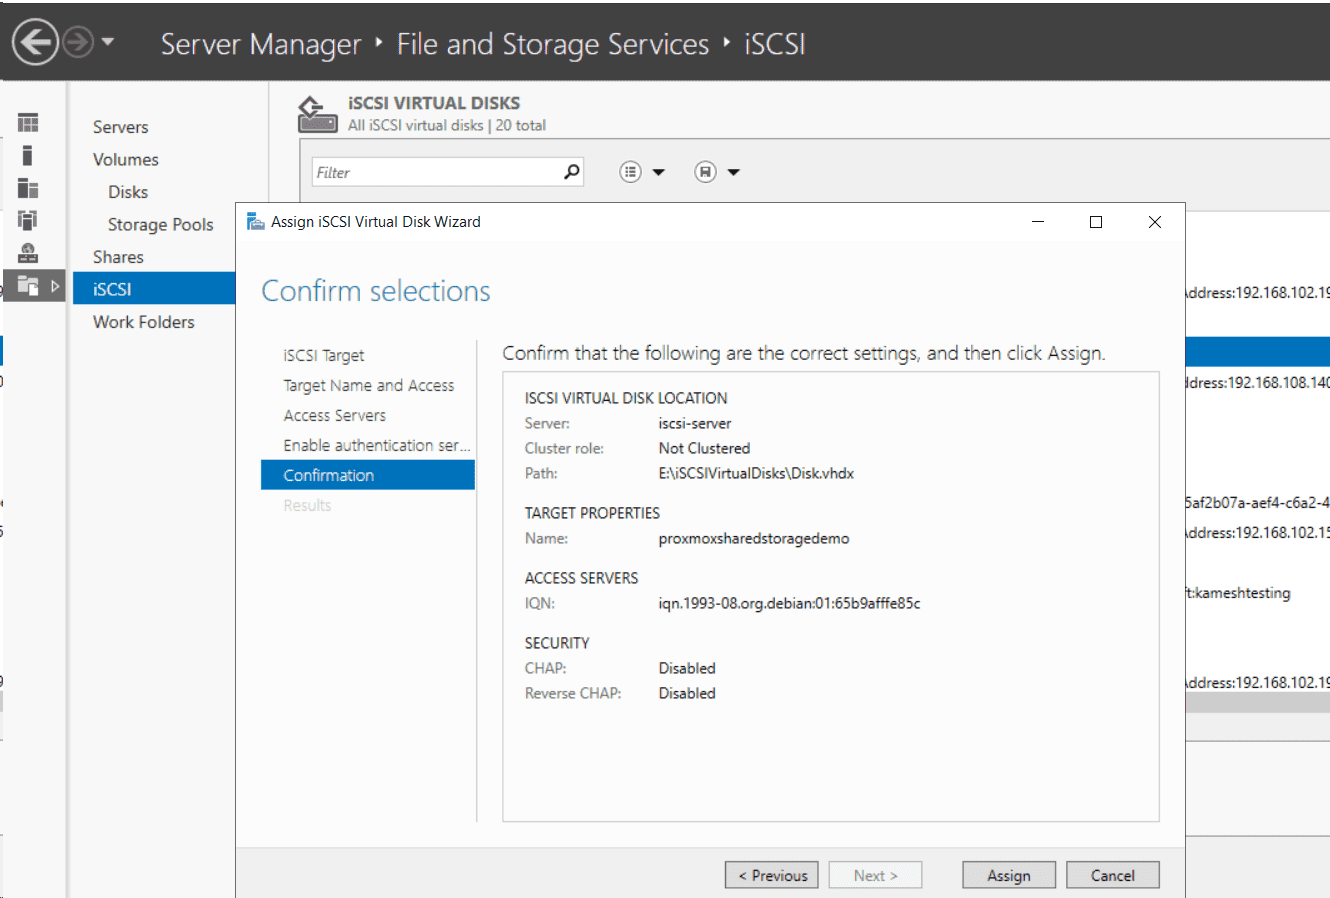
Once you’ve configured the iSCSI target properties and specified authorized initiator access, proceed to the final step by clicking “Assign.” This action triggers the creation of a new iSCSI target on your Windows Server. Additionally, it assigns the virtual disk you previously configured (in a separate step) to this newly created target. This association essentially links the storage space (virtual disk) with the target, making it accessible to the authorized iSCSI initiators (including your Proxmox VE server) that you defined earlier.
The below screenshot shows these steps.

Click close to finish the process.
Connecting Proxmox VE to Shared iSCSI Storage
The next step involves configuring the Proxmox VE server to access the shared iSCSI storage created on the Windows Server. This requires specifying the iSCSI target details, including the target IP address, port number, and authentication credentials (if configured).
Adding the iSCSI Storage on Proxmox VE
- Access the Storage Menu: Within the Proxmox VE web interface, navigate to the Datacenter view and select Storage. This will display a list of existing storage configurations
- Add a New Storage: Click the “Add” button in the top right corner to initiate the creation of a new storage definition
- Choose iSCSI Storage: In the “Add Storage” window, select “iSCSI” from the “Type” dropdown menu. This option indicates that you’ll be connecting to an external storage target using the iSCSI protocol
General Settings:
- ID: Provide a descriptive name for this iSCSI storage within Proxmox VE. This name will help you easily identify it later
- Portal: Enter the IP address or hostname of the Windows Server 2019 Datacenter machine where you previously configured the iSCSI target
- Target: Once you enter the portal details, Proxmox VE will attempt to discover available iSCSI targets on that server. A dropdown menu labeled “Target” will appear, populated with the discovered targets
- Select the specific target name you created on the Windows server in the previous step. This ensures you connect to the intended storage space
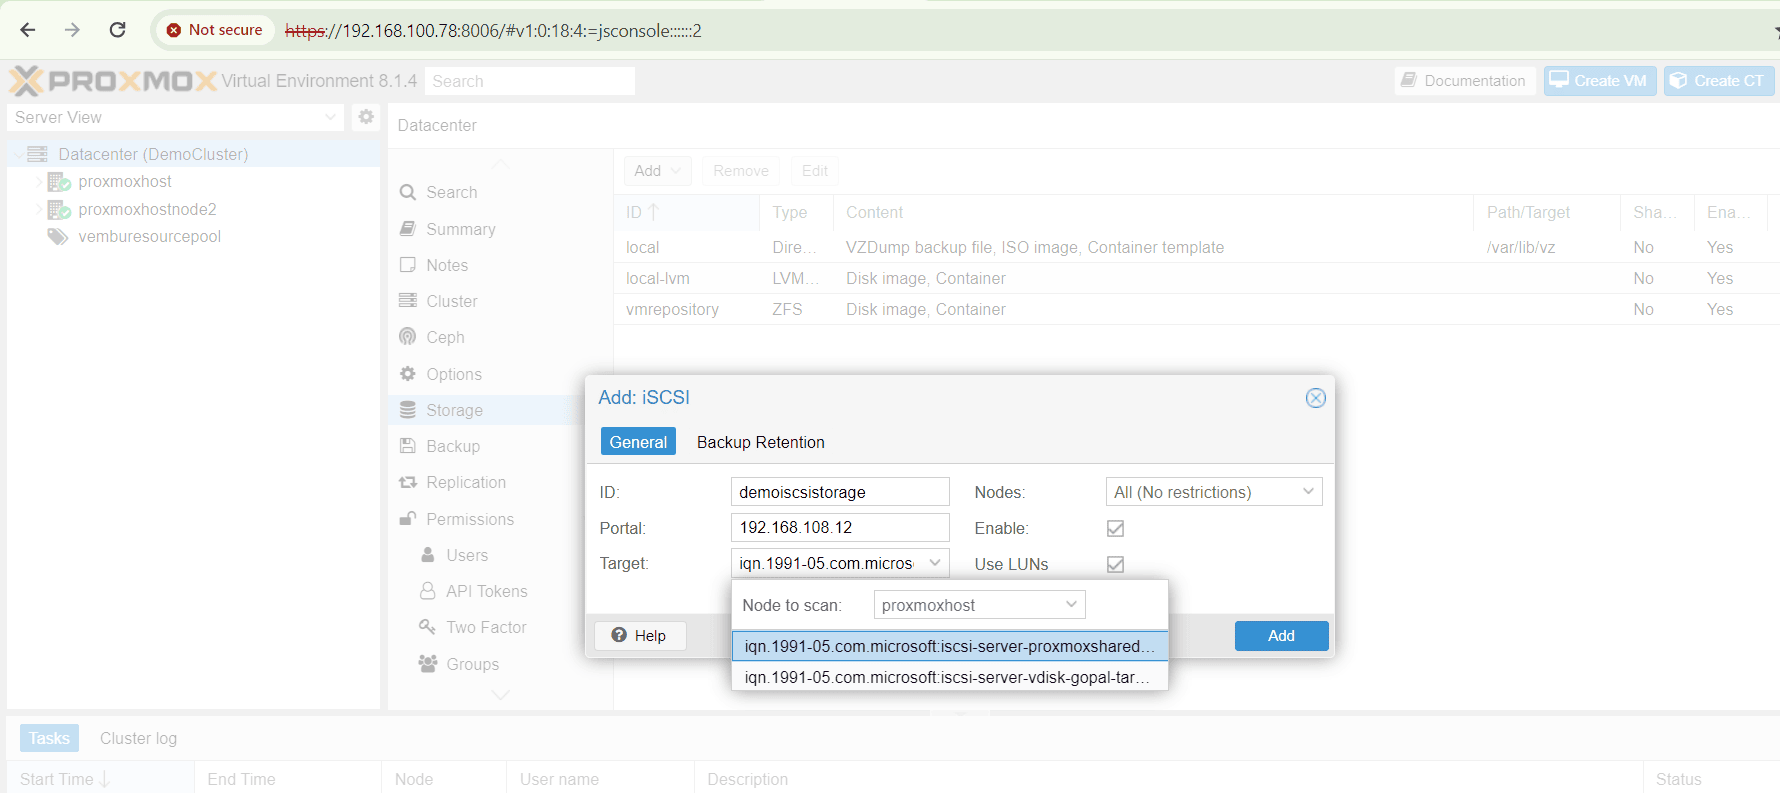
Click Add to add the shared storage.
Once successfully configured, the newly added storage will be visible under Datacenter → Storage within the Proxmox VE web interface. This storage will be identified as using the iSCSI protocol and will display a “Shared = Yes” status, indicating it’s accessible by all nodes within your Proxmox cluster.

Conclusion
This guide has comprehensively outlined the process of setting up shared storage using the open-iSCSI initiator in Proxmox VE and configuring an iSCSI target on a Windows Server 2019 Datacenter machine. By following these steps, you’ve achieved the following:
- Enabled iSCSI Target Functionality: You successfully configured Windows Server 2019 Datacenter to act as an iSCSI target, presenting virtual disk storage accessible over the network
- Established iSCSI Initiator Connection: You utilized the open-iscsi package on your chosen Proxmox VE cluster node to connect to the iSCSI target, allowing access to the shared storage
- Unlocked Shared Storage Potential: Through this configuration, you’ve unlocked the potential for shared storage within your Proxmox VE cluster. This shared storage can be used to create virtual machines and containers, enabling features like High Availability (HA) for increased redundancy and improved uptime for your critical workloads
Next Steps
With the shared storage now accessible, you can proceed to:
- Create Virtual Machines or Containers: Utilize the newly added iSCSI storage within Proxmox VE to create virtual machines or containers. These VMs and containers can leverage the shared storage, allowing them to be migrated between cluster nodes for enhanced fault tolerance
- Configure High Availability (HA): Explore the High Availability (HA) functionalities within Proxmox VE to configure automatic failover of virtual machines between cluster nodes in the event of hardware failures. Shared storage is a key component for enabling HA
- Manage Storage Permissions: Define access control permissions for the shared storage within Proxmox VE, ensuring only authorized users or VMs can access specific resources
By effectively utilizing this shared storage setup, you can significantly enhance the storage flexibility, scalability, and redundancy of your Proxmox VE cluster.

Leave A Comment