Table of Contents
- What is AWS Batch?
- Components of AWS Batch
- How to access AWS Batch service in AWS Cloud?
- Step 1: Creating a compute environment
- Step 2: Creating a job queue
- Step 3: Create a Job definition
- Step 4: Creating a Job
- Step 5: Review and Create
- Conclusion
What is AWS Batch?
AWS Batch helps to run batch computing or processing workloads on the AWS Cloud. As a fully managed service, AWS Batch helps you to run batch computing workloads of any scale. AWS Batch automatically computes resources and optimizes the workload distribution based on the quantity and scale of the workloads. With AWS Batch, there is no need to install or manage batch computing software, which allows you to focus on analyzing results and solving problems.
Components of AWS Batch
According to AWS documentation, AWS Batch constitute four distinct components viz
Jobs – A unit of work (such as a shell script, a Linux executable, or a Docker container image) that you submit to AWS Batch. It has a name and runs as a containerized application on an Amazon EC2 instance in your computing environment. Jobs can reference other jobs by name or by ID and can be dependent on the successful completion of other jobs.
Job Definitions – A job definition specifies how jobs are to be run, a blueprint for the resources in your job. You can supply your job with an IAM role to provide programmatic access to other AWS resources, and you specify both memory and CPU requirements. The job definition can also control container properties, environment variables, and mount points for persistent storage,
Job Queues – When you submit an AWS Batch job, you submit it to a particular job queue, where it resides until it is scheduled onto a computing environment. You associate one or more compute environments with a job queue, and you can assign priority values for these compute environments and even across job queues themselves. For example, you could have a high priority queue that you submit time-sensitive jobs to, and a low priority queue for jobs that can run anytime when compute resources are cheaper.
Compute Environment – A computing environment is a set of managed or unmanaged computed resources that are used to run jobs. Managed to compute environments allow you to specify desired instance types at several levels of detail. You can set up compute environments that use a particular type of instance, a particular model such as c4.2xlarge or m4.10xlarge, or simply specify that you want to use the newest instance types. You can also specify the minimum, desired, and a maximum number of vCPUs for the environment.
In this blog, we are detailing these steps i.e. creating a compute environment first, then creating a job queue and its definition, and then creating a job to use the new computing environment.
How to access AWS Batch service in AWS Cloud?
If you have an account in AWS login to that root account and choose the service “Batch” under the “Compute” section. Click Getting Started icon to submit your first batch job

Step 1: Creating a compute environment.
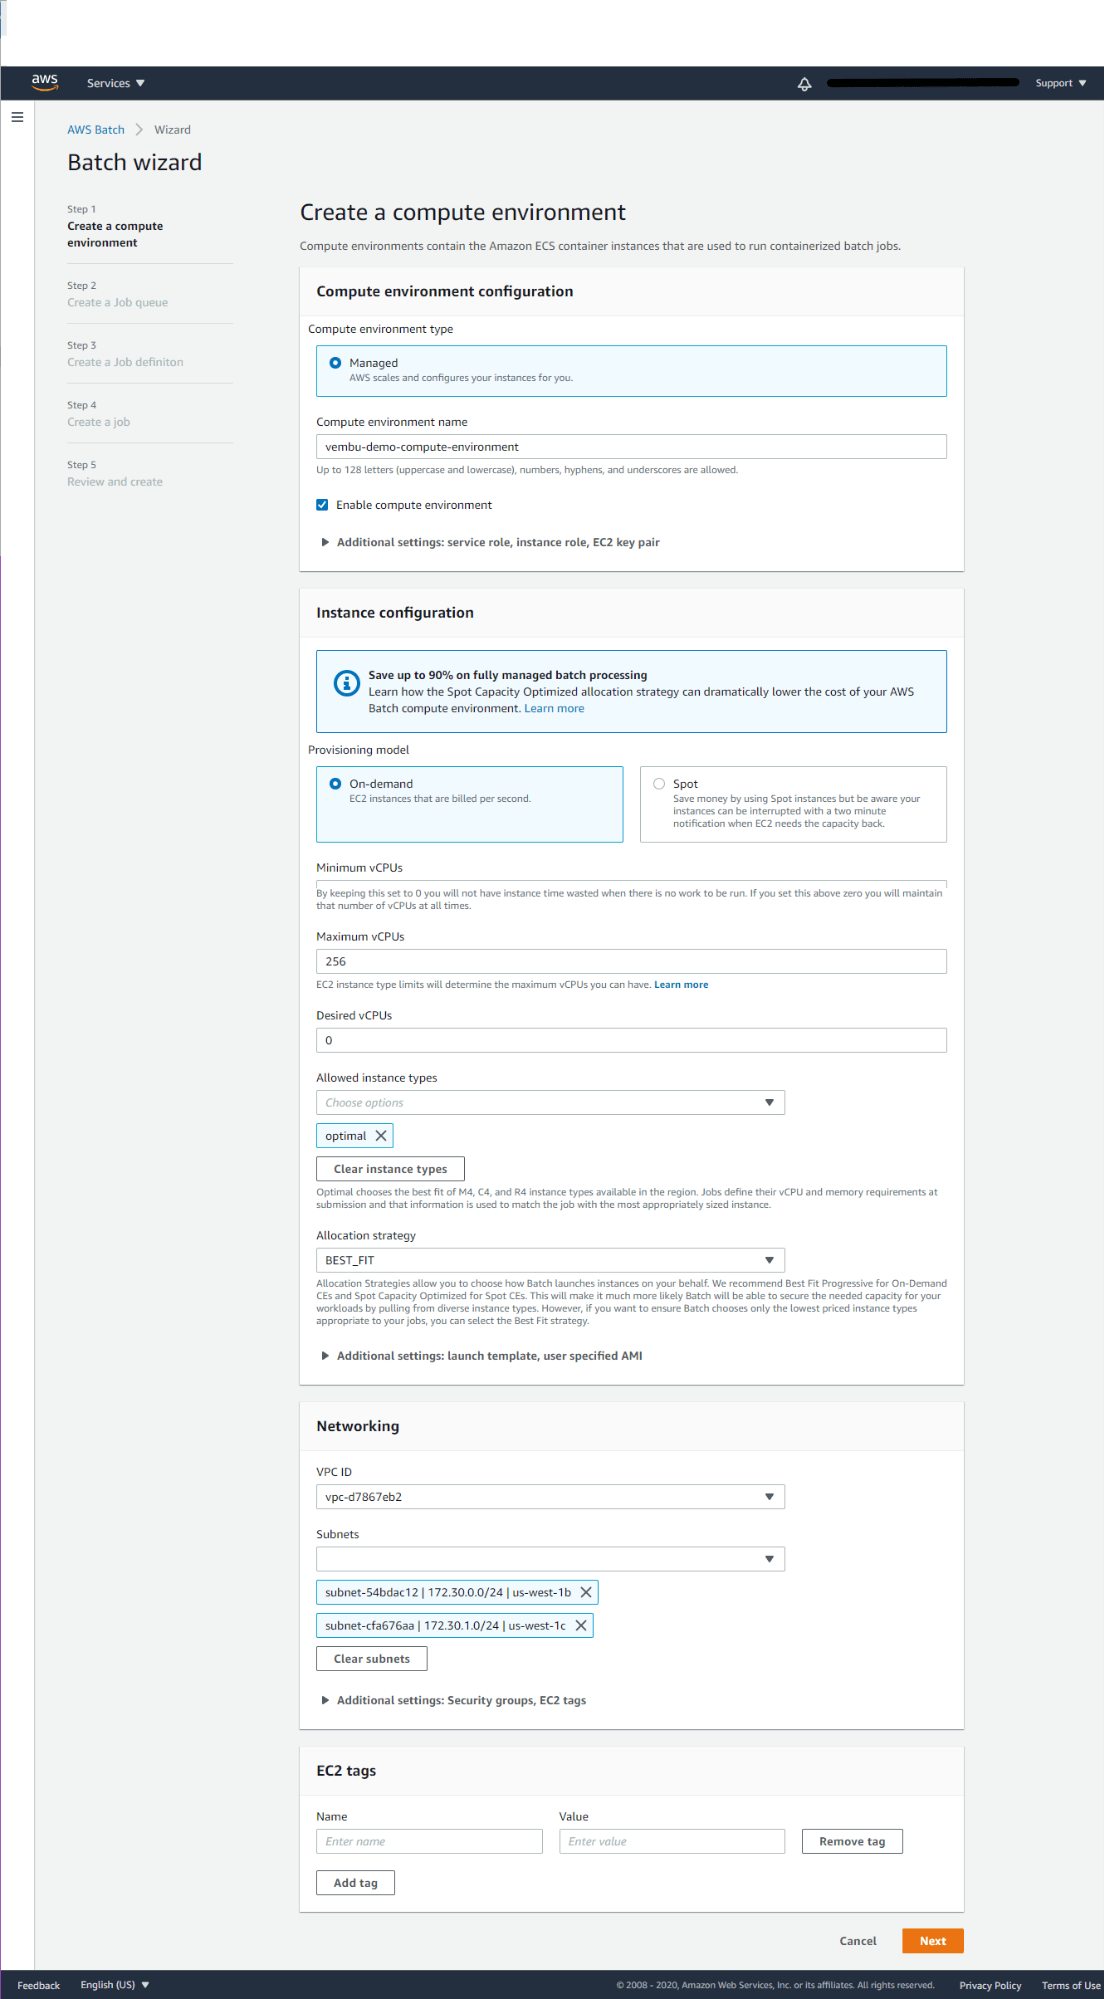
A Compute environment contains the Amazon ECS container instance(s) that are used to run containerized batch jobs. A Compute environment constitutes a compute environment type and a compute environment name. You could also enable compute environment with additional settings such as service role, Instance role, and EC2 key pair. Here AWS offers a managed compute environment that automatically scales and configures instances as per the job rule created in AWS Batch.
Users need to provide a compute environment name and enable compute environment as shown in the picture below.
Instance configuration – On the Instance configuration section, you may provide the provisioning model “On-demand” or Spot EC2 instances. The spot provisioning model can save money by using Spot instances but be aware your instances can be interrupted with a two-minute notification when EC2 needs the capacity back. So the “On-demand” provisioning model is selected.
Minimum vCPU – This should be set to 0, by keeping this set to 0 you will not have instance time wasted when there is no work to be run. If you set this above zero you will maintain that number of vCPUs at all times.
Maximum vCPU – By default Maximum vCPU set to 256, but it again depends on the EC2 instance model you have chosen.
Desired vCPU – This also can be set to 0.
Allowed instance type – Here you can choose the EC2 instances specifically. The list shows all the available EC2 instance types, you choose the one or can choose the optimal option which chooses the best fit of M4, C4, and R4 instance types available in the region. Jobs define their vCPU and memory requirements at the submission and that information is used to match the job with the most appropriately sized instance. Here we are choosing optimal
Allocation strategy – Allocation Strategies allow you to choose how Batch launches instances on your behalf. AWS recommends Best Fit Progressive for On-Demand CEs and Spot Capacity Optimized for Spot CEs. This will make it much more likely Batch will be able to secure the needed capacity for your workloads by pulling from diverse instance types. However, if you want to ensure Batch chooses only the lowest priced instance types appropriate to your jobs, you can select the Best Fit strategy. Here we are selecting the Best Fit strategy.
Networking – Provide an existing VPC ID and its subnet(s) or create a new VPC with subnets across the AWS region you chose for creating this AWS Batch. Optionally you could create a tag by providing a tag name and value.
Click Next to continue to Step2
Step 2: Creating a job queue
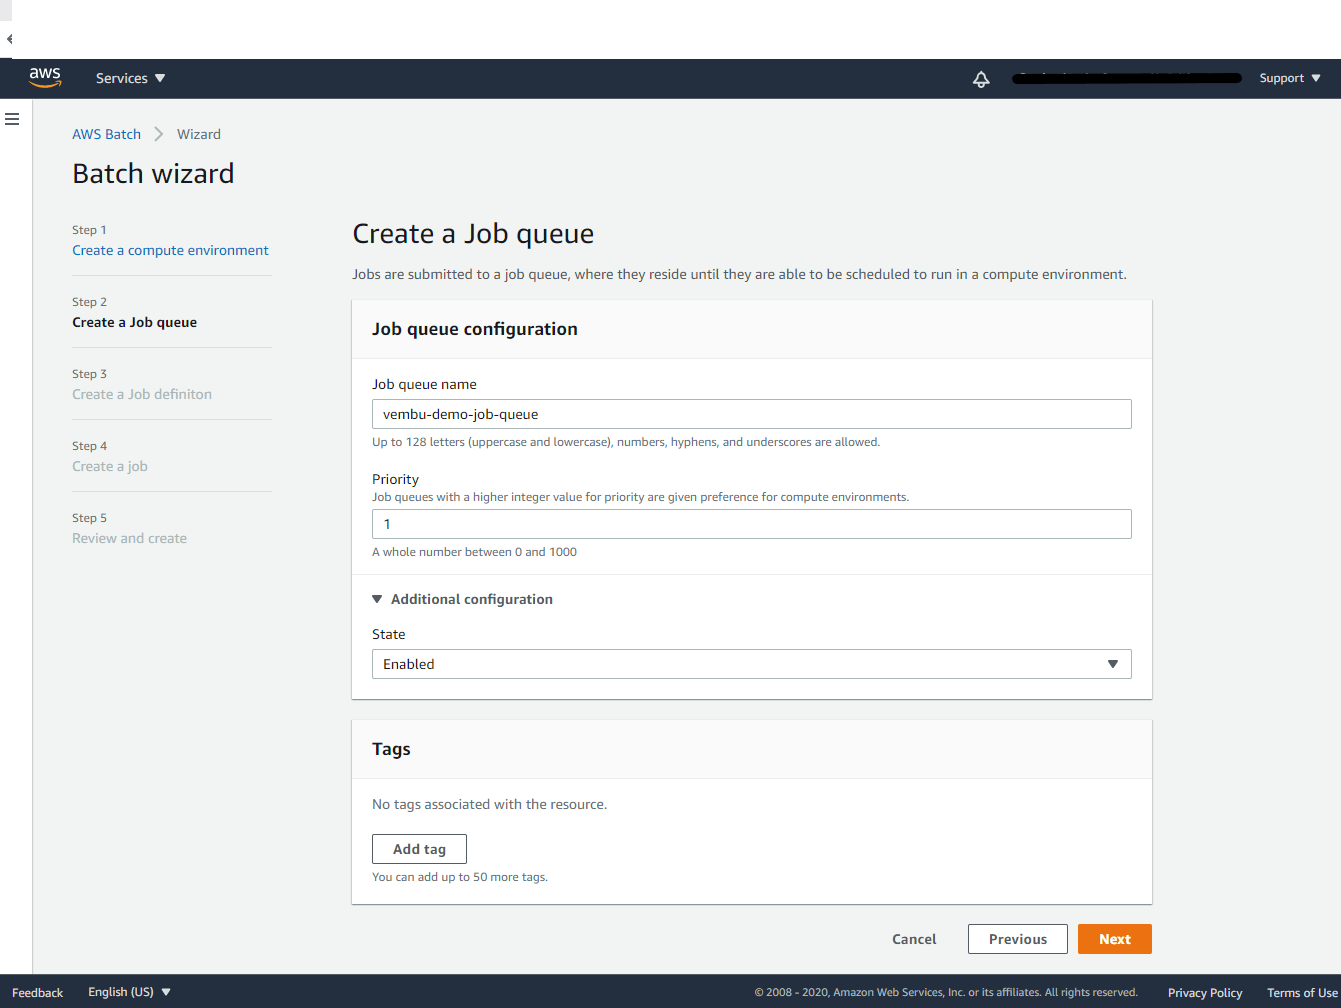
In this step, we are creating a unique job queue, where your job(s) reside. Here you need to provide a job queue name and its priority value. Job queues with a higher integer value for priority are given preference for computing environments. Here you can prioritize the job queue by inputting the integer value starting from 0 to 1000. By default integer 1 is selected.
In additional configuration choose state as “Enabled” Click Next to continue to Step 3
Step 3: Create a Job definition
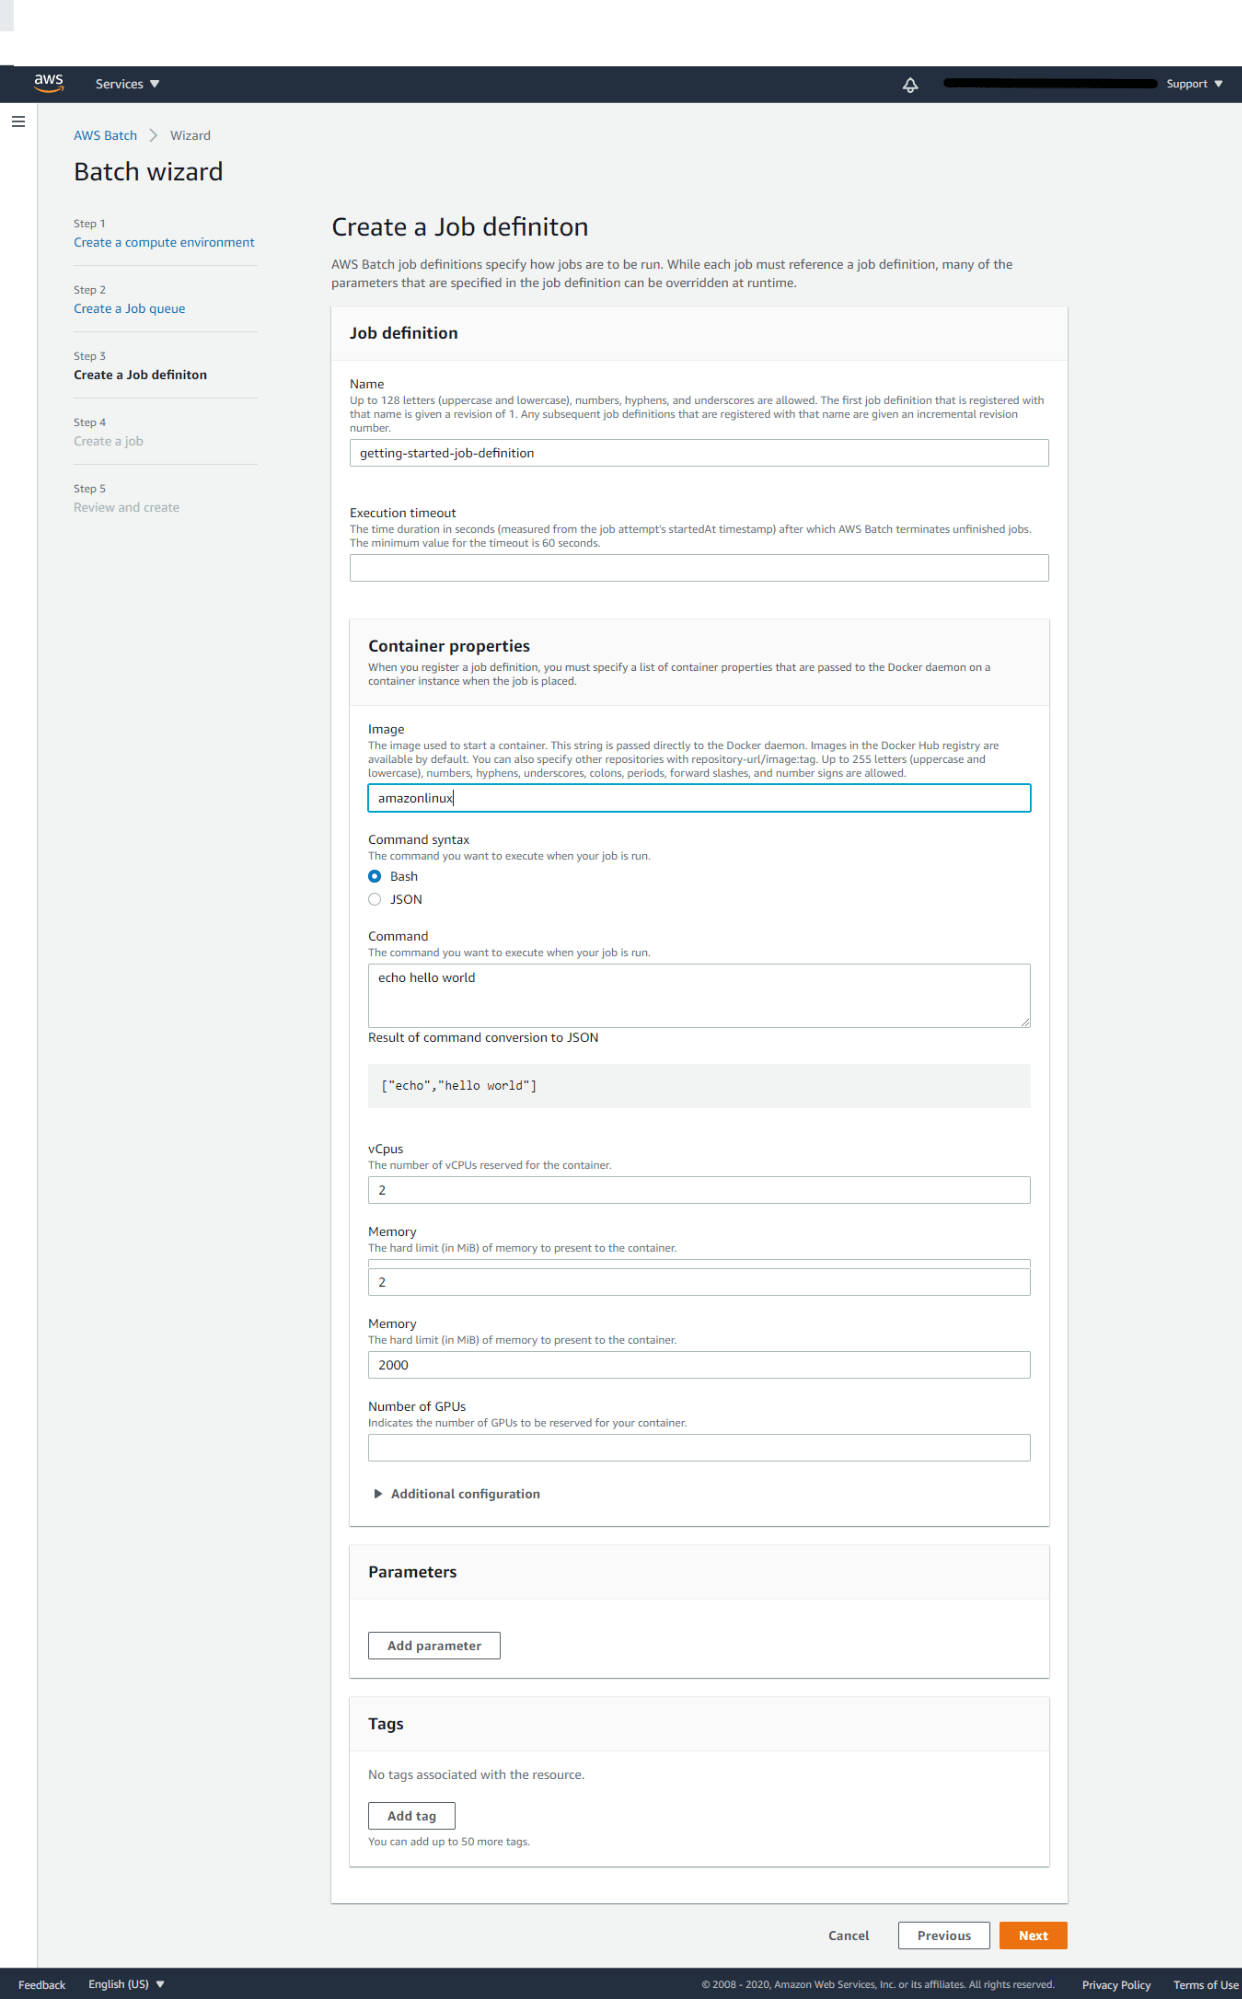
AWS Batch job definitions specify how jobs are to be run. While each job must reference a job definition, many of the parameters that are specified in the job definition can be overridden at runtime. Here we need to provide a job definition name and the container properties. When you register a job definition, you must specify a list of container properties that are passed to the Docker daemon on a container instance when the job is placed. Here we all used the default settings for command syntax Bash,vCPU count 2 nos, and Memory which is 2Gb. You can also reserve no of vGPUs for your container.
Click Next to continue to Step 4
Step 4: Creating a Job
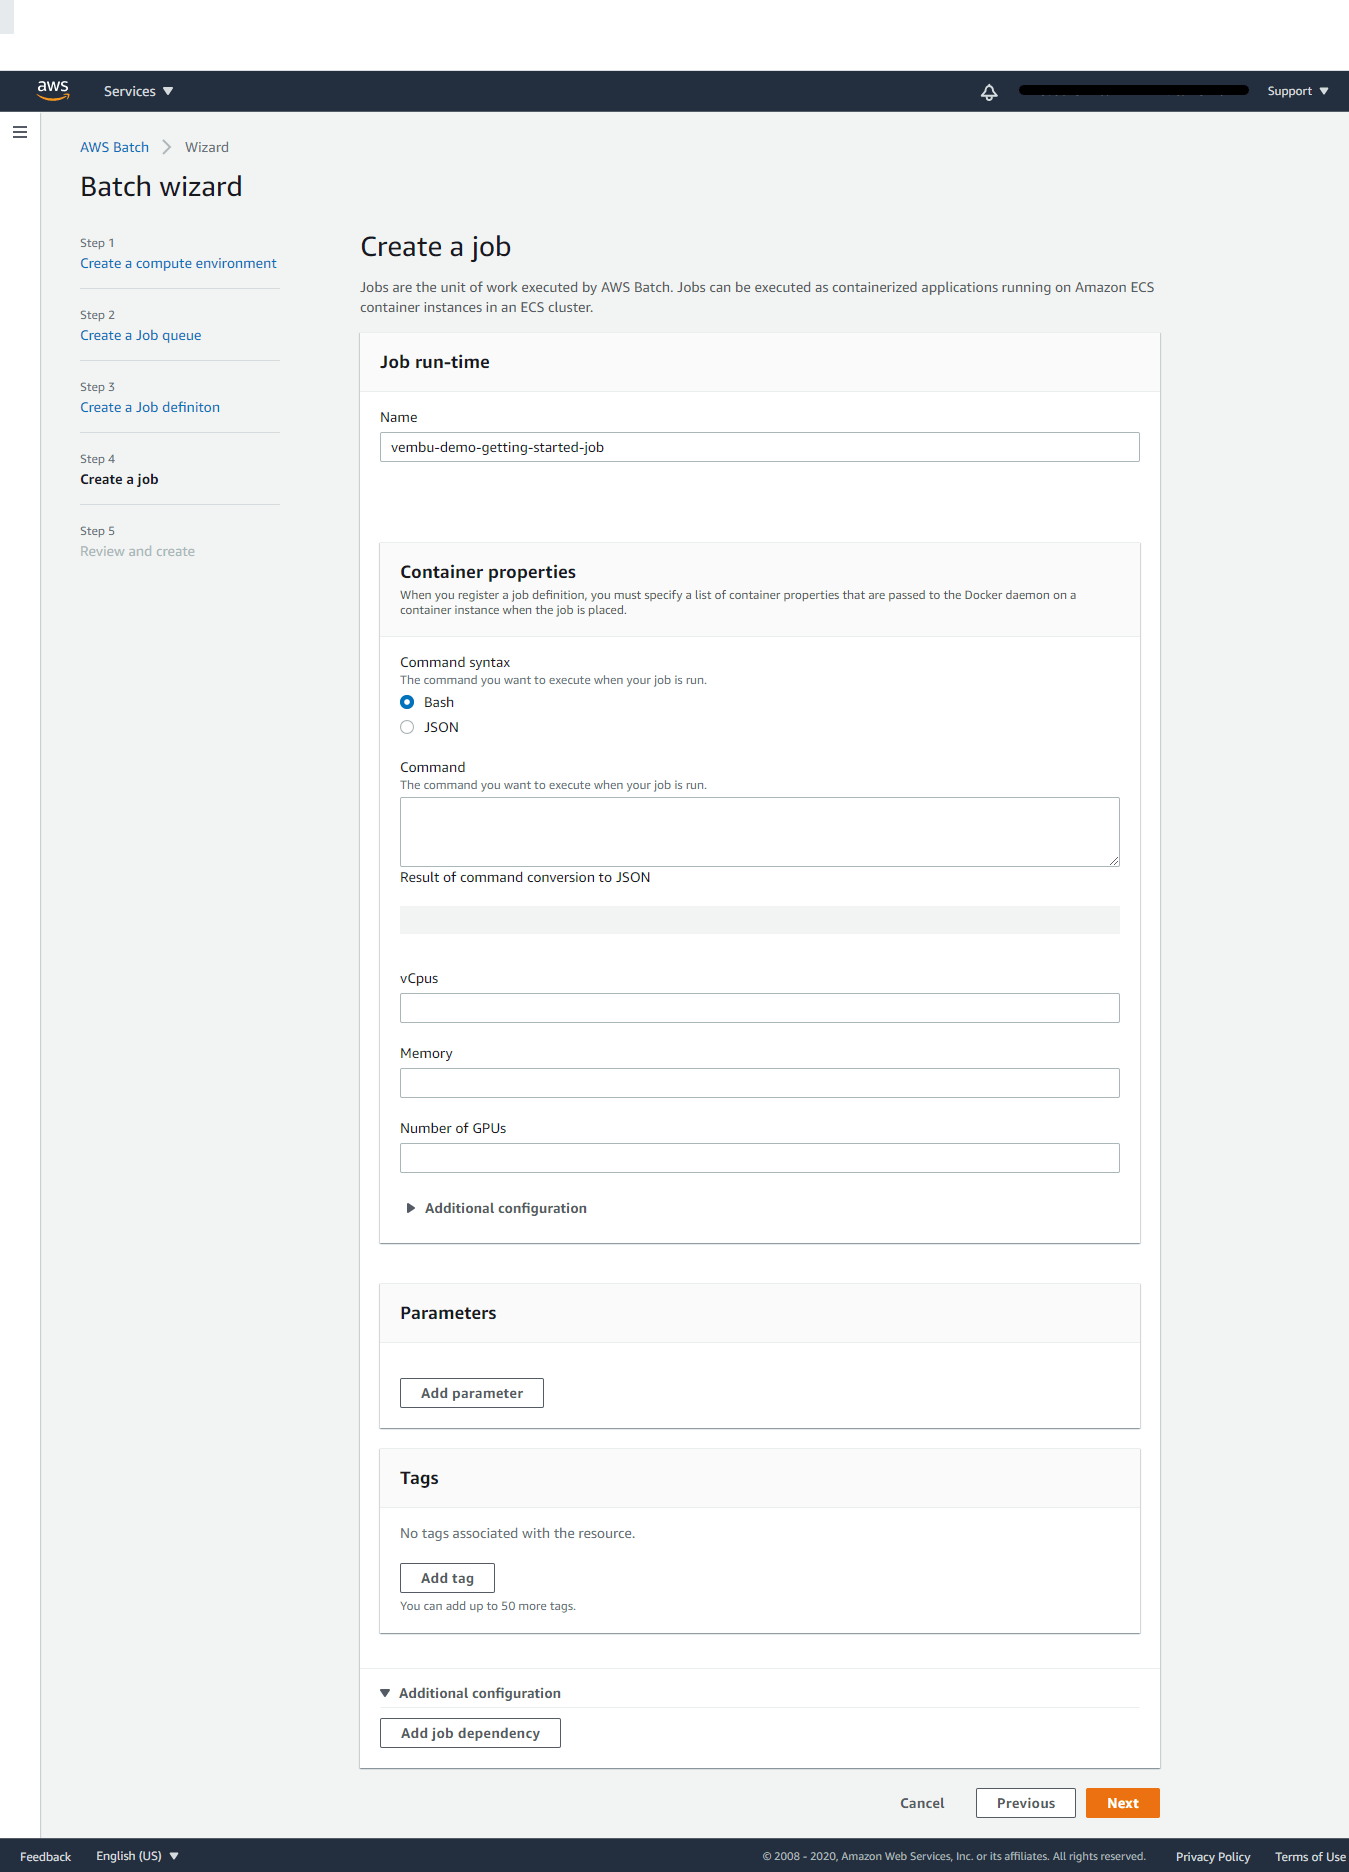
Jobs are the unit of work executed by AWS Batch. Jobs can be executed as containerized applications running on Amazon ECS container instances in an ECS cluster. In this step provide a name for the run time job. Similar to Job definition step container properties, you can also define container properties such as minimum and maximum vCPUs, Memory, and reserved GPUs for this particular job.
Click Next to continue to Step 5
Step 5: Review and Create
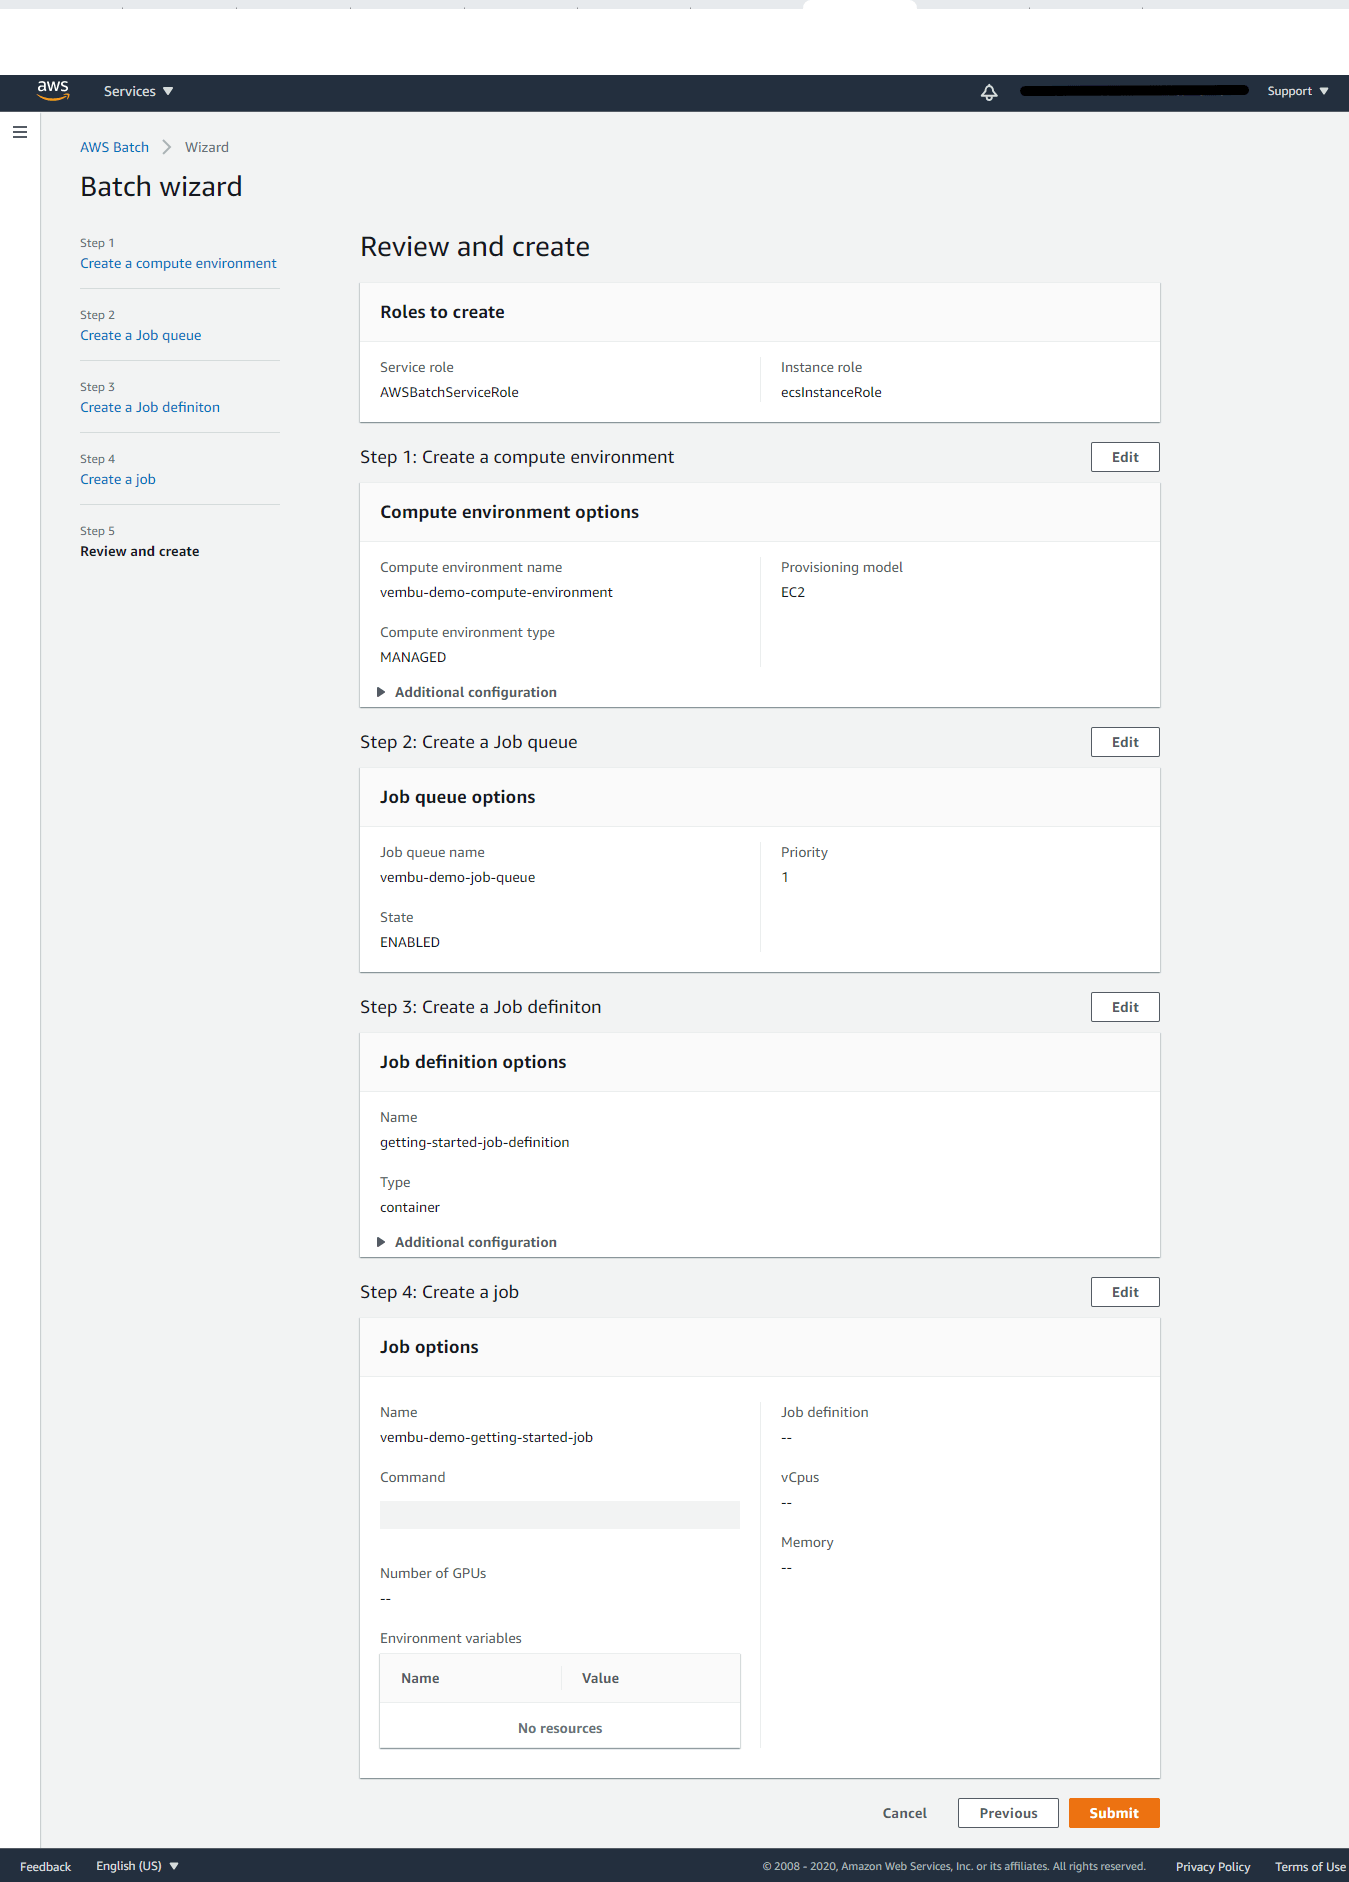
In this final step, you may edit all the properties shown on the above steps once for all finally, and after confirmation of the above settings Click the button Submit.
Conclusion
AWS Batch is a fully managed service that eliminates the need to operate third-party commercial or open-source batch processing solutions. There is no batch software or servers to install or manage. AWS Batch manages all the infrastructure for you, avoiding the complexities of provisioning, managing, monitoring, and scaling your batch computing jobs. Since AWS Batch is natively integrated with the AWS platform, allowing you to leverage the scaling, networking, and access management capabilities of AWS easily. Also AWS Batch will utilize Spot Instances on your behalf, reducing the cost of running your batch jobs further.
Follow our Twitter and Facebook feeds for new releases, updates, insightful posts and more.


Leave A Comment