Once you decide to virtualize your physical machines, you need to opt for the right solution.
The market is fraught with several conversion/migration tools and these are available in both free and paid options.
Each tool holds a different set of features. Finding a single efficient solution that can support all types of migration (P2V, V2V, V2P, P2P) is really a challenging task. But implementing different tools for each type of conversion can be difficult and prohibitively expensive.
In most cases, migration tools are mostly not reliable since data can’t be recovered if there is any inconsistency during migration. Hence, you require a tool that can also protect your data in any form like creating a backup and letting you restore your machine back to the previous state as it was before.
Vembu BDR Suite is one such solution that protects your data across diverse IT environments (Physical/Virtual/Cloud) and offers cross-platform migration support as a part of it.
The migration process can be carried either across different hypervisors or across different workloads (P/V) using Vembu.
In this post, we’ll look into the step by step process to virtualize windows machines using Vembu BDR Suite.
Step by Step process for Windows Virtualization using Vembu BDR Suite
Step 1 – Download and Install Vembu BDR Suite.
Step 2 – Configure backups for your Windows Servers & Workstations you would like to virtualize.
Vembu lets you configure disk-image backups for your windows machines using Microsoft VSS snapshot i.e., an image of your entire disk (OS, apps, & data) is created and then the backup is performed.
Backups for your Windows machines can be configured in 5 simple steps:
- Add your physical host credentials and save
- Select all the Disks/Volumes of your machine
- Enable App-aware process, if you have any MS apps running inside your machine
- Configure scheduling & retention policies, storage repository, and encryption settings
- Review your configs and save your backup job
Check out this video tutorial for a detailed backup configuration.
Step 3 – Now, perform the recovery of your backed up machine.
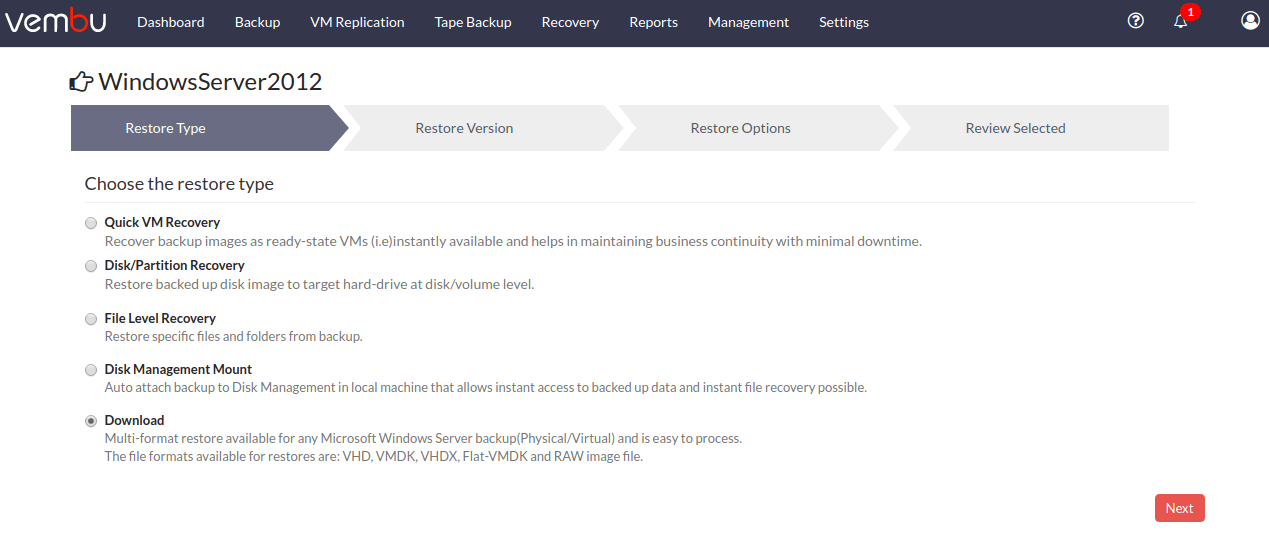
To cater to your different needs, Vembu offers multiple restore options. Here, you would like to virtualize your physical windows machine. To perform that you need to select the Download recovery option that is listed.
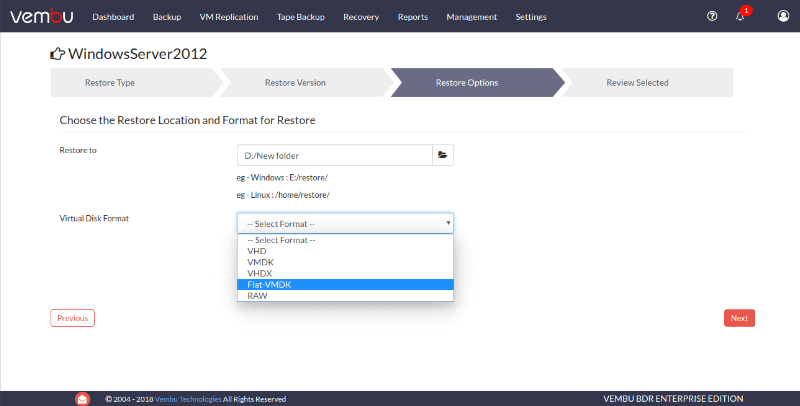
This option lets you download the backup data in any of the formats like VHD, VMDK, Flat.VMDK, VHDX, and RAW which is used to perform different migration processes.

Now you can select and download the required file format based on your requirement i.e, your target hypervisor’s file format where you would like to migrate your physical machine.
For example:
If you wish to migrate your windows machine to VMware environment, download your data in Flat.VMDK or VMDK format. Then, create a VM on VMware using the got virtual file format.

Here the process of migrating your physical machine to a virtual environment is similar to creating a new VM in the same.
Similarly, if you want to migrate your physical machine to a Hyper-V environment, then choose VHD (Generation-1 VM) or VHDX (Generation-2 VM) format and perform the restore.
Thus, based on your target hypervisor file format you can download the required virtual file format and can perform the migration.
Vembu has an efficient in-house file system called VembuHIVE which is the foundation of all the functionality that Vembu BDR provides, including data migrations.
Takeaways
Vembu BDR Suite provides migration tools as part of backup and disaster recovery solution, with which you can experience easy data migration across any environment.
Vembu BDR Suite is available in three different editions: Free/Standard/Enterprise.
Backup features & Restore options that are necessary to perform migration is available in all these editions. You can choose the edition type based on the functionalities that you would require.
Experience modern data protection with the latest Vembu BDR Suite v4.0.
Try the 30 days free trial here.
Got questions? Email us at vembu-support@vembu.com for answers.
Follow our Twitter and Facebook feeds for new releases, updates, insightful posts and more.


Leave A Comment