Read on:
AWS for Beginners: Understanding AWS Terminologies: Part 1
AWS for Beginners: What is AWS EC2: Part 2
AWS for Beginners: AWS Compute Services: Part 3
Read More
AWS Client VPN is a managed client-based VPN solution that enables you to securely access your AWS resources and resources in your on-premises network. With Client VPN, you can access your resources from anywhere using an OpenVPN-based VPN client. It will automatically scale up, or down, based on demand. It integrates with existing AWS services, including AWS Directory Service and Amazon VPC.
Architecture to follow
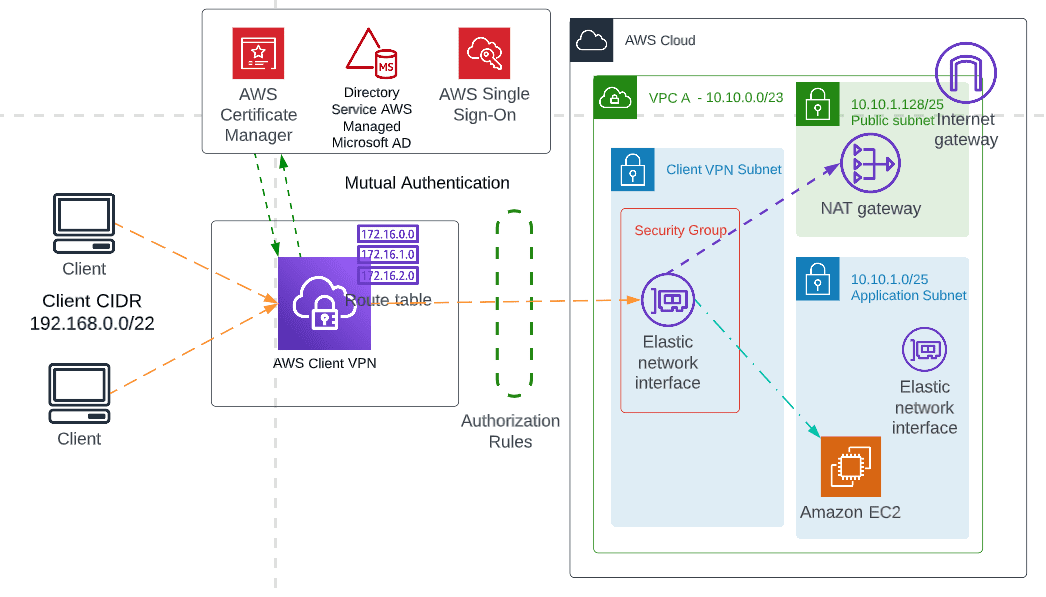
How Client VPN works
It’s a fully managed solution by AWS. All the back-end infrastructure for client VPN is managed by AWS. The working principle of client VPN is shown below:

Client VPN Authentication Options
Client authentication is implemented at the first point of entry into the AWS Cloud. It determines whether clients are allowed to connect to the Client VPN endpoint. If authentication succeeds, clients can connect to the Client VPN endpoint and establish a VPN session.
AWS Client VPN offers the following types of client authentication mechanism:
- Active Directory authentication (user-based)
- Mutual authentication (certificate-based)
- Single sign-on (SAML-based federated authentication) (user-based)
You can use one of the methods listed above alone, or a combination of mutual authentication with a user-based method.
In our demo, we are going to use the Mutual authentication (certificate-based) option.
Prerequisite
- AWS Account with required permission (Client VPN, Certificate Manager)
- 1 VPC – VPC A(10.10.0.0/23)
- 3 Subnets in VPC A
- Internet Gateway in VPC A, clients can also access the internet via AWS
- NAT Gateway in VPC A
- Application Instances in each VPC to check the connectivity over the client VPN
- CloudWatch log group for connection logging
- VPC A with CIDR
- Subnets for VPC A
- Application Instances in each VPC
- Internet Gateway in VPC A
- log group for connection logging


Steps to follow
- Generate server and client certificates and keys
- Create a Client VPN endpoint
- Associate a target network
- Add authorization rules for the VPC
- Provide access to the internet
- Verify security group requirements
- Create route association for Internet, Other VPCs over transit gateway
- Download the Client VPN endpoint configuration file
- Connect to the Client VPN endpoint
Deploying Client VPN solution with Transit Gateway
Generate server and client certificates and keys
We are using mutual authentication, Client VPN uses certificates to perform authentication between clients and the Client VPN endpoint. You will need to have a server certificate and key, and at least one client certificate and key. We will import the server certificate into AWS Certificate Manager (ACM) and specify when you create the Client VPN endpoint.
We will use the OpenVPN easy-RSA utility to generate server and client-side certificates. In Windows systems use gitbash or PowerShell, cmd may not work.
1. clone https://github.com/OpenVPN/easy-rsa.git
2. cd easy-rsa/easyrsa3
3. Initialize PKI environment — ./easyrsa init-pki
4. Create new certificate authority (CA) — ./easyrsa build-ca nopass
5. Generate the server certificate and key — ./easyrsa build-server-full server nopass
6. Generate the client certificate and key — ./easyrsa build-client-full client1.domain.tld nopass
7. Copy server and client certificates and keys to one directory
$mkdir ~/vpn
$ cp pki/ca.crt ~/vpn/
$ cp pki/issued/server.crt ~/vpn/
$ cp pki/private/server.key ~/vpn/
$ cp pki/issued/client1.domain.tld.crt ~/vpn/
$ cp pki/private/client1.domain.tld.key ~/vpn/
$ cd ~/vpn
8. Upload the server certificate to ACM
“aws acm import-certificate — certificate fileb://server.crt — private-key fileb://server.key — certificate-chain fileb://ca.crt — region ap-south-1”
“aws acm import-certificate — certificate fileb://client1.domain.tld.crt — private-key fileb://client1.domain.tld.key — certificate-chain fileb://ca.crt — region ap-south-1”
Create a Client VPN endpoint
Navigate to the VPC section in the AWS Management Console, and choose Client VPN endpoints from the left navigation panel. Click on create client VPN endpoint.
Enter a name, description, and Client IPv4 CIDR(address range must be between /12 and /22 CIDR block size).
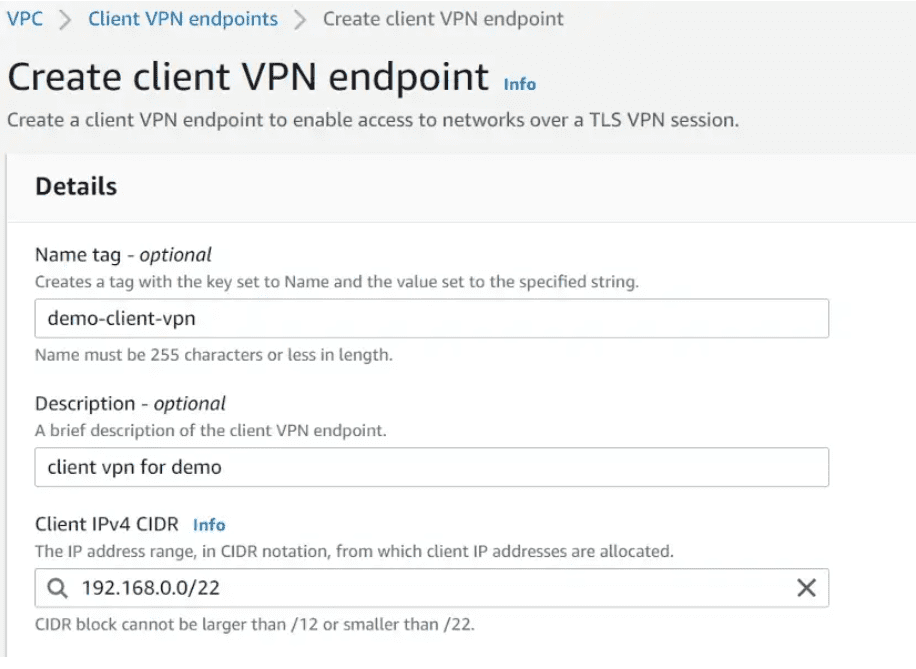
In the next section, we will provide authentication information(click mutual authentication) which we created earlier and uploaded to ACM.
For connection logging, enable log details on client connections and choose the cloudWatch logs log group name.
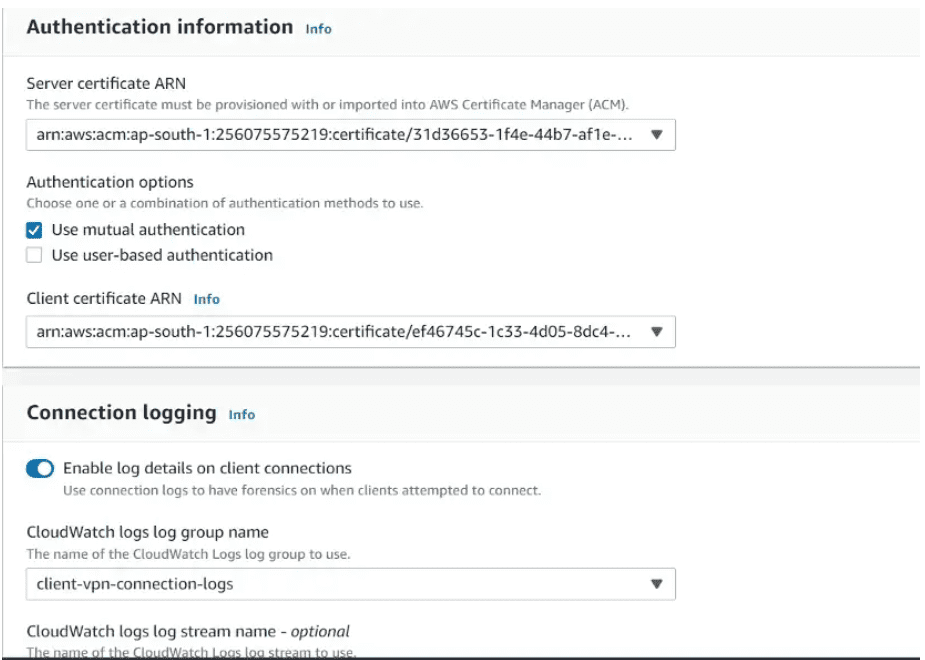
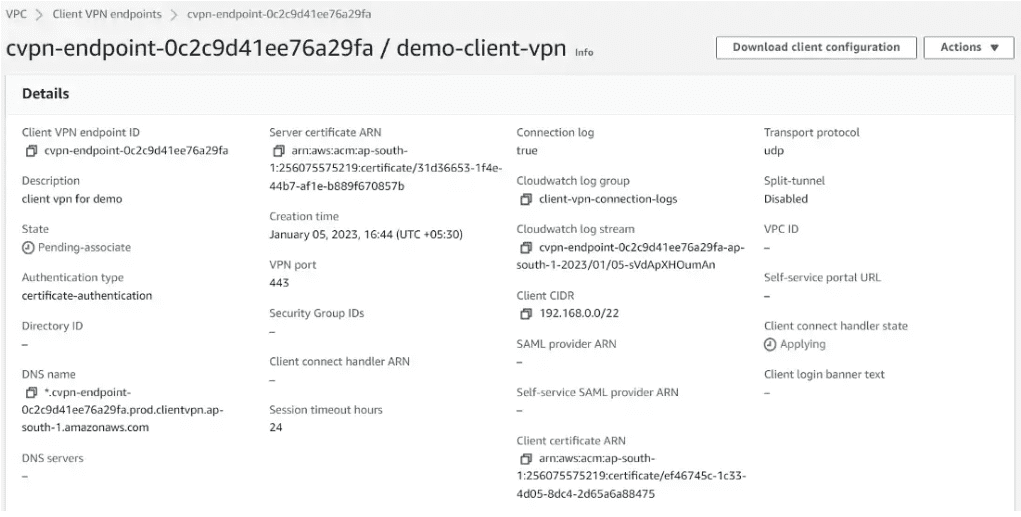
Keep the rest parameter as default and click on create client VPN endpoint.
Split-tunnel: by default split-tunnel is disabled. All traffic from the client device is routed over the VPN tunnel. you need to enable it when you want your specific traffic to route over the VPN tunnel.
Associate client VPN endpoint to a target network
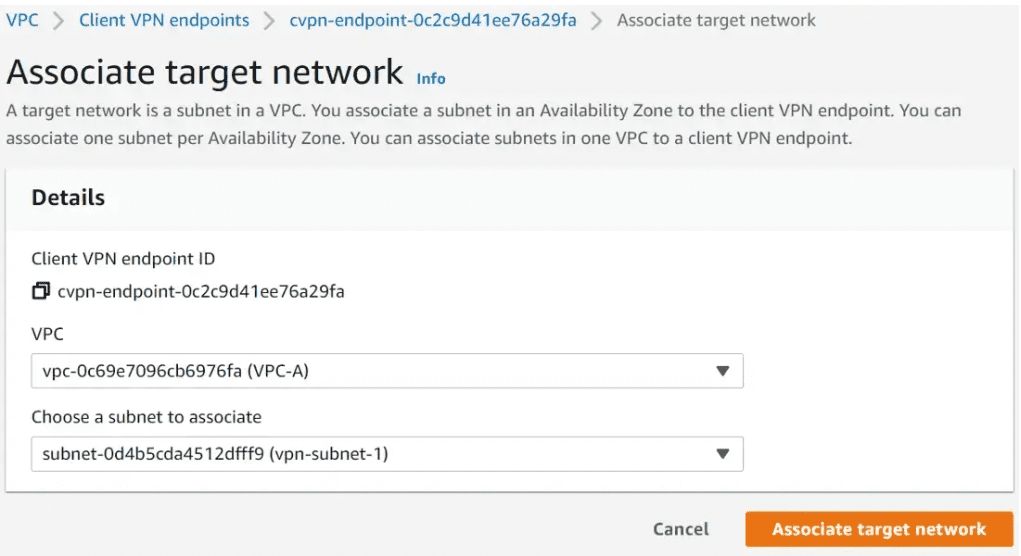
You can associate one or more target networks (subnets in your VPC) with a client VPN endpoint.
Under Client VPN endpoints, Click on Associate target network. Choose the VPC and subnet to associate.

Add authorization rules for the VPC
Authorization rules act as firewall rules that grant access to networks. Authorization rules will help specific clients access to the specified network. For each Network we have to add authorization rules.
Under Client VPN endpoints, Click on Add authorization rule. Provide the destination CIDR(VPC A), and leave all other options as default.
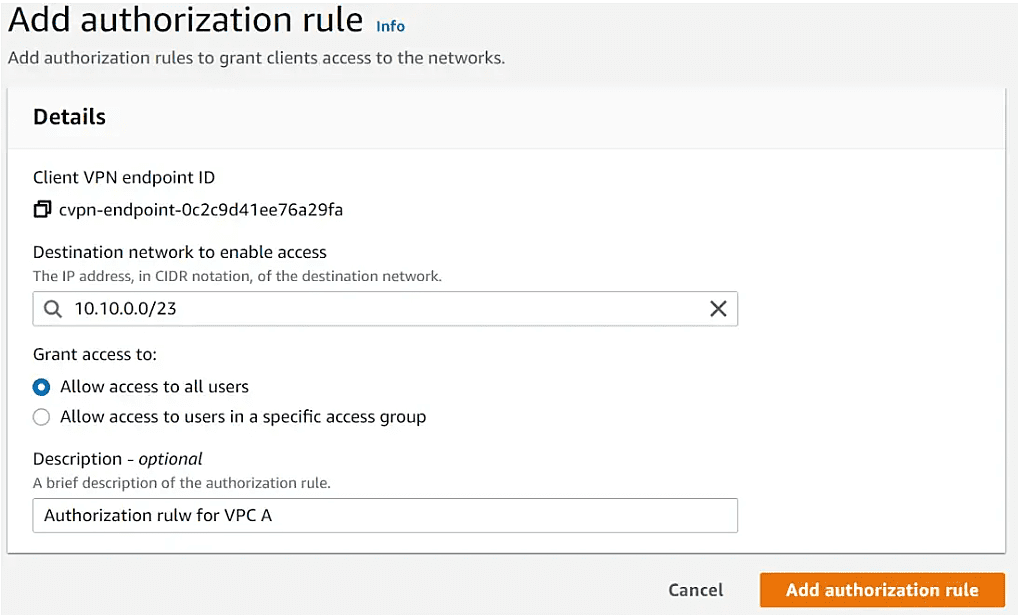
If you want to add any other VPC or Network to be communicated over VPN, then add authorization rules like above.

Provide access to the internet
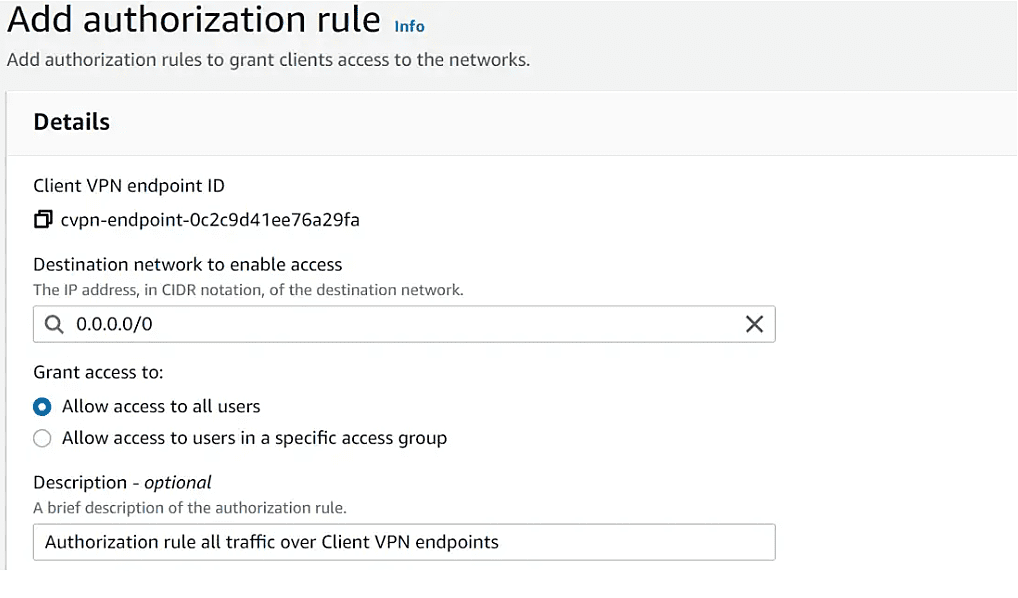
for Internet traffic access over the client VPN endpoint, you need to add an authorization rule for 0.0.0.0/0 and create a NAT gateway in your VPC for internet access. We will wait to add this rule as we want to test VPC destination traffic from Clients over client VPN endpoints.
Verify security group requirements
When you create a client VPN endpoint, you can specify the security groups from a specific VPC to apply to the client VPN endpoint.

I have added a default security group. But you can limit the security rules with desired ports.
Create route association for Internet, Other VPCs over transit gateway
Each client VPN endpoint has a routing table that describes the available destination network routes. When you associate a subnet from a VPC with a client VPN endpoint, a route for the VPC is automatically added to the client VPN endpoint’s route table. To enable access to additional networks, such as peered VPCs, on-premises networks, or the internet, you must manually add additional routes to the endpoint’s route table.
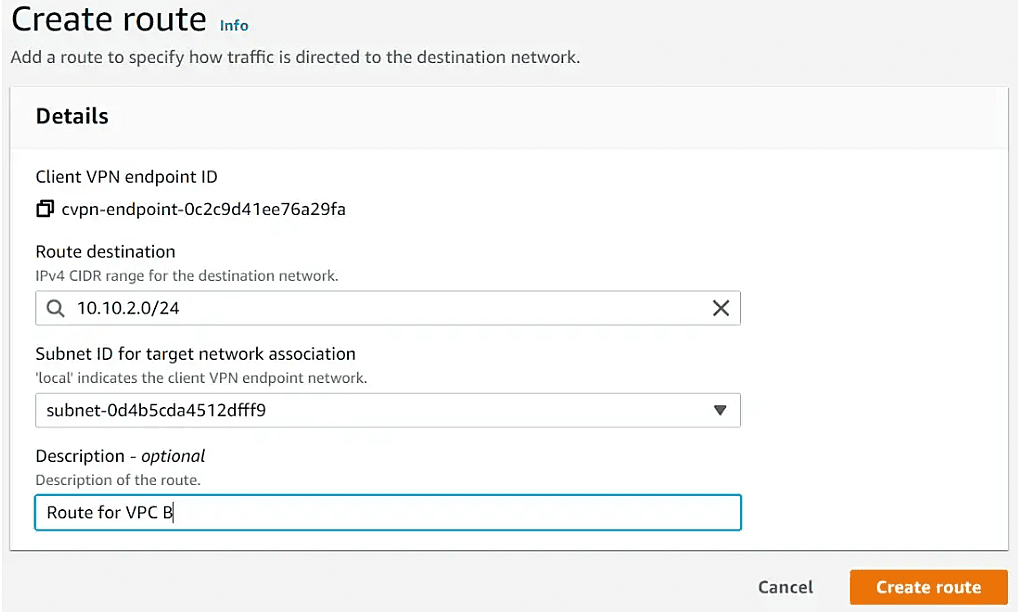
We created the client VPN endpoint in VPC A. VPC A CIDR is already added in the Route table. If you want to add any other VPC or Network to be communicated over VPN, then add a route like below.
Provide the CIDR for VPC B and choose the subnet of VPC A as the traffic will flow over the transit gateway attachment.

Download the Client VPN endpoint configuration file
Now the infrastructure is ready. Now download the client configuration

Keep the client certificate ready that we created earlier.
Open the configuration file with any editor and add the following lines
cert /path/to/client1.crt
key /path/to/client1.key
or
— — -BEGIN CERTIFICATE — — –
***Paste Your Cert Text Here***
— — -END CERTIFICATE — — –
— — -BEGIN PRIVATE KEY — — –
***Paste Your Cert Private Key Here***
— — -END PRIVATE KEY — — –
Also, modify the endpoint DNS name by adding a random prefix
Original: cvpn-endpoint-0c2c9d41ee76a29fa.prod.clientvpn.ap-south-1.amazonaws.com
Modified: xxxxxx.cvpn-endpoint-0c2c9d41ee76a29fa.prod.clientvpn.ap-south-1.amazonaws.com
Download OpenVPN Client from https://openvpn.net/community-downloads/
Import the edited VPN configuration file in the OpenVPN client. Click on browse and import the configuration file. The VPN will automatically connect.
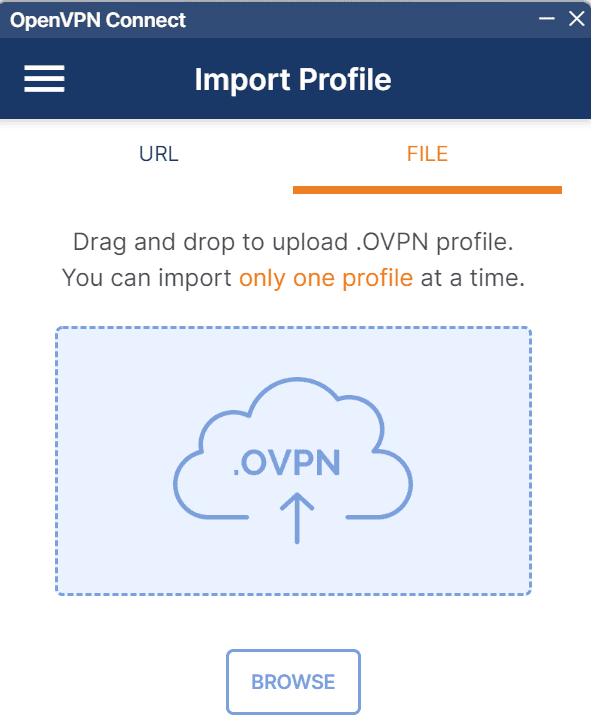
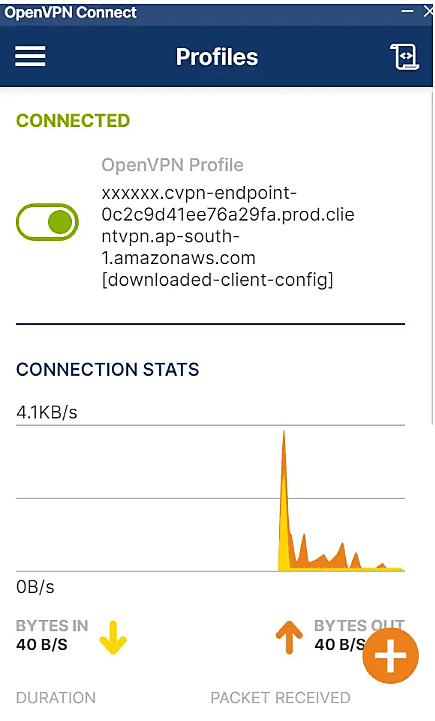
Navigate to the connection section under the Client VPN endpoint – you will see the active and history of connections. The client is getting IP from the VPN CIDR range which is 192.168.0.0/22.


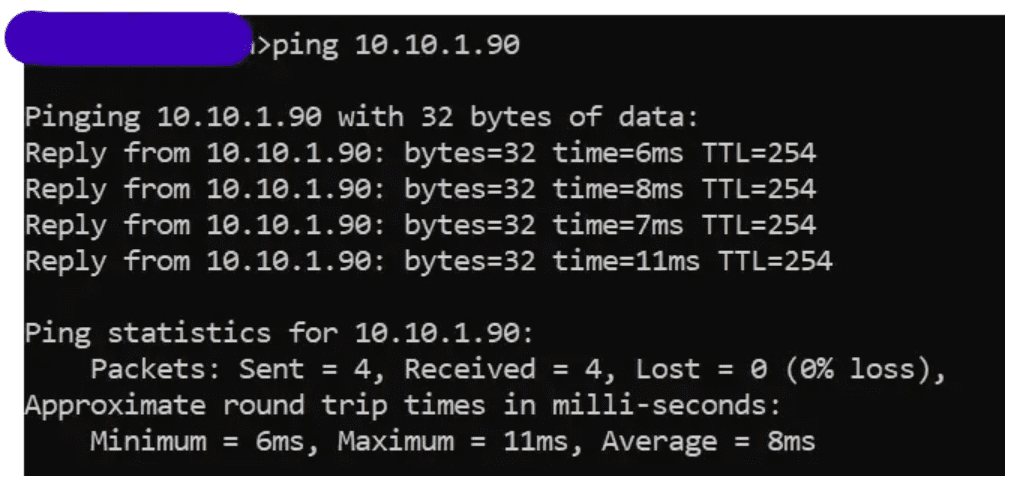
Test the Application instance in VPC A. Try to ping the Application instances created earlier. The client VPN is deployed in VPC A We can ping all the instances in each VPC over the Client VPN endpoint.
VPC A Application Instance IP: 10.10.1.90
Conclusion
We saw it’s easy to deploy an AWS Client VPN. It also took a few hours to set up the whole architecture. It’s always better and easy compared to a self-managed or third-party Client VPN solution. Using a single Client VPN endpoint we can connect multiple EC2 Instances hosted in different VPCs. Using Transit gateway it makes simple to connect different VPCs. You can include more security features by using proper security rules in security groups and AD groups.
AWS for Beginners: How to Protect AWS Security Tools: Part 4
AWS for Beginners: What is IAM (Identity and Access Management) and Best Practices: Part 5
AWS for Beginners: Provisioning IAM Users and Programmatic Access in AWS: Part 6
AWS for Beginners: Securing Root account using MFA: Part 7
AWS for Beginners: Amazon S3 Overview, Security and Best Practices : Part 8
AWS for Beginners: Creating and managing IAM groups: Part 9
AWS for Beginners: AWS Managed Policies and In-line Policies: Part 10
AWS for Beginners: Create and Attach a policy to an IAM User: Part 11
AWS for Beginners: How to Create a Customer Managed Policy: Part 12
AWS for Beginners: What are EC2 Placement groups: Part 13
AWS for Beginners: ALB vs NLB vs GLB – Which AWS Load Balancer Should You Choose: Part 14
AWS for Beginners: What is AWS Elastic IP Address: Part 15
AWS for Beginners: How to add secondary IP to EC2 Instance using Elastic Network Interfaces (ENI): Part 16
AWS for Beginners: How to Enable Multi-Attach for Amazon EBS Volumes: Part 17
AWS for Beginners: How to encrypt an unencrypted AWS EBS root volume: Part 18
AWS for Beginners – What is Application Load Balancer and How it Works: Part 19
Follow our Twitter and Facebook feeds for new releases, updates, insightful posts and more.


Leave A Comment