Full VM Recovery
Case 2: Permanently restore backed up VM
With the Full VM Recovery option, users can restore the virtual machine to the same or different Hyper-V server. Full VM Recovery is a permanent recovery process where the backed up virtual machine will be permanently restored to the target Hyper-V server.
Procedure
Step 1: Choose the Recovery Type
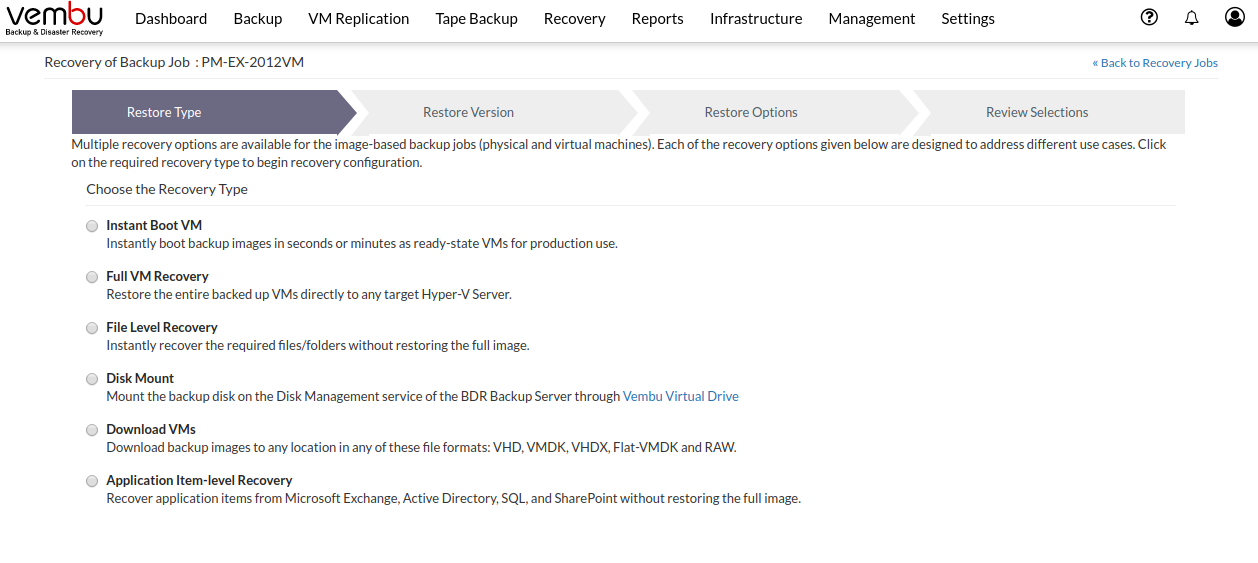
- Click the Recovery tab and select the restore icon near the Hyper-V backup that is to be restored. Select Full VM Recovery as the Restore type and click Next.

Step 2: Choose the Restore point
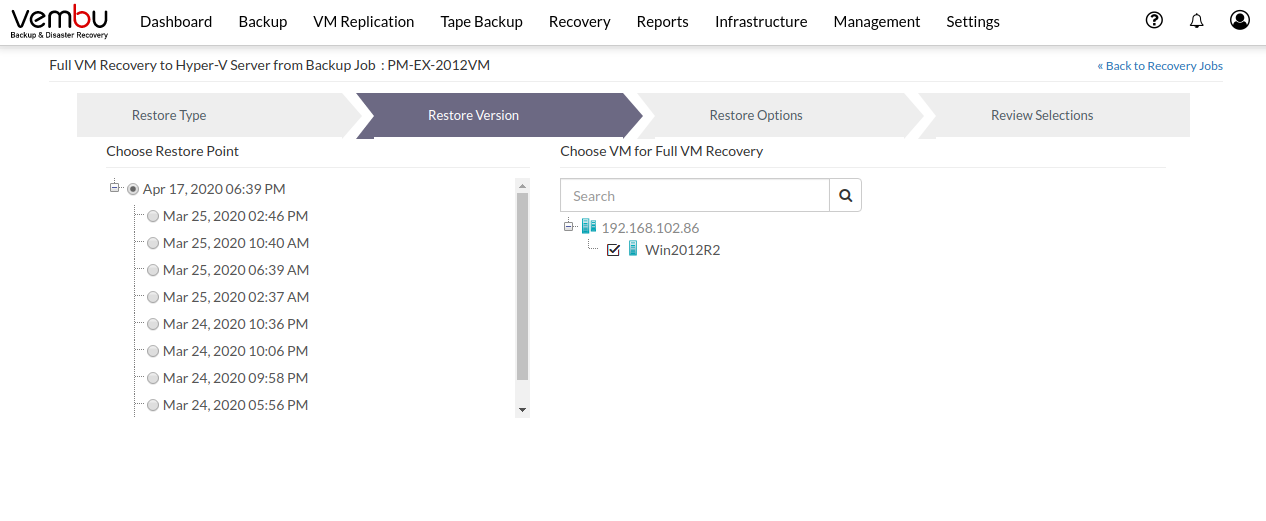
The restore version is created based on the time period (i.e the date and time) when the backup process is configured, where the full backup and incremental backup timestamp is viewed in form of the hierarchical tree structure. You can select the full backup timestamp for restore as well as the individual incremental timestamp version for the restore process. On selecting the full backup version, only the data of the full backup version is restored.
- The regular routine of the restore process is of selecting the timestamp version they wish to restore and click Next to proceed
- On selecting the restore point, its appropriate data to be restored is displayed
Step 3: Choose VM for Full VM Recovery
In this section, select the VMs you want to restore.
To select the restore data, expand the host node. You will be allowed to select a single VM or multiple VM’s for the restore at a time.
- If you have configured only a single VM in this backup then it will display the backed up VM for restore
- If you have configured an entire host in this backup, then it will list all the successfully backed up VM’s under the host in a tree structure. You can select the VM’s that you want to recover from the list
- You can also enter the VM name for quick search in the search field
Once you have selected the restore data, Click Next to proceed with restore options.

Step 4: Configure Target Server
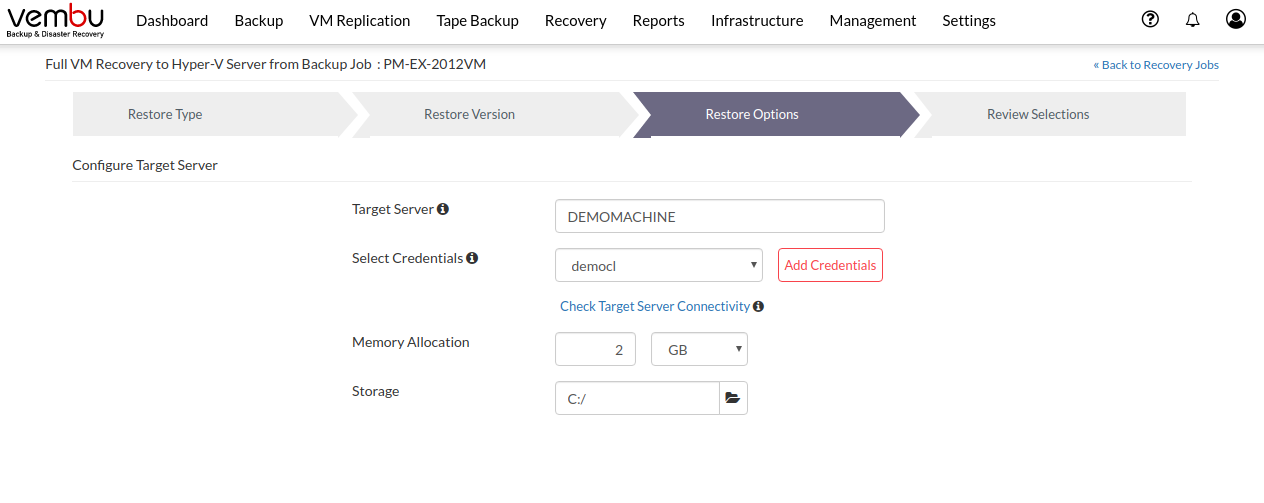
In this step, you need to enter or select the target server details to perform the Full VM Recovery.
- Now select the Credentials from the list and click the Check Target Server Connectivity option to check the connection between the Vembu BDR Backup Server and Target Hyper-V host.
- If it’s a new Hyper-V host, then Click Add credentials and enter the target host credentials in the respective fields of the credentials manager pop-up window and save the host credentials.
- You need to allocate the RAM size for the VM (By default, set to 2 GB)
- Choose a location where the VHD/VHDX file(required for live recovery) will be downloaded


- This option allows you to check whether the Vembu Integration Service agent is installed in the Target Hyper-V host or not. If the VIS agent is installed you will get an alert window stating 'Vembu Integration Service' agent is already installed on the remote host. Click OK to proceed with the restore.

- If the VIS agent is not installed, you will be asked to install the agent, click ok to install the VIS agent to proceed with the restore.

Make sure the provided location have read/write access |
- Click Next to proceed with the restore
|
Step 5: Review recovery configuration
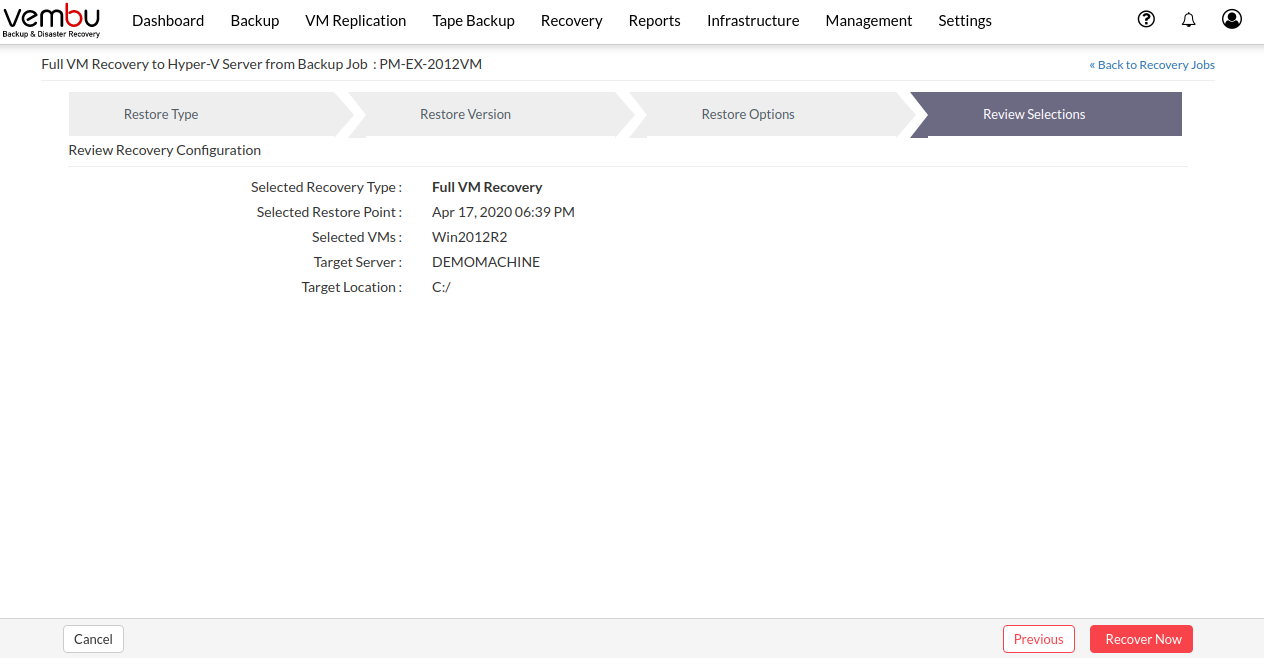
- Once done configuring the recovery job, the final step will be to review all your configurations before proceeding to trigger the restore. The page lists the Selected Recovery Type, Selected Restore Point, Selected VMs, Target Server and Target Location

- Once done reviewing, click Recover Now to proceed with Full VM Recovery
- You will be redirected to the recovery page once the restore process is completed
- You can view the status of the Restore from the 'Status' option. Once you click the inverted triangle, the below page will be displayed
The following details will be available in the Restore Progress Page window
- Backup Schedule: The Backup schedule name mentioned by you for indicating the backup during restore progress
- Client Name: The name of the client from which the backup process is initiated
- Total Files: The number of files present in the selected backup
- Transfer Rate: Speed of the restore process
- Bytes transferred: Rate at which the backup data is restored (Bytes, KB, MB, GB)
- Files Restored: Number of files restored during the process of recovery
- Time Left: Time remaining for the restore to complete
- Abort: You can abort your restore if not required from the 'Abort' (-) option available in that window. You will get a pop up as shown below. Click Ok to Abort your Restore
- Suspend: You can suspend your restore if not required from the Suspend option available in that window. You will get a pop up as shown below. Click Ok to Suspend your Restore

- You have the option of aborting the restore process. From the Recovery page click the Abort Server Side Restore option, this will open a pop-up window as displayed below. Click Yes to abort the restore.

- Or Open the restore progress window and click the Abort (-) option which will open a pop-up window displayed below. Click OK to abort the restore process.
