Instant Boot VM
Quick VM Recovery
Instant Boot VM option allows you to instantly access the backup image as a ready state VM in their production environment with minimal downtime (i.e) Minimal downtime and business continuity secured by making VMs instantly available. Instant Boot VM gives 3 choices of instant boot software to users:
- VMware (Available in both Windows and Linux servers as an alternate software for instant boot)
- Hyper-V (Default chosen software for Windows and available only on Windows servers)
- KVM (Default chosen software for Linux and available only on Linux servers)
- During any disaster, Users would like to bring back their critical VM's immediately into production. As previously said, Instant Boot VM gives a user the privilege to access their backup data instantly. Using Instant Boot VM, user can boot their virtual machine into different virtual environments such as VMware, Hyper-V, and KVM
- Moreover, users can directly boot the VM into their native host or to any virtual platform and check whether the Guest OS and application are working properly
Procedure
Step 1: Choose the Recovery Type
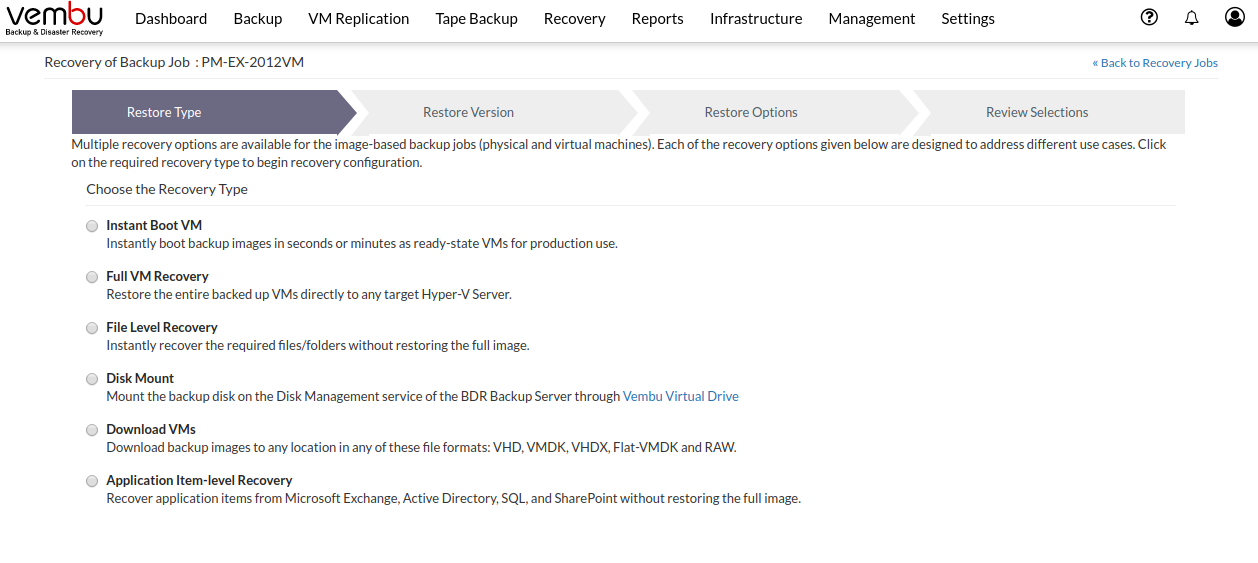
- Click the Recovery tab and select the VM that is to be restored. Select Instant Boot VM as the Restore type and click Next.

Step 2: Choose the Restore Point
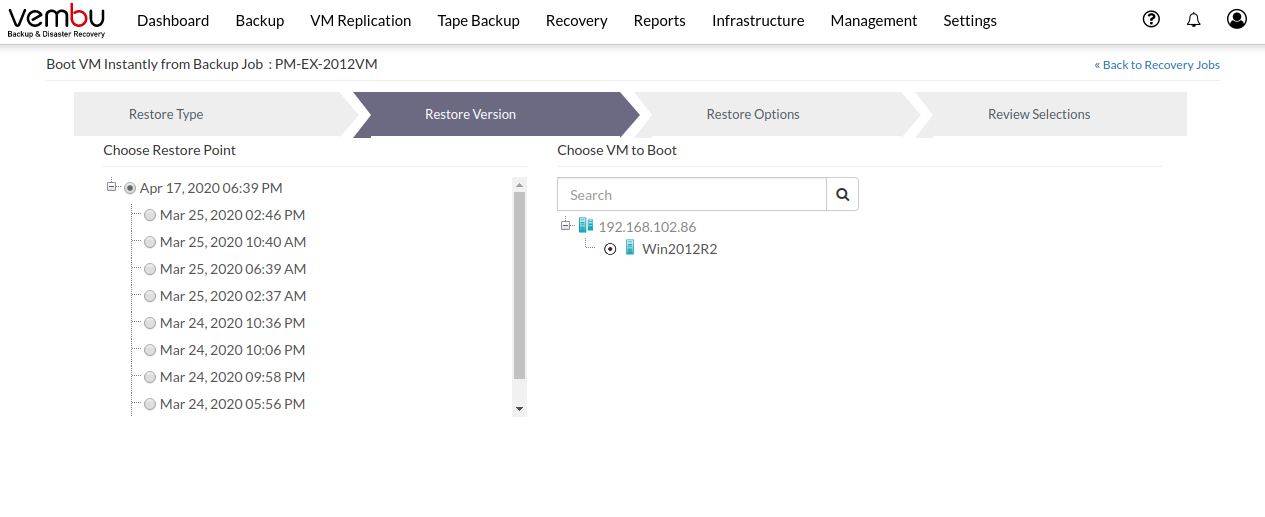
The restore version is created based on the period (i.e the date and time) when the backup process is configured, where the full backup and incremental backup time-stamp is viewed in form of the hierarchical tree structure. You can select the full backup time-stamp for restore as well as the individual incremental time-stamp version for the restore process. On selecting the full backup version, only the data of the full backup version is restored.
- The regular routine of the restore process is of selecting the time-stamp version they wish to restore and click Next to proceed
- On selecting the restore point, its appropriate data to be restored is displayed
Step 3: Choose VM to Boot
In the restore data section, select the VM that you want to restore.
To select the restore data, expand the host node. You will be allowed to select only one VM for the restore at a time.
- If you have configured only a single VM in this backup then it will display the backed up VM for restore
- If you have configured an entire host in this backup, then it will list all the VM’s under the host in a tree structure. You can select the VM that you want to recover from the list
- You can enter the VM name for quick search in the search field
Once you have selected the VM, Click Next to proceed with restore options.

Step 4: Choose the Target Hypervisor to Instantly Boot VM
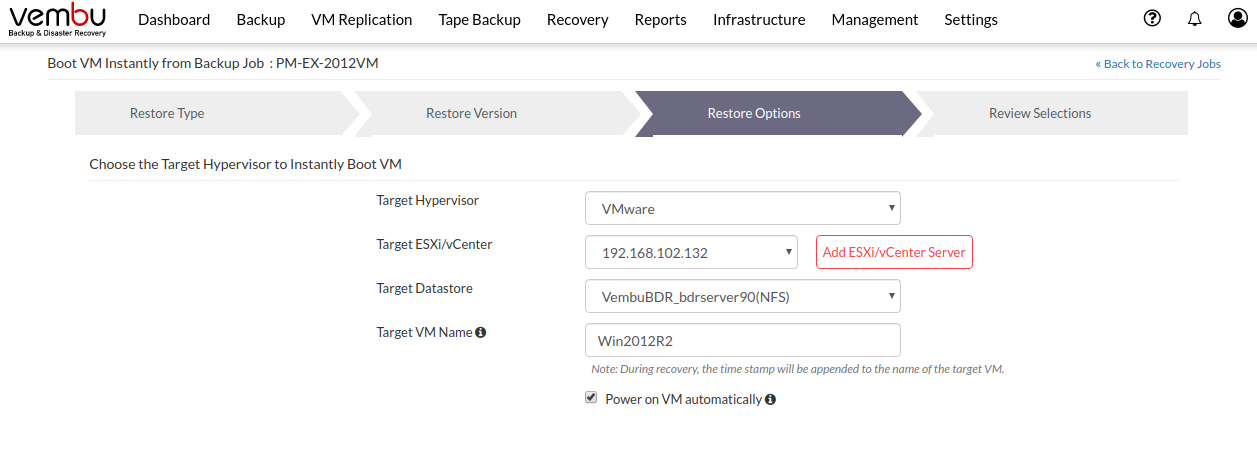
- The next step will be to choose the environment in which the Instant Boot VM is to be performed.
- Depending upon the target hypervisor where the VM needs to be booted, the restore options vary. In the target hypervisor drop-down list select any one from the following:
- VMware
- Hyper-V
- KVM
Restoring to a target VMware Server
- Select VMware from the drop-down list and the target VMware Server in which the VM is to be booted. If the target VMware Server is not displayed in the drop-down list, click Add VMware Server option. Enter the Hostname/ IP Address of the VMware Server, select a credential from the list or add a new credential using the Add Credentials option.

- Click here to read more about adding credentials. Click Add to save the provided credentials.
If you configure a port number that is already taken, you will get the message: "Network connection timed out. Invalid VMware Server IP or Invalid Port." |
If you have entered an ESXi host IP, then you will be asked to select the target datastore location.
- In the Target datastore field, list of datastore available in the ESXi host will be listed select the target datastore using the drop-down list
If you have entered the vCenter server address, then you will be asked to select the Target ESXi host in which you want to restore the VM
- In the target ESXi host field, select the target ESXi host using the drop-down list. Once you have selected the ESXi host you will be asked to select the target datastore
If the added server is a vCenter Server, select the Target Host Name from the list of ESXi hosts |
- In the Target datastore field, list of datastore available in the ESXi host will be listed select the target datastore using the drop-down list
In the VM name field, you can change the virtual machine name to identify the VM in the Target ESXi host or vCenter.
You can also specify whether the VM should be powered ON automatically in the Target ESXi host or vCenter server after the completion of recovery.
Only [a-z][A-Z][0-9][ - _ ] characters are allowed in the VM name to be created |
Restoring to a target Hyper-V Host
- From the target hypervisor drop-down list, select Hyper-V.

Make sure you enable Hyper-V role in the backup server, else you will get the warning: Error: Hyper-V role is not enabled in this server to do Instant Boot VM. Please enable Hyper-V role and then try again |
Restore to a KVM Host
If you have backed up multiple VMs, you can restore only one VM at a time using the Instant Boot VM option |
- From the target hypervisor drop-down list, select KVM

Step 5: Review Recovery Configuration
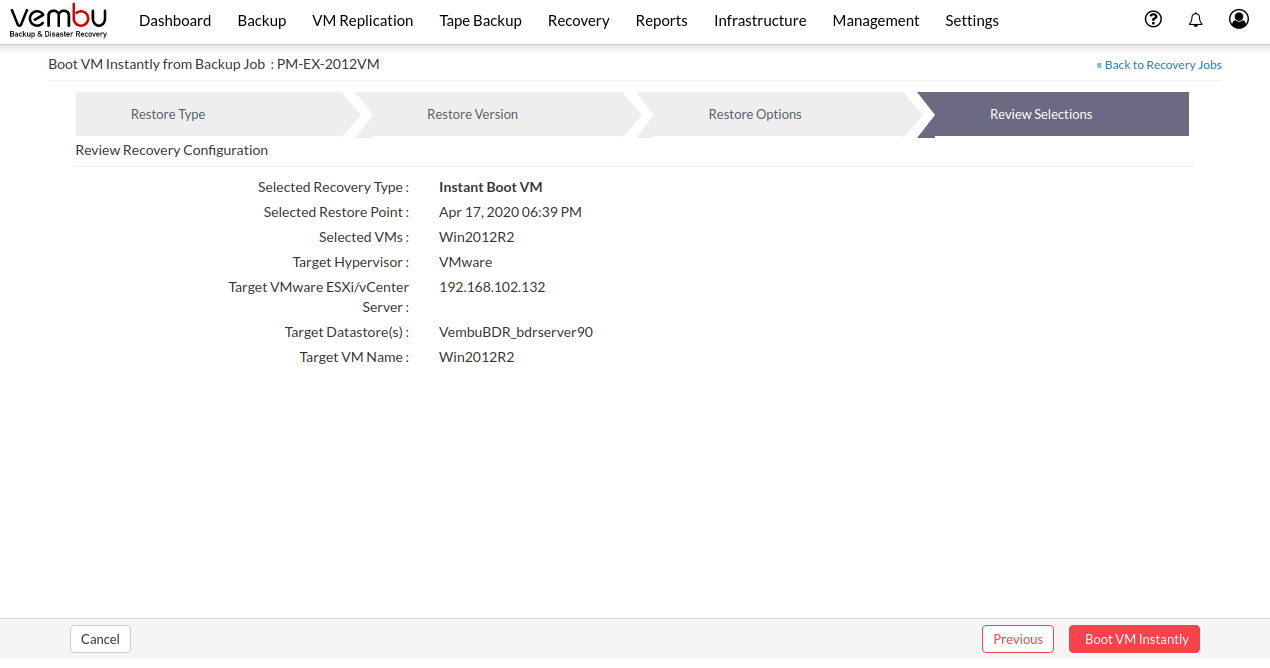
- The final step in this restore process is to review the configurations you have selected.
- Check the following:
- Selected Recovery type
- Selected Restore point
- Selected VMs
- Target Hypervisor
- Target Server IP address
- Target Datastore
- Target VM Name
- Verify all the details and click Boot VM Instantly. This will trigger the Instant Boot VM restore process.

Once done with the requirement, shutdown and turn off VM before unmounting backup data. This will resume the backup job so that incremental will run as per schedule |
- You will be redirected to the recovery page. From the 'Status' tab, click the arrow mark which will open the restore progress window.
- The following details will be available in the restore progress page:
- Backup Schedule
- User Name
- Current File
- Total Files
- Transfer Rate
- Files Restored

To enhance the restore performance, close the restore progress window and open it occasionally to check the restore progress |
- You have the option of aborting the restore process. From the Recovery page click the Abort Server Side Restore option, this will open a pop-up window as displayed below. Click Yes to abort the restore.

- Or open the restore progress window and click the Abort (-) option which will open a pop-up window displayed below. Click OK to abort the restore process.

