Instant Boot VM
Instant Boot VM
- In some scenarios, you might require instant access to your Physical Machines or VMs after a crash. Instant Boot VM provides that option.
- Instant Boot VM restores your Physical Machines instantly by reading the backup data in an encrypted state from the storage repositories. Once the data is read, Vembu proceeds to create VHD, VHDX, VMDK, and IMG disks in the VembuVirtualDrive without occupying any physical storage. By using this VMDK, VHD file present in the Vembu Virtual Drive, Vembu creates a VM in the ESXi host/Hyper-V instantly. When the VM is booted and in a ready to use state, the changes that occur after this will be stored in a separate virtual disk file.
- Instant Boot VM ensures minimal downtime and RTO for less than 15 minutes.
You can choose to boot your backed up VM in any of the following hypervisors:
- VMware (Available in both Windows and Linux servers as an alternate software for instant boot)
- Hyper-V (Default software chosen for Windows and available only on Windows Backup servers)
- KVM (Default software selected for Linux and available only on Linux servers)
is only possible if the backed-up disk is a System bootable disk |

Procedure
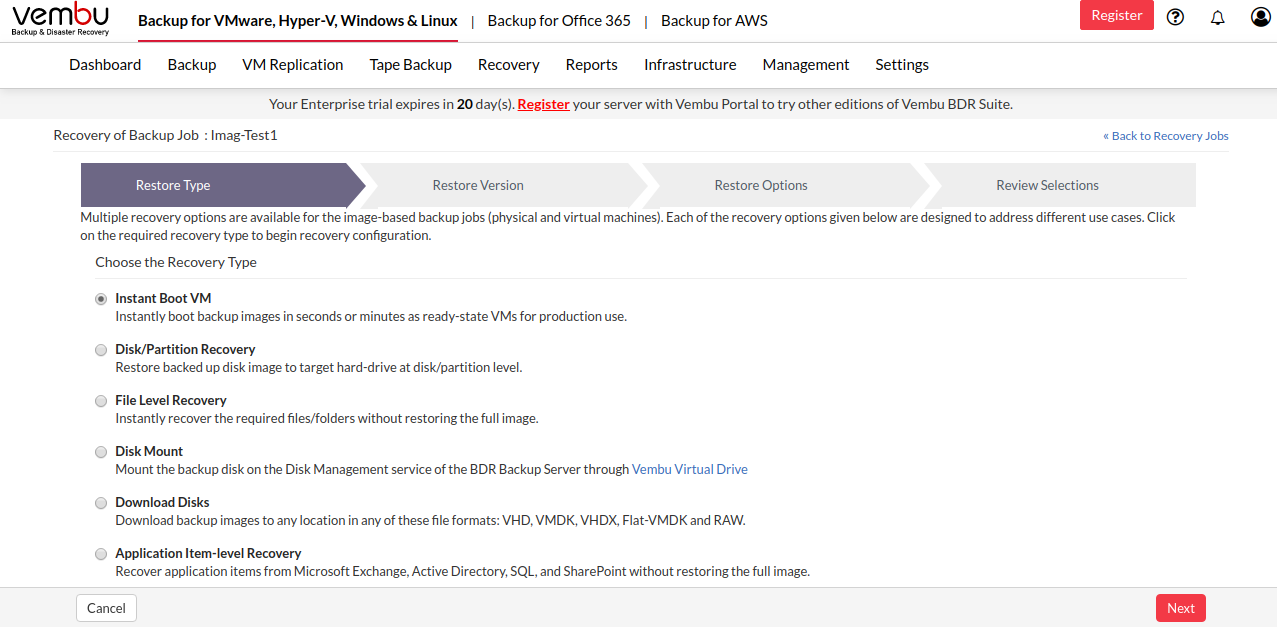
Step 1:Choose Restore Type
Login to BDR Backup Server installed in a Windows/Linux machine environment and click the Recovery tab. Select the desired backup job that has to be restored and choose Instant Boot VM as the restore type.
- Click Next to proceed with the restore process.
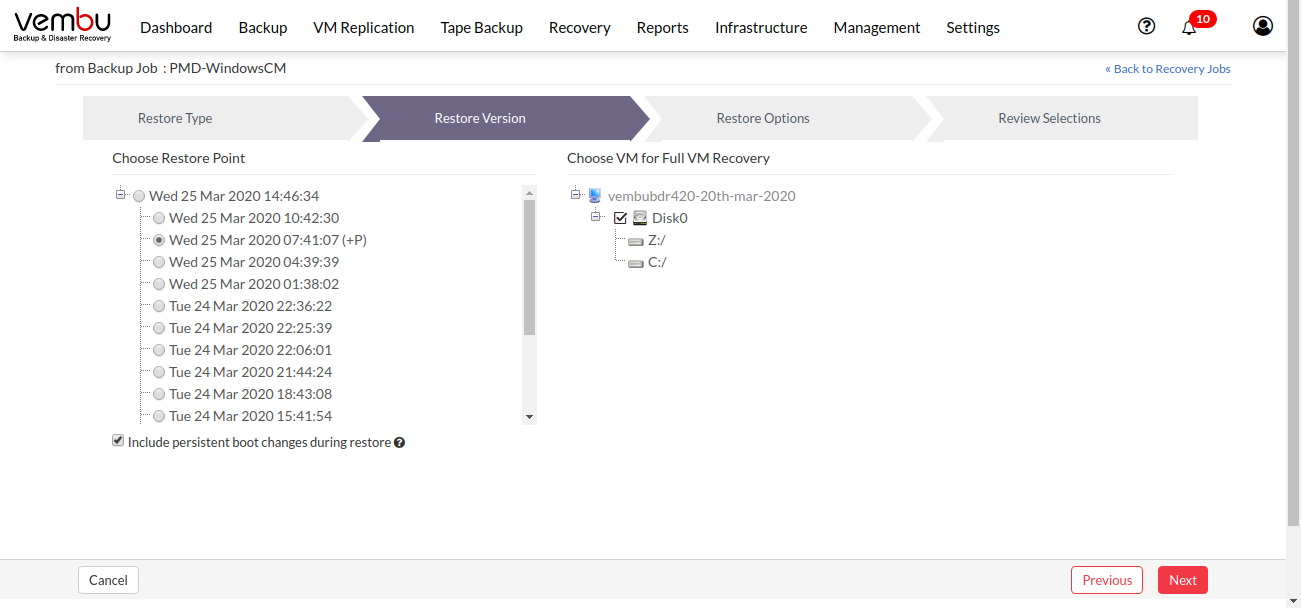
Step 2: Choose a Restore Point
- Select the restore version for the restore process. The restore version is created based on the end time of the backup (i.e the date and time when the backup process scheduled is completed), this is named as Recovery points. The full backup and incremental backup time-stamps are listed with the latest backup version as a parent node and old backup version further sub-nodes. You can fall back to the required time-stamp whenever needed to recover the backed up data.
- If you have configured Additional full backups, then separate restore version time-stamp is created for each full backups with another tree structure.
- If the restore time-stamp version is denoted with symbols (d), (w), (m), (+P) at the end, indicates that the Daily Merge (d), Weekly Merge (w), Monthly Merge (m), and Persistent boot changes (+P) process has taken place on the version. Here (d), (w), (m) restore version specifies the merge process has done on the recovery point and Persistent boot changes (+P) specifies the Instant Boot VM process has been done for that version.
- If you select Restore version time-stamp with (+P), you have to enable Include persistent boot changes in restore option to include the changes done during the previous boot restore process. If you don't enable the check-box, then the changes will not be included in the selected recovery process.
- You can select the full backup time-stamp for restore as well as the individual incremental time-stamp version for the restore process. On selecting the full backup recovery point, only the data of the full backup version is restored.
You can enable only one time-stamp for restore at a time |
Step 3: Choose the Disk/Drive to Restore
- Choose the disk/drive that you wish to restore. You will be allowed to select only a bootable drive for the restore in Instant Boot VM recovery.
- If you have configured disks with multiple drives for backup, you cannot recover all the drives in the disk using Instant Boot VM recovery option.
- After selecting the disk/drive to restore click ‘Next’ to proceed further
Only drives that have System-bootable OS in the backup will be displayed for Instant Boot VM |
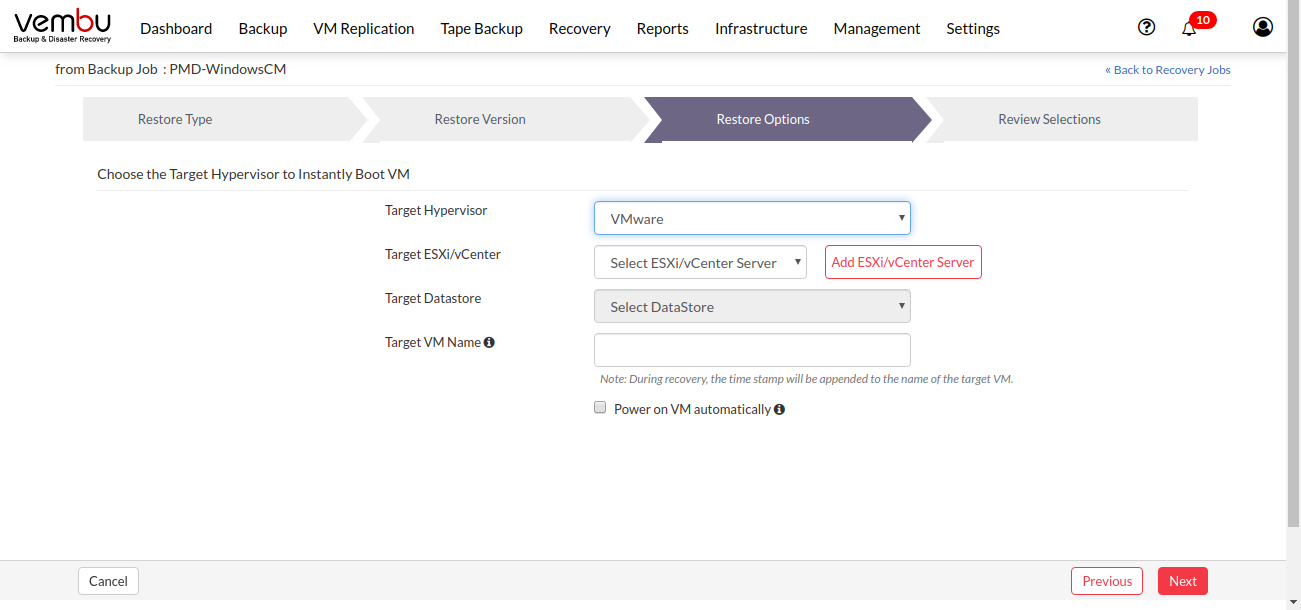
Step 4: Choose the Target Hypervisor
- Choose a Target Hypervisor to instantly boot the backup data as a VM.
- Select any one of the following hypervisor environments from the drop-down:
- VMware
- Hyper-V
- KVM (Applicable for BDR Backup Servers running on Linux)
- Depending on the target hypervisor, the restore options vary
Restore to VMware Hypervisor
- Select VMware from the drop-down list and the target VMware Server in which the booting must take place.
- If the Target ESXi/vCenter is not displayed in the drop-down list, then click Add ESXi/vCenter Server option to add a new ESXi/vCenter Server.
- Enter the Hostname/ IP Address of the VMware Server, select a credential from the list or add a new credential using the Add Credentials option.
If you configure a port number that is already taken, you will get the message: "Network connection timed out. Invalid VMware Server IP or Invalid Port." |
If the added server is a vCenter Server, select the Target Host Name from the list of ESXi hosts |
- In the Hostname/IP address field enter the IP address of ESXi host or the Domain name
- Enter the Username and Password of the specified ESXi host in the respective fields
- Port: Default port number for ESXi communication is 443. If you have a different port number configure it.
- To know more about adding credentials, click here. Click Add to save the provided credentials.
If you configure a port number that is already taken, you will get the message: "Network connection timed out. Invalid VMware Server IP or Invalid Port." |

If you have entered an ESXi host IP, then you will be asked to select the target datastore location.
- In the Target Datastore field, the available datastore in the ESXi host will be listed. Using the drop-down list, select the target datastore to which the VM will be added.
- If you have entered the vCenter Server address, then you have to select the Target ESXi host IP address in which you want to restore the VM.
- In the Target Datastore field, the available datastore of the added ESXi/vCenter host will be listed. Using the drop-down list, select the target datastore to which the VM should be added.
- Provide a Target VM Name. This is the name with which your VM will be created in the datastore you have configured. Enter the unique VM name, that you can identify easily in the selected target host.
Only [a-z][A-Z][0-9][ - _ ] characters are allowed in the VM name to be created |
- Enable the Power on VM automatically option if you want your restored VM to be powered ON automatically and click Next to proceed with the restore process. Once you are done with the restore options, click Next to proceed with Review selected window.
6 GB RAM will be assigned by default for VMs booted via VMware ESXi in Instant Boot VM |
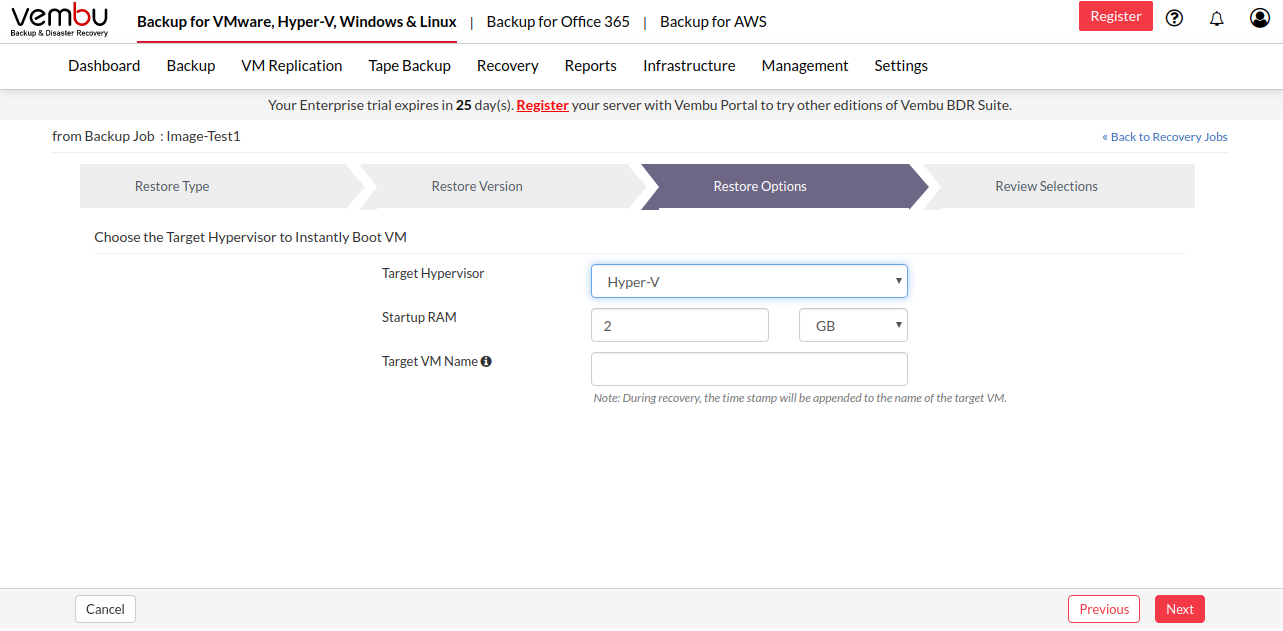
Restore to Hyper-v Hypervisor
- You can choose the software as Hyper-V (If your backup server runs on Windows).
- On selecting Hyper-V as your booting software, the Startup RAM size by default is 2 GB which can be modified based on your requirement.
- Provide a Target VM Name for the machine that is to be restored
- Once done click Next to proceed with the restore process.
If you assign a higher physical memory (RAM) than the free memory currently available on your server the Quick Recovery may fail |
Restore to KVM Hypervisor
If you have backed up multiple VMs, you can restore only one VM at a time using the Instant Boot VM option |
- You can choose the software as KVM (If your backup server runs on Linux-Ubuntu).
- On selecting KVM as your booting software, the Startup RAM size by default is 2 GB which can be modified based on your requirement.
- Provide a Target VM Name for the machine that is to be restored
If you assign a higher physical memory (RAM) than the free memory currently available on your server the Quick Recovery may fail |
- Once done click Next to proceed with the restore process.

Limitations
- If the KVM has EFI boot, the boot process will not occur in Instant Boot VM.
- If the backed up Disk Size is more than 2TB, then the boot process is not possible.
Step 5: Review Recovery Configuration
- Once done configuring the recovery job, the final step will be to review all your configurations before proceeding to trigger the Restore. Check the following:
- Restore type
- Restore version
- Selected Disk/ Drive(s)
- Booting software
- Target VMware Server IP
- Target Datastore
- Target VM Name
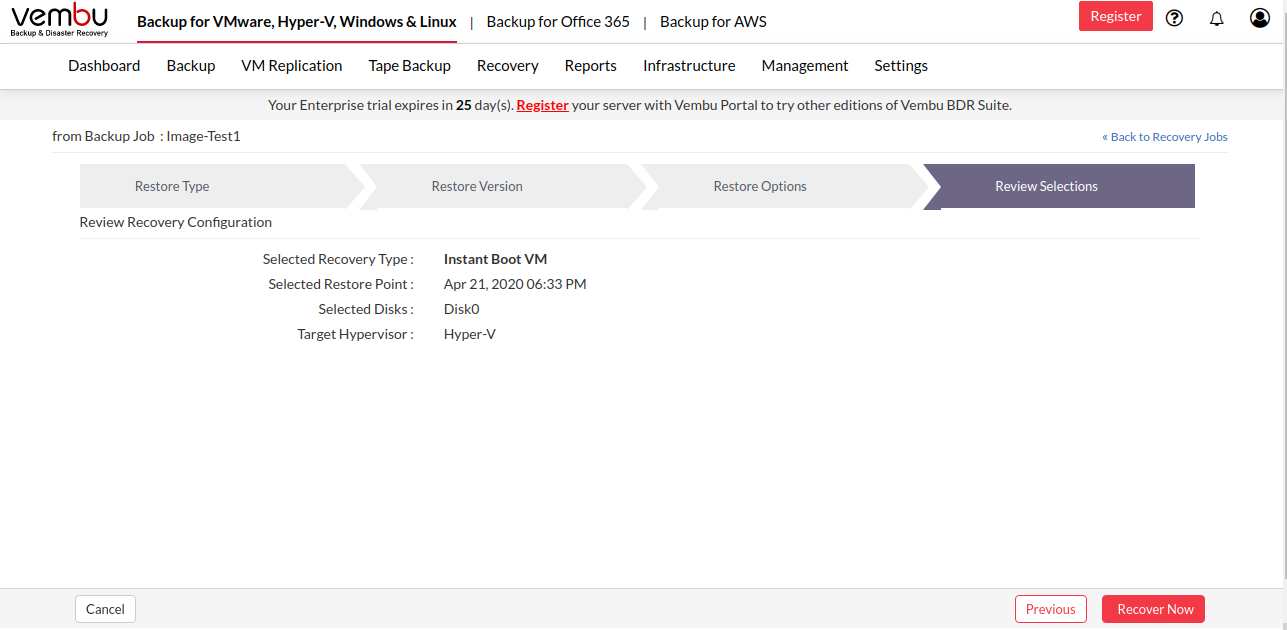
- Review all the configurations of Instant Boot VM recovery and click Recover Now to instantly boot the backup data as a VM on the selected hypervisor. You will be redirected to the recovery page once the restore process is completed.
- You can view the status of the Restore from the Status option. Once you click the inverted arrow mark, the below page will be displayed.
Once done with the requirement, shutdown and turn off VM before unmounting backup data. This will resume the backup job so that incremental will run as per schedule |

The following details will be available in the Restore Progress Page window
- Backup Schedule: The backup schedule name mentioned by the user for indicating the backup during restore progress.
- Client Name: The name of the client from which the backup process is initiated.
- Total Files: The number of disks/drives present in the selected backup.
- Transfer Rate: Speed at which the restore process
- Bytes transferred: Rate at which the backup data is restored (Bytes, KB, MB, GB)
- Files Restored: Number of disks/drives restored during the process of recovery
- Time Left: Time remaining for the restore to complete
- You have the option of aborting the restore process. From the Recovery page click the Abort Server Side Restore option, this will open a pop-up window as displayed below. Click Yes to abort the restore.

- Or open the restore progress window and click the Abort (-) option which will open a pop-up window displayed below. Click OK to abort the restore process.

To enhance your restore performance, close the progress window and open it only occasionally to check the restore progress |