Vembu BDR Backup Server - Ubuntu
Prerequisites:
Refer system requirements for Vembu BDR Here
To install Vembu BDR backup server on Linux machines follow the steps given below:
- Copy the download link from the following link: Click here and download the installer file using wget command and make sure you are a root user (use “sudo su” command to be a root user). You can download the installer to any Windows machine and move the installer to Linux machine using FTP/WinSCP.
- Once you execute wget command you will have “VembuBDRSetup.sh” in the download location.

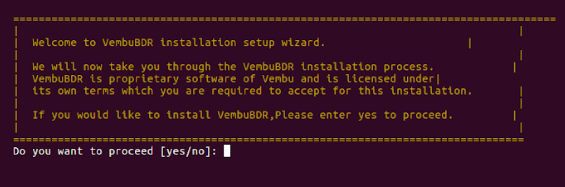
- Run the installer by using “sh” command. For ex: #sh VembuBDRSetup.sh. The installation process begins with the wizard displayed below, click Yes to proceed with the installation.
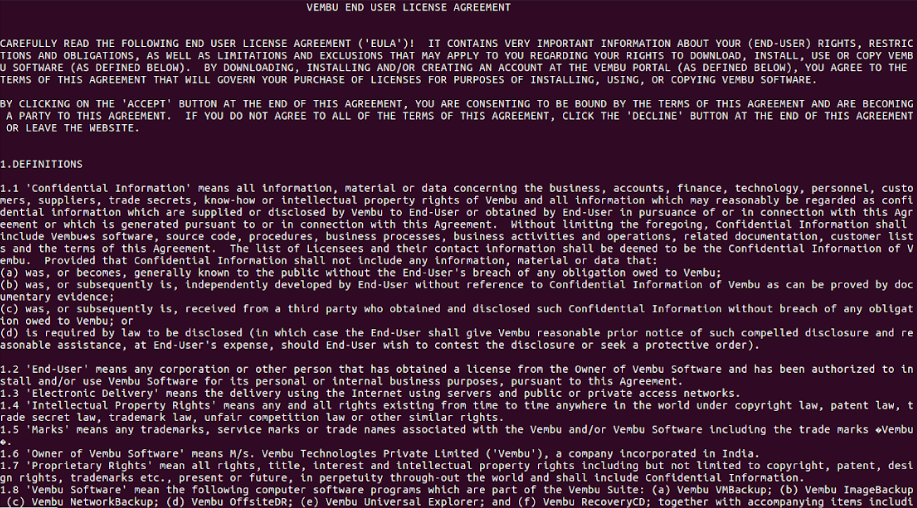
- The installer shows the License Agreement, read the License Agreement carefully as it contains important information about your Rights, Restrictions, Obligations, Limitations, and Exclusions. Enter “y” to proceed with your installation.
- After initiating the installer, it will check for dependent packages and request for a confirmation from your side. Enter “y” to proceed further.
- Please find the packages to be downloaded by Vembu BDR application here:
- ODBC Driver (2.3.4)
- PostgreSQL Connector (9.5.02)
- Vembu BDR Server (4.0.1)
- PostgreSQL RDBMS (9.6)

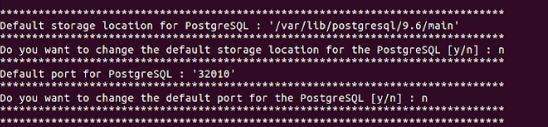
- Specify the location to which the PostgreSQL files will be stored (you can proceed with the default choice). Vembu BDR will basically require 10% of the backup data storage for the internal metadata store. Hence please assess and configure a storage medium appropriate to the storage requirements. Ensure your drives have higher I/O performance. Specify the path and click Enter. We recommend you to use dedicated drive for this location instead of root volume. (Important STEP)

- The next step in the installation is to specify the default port value for PostgreSQL. By default, the port number is 32010. The port number can be changed by proceeding with 'y'.
Note: You can enter the port value from 1024 to 65535. You cannot enter a port number that is below or beyond the allowed limit. You cannot proceed with a port value that is being used by another process.
- Enter a valid port value and proceed. The installer will proceed to install Unix ODBC and PostgreSQL driver.
- Click "Yes" install dependency packages of PostgreSQL.
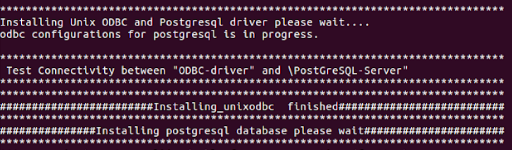
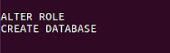
- Once done installing PostgreSQL, databases will be created and PostgreSQL will be restarted automatically.
- In the next step, installer will begin downloading VembuBDR_4_0_1_DBN.zip file.

- The Vembu BDR backup server build installation starts automatically after the download completes and will ask you to choose the type of installation. “Option 1” will Install Vembu BDR by creating a new Vembu BDR user account with root privileges. “Option 2” will install Vembu BDR in the current user and proceed with the installation. We recommend choosing Option 1.
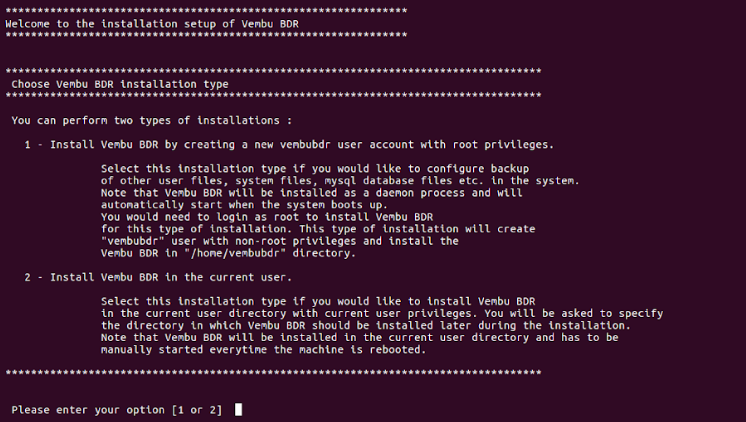
- If you have selected “Option 1” installer will create a new Vembu BDR user. If you have selected "Option 2" installer will install in the current user.
- Once the user is created, it will ask to create a directory for the installation path. Enter “y” to proceed

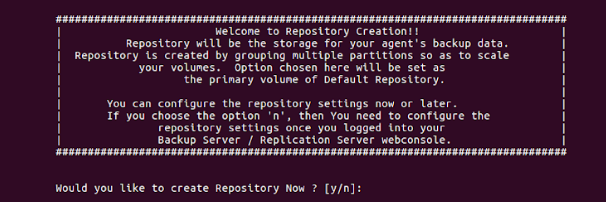
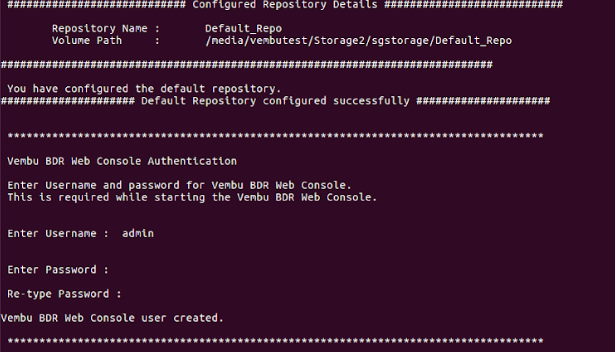
- Installer asks your permission to create repository. Enter “y” to create repository now or Enter “n” to create it after installing the backup server. If you want to create now press “y” and click Enter.
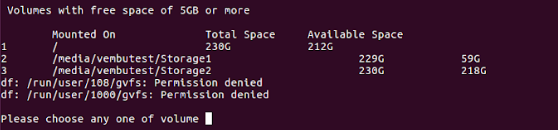
- Once you click enter, installer will show the list of volumes present in your machine. Choose any volume by entering the corresponding number. Click the number and press Enter to continue (Example : Enter 1)
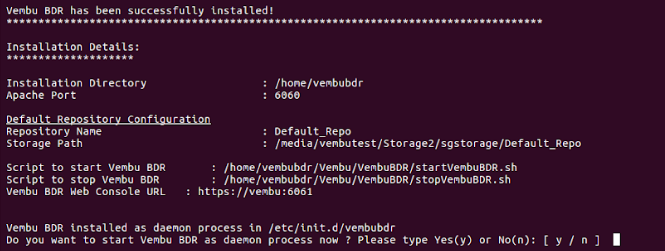
- The repository will be created successfully and the installer asks for Vembu BDR Web Console Authentication as shown below. Provide the username and password through which you can access your Vembu BDR web console. By default, we recommend username as 'admin' and password as 'admin'. Press Enter to continue, Vembu BDR web console user will be created successfully.
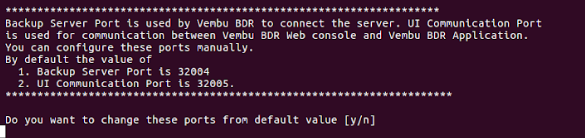
- The installer asks you to change ports from default value. If you want to change click “y” else “n”. By default, we recommend to click “n” and continue. Go through the usage of individual ports mentioned below.
- Backup Server Port is the port through which the installed Vembu VMBackup client will backup the data to the backup server. The default value is 32004.
- UI Communication Port is the port through which Vembu BDR Apache/PHP modules communicate with Vembu BDR to serve UI requests from the Vembu BDR Web Console. The default value is 32005.
- HTTPS Port is the port used to access the Vembu BDR Web Console in a secured manner. The default value is 6061.
- Enable HTTPS: HTTPS Port is the secure Web Console port through which you can access the Vembu BDR web console in a secure manner. You should enable “Enable HTTPS” option to edit this value. If you have enabled HTTPS option, you can access the Vembu BDR web console through https://localhost:6061
- Once the installation is complete you will be asked to start Vembu BDR as Daemon process. If you have not started Vembu BDR as daemon process you can start using “sh startVembuBDR.sh” command and “sh stopVembuBDR” to stop Vembu BDR from the Vembu BDR installation location. If you want to start the immediately, enter “y” to proceed as shown below.