MS SQL Server Backup
Vembu NetworkBackup supports backup of MS SQL Server with the help of SQL Server plugin.
How does SQL Server plugin work?
- SQL Server plugin makes use of VDI API for backing up Microsoft SQL Servers. One of the main reasons for using VDI API is that you can add SQL Servers very easily. MS SQL Server backup will be helpful during times of Disaster and for records retention.
- The default instance and named instances of SQL Server 2000, SQL Server 2005 and SQL Server 2008 will be auto-detected and listed for backup. However, in some cases, MSDE and SQL Server Express edition instances will not be listed automatically for backup. This section gives you information on how to add the MS SQL Server instances for backup which were not listed automatically in the Add SQL Server Backup page.
- Vembu NetworkBackup provides three types of backups for SQL Server database : Full, Differential and Transaction Log. Full backup type backs up the entire database. Differential backup type backs up only modified content since the previous full backup. Transaction Log backup backs up the active portion and truncates the inactive portion of the transaction log.
Supported Versions:
- Microsoft SQL Server 2016, 2014, 2012, 2008, 2005, 2000
Requirements:
- MS SQL Server
- Vembu NetworkBackup
Note: To backup an MS SQL Server database(s) you need to install Vembu NetworkBackup on the machine running Microsoft SQL Server
It is highly recommended to include all the system and user databases in the SQL Server database backup schedules. In case of a complete system failure, it will be necessary to restore the system databases along with user databases in order to recreate the SQL Server environment.
System database backup enables rebuilding the system in case of a system or database failure. The master databases should be backed up separately from other system databases as only full backups of master databases are allowed.
- The SQL Server system database(s) are: master, msdb, model and tempdb. It is important to have regular backups of these system databases except tempdb.
- Since tempdb is rebuilt each time when a SQL server restarts and is deleted permanently when the server shuts down, it is not required to be backed up.
- Model database needs to be backed up, only if customized.
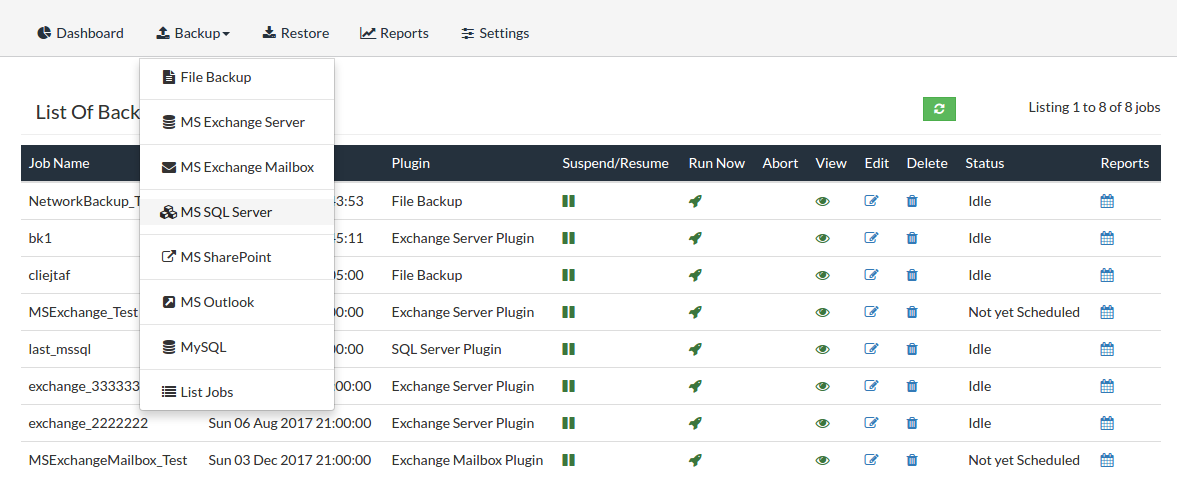
Select MS SQL Server:
- From the Backup tab select MS SQL Server
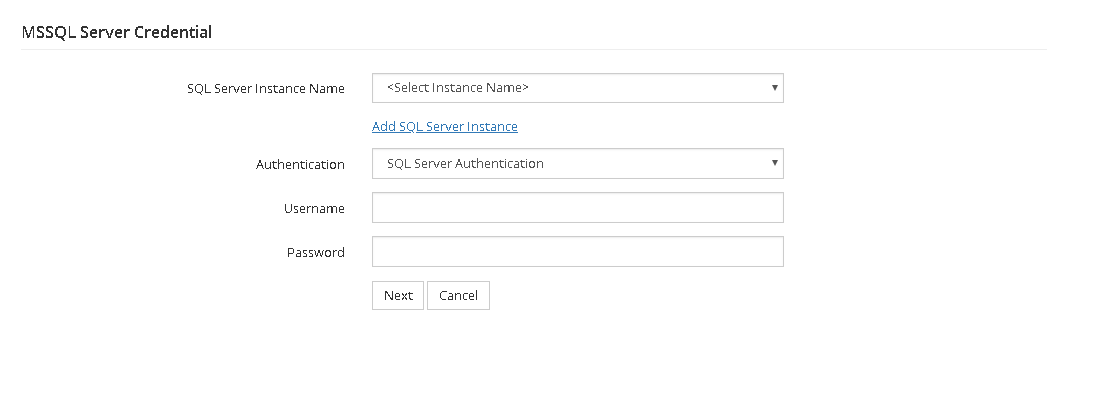
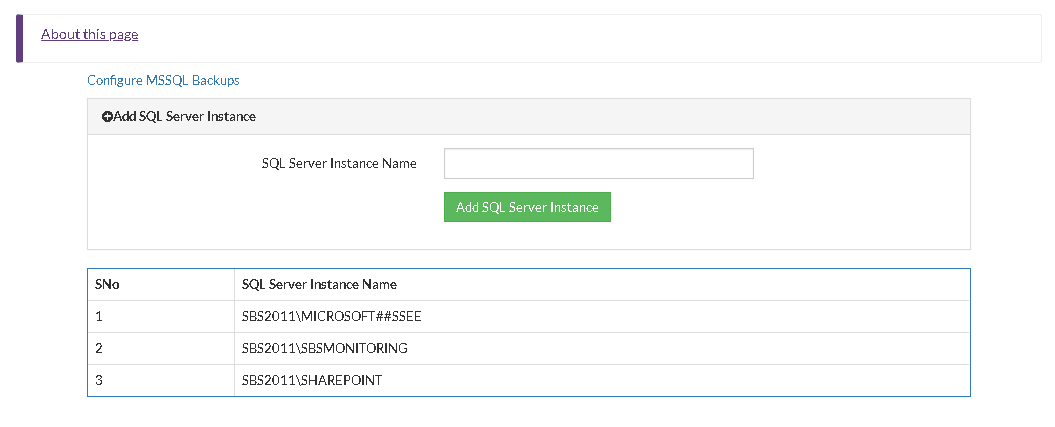
- Select a SQL Server Instance Name (i.e MS SQL instance which is to be backed up) from the SQL Server Instance Name drop down list. You can add SQL Server Instance from the Add SQL Server Instance option. You can add the MS SQL Server instance name which is not listed for backup. The second table contains a list of automatically detected and/or manually added SQL Server instances in this machine.
- Once you have provided the Instance Name, click the Add SQL Server Instance option. To know more about this page, click the About this page option available at the top of the page.
Note:
- Verify that the SQL Server instance added is installed in the local machine. Vembu NetworkBackup supports backup of only those SQL Server instances that are installed in the same machine where Vembu NetworkBackup is installed.
- Embedded spaces or other special characters are not allowed in SQL Server instance name. The double quote ("), single quote ('), comma (,), colon (:), semicolon (;), ampersand (&), and at sign (@) are also not allowed.
- Click Configure MSSQL Backups option to proceed with the backup process.
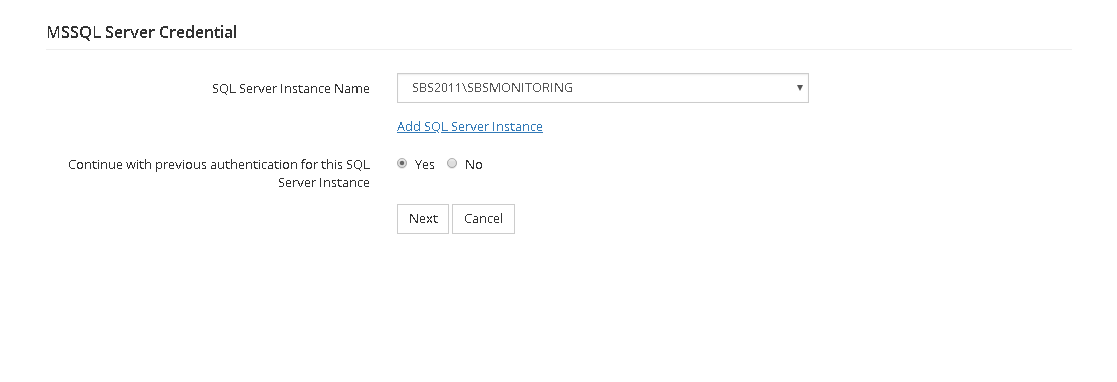
Note: If the name of the SQL Instance need to be changed, go to the SQL Server Connection Properties UI and choose the instance name again.
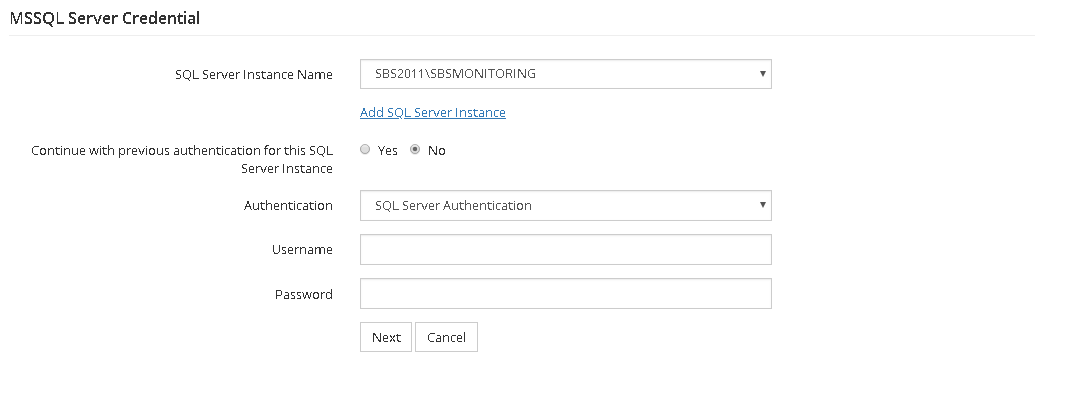
- From the list of SQL Server Instances, choose the required Instance. If you have changed the credentials for that particular Instance, click No option and provide the necessary credentials. If not, proceed with Yes.
- If Yes- Proceed to Configure Database. This option will proceed with the previous authentication which was already provided.
- If No- Provide new authentication credentials based on choice:
- If Windows authentication is selected click Next
- If MS SQL authentication is selected, provide user credentials for that instance and click Next
Step 1- Choose Database:
- A page that lists selected MS SQL Server database is shown. SQL Server databases are classified into the following models:
- Full Recovery Model
- Bulk-Logged Recovery Model
- Simple Recovery Model
When you select a particular Recovery Model, the databases of that Recovery Model type will be selected from the database list for backup.
- Select All Databases for this schedule
- If you select this option, 'all' the databases present in the SQL Server will be selected. If a new database is added after this, it will be automatically detected and added to the SQL Server. It will be further added to this schedule also.
- Select All Full Recovery Model databases
- "Select All Full Recovery Model databases" will include all the databases with Full Recovery model from the SQL Server to the backup schedule. If a new Full Recovery model database is later added to SQL Server, it will be automatically identified and included in this schedule.
What is Full Recovery Model?
- The Full Recovery Model provides extensive backup and restore capabilities. Full Recovery Model does not require any log backups and can be recovered only till a certain extent. Full, differential and Transaction Log backup of the databases are supported. If you want to restore a Full Recovery Model database, a full backup has to be restored first. On top of the full backup, Differential and/or Transaction Log backups could be restored to recover the database to the latest backup state.
- Select All Simple Recovery Model databases
- "Select All Simple Recovery Model databases" will include all the databases of the Simple Recovery Model from the SQL Server. If a new Simple Recovery model database is added to SQL Server instance after this then it will be automatically detected and included in the backup schedule.
What is Simple Recovery Model?
- The Simple Recovery Model offers one of the simplest form of backup and restore. Full or differential backup of the databases could be done. Transaction Log Backups are not available for databases belonging to this model. For recovering a Simple Recovery Model database, a full backup has to be first restored. On top of the full backup, Differential Backups could be restored to recover the database to the latest backup state.
- Select All Bulk-Logged Recovery Model databases
- "Select All Bulk-Logged Recovery Model databases" option will include all the databases of the Bulk-Logged Recovery Model type from the SQL Server. If a new Bulk-Logged recovery model database is added to SQL Server post this, it will be automatically detected and included in the backup schedule.
What is Bulk Logged Model?
- Similar to Full Recovery Model database, Bulk Logged Model databases provides extensive backup and restore capabilities. Full, Differential and Transaction Log backup of the databases are supported. However when compared to the Full Recovery Model that logs all transactions,this model minimally logs bulk operations. Recovery is possible only upto the end of a Transaction Log Backup.
- Like Full Recovery Model database, to restore a Bulk Logged Model database, a full backup has to be first restored. On top of the full backup, Differential and/or Transaction Log Backups could be restored to recover the database to the latest backup state.
- Let me manually choose databases :
- This option allows you to select the databases you wish to backup irrespective of the recovery model. If a database does not support Differential/Transaction Log backups, then that Differential/Transaction Log backup will be skipped for that database and the error message will be reported in backup report.
- Select any database and proceed further by selecting Next.
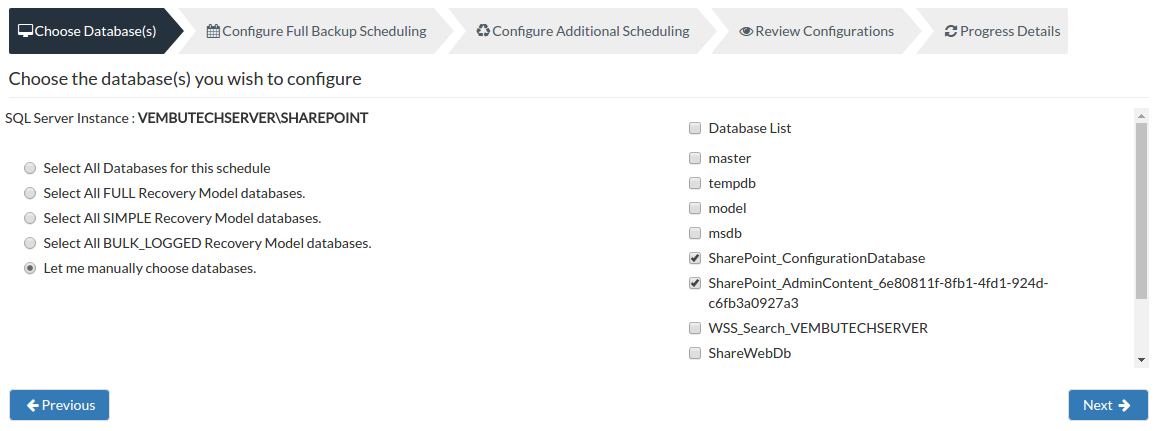
- Select the appropriate option required for database selection. If you are selecting a database in a backup schedule, that database cannot be included in another backup schedule as the data might get inconsistent when backed up in two different schedules. Once done, click Next
Note: The database 'tempdb' need not be configured as part of any of the above mentioned schedules. However, if it was configured for a backup, it will be skipped internally when the backup is scheduled. 'tempdb' is used internally by SQL Server just for saving temporary data.
Step 2- Configure Full Backup Scheduling:
- Need for configuring a Full Backup?
- Configuring a full backup of your MS SQL Server data is a must and cannot be omitted. A full backup is necessary because Vembu NetworkBackup will first take a dump of your MS SQL Server data locally and then transfer the data directly to your backup server. Once your full backup is completed, the log files that are backed up will be deleted.
Server configuration:
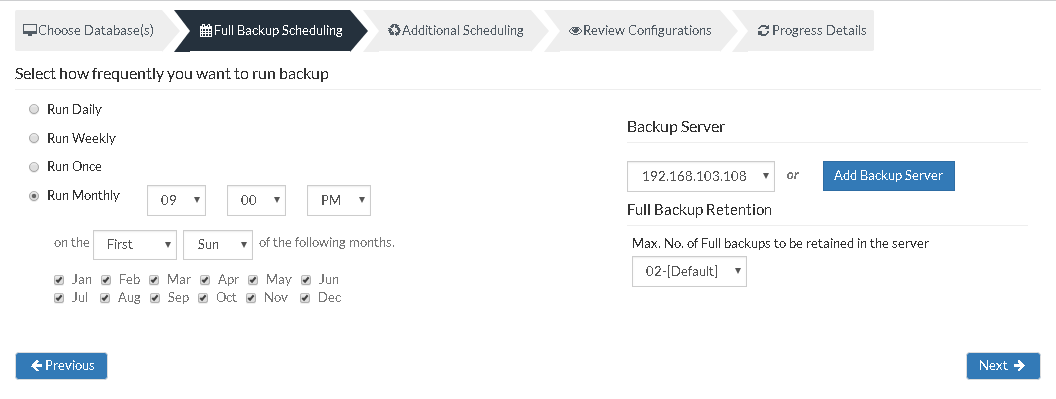
Select Backup Server:
- This option lists and lets you add the backup servers to which the backup data are to be sent and stored. Once a backup server is configured and backup is initiated, it cannot be changed in the future. If there's a change in server name or IP address, you can use seed backup migration page.
Test Connectivity:
- Before choosing the backup server for scheduling backups, it is recommended to test the connectivity status of the server. This ensures that backup server is all set to receive backups from a particular client and there is no interruption in backup processing.
Add Backup Server:
- If a server you want to schedule backups is not configured, add the server using the Add Backup Server option.
- Make sure Vembu BDR is installed in the Backup Server else you will get the message: "The server is not listening on the port '32004'. Make sure Vembu BDR is running in the server and that you have specified the right port number. Ensure that your NAT/firewall at your server is configured to allow incoming TCP traffic on port."

You can configure your backup schedules flexibly based on your requirement. You can choose from Daily/Weekly/Once/Monthly options for backup schedules.
- Run Daily- This option lets you run a full backup once a day. Specify the time interval in which the full backups should run every day.
- Run Weekly- This option will run a full backup once in a week. Specify the day and time of your choice as to when to perform full backups in a week.
- Run Once- This backup type allows you to run your backup once in the month/day/year you want to run it. Select the required month/day/year in which the backup must occur. You have the option of configuring your time from the time format option available below the calendar view. The left pane is the Hour and right pane is minutes.
- Run Monthly- Run Monthly selection will run the full backup once a month. Specify the day, time and month of your choice for full backup schedules.
Note: Run Monthly is the recommended and default configuration
Full Backup Retention:
- Maximum Number Of Full Backups:
You can specify the count for the maximum number of full backups to be retained. For example, when you set the count as 2 for retaining the full backups in the backup server, only the latest 2 versions of the full backup will be maintained at all times. The default value is 2 for full backup retention. Retention count runs from '01' to '99'.
Once done with scheduling full backups, click Next to proceed to configure Additional Scheduling.
Step 3- Configure additional scheduling:
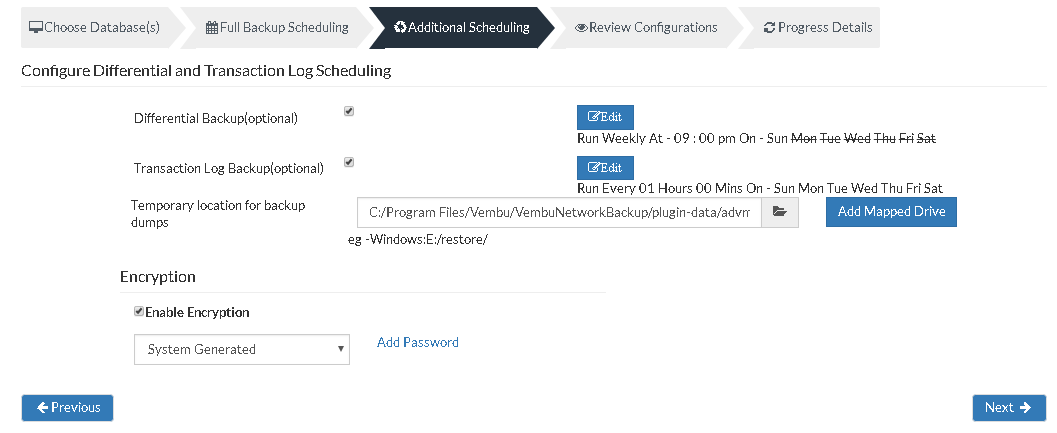
There are two backup types available which are optional and can be disabled . Click the Edit option to configure the backup schedule.
- Differential Backup
- Transaction Log Backup
Based on requirement edit these additional settings, but make sure this additional scheduling stays less than full backup schedules.
Note: You cannot assign the same time for both full backup schedule and additional schedule.
Differential- Vembu NetworkBackup will do a Differential Backup dump of the database with respect to the previous full backup whenever this Differential Backup is scheduled. Configuring this step is optional
Transactional Log- Vembu NetworkBackup will do a Transaction Log Backup dump of the database with respect to the previous backup (Full/Differential/Transaction Log) whenever this Transaction Log Backup is scheduled. Configuring this step is optional
Note: The Transaction Log Backup is not supported for Simple Recovery Model databases.
Scheduling:
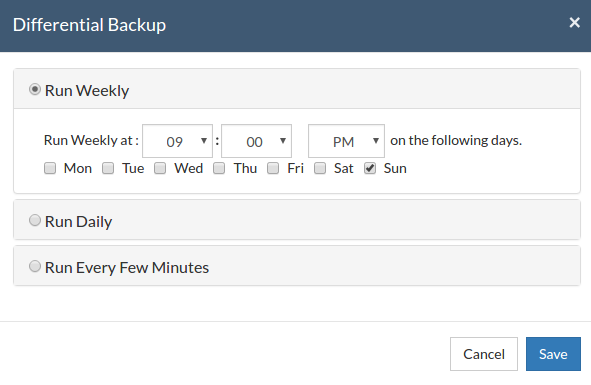
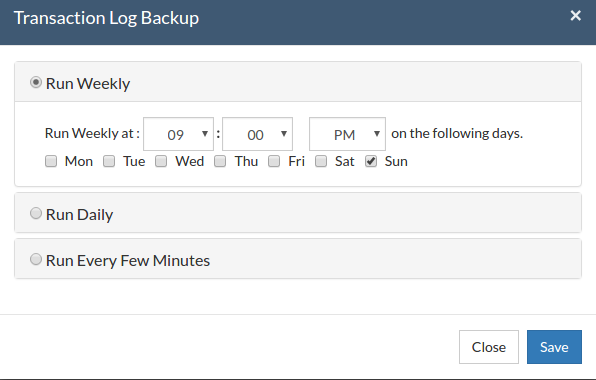
- Run Weekly- This option lets you select the day and time of a week to run the scheduled backup. You can additionally select more than a day in a week for schedule.
- Run Daily- This option allows you to trigger the backup in a specific time-frame on a daily basis.
- Run Every Few Hours- This option lets you decide the time period in which backup schedules should be carried out. Additionally, you can configure the days in a week and decide when to and when not to backup.
Note: If have selected Run Daily for full backup and Run Weekly option in differential backup then your selection will not be valid. Select Run Daily or Run Every Few Minutes option.
Temporary location for backup dumps:
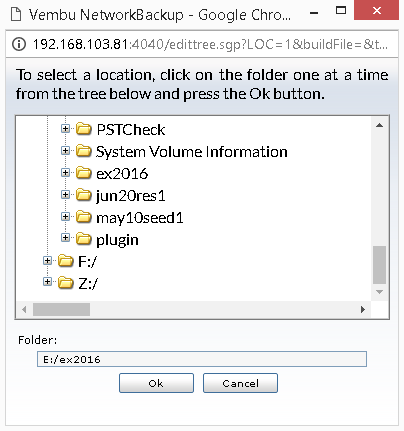
- Enter the location/directory path in which the MS SQL dumps has to be temporarily stored, before uploading to the backup server. Ensure you have enough disk space in the configured location(where the backup dump has to be saved).
- Select the location to which the dump must take place from the window as displayed below. The dump location you have configured will be mentioned in the Folder tab. Click OK to finalize your dump location.
Note: Backup dumps stored in temporary location will be deleted once the backup dumps are transferred successfully to the remote backup server.
Add Mapped Drive:
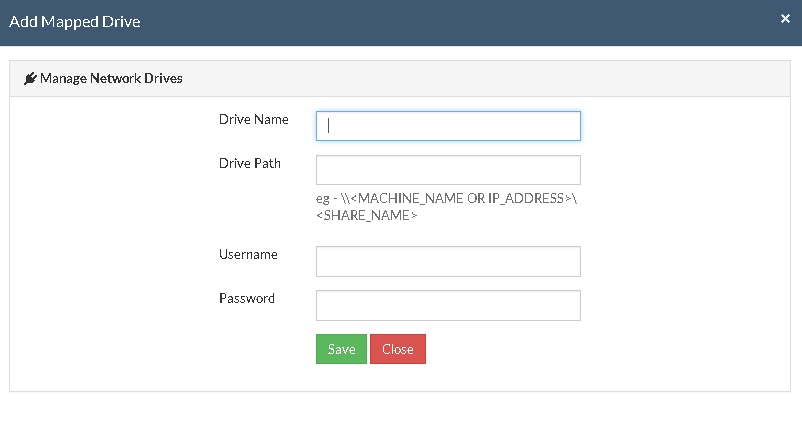
- There may be situations in which you may not have enough space to allocate for the dump process. In such cases, you can add a mapped drive by providing the drive name, drive path, username, and password. From there on the dumping process will happen to the configured drive only.
- The drive path must be in the following format : \\<MACHINE_NAME OR IP_ADDRESS>\<SHARE_NAME> make sure you give the correct details else you will get the status "Mapping the drive letter to the UNC path failed with the error: The network path was not found."
- Ensure you provide proper credentials, if not the message "Mapping the drive letter to the UNC path failed with the error: The specified network password is not correct" will appear. Click Save to complete the process.
Note: If the drive you have configured already exists or you have already mapped that drive to an UNC path, you will get the following message "C:/ drive already exists or mapped to an UNC path. Please choose a different drive letter.
Encryption Setting
Backups configured under Vembu NetworkBackup can be encrypted with a user-defined password which can be provided during backup configuration.
Steps to add Encryption Password:
- In order to encrypt your backup, select Enable Encryption checkbox. You can either add your own password or encrypt the backup with a System Generated Password.
- To create a new password, click on Add Password. Provide password of your choice along with a password hint and save it
- Newly created password will be available in the drop-down list. Choose the password and click Next. All the added passwords will be listed in the drop-down box. With the help of the encryption hint, you can easily identify the required password. Click Save once you have provided the required details.
Note: By default, Vembu NetworkBackup uses the system-generated password to encrypt backups even if Encryption is disabled. You can opt to a custom password for extended data protection and you will be required to provide it during recovery. Opting to the custom password will disable integrity check from being performed automatically. It is recommended to perform Quick VM Recovery periodically to ensure data integrity.
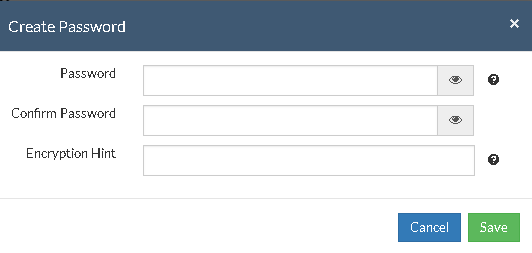
Note: Password and its hint should not be the same to avoid security issues. Password should contain at least a character, a number and a special character [ ! @ # $ % ^ & * ] .Encryption hint should be at least 6 characters and not more than 25 characters. Encryption hints are unique and no two passwords can have the same encryption hint.
- Once you have completed configuring Encryption Password, click Save.
Step 4- Review Configurations:
- The last step in the MS SQL Server backup configuration is to enter the backup schedule name. Vembu NetworkBackup supports creating multiple backup schedules each with its own configuration. The backup schedule name will uniquely identify the backup. While restoring your backup data, you need to choose the data to be restored using its schedule name.
- Review the configuration provided and enter an appropriate name for the backup schedule. Once done, click Save the Backup to initiate the backup progress as per schedule configured and it gets completed successfully. Select Run this backup immediately after saving this configuration option. This will trigger the backup once you save your configurations.
Note: While providing a backup name, only [a-z][A-Z][0-9][ - _ ] characters are allowed in the backup name. If you have configured a backup schedule with this name already, enter a different name for this backup job.
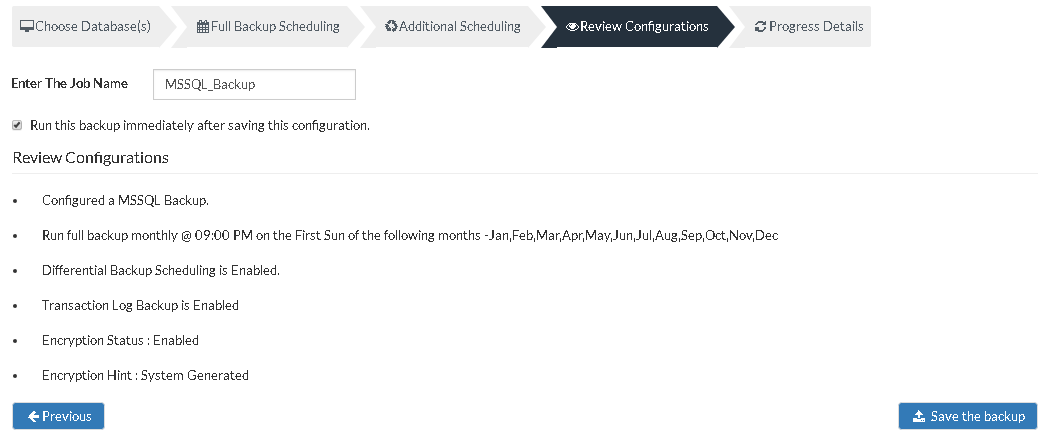
Note: Run this backup immediately after saving this configuration will not be applicable for 'Run Daily' Schedule.
- You can verify the progress of your backup in the progress schedule window. In the List Jobs page, click on the arrow mark next to your backup schedule to open the backup progress window. The overall progress of your backup along with details such as :
- Job Name - Name of your backup job
- Backup Server - The backup server to which the backup is currently happening
- Warning - Warning if any
- Reconnection Attempts - The count of the number of times Vembu NetworkBackup client attempted to reconnect to the backup server
- Transfer Rate - Rate at which the backup data is transferred to your backup server. (Bytes,KB,MB,GB)
- Original Size of the file - The actual size of your backup file
- Added, Modified, Deleted, Skipped files and Folders count
- Time Left - Time remaining for your backup to complete.
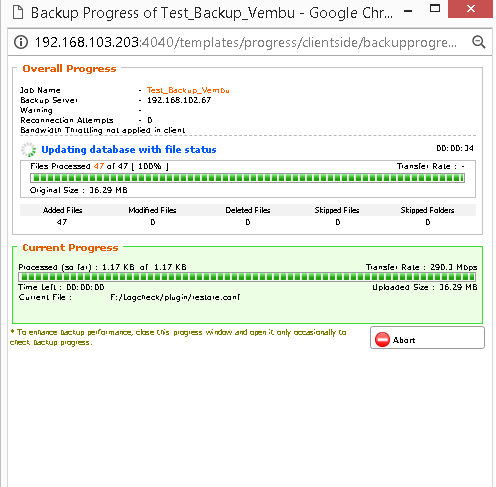
- You can abort your backup if not required from the Abort option available in the List Jobs page. You will get a pop up as shown below. Click Yes to Abort your backup.
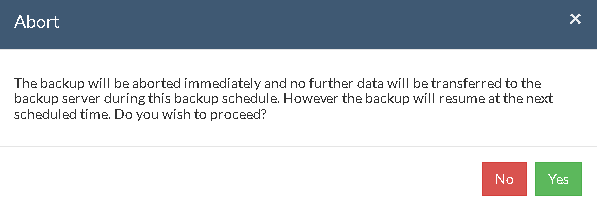
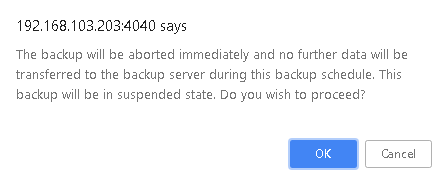
- You can Abort your backup from the backup progress window page also. Select the Abort (-) option in that window. You will be alerted with a pop-up as shown below. Click OK to abort your backup.
Note: To enhance your backup performance, close the progress window and open it only occasionally to check backup progress.


