MS SharePoint Backup
SharePoint sites that are present locally can be backed up using Vembu NetworkBackup. It isn't an easy task backing up SharePoint sites and poses various challenges such as location, limitations. Vembu NetworkBackup utilizes SharePoint's dump utility tool STSADM.exe for dumping the SharePoint collections locally and then transfer them to the backup server. During an incremental, the entire site-collections are dumped locally and only the modified contents are transferred to the backup server.
Supported Versions:
Vembu NetworkBackup supports site-collection level backup for SharePoint versions:
- SPS2003/WSS2.0
- MOSS2007/WSS3.0
- MS SharePoint 2010
- MS Sharepoint 2013
Configuring Backup:
- From the Backup tab select MS SharePoint option and proceed to begin with the backup process.
Pre-requisites of SharePoint Backup:
- For MOSS2007/WSS3.0 and MS SharePoint 2010, all web-applications will be listed automatically in "Add SharePoint Site Backup" page, if STSADM.EXE path and other settings are valid.
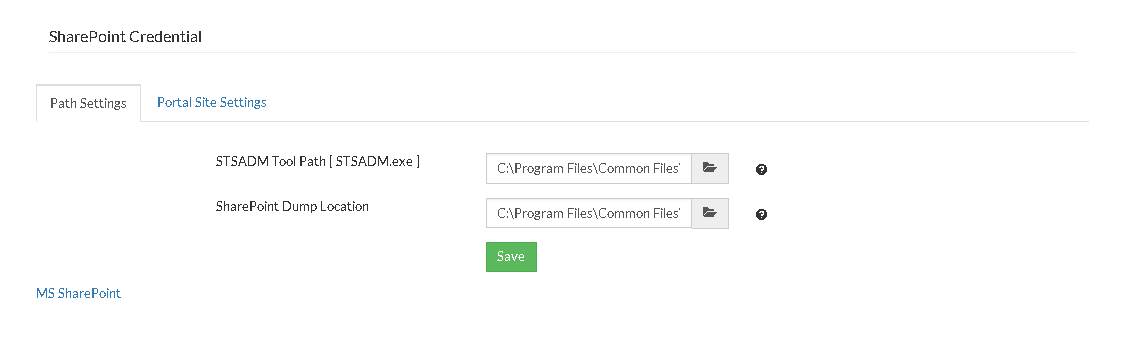
- For SPS2003/WSS2.0, configure SharePoint settings in 'Settings' tab open Credentials option and SharePoint Credentials option before configuring SharePoint backup. Add the portal sites that are to be listed for backup.
Note: If SharePoint sites are not listed in Add SharePoint Site Backup page, read SharePoint settings help document for more details.
Step 1- Select SharePoint Site:
- To begin with the backup process, you must provide the SharePoint Credentials so that the internal utility tool STSADM used for listing and backing up the site collections. Configure the STSADM Tool Path [STSADM.exe] so that the exe file can run. Configure the SharePoint dump location, enter the location/directory path to a folder where you wish to dump the SharePoint Site Collection backup. This path will be displayed in the SharePoint page by default. You can change it however for individual backups.
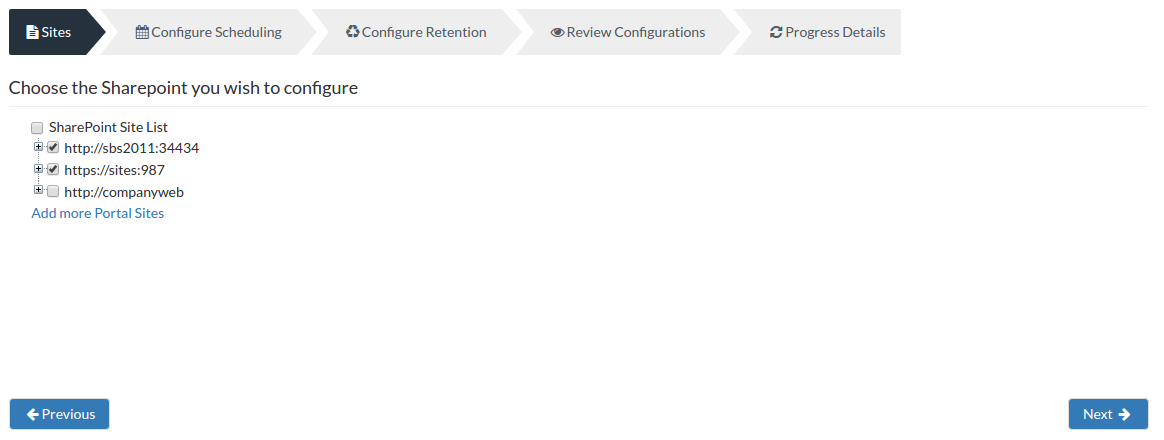
- You can add more Portal sites by choosing the Add more Portal Sites option. This will redirect you to a page where you must provide the Portal Site Settings credentials. You can also enter the Portal Site URL to add the Portal sites that are to be backed up. In that page, the list of Portal Sites available will also be displayed. The table below this portion lists the SharePoint Portal Sites that will be listed in page. If you do not want to list any of the portal sites mentioned, you can delete that Portal Site from the table.
- Select the SharePoint sites you need to backup from the tree and click Next to proceed with your backup.
Step 2- Configure Scheduling:
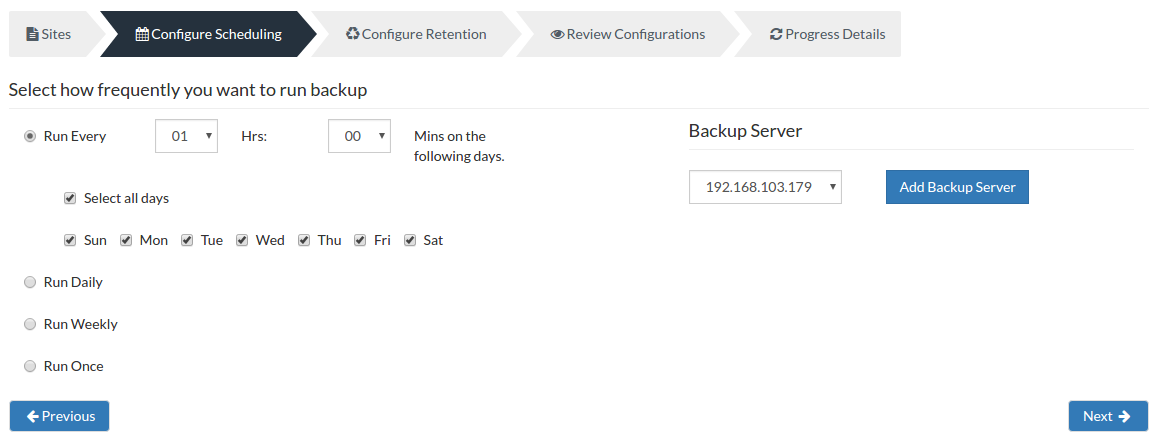
You can configure your backup schedules flexibly based on your requirement. You can choose from Run Hourly/Run Daily/Run Weekly/Run Monthly options for backup schedules.
In this page, you can schedule the frequency of your backup. They are explained below.
- Run Every- Lets you decide the hour frequency at which backup schedule should be triggered. Also decide the days when the hourly schedules should be carried out.
- Run Daily- This option lets you run a full backup once a day. Specify the time interval in which the full backups should run every day.
- Run Weekly- This option will run a full backup once in a week. Specify the day and time of your choice as to when to perform full backups in a week.
- Run Once- You can configure a one time scheduled backup job which can be triggered manually when needed.
Note: Retention of deleted files and Automatic Directory Monitoring (in Advanced Options) is not supported for Run Once Only scheduling option and so these options have been disabled.
Server configuration:
Select Backup Server:
- This option lists and lets you add the backup servers to which the backup data are to be sent and stored. Once a backup server is configured and backup is initiated, it cannot be changed in the future. If there's a change in server name or IP address, you can use seed backup migration page.
Test Connectivity:
- Before choosing the backup server for scheduling backups, it is recommended to test the connectivity status of the server. This ensures that backup server is all set to receive backups from a particular client and there is no interruption in backup processing.
Add Backup Server:
- If a server you want to schedule backups is not configured, add the server using the Add Backup Server option.
- Make sure Vembu BDR is installed in the Backup Server else you will get the message: "The server is not listening on the port '32004'. Make sure Vembu BDR is running in the server and that you have specified the right port number. Ensure that your NAT/firewall at your server is configured to allow incoming TCP traffic on port."

Step 3- Configure Retention:
Vembu NetworkBackup provides the retention feature wherein you can retain multiple versions of a backup in the backup server. Retention feature is aimed at optimizing the storage utilization while adhering to your organization's backup policy. Retention can be configured for backed up files as well as deleted files. Vembu NetworkBackup retains the version files at the backup server based on two types of retention:
- Version-Based Retention
- Time-Based Retention
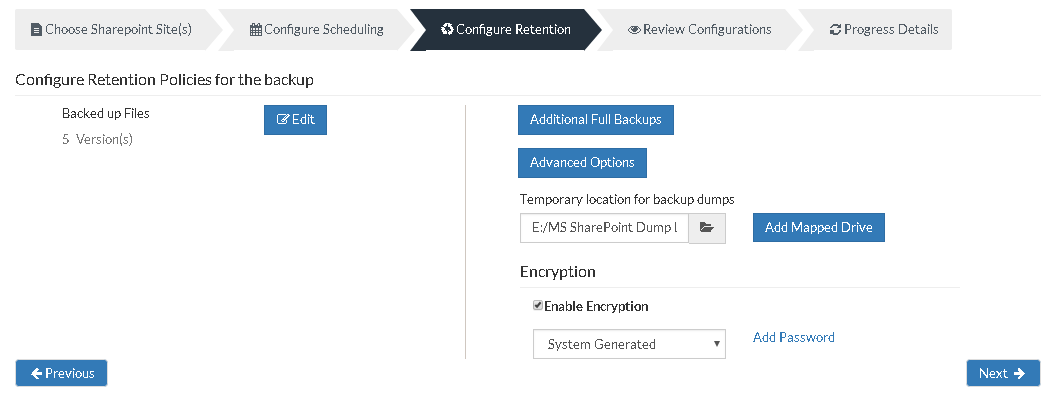
By default, retention count is defined to be 5 versions, which can also be customized based on user requirement.
Retention policy for backed up files:
- Beside the backed up files tab, select the Edit option which will allow you to edit the retention policies for backed up files.
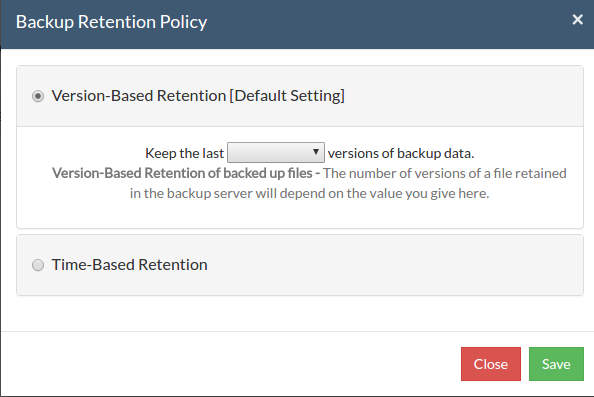
Version-Based Retention:
- This option lets Vembu NetworkBackup retain multiple versions for a backed up file based on version count. The default value chosen is 5, while you can choose any value between '0' to '99'.
Time-Based Retention
When you select Time-Based Retention as your retention type, Vembu NetworkBackup will retain the version of your backup files in the backup server based on the age of version. The time period varies from day, week, month and year(default). Default count is for 5 years, which implies that until 5 years your version of the backup data will be retained in the backup server and will then be removed automatically. The maximum number of versions that can be retained during this period is '10 years'. You can further customize your Retention based on two options provided:
- Any number of versions can be created within this retention period
- Restrict the maximum number of versions that can be created within this retention period to
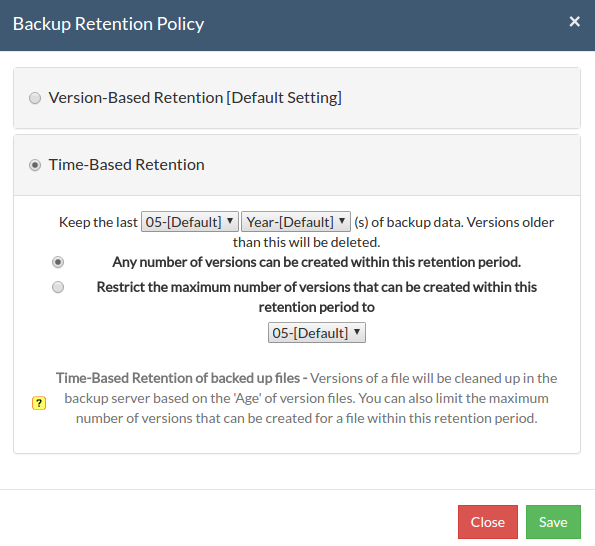
Any number of versions can be created within this retention period:
When you select this option, Vembu NetworkBackup will retain all the versions of the backup data in the specified time frame. For example, if you have selected 5 years and select this option, all the versions that occur in the 5 years will be retained in your backup server. This is the default setting and default value is '5'.
Restrict the maximum number of versions that can be created within this retention period to :
Vembu NetworkBackup will retain the version files based on the value you configure. For example, if you have selected value as '5', then only the last five version files created will be retained. By default '05' is the default value selected.
- Click Save once you are done with configuring the required retention type.
Temporary location for backup dumps
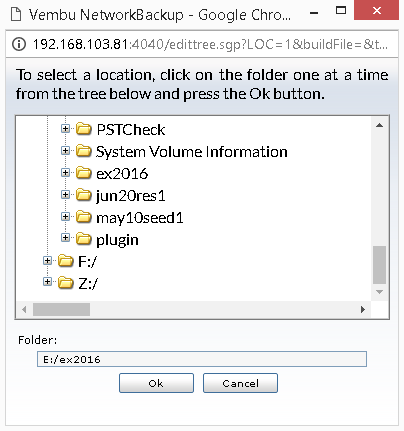
- Enter the location/directory path to which the dumps has to be stored locally before uploading to the backup server. Ensure that you have enough disk space in the configured temporary location (where the backup dump has to be saved)
- Select the location to which the dump must take place from the window as displayed below. The location which you have configured for the backup dumps will be mentioned in the Folder tab. Click OK to finalize your dump location.
Note: Backup dumps stored in temporary location will be deleted once backup dumps are transferred successfully to the remote backup server.
Temporary Dump Path Details:
Temporary dump files will be stored in following name pattern:
<Temporary_Dump_Location>\<Backup_Name>\<Portal_Site_Name>\<Site_Collection_Name>\<Site_Collection_Name>.dat
Note: Portal site name and site collection name will be modified as per following rules and will be used as file/folder name.
- The character colon (:) in the portal site URL will be replaced with "@".
- The Characters \<>/*?"| and space characters in the portal site/site collection will be replaced with an underscore(_). Other characters will remain the same.
- "http://" or "https://" will be removed.
Example:
Take portal URL: "http://winserver3:9090"
One of the site collections under it: "http://winserver3:9090/sites/first-No.1site"
Temporary dump path: "C:/TEMPORARYDUMP"
Backup name: "MyShareBackup"
The dump file will be of the following name:
C:\TEMPORARYDUMP\MyShareBackup\winserver3@9090\winserver3@9090_sites_first-No.1site\winserver3@9090_sites_first-No.1site.dat
Note: Backup file for a site collection will have ".dat" extension
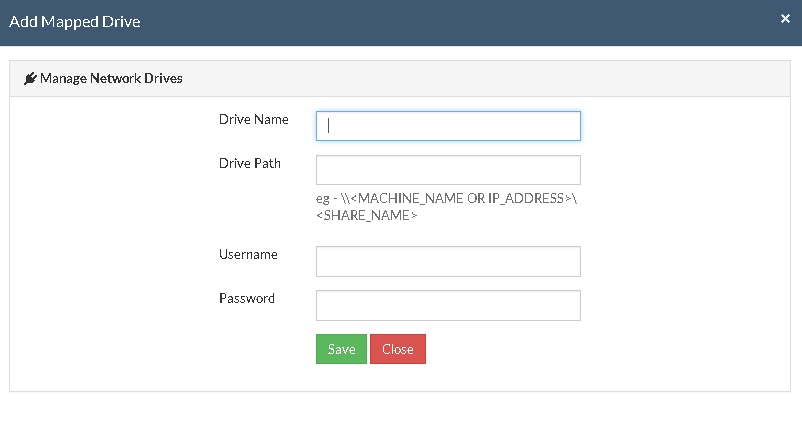
Add Mapped Drive:
- There may be situations in which you may not have enough space to allocate for the dump process. In such cases, you can add a mapped drive by providing the drive name, drive path, username, and password. From there on the dumping process will happen to the configured drive only.
- The drive path must be in the following format : \\<MACHINE_NAME OR IP_ADDRESS>\<SHARE_NAME> make sure you give the correct details else you will get the status "Mapping the drive letter to the UNC path failed with the error: The network path was not found."
- Ensure you provide proper credentials, if not the message "Mapping the drive letter to the UNC path failed with the error: The specified network password is not correct" will appear. Click Save to complete the process.
Note: If the drive you have configured already exists or you have already mapped that drive to an UNC path, you will get the following message "C:/ drive already exists or mapped to an UNC path. Please choose a different drive letter.
Additional Full Backup:
- In an enterprise environment, configuring a backup job with one full backup followed by incremental forever is not a recommended practice. There may arise a requirement wherein you need to schedule full backups frequently.
- Running full backups frequently may sometimes lead to storage space consumption, due to which Vembu has developed an option to retain the number of additional full backups.
- Once you have scheduled the additional full backup, the incremental post this will use this backup as your latest point. With this option, you can automate the periodic additional full backups.
- For Continuous, Run Every Few Hours and Run Daily backups, the Additional Full Backup settings will allow you to configure daily/weekly/monthly additional full backups. For weekly backups, only Monthly additional full backups are possible.
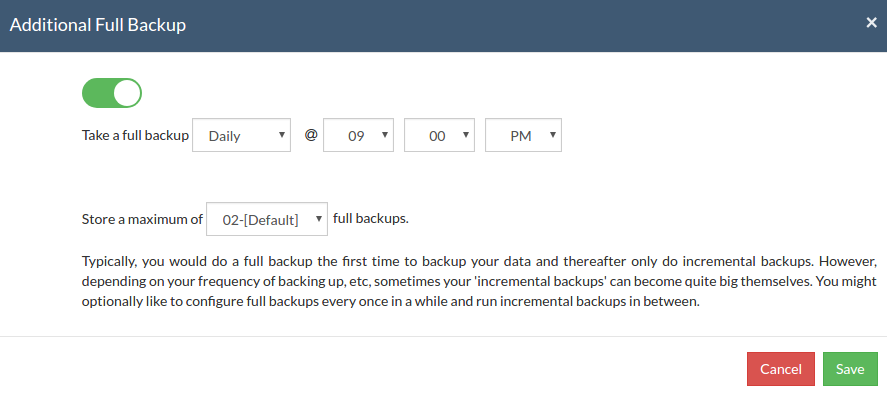
Additional Full Backups can be configured in the following order of scheduling:
- For Continuous and Run every few hours schedules- Configuring daily/weekly/monthly additional full backup is possible.
- For Run Daily schedule- Configuring weekly/monthly additional full backup are the possible options
- For Run Weekly schedule- Only possible additional full backup is 'Monthly full backup'
- For Run Once schedule- You cannot configure additional full backup
- Click 'Save' once you are done configuring Additional Full Backup Scheduling
Note: You can limit the number of full backups to be retained with 'Store a maximum of' option. With this option, you can share the unwanted storage data occupied based for a time period. For example, a user needing no more than 6 months of data retainment can configure 6 monthly full backups where the 1st additional full backup will be deleted on the 7th month when a new full backup completes successfully.
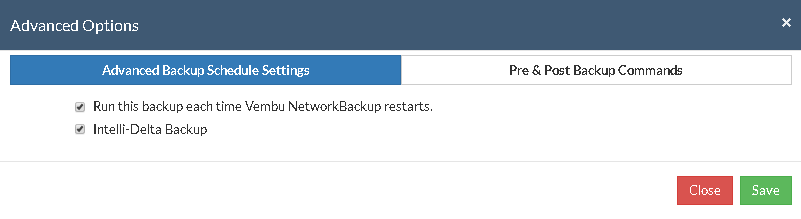
Advanced Options (Optional)
Advanced Backup Schedule Settings
This option let you configure additional settings such as:
- Running backup schedule each time Vembu NetworkBackup restarts.
- Performing data integrity check.
Run this backup each time Vembu NetworkBackup Restarts:
- Backup schedule will run every time Vembu NetworkBackup is restarted or the machine is rebooted irrespective of the actual scheduled time of this backup schedule if this option is enabled. This is to ensure that any modified or new files created when Vembu NetworkBackup was down are backed up as soon as possible. In case of the 'Continuous' or ‘Run Every’ scheduling options, backups will run each time Vembu NetworkBackup restarts by default.
Intelli-Delta Backup
- When you choose this option, incrementals will occur or else SharePoint backup will continue to occur as a full backup schedule only.
Pre\Post Backup Commands:
Pre/post commands allows you to configure system-level actions that are to be executed before and after a backup process. This action includes running an application or executing script files.
Pre & Post Backup command settings:
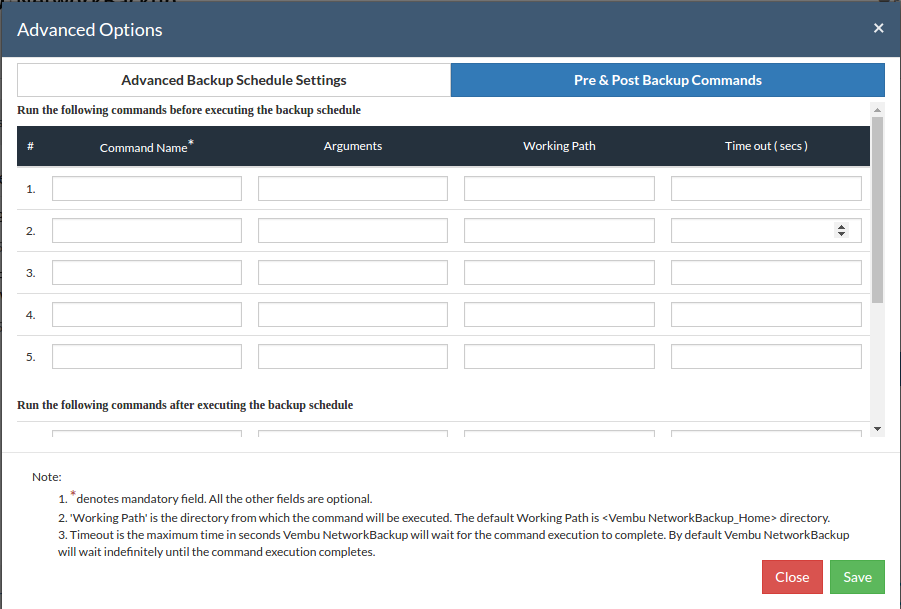
- Enter the commands that you need to run before and after the backup.
- Command Name: The command can be an executable file such as: application .exe files, batch files, script files etc.
- For Example:
- Windows - Commands, *.bat, *.cmd files
- Linux - Commands, bash(shell scripting), *.sh files
- Arguments: You can provide any command line arguments for the command to be executed.
- Working path: The command should be provided with full path. If the command name is in the system command path then providing the full path for the command is not necessary.
- For Example: C:\MyTools\myzip.exe. A simple zip tool which compresses the given files or folders that is present in the system command path.
- From the users backup scheduling information, Vembu NetworkBackup will start the Pre Backup commands and wait till the timeout value.
- Once the backup files and folders are transferred to the backup server, the Post backup commands are executed.
Note:
- This feature is applicable for Vembu ImageBackup client, Vembu NetworkBackup client (for File Backups, MS SharePoint, MySQL backup) and Vembu OnlineBackup client.
- You can provide a maximum of 5 Pre-Backup commands and a maximum of 5 Post-Backup commands for each backup schedule.
- Both the Pre and Post Backup commands are optional. Once command details are provided, click Save.
Encryption Setting
Backups configured under Vembu NetworkBackup can be encrypted with a user-defined password which can be provided during backup configuration.
Steps to add Encryption Password:
- In order to encrypt your backup, select Enable Encryption checkbox. You can either add your own password or encrypt the backup with a System Generated Password.
- To create a new password, click on Add Password. Provide password of your choice along with a password hint and save it
- Newly created password will be available in the drop-down list. Choose the password and click Next. All the added passwords will be listed in the drop-down box. With the help of the encryption hint, you can easily identify the required password. Click Save once you have provided the required details.
Note: By default, Vembu NetworkBackup uses the system-generated password to encrypt backups even if Encryption is disabled. You can opt to a custom password for extended data protection and you will be required to provide it during recovery. Opting to the custom password will disable integrity check from being performed automatically. It is recommended to perform Quick VM Recovery periodically to ensure data integrity.
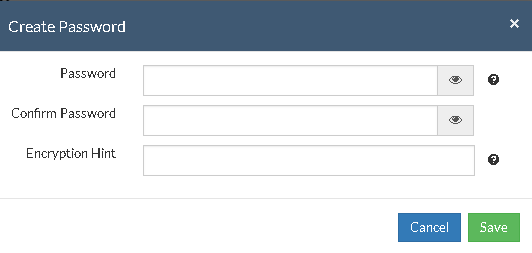
Note: Password and its hint should not be the same to avoid security issues. Password should contain at least a character, a number and a special character [ ! @ # $ % ^ & * ] .Encryption hint should be at least 6 characters and not more than 25 characters. Encryption hints are unique and no two passwords can have the same encryption hint.
- Once you have completed configuring the Encryption Password, Click Save.
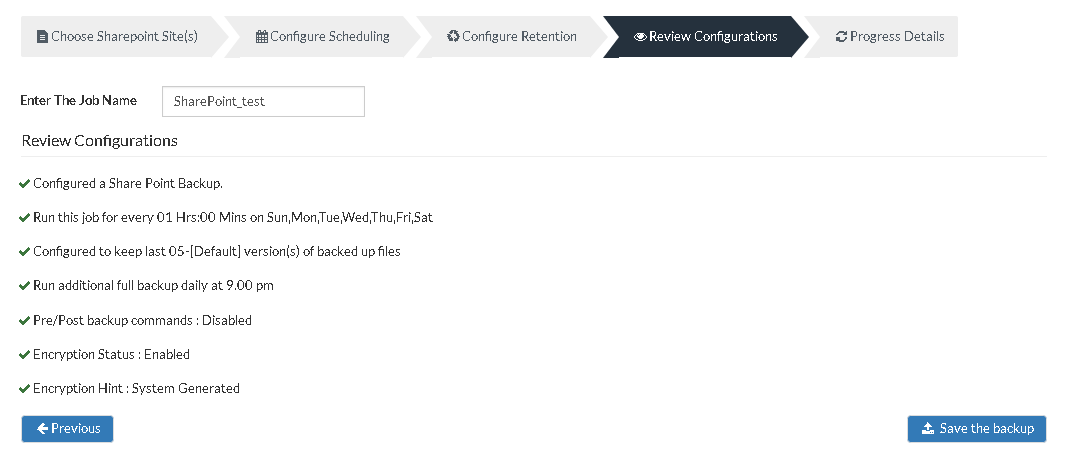
Step 4- Review Configurations:
- The last step in the MS SharePoint backup configuration is to enter the backup schedule name. Vembu NetworkBackup supports creating multiple backup schedules each with its own configuration. The backup schedule name will uniquely identify the backup. While restoring your backup data, you need to choose the data to be restored using its schedule name.
- Review the configuration provided and enter an appropriate name for the backup schedule. Once done, click Save the Backup to initiate the backup progress as per schedule configured and it gets completed successfully.
Note: While providing a backup name, only [a-z][A-Z][0-9][ - _ ] characters are allowed in the backup name. If you have configured a backup schedule with this name already, enter a different name for this backup job.
Note: 'Run this backup immediately after saving this configuration' will not be applicable for 'Run Every' Schedule.
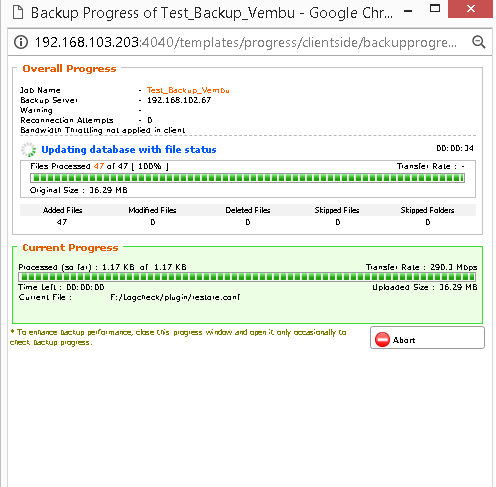
- You can verify the progress of your backup in the progress schedule window. In the List Jobs page, click on the arrow mark to open the backup progress window. The overall progress of your backup along with details such as :
- Job Name - Name of your backup job
- Backup Server - The backup server to which the backup is currently happening
- Warning - Warning if any
- Reconnection Attempts - The count of the times Vembu NetworkBackup client attempted to reconnect to the backup server
- Transfer Rate - Rate at which the backup data is transferred to your backup server. (Bytes,KB,MB,GB)
- Original Size of the file - The actual size of your backup file
- Added, Modified, Deleted, Skipped files and Folders count
- Time Left - Time remaining for your backup to complete.
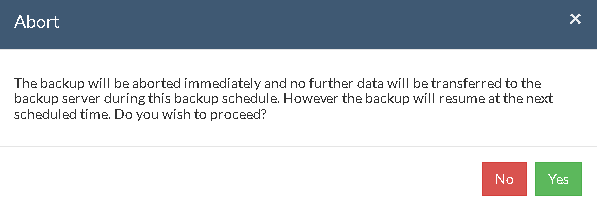
- You can abort your backup if not required from the Abort option available in the List Jobs page. You will get a pop up as shown below. Click Yes to Abort your backup.
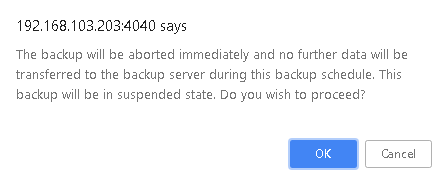
- You can Abort your backup from the backup progress window page also. Select the Abort (-) option in that window. You will be alerted with a pop-up as shown below. Click OK to abort your backup.
Note: To enhance your backup performance, close the progress window and open it only occasionally to check backup progress.